3 PLC CPU Initial Setup
MITSUBISHI CNC
68
(4)
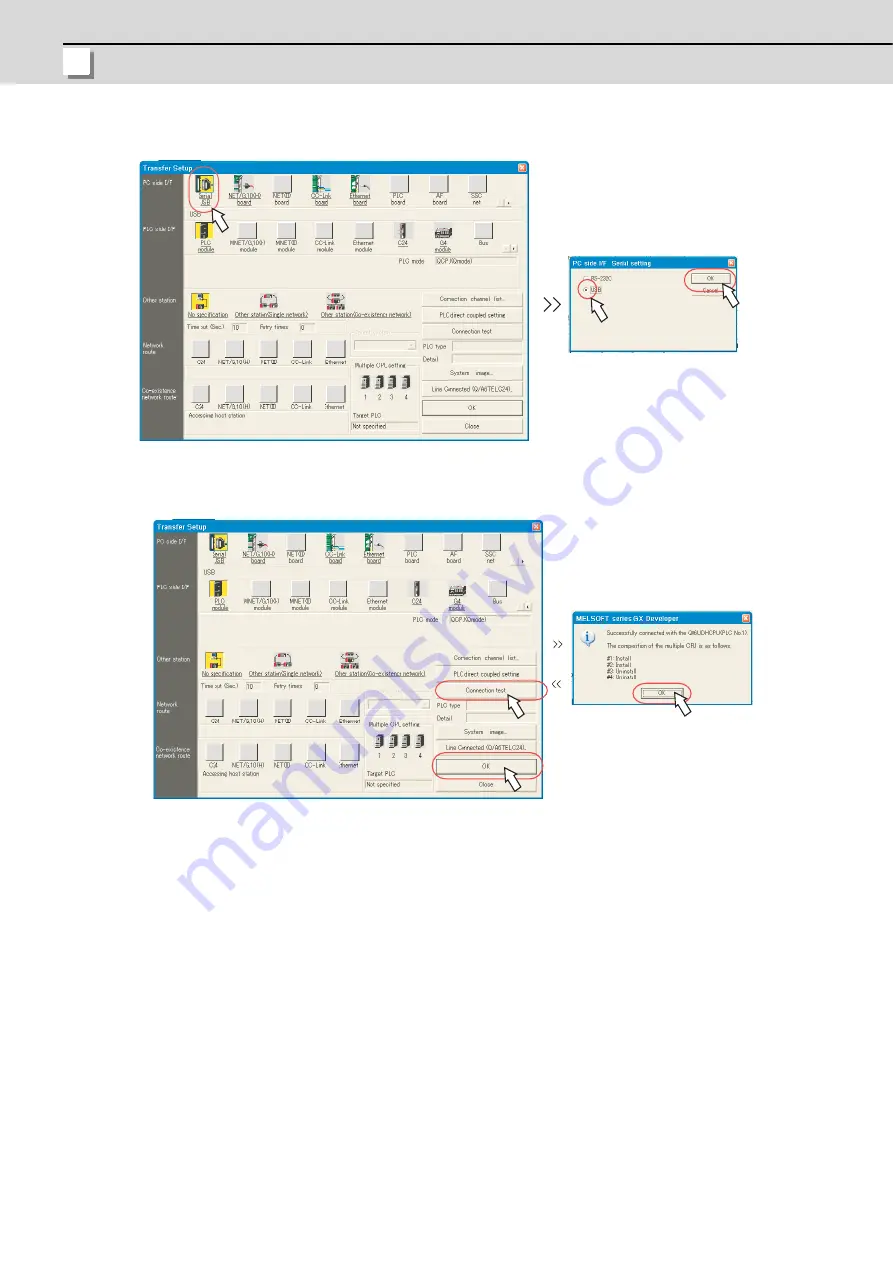
Double-click "Serial USB" on the "Transfer setup" screen, and select the connection method (USB or RS-232C).
(5)
Click "Connection test" to execute the test. After confirming the message "Successfully connected", click "OK".
Click "OK" of the "Transfer setup" screen, and close the window.
Содержание C70
Страница 1: ......
Страница 3: ......
Страница 9: ......
Страница 11: ......
Страница 13: ......
Страница 18: ...1 1 Outline ...
Страница 21: ...1 Outline MITSUBISHI CNC 4 ...
Страница 22: ...5 2 GOT Initial Setup ...
Страница 73: ...2 GOT Initial Setup MITSUBISHI CNC 56 ...
Страница 74: ...57 3 PLC CPU Initial Setup ...
Страница 91: ...3 PLC CPU Initial Setup MITSUBISHI CNC 74 ...
Страница 92: ...75 4 CNC CPU Initial Setup ...
Страница 105: ...4 CNC CPU Initial Setup MITSUBISHI CNC 88 ...
Страница 106: ...89 5 Connecting and Setting up Multiple CNC CPU Modules ...
Страница 115: ...5 Connecting and Setting up Multiple CNC CPU Modules MITSUBISHI CNC 98 ...
Страница 116: ...99 6 Setting Machine Parameters ...
Страница 130: ...113 7 Setting the Position Detection System ...
Страница 153: ...7 Setting the Position Detection System MITSUBISHI CNC 136 ...
Страница 154: ...137 8 Deceleration Check ...
Страница 159: ...8 Deceleration Check MITSUBISHI CNC 142 ...
Страница 160: ...143 9 Setting the Tool Entry Prohibited Range ...
Страница 169: ...9 Setting the Tool Entry Prohibited Range MITSUBISHI CNC 152 ...
Страница 170: ...153 10 Data Backup and Restoration ...
Страница 184: ...167 Appendix 1 Explanation of Parameters ...
Страница 435: ...Appendix 1 Explanation of Parameters MITSUBISHI CNC 418 ...
Страница 436: ...419 Appendix 2 Explanation of Alarms ...
Страница 608: ...591 Appendix 3 Display on 7 segment LED ...
Страница 624: ......
Страница 628: ......


