


14-17
Ch
ap
ter
14
T
rou
bl
e
sh
oot
in
g
4. Troubleshooting
If you suspect some trouble, follow the appropriate instructions described in this section. If these
measures fail to resolve the problem, contact your nearest service center.
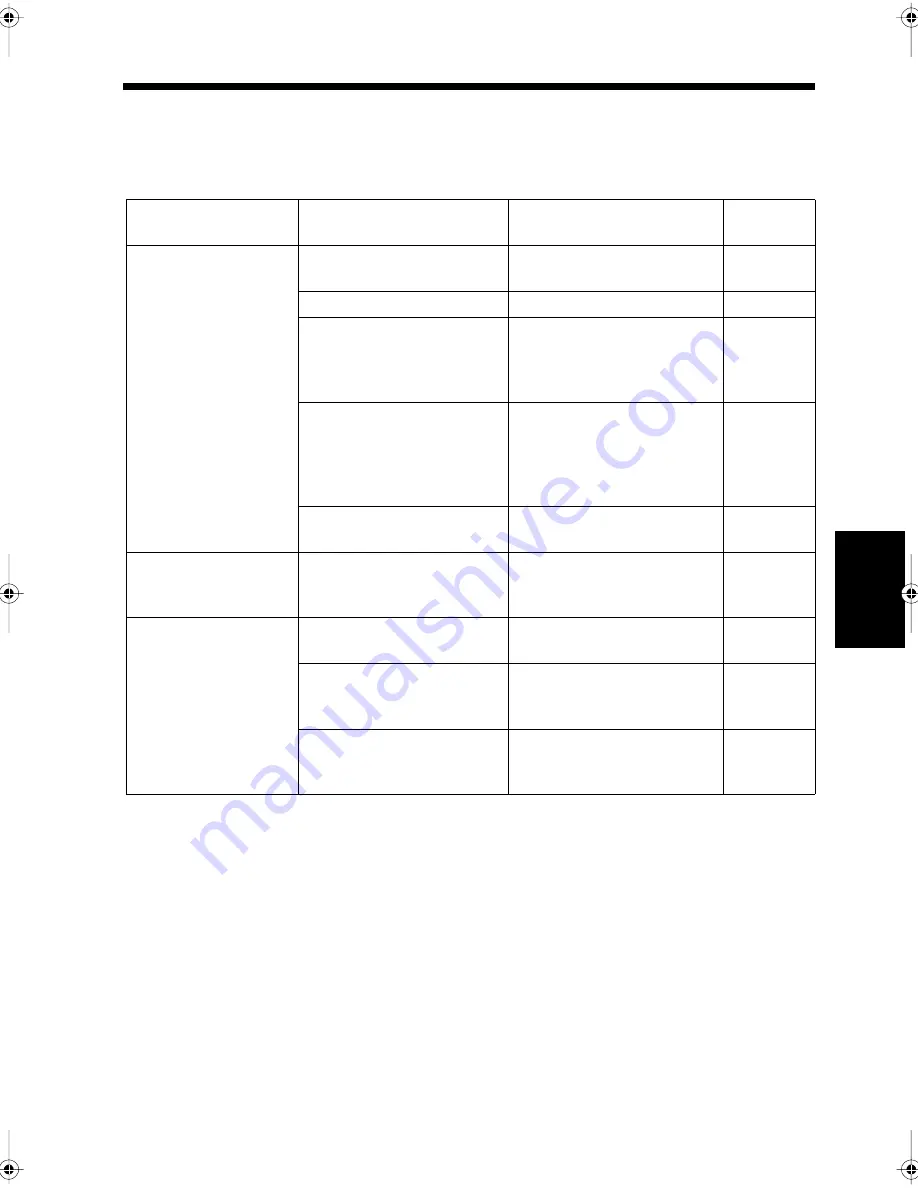
During Stand-by Mode
Condition
Cause
Countermeasures
Reference
page
Nothing displayed on
the touch panel.
Power plug is disconnected at
the wall outlet.
Connect the power plug
correctly to the wall outlet.
1-4
Power switch is turned off.
Turn on the power switch.
1-2
Touch panel does not light.
Press any key on the control
panel. It is also possible to set
the period of time to turn off
the LCD Back-light.
1-13
9-37
The protector is activated due
to excessive heat within the
product, or electrical
interference due to
thunderstorms, etc.
Turn off the power switch and
wait two or three seconds
before turning it on again.
1-2
The touch panel contrast is
dark.
Use the knob to adjust the
contrast.
1-3
Start key does not light
green.
The user has not been selected
(when user management mode
is activated).
Select the user.
1-18
Power cannot be turned
on.
Power plug is disconnected
from the wall outlet.
Connect the power plug
correctly to the wall outlet.
-
The breaker (trip-switch)
covering the position where
this product is installed is off.
Reset the breaker (trip-switch).
-
Slow reduction in voltage.
Power failure occurs.
Turn off the power switch and
wait about 90 seconds before
turning it on again.
-
chapte14.fm Page 17 Thursday, September 16, 1999 8:33 PM
Содержание Di250f
Страница 1: ...Di250f Di350f 1166 7710 02 ...
Страница 2: ......
Страница 6: ......
Страница 28: ...xxii Terms and Definitions ...
Страница 29: ...1 1 Chapter 1 Introduction Chapter 1 Introduction ...
Страница 58: ...1 30 10 Confirming the Settings Chapter 1 Introduction ...
Страница 59: ...2 1 Chapter 2 Copying a Document Chapter 2 Copying a Document ...
Страница 74: ...2 16 5 Copying Figures and Photos Chapter 2 Copying a Document ...
Страница 75: ...3 1 Chapter 3 Sending and Receiving Documents Chapter 3 Sending and Receiving Documents ...
Страница 98: ...3 24 11 Making and Receiving a Telephone Call Chapter 3 Sending and Receiving Documents ...
Страница 99: ...4 1 Chapter 4 Advanced Copying Procedures Chapter 4 Advanced Copying Procedures ...
Страница 137: ...5 1 Chapter 5 Transmission Methods Chapter 5 Transmission Methods ...
Страница 169: ...6 1 Chapter 6 Reception Methods Chapter 6 Reception Methods ...
Страница 175: ...7 1 Chapter 7 Before Registration and Setting Chapter 7 Before Registration and Setting ...
Страница 187: ...8 1 Chapter 8 Basic Settings Chapter 8 Basic Settings ...
Страница 190: ...8 4 2 Setting the Monitor Speaker and the Buzzer Volume Chapter 8 Basic Settings ...
Страница 191: ...9 1 Chapter 9 Registration and Setting Operations Chapter 9 Registration and Setting Operations ...
Страница 232: ...9 42 22 Confirming the Accumulated Number of Pages Chapter 9 Registration and Setting Operations ...
Страница 233: ...10 1 Chapter 10 Registrations and Settings for Each User Chapter 10 Registrations and Settings for Each User ...
Страница 267: ...12 1 Chapter 12 Reports and Lists Chapter 12 Reports and Lists ...
Страница 279: ...13 1 KDSWHU Routine Care Chapter 13 Routine Care ...
Страница 295: ...14 1 Chapter 14 Troubleshooting Chapter 14 Troubleshooting ...
Страница 320: ...14 26 7 When the Print is Faint Chapter 14 Troubleshooting ...
Страница 321: ...15 1 Chapter 15 Miscellaneous Chapter 15 Miscellaneous ...
Страница 332: ...15 12 Index Chapter 15 Miscellaneous ...
Страница 333: ...MEMO ...
Страница 334: ...MEMO ...
Страница 335: ...MEMO ...
Страница 336: ...MEMO ...
Страница 337: ...MEMO ...
Страница 338: ...MEMO ...


