


9-40
Ch
ap
ter
9
Re
gis
tr
a
ti
on
an
d S
ett
in
g Ope
rat
ion
s
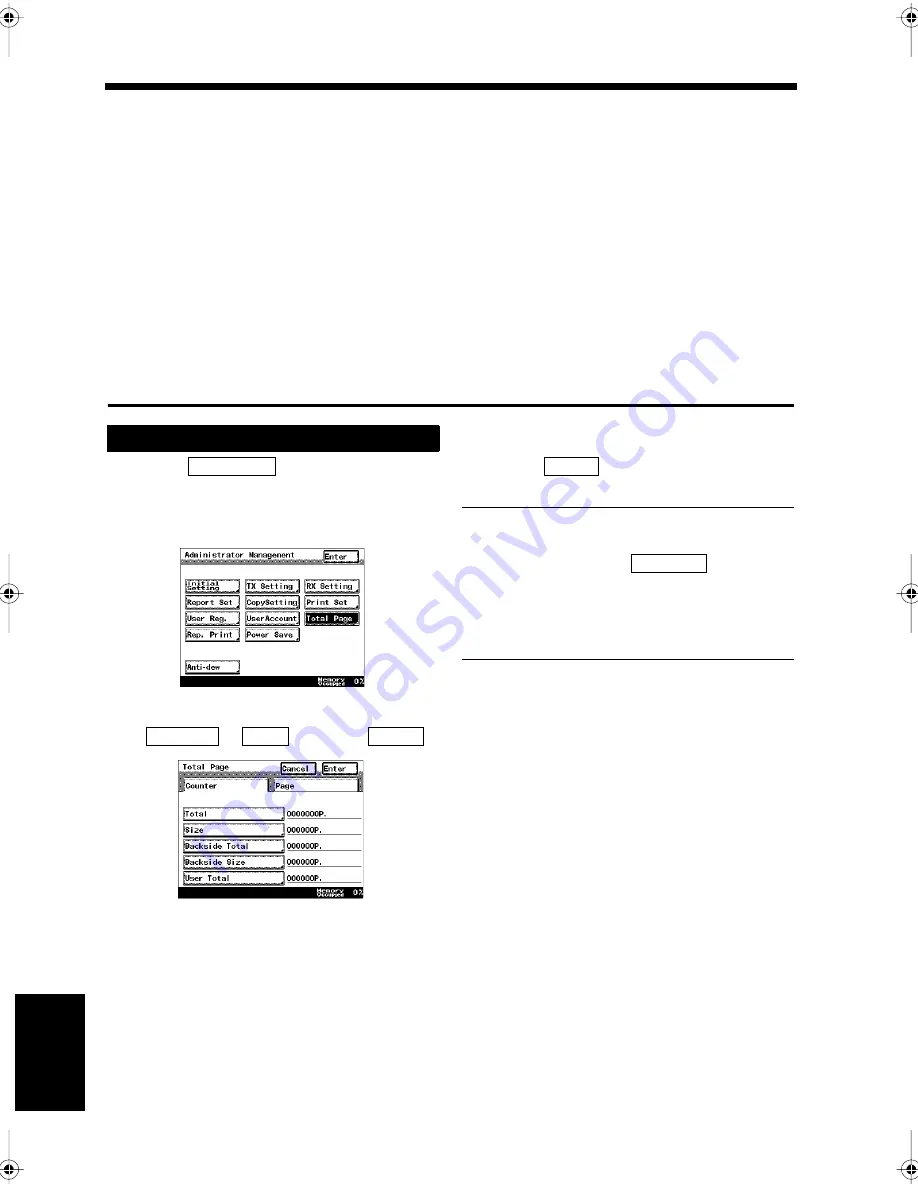
22. Confirming the Accumulated Number of Pages
The accumulated number of pages received, copied, reported and transmitted can be confirmed. The
number of 2-sided printings and those controlled by the size counter can also be confirmed.
• Total
: Indicates the total number of pages printed since the product was first set up.
• Size
: Indicates the total number of printed pages on the paper size set as the size
counter. (The service technician will set the specific paper size.)
• Backside total
: Indicates the total number of 2-sided pages printed.
• Backside size
: Indicates the total number of 2-sided prints on the paper size set in the size
counter. (The number of 2-sided pages on the same paper as the size counter
is indicated.)
• User total
: Indicates the total number of pages printed per user.
• FAX print
: Indicates the number of received facsimile pages printed.
• Copy print
: Indicates the number of copies printed.
• Report print
: Indicates the number of reports printed.
• TX
: Indicates the number of pages transmitted by facsimile.
Touch
on the Administrator
Management screen.
“Accessing the Administrator Management
Screen”
☞
p. 9-2
Confirm the accumulated data for
or
, and touch
.
Touch
repeatedly until the screen
returns to the initial screen.
Useful Tip
Another way to confirm the accumulated
number of pages, touch
after
pressing the Utility key on the initial screen,
and press the Mode Check key consecutively,
then the screen for the accumulated number of
pages is displayed.
Confirming
1
Total Page
1171P292EA
2
Counter
Page
Enter
1171P293EB
3
Enter
Report 1
Chapter9.fm Page 40 Thursday, September 16, 1999 8:08 PM
Содержание Di250f
Страница 1: ...Di250f Di350f 1166 7710 02 ...
Страница 2: ......
Страница 6: ......
Страница 28: ...xxii Terms and Definitions ...
Страница 29: ...1 1 Chapter 1 Introduction Chapter 1 Introduction ...
Страница 58: ...1 30 10 Confirming the Settings Chapter 1 Introduction ...
Страница 59: ...2 1 Chapter 2 Copying a Document Chapter 2 Copying a Document ...
Страница 74: ...2 16 5 Copying Figures and Photos Chapter 2 Copying a Document ...
Страница 75: ...3 1 Chapter 3 Sending and Receiving Documents Chapter 3 Sending and Receiving Documents ...
Страница 98: ...3 24 11 Making and Receiving a Telephone Call Chapter 3 Sending and Receiving Documents ...
Страница 99: ...4 1 Chapter 4 Advanced Copying Procedures Chapter 4 Advanced Copying Procedures ...
Страница 137: ...5 1 Chapter 5 Transmission Methods Chapter 5 Transmission Methods ...
Страница 169: ...6 1 Chapter 6 Reception Methods Chapter 6 Reception Methods ...
Страница 175: ...7 1 Chapter 7 Before Registration and Setting Chapter 7 Before Registration and Setting ...
Страница 187: ...8 1 Chapter 8 Basic Settings Chapter 8 Basic Settings ...
Страница 190: ...8 4 2 Setting the Monitor Speaker and the Buzzer Volume Chapter 8 Basic Settings ...
Страница 191: ...9 1 Chapter 9 Registration and Setting Operations Chapter 9 Registration and Setting Operations ...
Страница 232: ...9 42 22 Confirming the Accumulated Number of Pages Chapter 9 Registration and Setting Operations ...
Страница 233: ...10 1 Chapter 10 Registrations and Settings for Each User Chapter 10 Registrations and Settings for Each User ...
Страница 267: ...12 1 Chapter 12 Reports and Lists Chapter 12 Reports and Lists ...
Страница 279: ...13 1 KDSWHU Routine Care Chapter 13 Routine Care ...
Страница 295: ...14 1 Chapter 14 Troubleshooting Chapter 14 Troubleshooting ...
Страница 320: ...14 26 7 When the Print is Faint Chapter 14 Troubleshooting ...
Страница 321: ...15 1 Chapter 15 Miscellaneous Chapter 15 Miscellaneous ...
Страница 332: ...15 12 Index Chapter 15 Miscellaneous ...
Страница 333: ...MEMO ...
Страница 334: ...MEMO ...
Страница 335: ...MEMO ...
Страница 336: ...MEMO ...
Страница 337: ...MEMO ...
Страница 338: ...MEMO ...


