


11-23
7. Establishing a Bulletin Board
Ch
ap
ter
1
1
Re
gis
tr
a
ti
on
s
an
d
S
et
ti
n
gs
f
o
r
Co
n
ve
n
ie
n
t Us
ag
e
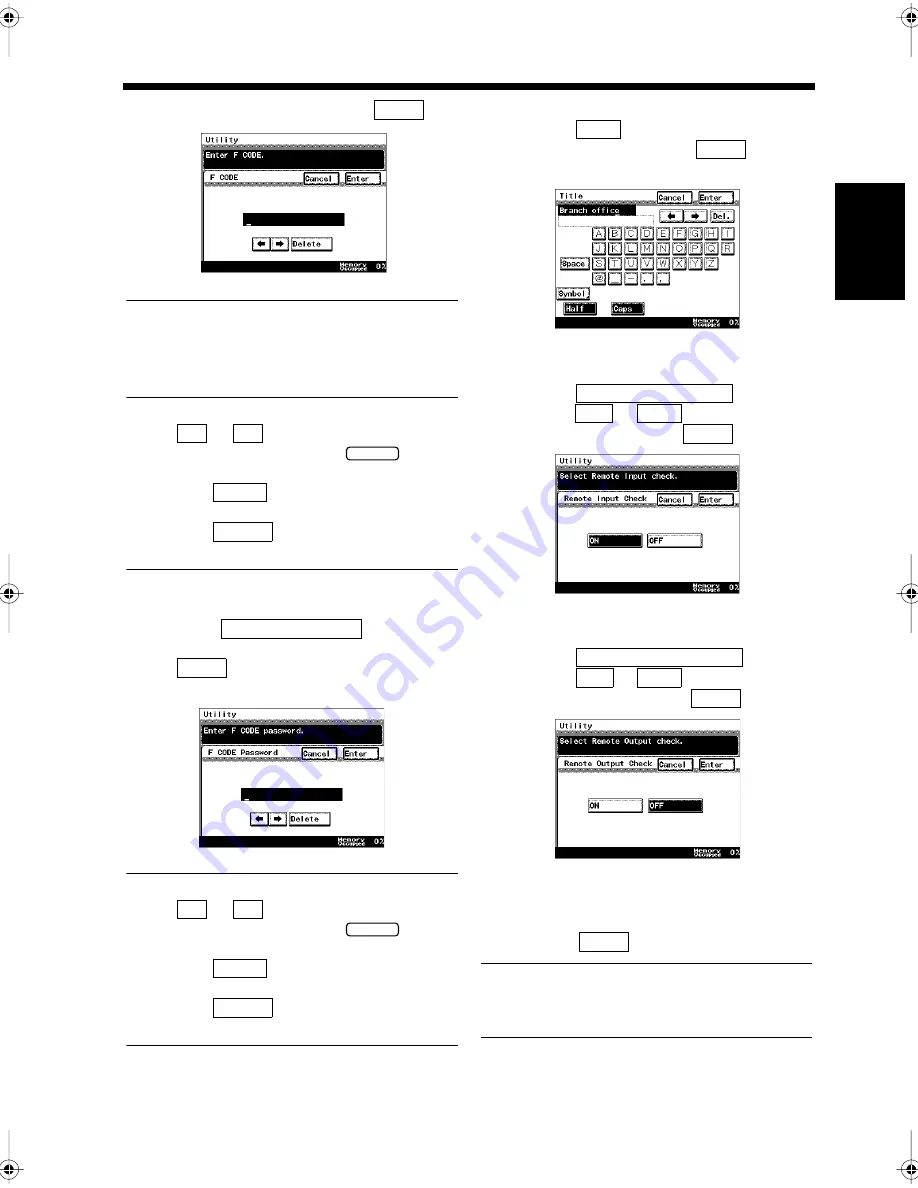
• Enter the F CODE, and touch
.
NOTE
Make sure not to duplicate the F Codes for the
bulletin board and the mailbox when setting the
F CODE. “F CODE”
☞
p. 5-27
Useful Tips
• Use
or
to move the cursor and re-
enter the number, or press the
key to
re-enter it.
• When the
key is touched, the
character on the cursor is deleted.
• When the
key is touched, it returns
to the previous screen.
<Registration of the F CODE Password>
• Touch
.
• Enter the F CODE password, and touch
.
“F CODE”
☞
p. 5-27
Useful Tips
• Use
or
to move the cursor and re-
enter the number, or press the
key to
re-enter it.
• When the
key is touched, the
character on the cursor is deleted.
• When the
key is touched, it returns
to the previous screen.
<Registration of the Title>
• Touch
.
• Enter the title, and touch
.
“Entering Characters”
☞
p. 7-11
<Setting for the Remote Input Check>
• Touch
.
• Select
or
for the remote
input check, and touch
.
<Setting for the Remote Output Check>
• Touch
.
• Select
or
for the remote
output check, and touch
.
Confirm the registered details once the
screen has returned to the same one as in step
4. Touch
if they are correct.
Useful Tip
Touch the key for the item to be modified, and
re-register.
Enter
1171P221EA
←
→
C
Delete
Cancel
F CODE password
Enter
1171P222EA
←
→
C
Delete
Cancel
Title
Enter
1171P361EA
Remote Input Check
ON
OFF
Enter
1171P362EA
Remote Output Check
ON
OFF
Enter
1171P363EA
5
Enter
Chapter11.fm Page 23 Thursday, September 16, 1999 8:16 PM
Содержание Di250f
Страница 1: ...Di250f Di350f 1166 7710 02 ...
Страница 2: ......
Страница 6: ......
Страница 28: ...xxii Terms and Definitions ...
Страница 29: ...1 1 Chapter 1 Introduction Chapter 1 Introduction ...
Страница 58: ...1 30 10 Confirming the Settings Chapter 1 Introduction ...
Страница 59: ...2 1 Chapter 2 Copying a Document Chapter 2 Copying a Document ...
Страница 74: ...2 16 5 Copying Figures and Photos Chapter 2 Copying a Document ...
Страница 75: ...3 1 Chapter 3 Sending and Receiving Documents Chapter 3 Sending and Receiving Documents ...
Страница 98: ...3 24 11 Making and Receiving a Telephone Call Chapter 3 Sending and Receiving Documents ...
Страница 99: ...4 1 Chapter 4 Advanced Copying Procedures Chapter 4 Advanced Copying Procedures ...
Страница 137: ...5 1 Chapter 5 Transmission Methods Chapter 5 Transmission Methods ...
Страница 169: ...6 1 Chapter 6 Reception Methods Chapter 6 Reception Methods ...
Страница 175: ...7 1 Chapter 7 Before Registration and Setting Chapter 7 Before Registration and Setting ...
Страница 187: ...8 1 Chapter 8 Basic Settings Chapter 8 Basic Settings ...
Страница 190: ...8 4 2 Setting the Monitor Speaker and the Buzzer Volume Chapter 8 Basic Settings ...
Страница 191: ...9 1 Chapter 9 Registration and Setting Operations Chapter 9 Registration and Setting Operations ...
Страница 232: ...9 42 22 Confirming the Accumulated Number of Pages Chapter 9 Registration and Setting Operations ...
Страница 233: ...10 1 Chapter 10 Registrations and Settings for Each User Chapter 10 Registrations and Settings for Each User ...
Страница 267: ...12 1 Chapter 12 Reports and Lists Chapter 12 Reports and Lists ...
Страница 279: ...13 1 KDSWHU Routine Care Chapter 13 Routine Care ...
Страница 295: ...14 1 Chapter 14 Troubleshooting Chapter 14 Troubleshooting ...
Страница 320: ...14 26 7 When the Print is Faint Chapter 14 Troubleshooting ...
Страница 321: ...15 1 Chapter 15 Miscellaneous Chapter 15 Miscellaneous ...
Страница 332: ...15 12 Index Chapter 15 Miscellaneous ...
Страница 333: ...MEMO ...
Страница 334: ...MEMO ...
Страница 335: ...MEMO ...
Страница 336: ...MEMO ...
Страница 337: ...MEMO ...
Страница 338: ...MEMO ...


