


14-10
Ch
ap
ter
14
T
rou
bl
e
sh
oot
in
g
3. Paper Misfeed
If a paper misfeed occurs, use the following procedure to remove it.
If paper becomes misfed, the touch panel displays the message, “Misfeed detected. Remove misfeed at
●
.” and indicates which cover needs to be opened to remove the misfed paper. Open the cover indicated
by the arrow, and remove the misfed paper.
If the paper frequently misfeeds:
Confirm how to load paper, storage conditions, and the paper size, etc. “Loading Paper”
☞
p. 13-2
If the multi-purpose or universal cassettes are used, the paper will misfeed if the paper size is incorrectly
set.
If the Side Cover is opened to remove paper:
As far as possible, try not to remove the imaging unit otherwise the toner may spill out. If the imaging
unit must be removed to pull out the misfed paper, take care not to spill the toner.
The handling procedure differs according to the position of the paper misfeed. Refer to the appropriate
page for the indicated position of the paper misfeed, and remove the misfed paper in line with the
instructions.
CAUTION
Do not touch the copper terminals located within the Side Cover, under the imaging
unit because this may cause failure due to static electricity.
1166O264AB
Terminals
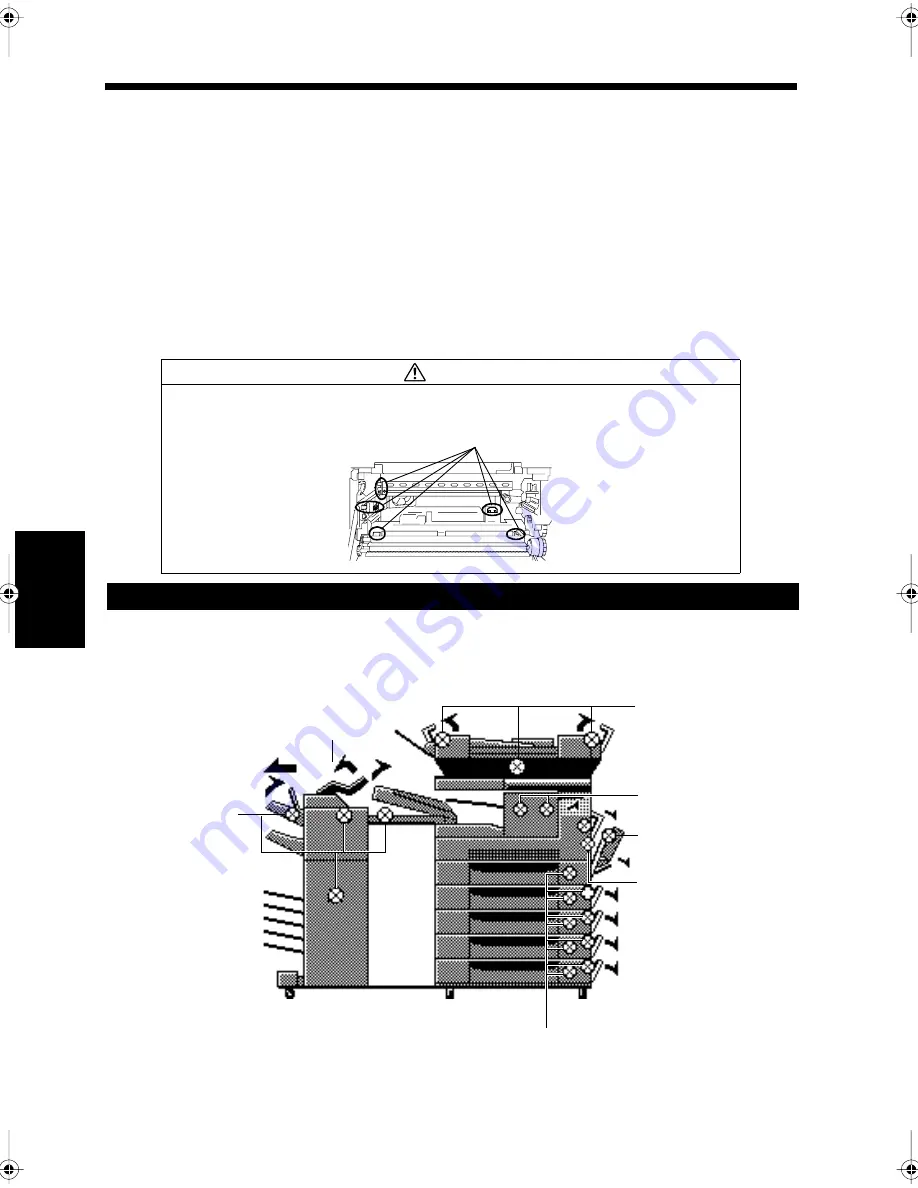
Displays and Paper misfeed Positions
1166P180BE
Staple Cartridge
☞
p.13-13
Finisher/Mail-bin
Finisher
☞
p.14-15
Side Cover
☞
p.14-11
Job Tray/Shift Tray
☞
p.14-14
Duplex Unit
☞
p.14-14
Toner Fuser Unit
Cover
☞
p.14-13
Duplexing Document
Feeder
☞
p.14-8
Automatic Document
Feeder
☞
p.14-6
chapte14.fm Page 10 Thursday, September 16, 1999 8:33 PM
Содержание Di250f
Страница 1: ...Di250f Di350f 1166 7710 02 ...
Страница 2: ......
Страница 6: ......
Страница 28: ...xxii Terms and Definitions ...
Страница 29: ...1 1 Chapter 1 Introduction Chapter 1 Introduction ...
Страница 58: ...1 30 10 Confirming the Settings Chapter 1 Introduction ...
Страница 59: ...2 1 Chapter 2 Copying a Document Chapter 2 Copying a Document ...
Страница 74: ...2 16 5 Copying Figures and Photos Chapter 2 Copying a Document ...
Страница 75: ...3 1 Chapter 3 Sending and Receiving Documents Chapter 3 Sending and Receiving Documents ...
Страница 98: ...3 24 11 Making and Receiving a Telephone Call Chapter 3 Sending and Receiving Documents ...
Страница 99: ...4 1 Chapter 4 Advanced Copying Procedures Chapter 4 Advanced Copying Procedures ...
Страница 137: ...5 1 Chapter 5 Transmission Methods Chapter 5 Transmission Methods ...
Страница 169: ...6 1 Chapter 6 Reception Methods Chapter 6 Reception Methods ...
Страница 175: ...7 1 Chapter 7 Before Registration and Setting Chapter 7 Before Registration and Setting ...
Страница 187: ...8 1 Chapter 8 Basic Settings Chapter 8 Basic Settings ...
Страница 190: ...8 4 2 Setting the Monitor Speaker and the Buzzer Volume Chapter 8 Basic Settings ...
Страница 191: ...9 1 Chapter 9 Registration and Setting Operations Chapter 9 Registration and Setting Operations ...
Страница 232: ...9 42 22 Confirming the Accumulated Number of Pages Chapter 9 Registration and Setting Operations ...
Страница 233: ...10 1 Chapter 10 Registrations and Settings for Each User Chapter 10 Registrations and Settings for Each User ...
Страница 267: ...12 1 Chapter 12 Reports and Lists Chapter 12 Reports and Lists ...
Страница 279: ...13 1 KDSWHU Routine Care Chapter 13 Routine Care ...
Страница 295: ...14 1 Chapter 14 Troubleshooting Chapter 14 Troubleshooting ...
Страница 320: ...14 26 7 When the Print is Faint Chapter 14 Troubleshooting ...
Страница 321: ...15 1 Chapter 15 Miscellaneous Chapter 15 Miscellaneous ...
Страница 332: ...15 12 Index Chapter 15 Miscellaneous ...
Страница 333: ...MEMO ...
Страница 334: ...MEMO ...
Страница 335: ...MEMO ...
Страница 336: ...MEMO ...
Страница 337: ...MEMO ...
Страница 338: ...MEMO ...


