background image

45

DigiSuite LX MAX DigiConnect/Video breakout box

breakout box to switch from one signal to the other, as explained in the 
following section).

¬

To choose your connection signal options:

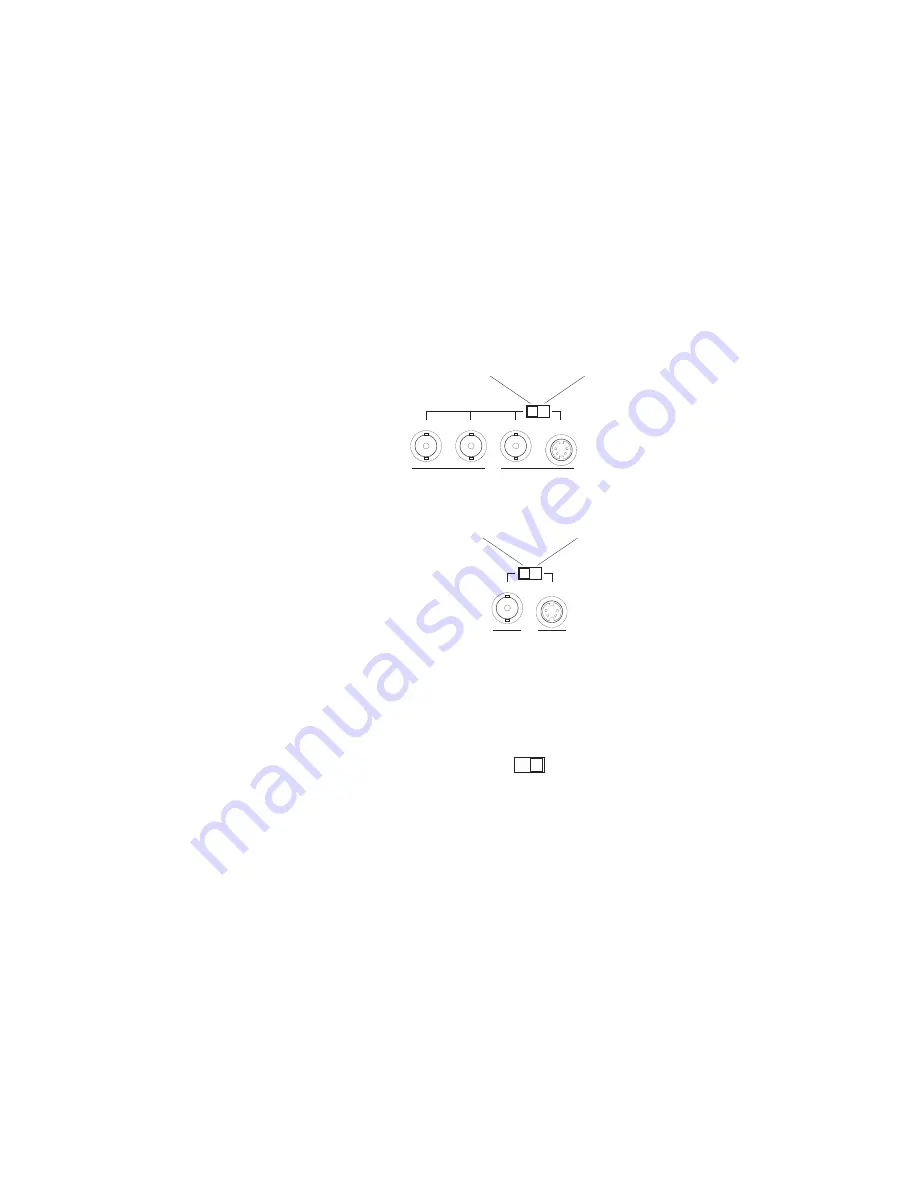
1

Set the IN 1 switch to the desired position. If you have an analog 
component input source, you must connect it to IN 1, as IN 2 only 
supports composite and S-Video inputs.  

2

If you have two input sources, set the IN 2 switch.

3

Set the IN MODE switch. The switch position determines which
jacks are available for your input connections (IN 1 and IN 2 on
the breakout box). If you have an analog component input, set the 
switch to the COMPONENT ONLY position. Otherwise, set it to
S-VIDEO/COMPOSITE.

°Important

If you’re using IN 1 for analog component and IN 2 for 

composite, you’ll need to change the IN MODE setting to switch from one 
signal to the other. Remember that you’ll also need to change your video 
source in the DigiSuite Configuration program as explained in 

“Configuring your video settings” 

on page

81

.

IN 1

S-VIDEO

Y/COMPOSITE

R-Y

B-Y

Switch position for
analog component
or composite input

Switch position
for S-Video input

COMPOSITE

IN 2

S-VIDEO

Switch position for
composite input

Switch position
for S-Video input

IN MODE

S-VIDEO/COMPOSITE

COMPONENT ONLY

Содержание DigiSuite LX MAX

Страница 1: ...10767 101 0700 Installation Manual November 5 2001 DigiSuite LX MAX...

Страница 2: ...Suite LX DigiTools DigiUtils DigiView Flex 3D Matrox MAX MediaExport MediaTools Matrox Graphics Inc Matrox G400 Matrox G450 Matrox G550 Matrox Millennium Adobe Systems Inc Adobe Acrobat After Effects...

Страница 3: ...at www matrox com videoweb support in the DigiSuite Customer Support section or fill in and mail the included registration card to be eligible for customer support software updates new product announ...

Страница 4: ......

Страница 5: ...Matrox reserves the right to terminate this license if there is a violation of its terms or default by the original purchaser Upon termination for any reason all copies of the Software must be immedia...

Страница 6: ...nty is in lieu of any other warranty whether expressed implied or statutory including but not limited to any warranty for design merchantability or fitness for a particular purpose and any warranty ar...

Страница 7: ...giUtils 9 Remove your existing DigiSuite hardware 9 Install your Matrox G400 G450 or G550 9 Install the Matrox display driver from your DigiSuite CD 9 Set your display resolution 10 Install your third...

Страница 8: ...27 Assemble and install your DigiSuite LX MAX card set 27 Connect the digital module internal cable 30 Connect the VIP ribbon cable to your Matrox display card 31 Connecting your MAX card to a Matrox...

Страница 9: ...oftware codecs for use on a system without the DigiSuite hardware 64 Installing the Matrox File Converter for use on a system without the DigiSuite hardware 65 Installing the Matrox DVD Player 66 Inst...

Страница 10: ...k source digital module only 89 Configuring the audio input pairs 90 Configuring the audio output pairs 91 Testing the performance of your A V drives 92 Notes on configuring your storage devices for u...

Страница 11: ...dimensions 123 Connector types 123 DigiSuite LX environmental specifications 123 Matrox MAX electrical specifications 124 Matrox MAX mechanical specifications 124 Physical dimensions 124 Connector ty...

Страница 12: ...x Contents Your notes...

Страница 13: ...ite LX MAX This chapter outlines some of the features of your DigiSuite LX MAX and associated optional digital module It also specifies the computer system requirements for your DigiSuite LX MAX and e...

Страница 14: ...he top Movie 2 expansion bus for connecting the DigiSuite LX MAX cards and the optional digital module Video Three multi standard DV MPEG 2 video codecs ITU R 601 digital video compression and decompr...

Страница 15: ...l module features The digital module for DigiSuite LX MAX adds serial digital video and AES EBU audio input output capabilities to your system Digital video SMPTE 259M serial 4 2 2 at 270 Mb sec One 1...

Страница 16: ...systems and storage devices You should refer to our web site at www matrox com videoweb support for information on recommended DigiSuite computer systems and storage devices As new technology becomes...

Страница 17: ...he available documentation Chapter 2 Preparing Your DigiSuite System for Upgrading to DigiSuite LX MAX outlines the step by step procedures for preparing your existing DigiSuite LX system for upgradin...

Страница 18: ...ides contact information for our sales offices around the world Style conventions The following style conventions are used in this manual The names of files directory paths and manuals appear in itali...

Страница 19: ...ter 2 Preparing Your DigiSuite System for Upgrading to DigiSuite LX MAX This chapter outlines the step by step procedures for preparing your existing DigiSuite LX system for upgrading to DigiSuite LX...

Страница 20: ...atrox com videoweb support Installation overview The following steps summarize the four step installation process for DigiSuite LX MAX Important Please do not attempt to install any of the components...

Страница 21: ...ur DV 1394TI card and your DigiDesktop card because neither of these cards is compatible with DigiSuite LX MAX You may keep your Adaptec DV 1394 card in your system during the installation if you want...

Страница 22: ...you install your third party applications before attempting to install your DigiSuite software This is because DigiUtils Setup must locate the directory where you ve installed your program in order to...

Страница 23: ...system and install your DigiUtils software Setup is designed to detect and modify these files so that you ll have a trouble free installation once you ve installed your DigiSuite LX MAX 1 Insert the...

Страница 24: ...12 Chapter 2 Preparing Your DigiSuite System for Upgrading to DigiSuite LX MAX Your notes...

Страница 25: ...instructions on preparing for a new DigiSuite LX MAX installation The procedures covered include installing Windows 2000 configuring your display card for DigiSuite LX MAX installing your third party...

Страница 26: ...em for use with DigiSuite LX MAX this information can help you choose the best system for your needs If you already have a computer you intend to use with DigiSuite LX MAX the recommendations may help...

Страница 27: ...ntation Install the Matrox display driver from your DigiSuite CD After installing Windows 2000 install the Matrox display driver provided on your DigiSuite CD before running DigiUtils Setup To install...

Страница 28: ...Utils Setup to prepare some configuration files Before you can install your DigiSuite hardware you need to run DigiUtils Setup This is because Windows 2000 contains some configuration files that can c...

Страница 29: ...ecessary preparations Have you Installed and connected your storage devices Installed Windows 2000 and configured your display Installed your third party software Run DigiUtils Setup to prepare config...

Страница 30: ...18 Chapter 3 Preparing Your System for a New Installation Your notes...

Страница 31: ...Chapter 4 Installing Your DigiSuite LX MAX Hardware This chapter describes how to install DigiSuite LX MAX and associated optional digital module...

Страница 32: ...mall to cause a spark but it can still cause damage to sensitive electronic components or at least reduce their lifespan To avoid damage please observe the following precautions Do not remove DigiSuit...

Страница 33: ...slots and two ISA slots and so on With this in mind we ve developed a numbering scheme for identifying each slot position Computers with AGP and PCI slots only In the case of computers with AGP and P...

Страница 34: ...ts You should make sure the fan directs air between the various circuit boards The fan should have a minimum rating of 40 CFM CFM stands for cubic feet of air displaced per minute and is a measurement...

Страница 35: ...our card should not exceed 105 C for T1 or 90 C for T2 Important A warning will be displayed whenever the card s maximum operating temperature exceeds the recommended limit Use the PCI retainer bracke...

Страница 36: ...box or another device for termination however set both termination switches to Hi Z Connect the VIP cable to your MAX card If your VIP cable was not shipped already attached to your Matrox MAX card yo...

Страница 37: ...all your DigiSuite LX MAX and digital module before installing other cards such as your SCSI controller Take care of your Movie 2 bus Important The Movie 2 bus is one of the most important parts in a...

Страница 38: ...en when the screws are properly tightened there will be a small space between the Movie 2 bus circuit board and the top of the cards When installing or removing your Movie 2 bus be sure to do so in a...

Страница 39: ...ace Assemble and install your DigiSuite LX MAX card set Important Be sure your VIP cable is connected to your Matrox MAX card as explained in Connect the VIP cable to your MAX card on page 24 If you a...

Страница 40: ...ough the top of the Movie 2 bus and secure it to the card 6 Flip the assembled card and Movie 2 bus over with the bus underneath Rest the plate end of the DigiSuite LX card on a flat surface and place...

Страница 41: ...ith and inserted into the card guides inside the front of the computer chassis c Once the cards touch their slots make sure they re perfectly aligned and then press them into the slot connectors until...

Страница 42: ...e module at all times Do not try to remove the internal cable from the digital module or tamper with the audio and video connectors on the module 1 Connect the internal video audio cable to one of the...

Страница 43: ...cable a full 180 degrees to make a proper connection An easy way to ensure the cable is properly aligned with the connector pins on your display card is to check the red edge of the ribbon cable When...

Страница 44: ...ear the top edge of your G450 or G550 display card The red edge of the cable should be on the side closest to the card bracket DigiSuite LX and Movie 2 bus not shown in this illustration to allow view...

Страница 45: ...Chapter 5 Connecting Your External Devices This chapter shows you how to connect external devices to DigiSuite LX MAX and its associated optional digital module...

Страница 46: ...te LX card its associated optional digital module and the MAX card PCI bus connector 26 pin video bracket connector 26 pin audio bracket connector DigiSuite LX Movie 2 bus connectors 90 Pins 70 Pins D...

Страница 47: ...the video cable connector and breakout box cable connector is missing Similarly pin positions 9 and 13 have been blocked off on the DigiSuite LX audio bracket connector the corresponding pins on the...

Страница 48: ...DigiSuite LX MAX audio cables The analog XLR input output audio cable DLITE XLR CBL and the analog RCA input output audio cable DLITE RCA CBL both provide four input and output connections The digital...

Страница 49: ...rackmount brackets 1 Unpack the two rackmount brackets and their eight short mounting screws Do not use the long screws 2 Line up each bracket with its respective screw holes on the side of the break...

Страница 50: ...e internal shielded wires Choosing your connection signal options As you can see by reading the front panel labels DigiConnect Audio offers several signal options Note The front switches on DigiConnec...

Страница 51: ...in the analog output jacks of your breakout box before connecting your unbalanced cables Digital audio input output The DigiConnect Audio breakout box provides two stereo AES EBU input and output conn...

Страница 52: ...40 Chapter 5 Connecting Your External Devices RCA audio cable Digital audio cable Audio cable connector Bottom IN 1 IN 3 IN 4 OUT 1 OUT 2 OUT 3 OUT 4 IN 2 Top of DigiSuite LX...

Страница 53: ...ake sure you are using properly impedance matched adapters Using the wrong type of adapter may degrade the audio quality Important If you re using the DigiSuite LX MAX DigiConnect Audio breakout box a...

Страница 54: ...le for connecting external devices to your computer Available DigiSuite LX MAX video cables The analog video input output cable DLITE VIDEO CBL supports analog component composite and Y C video The di...

Страница 55: ...ts 1 Unpack the two rackmount brackets and their eight short mounting screws Do not use the long screws 2 Line up each bracket with its respective screw holes on the side of the breakout box 3 Using a...

Страница 56: ...he front panel labels DigiConnect Video offers several signal options Note The front switches on DigiConnect Video are all recessed to prevent unwanted changes Use a small screwdriver or other appropr...

Страница 57: ...nd IN 2 on the breakout box If you have an analog component input set the switch to the COMPONENT ONLY position Otherwise set it to S VIDEO COMPOSITE Important If you re using IN 1 for analog componen...

Страница 58: ...ts The DigiConnect Video breakout box for use with DigiSuite LX MAX supports any of the following combinations of video output connections One S Video and one composite connection Preview One S Video...

Страница 59: ...this will short circuit your hardware and damage your equipment Similarly do not attempt to connect PROGRAM Y C at the same time as PROGRAM Y and or PROGRAM R Y C as this will lead to the double termi...

Страница 60: ...aterial from different DV 1394 devices you must turn off the first device before turning on the second Hot plugging Your DV 1394 device can be plugged into or unplugged from the MAX card at any time t...

Страница 61: ...ctors on the MAX card as shown below 2 Match the notch on the smaller connector 4 pin end of the 1394 cable to the notch on the 1394 port DV In Out port of your DV device and insert the connector as i...

Страница 62: ...onnectors on page 34 Illustrations in the following section show some typical video connections In these illustrations we ve connected a Program monitor NTSC PAL or digital to view the signal that wil...

Страница 63: ...F W Recorder Deck 2 SYNC 75 ON OFF W SYNC VIDEO IN OUT Program monitor input VIDEO IN REF IN KEY OUT R Y B Y Y S VIDEO COMPOSITE S VIDEO COMPOSITE PREVIEW OUT PROGRAM OUT MODE REF IN 1 S VIDEO Y COMPO...

Страница 64: ...C VIDEO IN OUT Program monitor input VIDEO IN REF IN IN S VIDEO PROGRAM S VIDEO KEY OUT R Y B Y Y S VIDEO COMPOSITE S VIDEO COMPOSITE PREVIEW OUT PROGRAM OUT MODE REF IN 1 S VIDEO Y COMPOSITE R Y B Y...

Страница 65: ...S VIDEO COMPOSITE PREVIEW OUT PROGRAM OUT MODE REF IN 1 S VIDEO Y COMPOSITE R Y B Y COMPOSITE IN 2 S VIDEO IN MODE S VIDEO COMPOSITE COMPONENT ONLY DigiSuite LX video connector Digital Video Sol utio...

Страница 66: ...External sync source Source Deck 1 DigiSuite LX video connector IN C2 R Y IN Y2 Y COMPS2 IN C1 B Y PROGRAM R Y C PROGRAM Y PROGRAM B Y Recorder Deck 2 COMPONENT OUT 75 Y B Y R Y ON OFF SYNC Y B Y R Y...

Страница 67: ...cable connections External sync source Source Deck 1 DigiSuite LX video connector IN Y1 COMPS1 PROGRAM COMPS Recorder Deck 2 COMPOSITE VIDEO 75 OUT IN ON OFF SYNC IN OUT COMPOSITE VIDEO 75 ON OFF SYN...

Страница 68: ...cable connections External sync source Source Deck 1 IN Y C 2 PROGRAM Y C Recorder Deck 2 75 ON OFF SYNC 75 ON OFF SYNC VIDEO IN OUT Program monitor input VIDEO IN SYNC OUT REF IN S VIDEO OUT S VIDEO...

Страница 69: ...able connections External sync source Source Deck 1 Digital module video connector SDI IN Recorder Deck 2 SERIAL OUT 75 ON OFF SYNC SERIAL IN 75 ON OFF SYNC SERIAL IN OUT Program monitor digital input...

Страница 70: ...58 Chapter 5 Connecting Your External Devices Your notes...

Страница 71: ...Chapter 6 Installing the DigiSuite LX MAX Software This chapter explains how to install the software required to use DigiSuite LX MAX and optional software that s provided with DigiSuite...

Страница 72: ...as the Mystique and Windows detects these chips as display cards When you follow the steps below to search your CD for the correct driver files the installation routine will install the correct drive...

Страница 73: ...My Computer then double click Compact Disc 3 From the DigiSuite CD menu choose Run DigiUtils Setup 4 Follow the instructions that appear on the screen If your computer hangs when Setup scans your syst...

Страница 74: ...etup install The DigiUtils Setup program that s provided on your DigiSuite CD installs the drivers needed to use DigiSuite LX MAX with Video for Windows and DirectShow programs and also installs the D...

Страница 75: ...to tape of clips using time code This driver will be installed automatically if you install the Matrox realtime plug in for Adobe Premiere For instructions on how to use the DigiSuite software refer...

Страница 76: ...FW software codecs let you render compile and play back DigiSuite compatible avi files in your Video for Windows programs without having the DigiSuite hardware installed in your computer To install th...

Страница 77: ...k Compact Disc 3 From the DigiSuite CD menu choose Install the Matrox File Converter on a system without the DigiSuite hardware 4 Follow the instructions that appear on the screen An information box i...

Страница 78: ...Sonic Solutions DVDit SE To install Sonic Solutions DVDit SE 1 Close all Windows programs 2 Insert the DVDit SE installation CD in your CD ROM drive 3 When the setup program starts follow the onscreen...

Страница 79: ...bination such as by adding a new DigiSuite card you must first uninstall DigiUtils Once you ve installed the new card set run DigiUtils Setup again to update your current installation Connect your VTR...

Страница 80: ...68 Chapter 6 Installing the DigiSuite LX MAX Software Your notes...

Страница 81: ...information on how to configure various settings on your computer for use with Matrox DigiSuite LX MAX It also explains how to test the maximum data rates your A V drives can achieve configure your VT...

Страница 82: ...2 At the bottom of the dialog box under Energy saving features of monitor click Power 3 Select Never for all the settings You can save this power scheme as DigiSuite as in the following example 4 Clic...

Страница 83: ...s Setup to install the DigiSuite software you were prompted to assign appropriate display properties to your Matrox MAX card These settings are required to ensure that your MAX works correctly To veri...

Страница 84: ...nces should you clear Extend my Windows desktop onto this monitor If you clear this option you Matrox MAX will not work correctly Note The Colors and Screen area settings for the MAX display driver ar...

Страница 85: ...at the Matrox DigiSuite Wave driver is the preferred device for audio playback and recording and that Windows uses only preferred devices To configure your audio settings 1 Choose Start Settings Contr...

Страница 86: ...et your initial and maximum paging file sizes to the same number Windows creates one file of the specified size and uses it for virtual memory without resizing thus saving the CPU resources required t...

Страница 87: ...applications The DigiSuite Configuration program lets you customize these settings to meet specific video and audio input or output requirements For example you may want to change the default proc am...

Страница 88: ...s installed Use this tab to configure your VTR for RS 422 device control with DigiTools and various nonlinear editing programs Default button To restore the factory default settings for your card set...

Страница 89: ...our computer Once you reboot your settings will be returned to their previous state Changing default proc amp settings If you d like your default proc amp settings for DigiSuite LX to be restored each...

Страница 90: ...enlock master You cannot change the genlock master using the DigiSuite Configuration program Important When using an external video genlock source you must genlock DigiSuite LX and all your external d...

Страница 91: ...ternal sync generator Internal Genlock to DigiSuite LX s internal reference signal Select this option only if you don t have an external sync generator or other external video sync source Genlock opti...

Страница 92: ...ensures that the effects you create on DigiSuite LX will be displayed with the correct proportions If the editing aspect ratio isn t set correctly effects such as circular wipes and borders added to...

Страница 93: ...use your S Video VTR connected to Y C IN 1 as your default capture source with DigiTools and Adobe Premiere If you have the optional digital module select 4 2 2 SDI to use your digital input source P...

Страница 94: ...eet broadcast quality standards make sure this option isn t selected DigiSuite LX will then filter the signal to increase the tolerance for sync pulse instability Note Whether or not you select the So...

Страница 95: ...h as the Graphic for Edge Filtering Adjustment you must select a graphic display source from the Display Source list Program Output Use this list to select the type of program output you want to use F...

Страница 96: ...ettings Broadcast Select this preset to output video for broadcast Any super black or super white luminance levels in your video will be clipped The following settings are applied Luminance range for...

Страница 97: ...option to help eliminate distorted or ringing edges in your keyed images This problem typically occurs in hard keyed images where you have abrupt changes between opaque and completely transparent are...

Страница 98: ...the key output to a downstream switcher To check the external key alignment set the display source in the DigiSuite LX Video Out dialog box to Graphic external key then select Graphic for Key H Phase...

Страница 99: ...To check the external key alignment set the display source in the DigiSuite LX Video Out dialog box to Graphic external key then select Graphic for Key H Phase Adjustment from the Test Pattern list SC...

Страница 100: ...ying back DV material Allow Super Black and Super White Post Production Outputs a video signal in which both super black and super white luminance levels are retained This setting is appropriate for p...

Страница 101: ...ce digital module only To select the source to which you want to genlock your audio click the DigiSuite LX tab then the Audio Genlock tab You can select one of the following audio genlock options Vide...

Страница 102: ...audio input you re using If you select Digital Input the remaining controls in this dialog box will be unavailable Input Pair 1 Input Pair 2 Use these lists to select your default analog audio input...

Страница 103: ...unbalanced analog To ensure that your balanced analog output is properly calibrated for your recorder make sure you select the option that matches your recorder s audio input impedance For example if...

Страница 104: ...of free disk space on the drive 3 Under Test Settings for All Selected Drives drag the slider to set the size of the test files to be created You can select Fill x of disk capacity to set the file si...

Страница 105: ...at Ciprico Write Mode is selected before capturing material to your Ciprico disk array but clear this option before using your other drives 6 To start the disk performance test click the Start Test bu...

Страница 106: ...ms integrator See the Customer Support section on our web site at www matrox com videoweb support for up to date information on recommended storage devices test results references and so on Formatting...

Страница 107: ...while capturing or playing back material on your SCSI A V drives Doing so may interrupt the capture or playback process if you don t have the correct bus mastering EIDE settings Configure your DMA se...

Страница 108: ...Device Manager 3 Click the plus sign next to IDE ATA ATAPI controllers 4 Right click the Primary IDE Channel and choose Properties 5 Click the Advanced Settings tab 6 Under Device 0 and Device 1 in t...

Страница 109: ...formation tab You may be asked to provide this information if you call the Matrox DigiSuite Customer Support Department for assistance Displaying Matrox MAX information To display system usage and oth...

Страница 110: ...eir own RS 422 device control rather than DigiSuite s If after configuring your VTR using the DigiSuite Configuration program you find that you have frame accurate capture and printing to tape with Di...

Страница 111: ...use of one or the other type of time code You would do this if the two types of time code don t match on your tapes If this isn t the case you can select both types of time code to let the VTR decide...

Страница 112: ...trox logos onto your tape prompts you to locate the first and last frames in the series of logos then adjusts your VTR s calibration settings Edit On Delay and Edit Off Delay according to your respons...

Страница 113: ...Settings tab 3 Make sure Enable Recording is selected then click Set Up Recorder 4 Click Validate Calibration then follow the instructions that appear on the screen 5 If you find that your recorder i...

Страница 114: ...ttings This displays the Calibration Settings dialog box 4 Adjust the Edit On Delay and Edit Off Delay values as needed see step 5 on page 101 If you want to return the calibration settings to their d...

Страница 115: ...on Program To run the Stripe Tape utility 1 Set your VTR to record time code and load the tape you want to stripe into your VTR 2 Click the Card Set 1 tab then the VTR Settings tab 3 Make sure Enable...

Страница 116: ...104 Chapter 7 Configuring Your DigiSuite LX MAX Your notes...

Страница 117: ...Chapter 8 DigiSuite LX MAX Troubleshooting This chapter provides some possible answers if you have trouble installing or operating your DigiSuite system...

Страница 118: ...l of your hardware and software to the latest available versions For hardware such as your motherboard soundcard and storage devices check the manufacturers web sites for the latest updates that you c...

Страница 119: ...tem BIOS version is out of date there may be conflicts with hardware and thus your computer may not be able to start Solution Check BIOS version Make sure your system BIOS version is the latest availa...

Страница 120: ...nstall the DigiSuite cards 3 Restart your computer Possible cause 2 Incompatible motherboard In the DigiSuite System Recommendations section of the Matrox web site we provide a list of motherboards th...

Страница 121: ...ls Computer Management Device Manager Operation Random or erratic system operating behavior Possible cause 1 Inadequate ventilation The components on all DigiSuite cards are placed very close together...

Страница 122: ...obtain a warning message if your genlock source s video standard isn t the same as that of your system 1 Run the DigiSuite Configuration program 2 In the General dialog box the video standard that you...

Страница 123: ...to ensure smooth playback without dropped frames For more information see Creating Realtime Effects in your DigiSuite MAX User Guide Possible cause 2 MAX effects too close Your realtime MAX effects ar...

Страница 124: ...sync signal make sure the cable is properly connected and terminated only once 2 Select the External VTR Quality setting in the General dialog box of the DigiSuite Configuration program only if you re...

Страница 125: ...hen there could be something wrong with your DigiSuite LX card Important Refer to your manual for information on certain limitations to switch combinations on your video breakout box Possible cause 2...

Страница 126: ...uite equipped computer system in areas where the temperature is above 86 F 30 C Do not operate it in areas with an ambient temperature above 104 F 40 C Note If the problem persists one or more of your...

Страница 127: ...its Status column If not one or more drivers are not running Solution Check version of Windows 2000 Make sure you re running Windows 2000 with Service Pack 1 Pink or green video when playing back vid...

Страница 128: ...ut card Try removing the card If the problem goes away get updated drivers for the network card or try another network card Possible cause 5 Low quality sync Your sync signal may not be stable or may...

Страница 129: ...s will now apply your new desktop settings When prompted click Yes to keep the new settings then OK to exit the Display Properties dialog box Note You won t be able to change the Colors and Screen are...

Страница 130: ...iguration program As much system information as possible Your computer specs The manufacturer and version number of your computer s BIOS Windows 2000 version Operating environment Peripherals especial...

Страница 131: ...Appendix A DigiSuite LX MAX Specifications This appendix provides hardware specifications for DigiSuite LX MAX and its associated optional digital module...

Страница 132: ...NTSC PAL Analog video input signals 5 V 12 V 12 V Current 5 6 A 720 mA 190 mA 5 V 12 V Current 523 mA 366 mA Signal Type Quantity Voltage Impedance Composite Video 2 1 0 Vp p 75 Y C Video Luminance s...

Страница 133: ...AL 700 mV at 100 Color Bar NTSC 700 mV at 75 Color Bar 75 75 75 75 Program Out Composite Video Y C Video Luminance signal Chrominance signal Component Video Y B Y R Y 1 1 1 1 0 Vp p 1 0 Vp p PAL 700 m...

Страница 134: ...nput impedance 10 k Input level 0 VU 10 dBV Output load impedance 600 min Output impedance 50 short circuit protected Output level 10 dBV maximum 8 dBV Digital input output AES EBU signal 110 balanced...

Страница 135: ...26 263 032 Optional digital module Digital video input output AMPHENOL 717TWB9W4P4R Digital audio input output HD 15 male connector Movie 2 bus CON 1 BERG 74192 090 Movie 2 bus CON 2 BERG 74192 070 Di...

Страница 136: ...al dimensions 12 135 long 4 2 high 0 71 wide Connector types Movie 2 bus CON 1 BERG 74192 090 IEEE 1394 Two 6 pin 400 Mbps ports Matrox MAX environmental specifications Ambient operating temperature 0...

Страница 137: ...Appendix B DigiSuite Glossary This glossary defines many of the terms used in the DigiSuite documentation...

Страница 138: ...ber CG rolling and crawling titles See also multi layer compositing AGP slot Connection slot to a type of expansion bus found in most current computers The AGP slot is used to house the display card a...

Страница 139: ...or black Blue Book standard See DV blur effect A Matrox effect that uses various levels of intensity to blur an image burnt in time code Time code that s superimposed onto each frame of video generall...

Страница 140: ...D D 9 Originally known as Digital S A professional variant of the DV format developed by JVC that uses a data rate of 50 Mb sec 5 96 MB sec which is double the data rate of most other DV formats Video...

Страница 141: ...4 2 2 for both NTSC and PAL sources to give enhanced chroma resolution It uses the same type of tape as DVCPRO DVD Digital Versatile Disk or Digital Video Disk A type of disk that can hold from 4 7 g...

Страница 142: ...an external device to execute a particular command such as to start or stop playback of a video effect H hard key A key effect in which areas of the keyed image are either completely transparent or c...

Страница 143: ...ection slot to a type of computer expansion bus found in most computers It s larger in size than the PCI slots found on most current computers and provides connections to the slower ISA bus A variatio...

Страница 144: ...fer to the assembled component which consists of a printed circuit board backplane with attached connectors MP ML Main Profile Main Level An MPEG 2 video compression profile that supports 4 2 0 lumina...

Страница 145: ...card guides PCI slot Connection slot to a type of expansion bus found in most current computers It is smaller in size than older ISA slots and provides connections to the high speed PCI host bus P fra...

Страница 146: ...l Digital Interface A communications standard for broadcast digital equipment in which data is transmitted and received one bit at a time over a signal line self key A key effect in which the key sour...

Страница 147: ...f only one color This is useful for simulating old time sepia images transform settings Settings that let you change the position size and rotation of a clip in the Matrox realtime plug in Transform s...

Страница 148: ...uter graphics for creating models with height width and depth and for moving models in 3D space Y Y C video A component video signal in which the luminance Y and chrominance C information are separate...

Страница 149: ...Appendix C DigiSuite Customer Support This appendix explains how you can obtain customer support to get the most from your DigiSuite system...

Страница 150: ...s who want to share their experiences and learn more about DigiSuite Keep up to date with our web site In addition to registering your DigiSuite product our web site offers you up to the minute inform...

Страница 151: ...Appendix D Matrox Around the World This appendix provides contact information for Matrox sales offices around the world...

Страница 152: ...eo info emea matrox com France Matrox France SARL 2 rue de la Couture Silic 225 94528 Rungis Cedex tel 33 0 1 45 60 62 08 fax 33 0 1 45 60 88 65 Email infovideo matrox com Germany Matrox Electronic Sy...

Страница 153: ...89 Audio input pairs adjusting default gain 90 selecting default 90 Audio output pairs adjusting default gain 91 selecting default 91 Automatic Gain Control 82 B Breakout boxes audio choosing your co...

Страница 154: ...rogram 75 A V drive performance test 92 Always Restore Default Settings option 77 configuring audio settings 89 configuring video settings 81 configuring VTR settings 98 Default button 76 displaying c...

Страница 155: ...urce H H Phase control 85 86 Heat buildup problems 22 monitoring card operating temperature 23 Hot plugging 48 Hue control 81 I Input Pair 1 adjusting default gain 90 selecting default 90 Input Pair 2...

Страница 156: ...i RS 422 device control configuring 98 S Saving configuration settings 76 SC Phase control 86 SC H Phase Analog control 87 SCSI drives formatting 94 See also A V drives SDI Key Output Mode 83 SDI modu...

Страница 157: ...ils software 67 Upgrading to DigiSuite MAX 8 Use Automatic Gain Control option 82 Use Device Cue option 102 V V Phase control 87 Ventilation 22 monitoring card operating temperature 23 Video Clipboard...

Страница 158: ...146 Index Your notes...

Страница 159: ...the user may be required to take adequate measures To meet EC requirements shielded cables must be used to connect the monitor and other peripherals to the card These products have been tested in a t...

Страница 160: ...www matrox com video...

Отзывы: