37
DigiSuite LX MAX DigiConnect/Audio breakout box
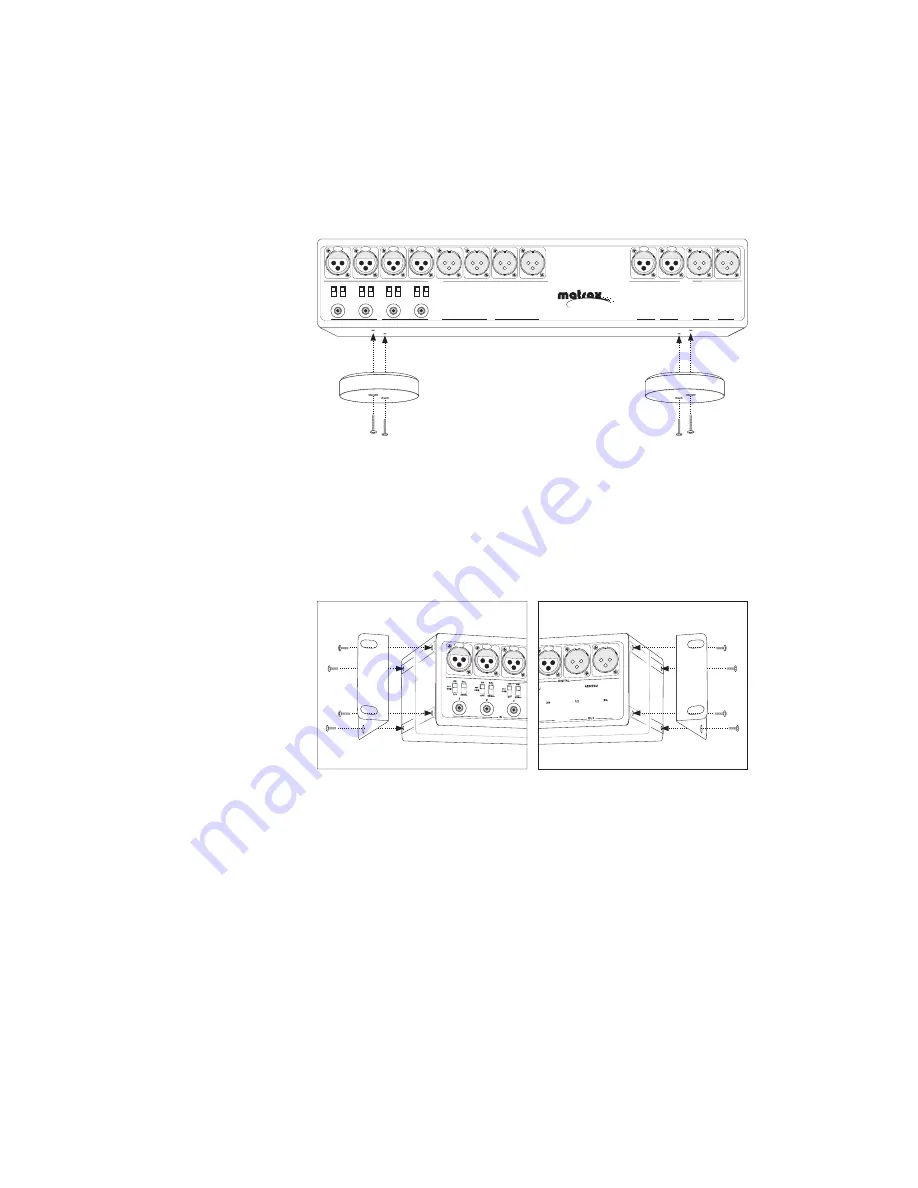
Attaching the desktop pedestals
1
Unpack the two desktop pedestals and their four long mounting
screws.
2
Line up each pedestal with its respective screw holes on the bottom of
the breakout box.
3
Using a hand screwdriver only (
no power screwdrivers
), carefully
tighten each screw until snug.
Do not overtighten
!
Attaching the rackmount brackets
1
Unpack the two rackmount brackets and their eight short mounting
screws.
Do not use the long screws!
2
Line up each bracket with its respective screw holes on the side of the
breakout box.
3
Using a hand screwdriver only (
no power screwdrivers
), carefully
tighten each screw until snug.
Do not overtighten
!
DIGITAL
1
2
3
4
600
OHM
600
OHM
600
OHM
600
OHM
ON
BAL
OFF
UNBAL
ON
BAL
OFF
UNBAL
ON
BAL
OFF
UNBAL
1/2
3/4
AES/EBU
1/2
3/4
AES/EBU
IN
IN
OUT
OUT
ON
BAL
OFF
UNBAL
ANALOG
1
2
3
4
Di gi tal Vi deo Sol uti ons
Right rackmount bracket
Left rackmount bracket
Содержание DigiSuite LX MAX
Страница 1: ...10767 101 0700 Installation Manual November 5 2001 DigiSuite LX MAX...
Страница 4: ......
Страница 12: ...x Contents Your notes...
Страница 24: ...12 Chapter 2 Preparing Your DigiSuite System for Upgrading to DigiSuite LX MAX Your notes...
Страница 30: ...18 Chapter 3 Preparing Your System for a New Installation Your notes...
Страница 70: ...58 Chapter 5 Connecting Your External Devices Your notes...
Страница 80: ...68 Chapter 6 Installing the DigiSuite LX MAX Software Your notes...
Страница 116: ...104 Chapter 7 Configuring Your DigiSuite LX MAX Your notes...
Страница 137: ...Appendix B DigiSuite Glossary This glossary defines many of the terms used in the DigiSuite documentation...
Страница 151: ...Appendix D Matrox Around the World This appendix provides contact information for Matrox sales offices around the world...
Страница 158: ...146 Index Your notes...
Страница 160: ...www matrox com video...


