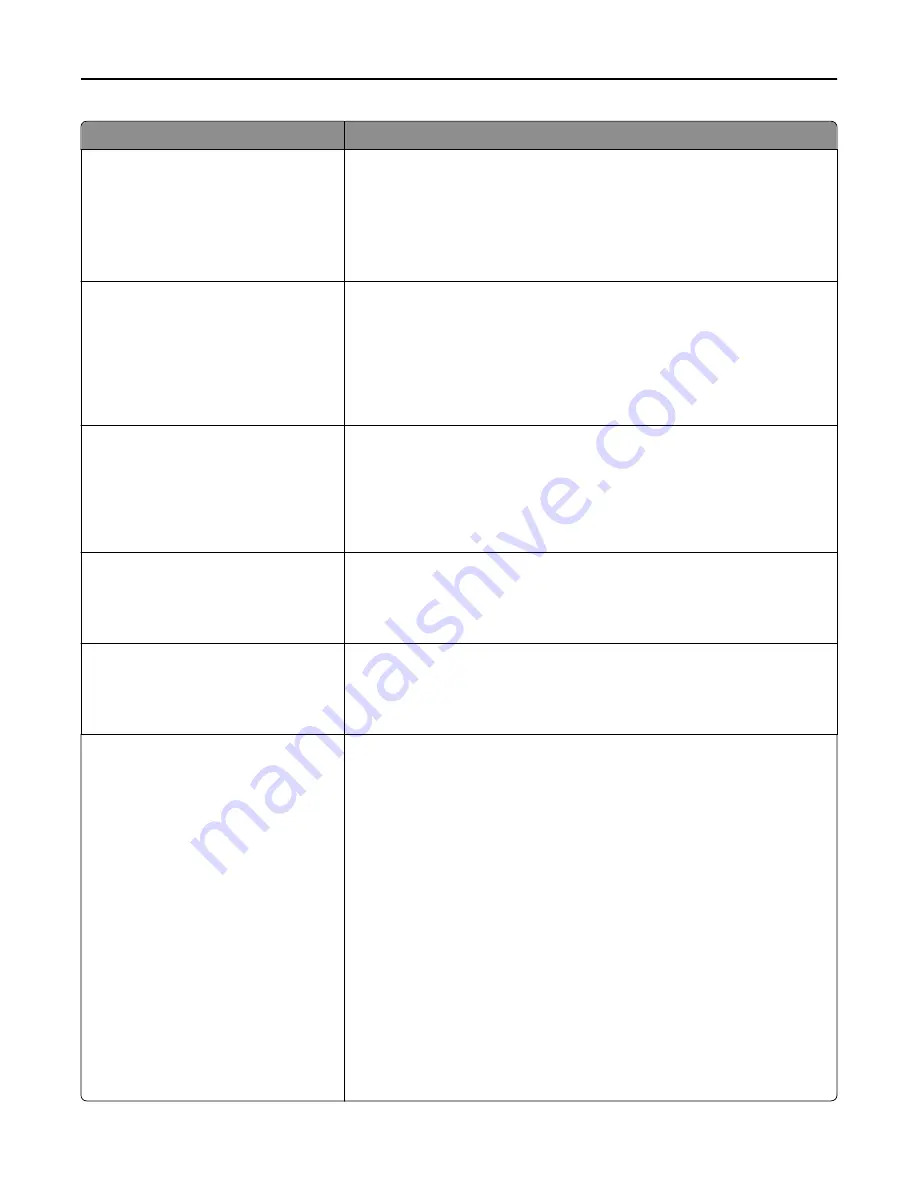
Menu item
Description
PCL Emulation Settings
Orientation
Portrait
Landscape
Specifies the orientation of text and graphics on a page
Notes:
•
Portrait is the factory default setting.
•
Portrait prints text and graphics parallel to the short edge of the page.
•
Landscape prints text and graphics parallel to the long edge of the page.
PCL Emulation Settings
Lines per Page
1–255
Specifies the number of lines that print on each page
Notes:
•
60 is the US factory default setting. 64 is the international default setting.
•
The printer sets the amount of space between each line based on the
Lines per Page, Paper Size, and Orientation settings. Select the desired
Paper Size and Orientation before setting Lines per Page.
PCL Emulation Settings
A4 Width
198 mm
203 mm
Sets the printer to print on A4
‑
size paper
Notes:
•
198 mm is the factory default setting.
•
The 203
‑
mm setting sets the width of the page to allow the printing of
eighty 10
‑
pitch characters.
PCL Emulation Settings
Auto CR after LF
Off
On
Specifies whether the printer automatically performs a carriage return (CR) after
a line feed (LF) control command
Note:
Off is the factory default setting.
PCL Emulation Settings
Auto LF after CR
Off
On
Specifies whether the printer automatically performs a line feed (LF) after a
carriage return (CR) control command
Note:
Off is the factory default setting.
Tray Renumber
Assign MP Feeder
Off
None
0–199
Assign Tray [x]
Off
None
0–199
Assign Manual Paper
Off
None
0–199
Assign Manual Env
Off
None
0–199
Configures the printer to work with printer software or programs that use
different source assignments for trays, drawers, and feeders
Notes:
•
Off is the factory default setting.
•
None ignores the Select Paper Feed command. This selection is displayed
only when it is selected by the PCL 5e interpreter.
•
0–199 allows a custom setting to be assigned.
Understanding printer menus
231
Содержание X950de 4
Страница 28: ...Touch To Reset Reset values on the screen Understanding the home screen 28 ...
Страница 242: ...4 Locate the printhead wipers Maintaining the printer 242 ...
Страница 244: ...7 Slide the release lever to the right to lock the cover 8 Close the front door Maintaining the printer 244 ...
Страница 245: ...Emptying the hole punch box 1 Open door G 2 Pull out the hole punch box Maintaining the printer 245 ...
Страница 254: ...11 Close the cover 12 Rotate the release lever clockwise to lock the cover Maintaining the printer 254 ...
Страница 259: ...7 Lower the cover 8 Slide out the printhead wipers 3x 3x 3x Maintaining the printer 259 ...
Страница 260: ...9 Slide the printhead wipers back into place 10 Close the cover Maintaining the printer 260 ...
Страница 266: ...3 Hold the tabs on both sides of the staple cartridge Maintaining the printer 266 ...
Страница 267: ...4 Rotate the booklet staple cartridge at an angle Maintaining the printer 267 ...
Страница 285: ...2 Open the top cover 1 2 2 3 Firmly grasp the jammed paper on each side and then gently pull it out Clearing jams 285 ...


