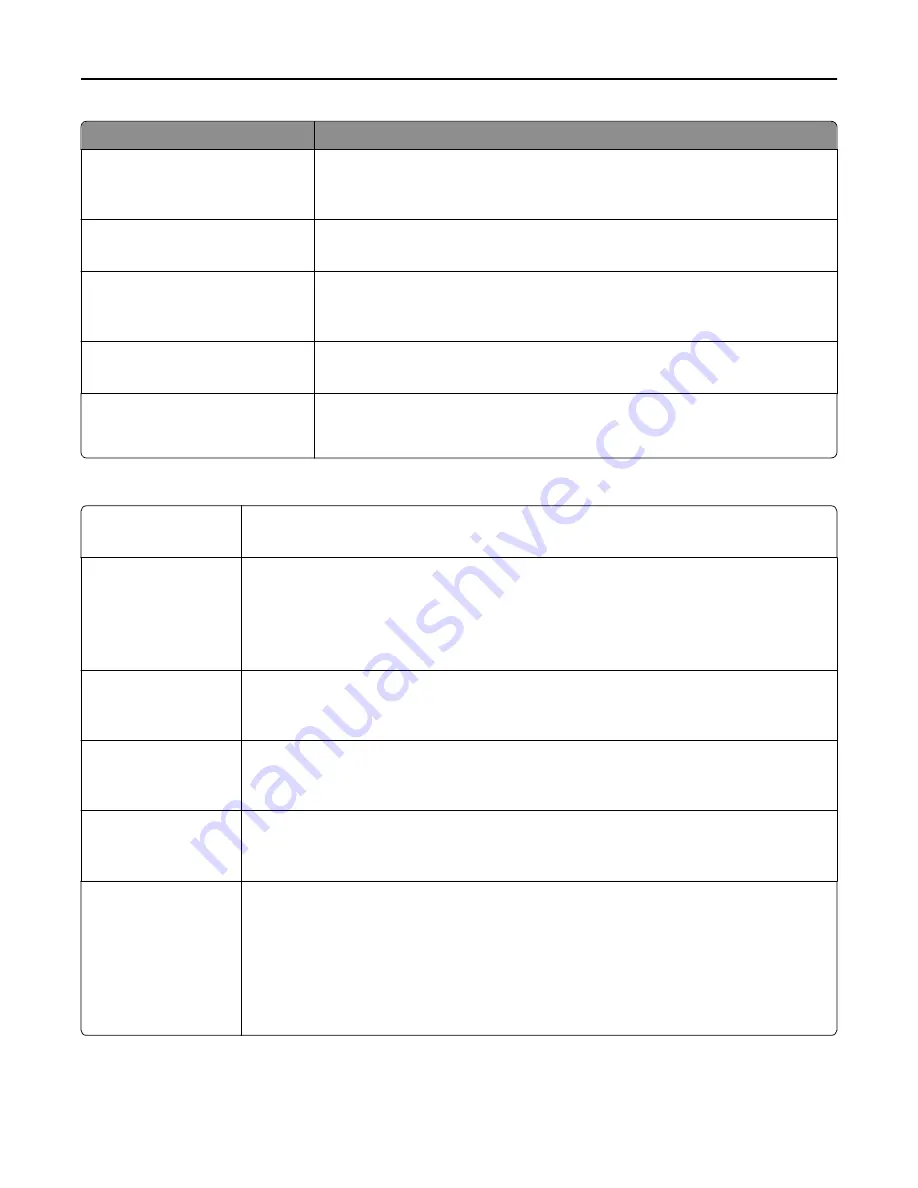
Menu item
Description
Negative Image
Off
On
Creates a negative image of the original document
Note:
Off is the factory default setting.
Shadow Detail
‑
4 to 4
Adjusts the amount of shadow detail visible on a scanned image
Note:
0 is the factory default setting.
Scan edge to edge
Off
On
Specifies whether the original document is scanned edge-to-edge
Note:
Off is the factory default setting.
Sharpness
1–5
Adjusts the amount of sharpness on a scanned image
Note:
3 is the factory default setting.
Temperature
‑
4 to 4
Enables the user to specify “warm” or “cool” outputs. "Cool” values generate a bluer
output than the default while “warm” values generate a redder output than the
default.
Print Settings
Copies
1–999
Specifies a default number of copies for each print job
Note:
1 is the factory default setting.
Paper Source
Tray [x]
MP Feeder
Manual Paper
Manual Envelope
Sets a default paper source for all print jobs
Note:
Tray 1 is the factory default setting.
Color
Color
Black Only
Specifies whether copies are printed in color or black
‑
and
‑
white
Note:
Color is the factory default setting.
Collate
On (1,2,1,2,1,2)
Off (1,1,1,2,2,2)
Stacks the pages of a print job in sequence when printing multiple copies
Note:
On is the factory default setting.
Sides (Duplex)
1 sided
2 sided
Specifies whether prints are on one side or on both sides of the page
Note:
1 sided is the factory default setting.
Staple
Off
Auto
Back
Dual
Dual Double
Front
Specifies whether prints are stapled
Notes:
•
Off is the factory default setting.
•
This menu appears only when a stapler is installed.
Understanding printer menus
217
Содержание X950de 4
Страница 28: ...Touch To Reset Reset values on the screen Understanding the home screen 28 ...
Страница 242: ...4 Locate the printhead wipers Maintaining the printer 242 ...
Страница 244: ...7 Slide the release lever to the right to lock the cover 8 Close the front door Maintaining the printer 244 ...
Страница 245: ...Emptying the hole punch box 1 Open door G 2 Pull out the hole punch box Maintaining the printer 245 ...
Страница 254: ...11 Close the cover 12 Rotate the release lever clockwise to lock the cover Maintaining the printer 254 ...
Страница 259: ...7 Lower the cover 8 Slide out the printhead wipers 3x 3x 3x Maintaining the printer 259 ...
Страница 260: ...9 Slide the printhead wipers back into place 10 Close the cover Maintaining the printer 260 ...
Страница 266: ...3 Hold the tabs on both sides of the staple cartridge Maintaining the printer 266 ...
Страница 267: ...4 Rotate the booklet staple cartridge at an angle Maintaining the printer 267 ...
Страница 285: ...2 Open the top cover 1 2 2 3 Firmly grasp the jammed paper on each side and then gently pull it out Clearing jams 285 ...


