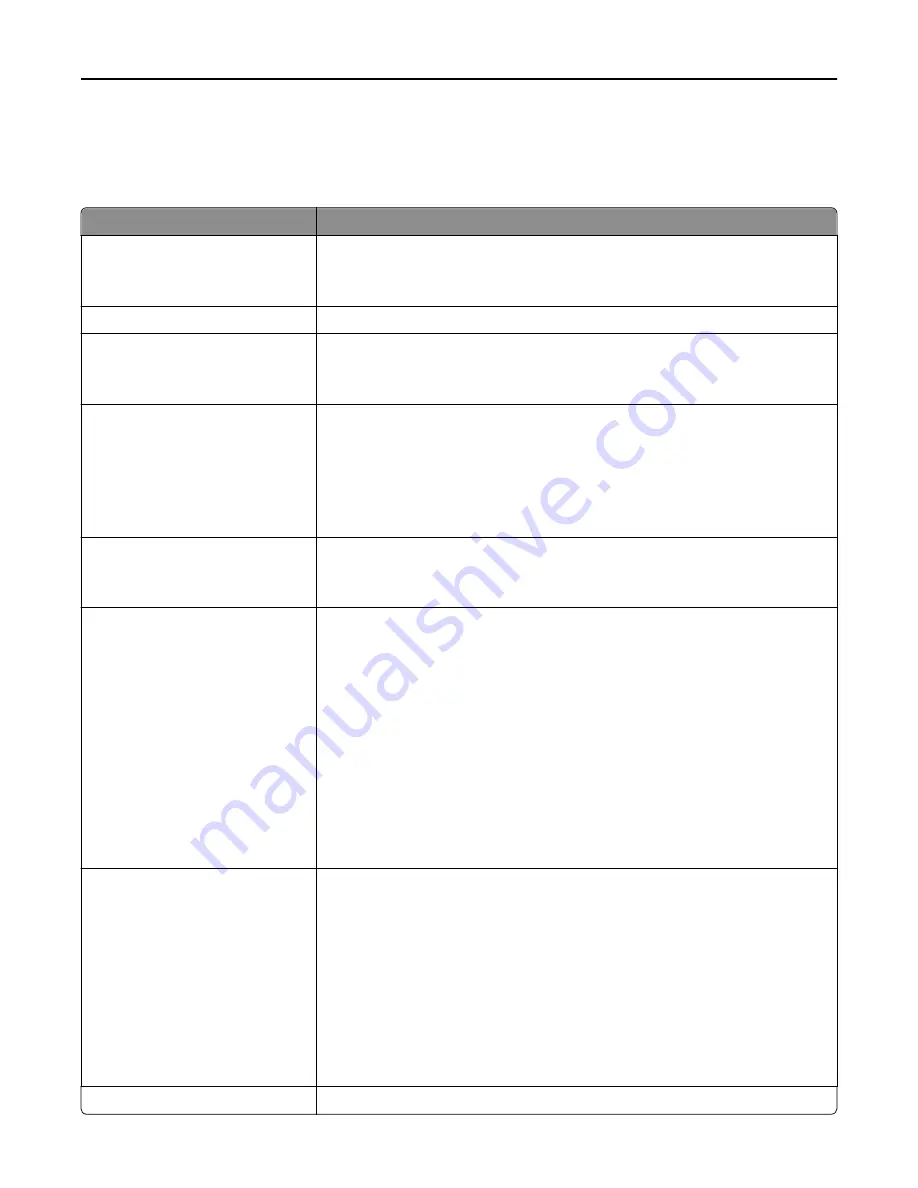
Job Accounting menu
Note:
This menu item appears only if a formatted, non-defective printer hard disk is installed. The printer hard disk
cannot be read/write
‑
or write
‑
protected.
Menu item
Description
Job Accounting Log
Off
On
Determines if the printer creates a log of the print jobs it receives
Note:
Off is the factory default setting.
Job Accounting Utilities
Lets you print and delete log files or export them to a flash drive
Accounting Log Frequency
Monthly
Weekly
Determines how often a log file is created
Note:
Monthly is the factory default setting.
Log Action at End of Frequency
None
E
‑
mail Current Log
E
‑
mail & Delete Current Log
Post Current Log
Post & Delete Current Log
Determines how the printer responds when the frequency threshold expires
Note:
None is the factory default setting.
Disk Near Full Level
1–99
Off
Specifies the maximum size of the log file before the printer executes the Disk Near
Full Action
Note:
5MB is the factory default setting.
Disk Near Full Action
None
E
‑
mail Current Log
E
‑
mail & Delete Current Log
E
‑
mail & Delete Oldest Log
Post Current Log
Post & Delete Current Log
Post & Delete Oldest Log
Delete Current Log
Delete Oldest Log
Delete All Logs
Delete All But Current
Determines how the printer responds when the printer hard disk is nearly full
Notes:
•
None is the factory default setting.
•
The value defined in Disk Near Full Level determines when this action is
triggered.
Disk Full Action
None
E
‑
mail & Delete Current Log
E
‑
mail & Delete Oldest Log
Post & Delete Current Log
Post & Delete Oldest Log
Delete Current Log
Delete Oldest Log
Delete All Logs
Delete All But Current
Determines how the printer responds when disk usage reaches the maximum limit
(100MB)
Note:
None is the factory default setting.
URL to Post Logs
Determines where the printer posts job accounting logs
Understanding printer menus
221
Содержание X950de 4
Страница 28: ...Touch To Reset Reset values on the screen Understanding the home screen 28 ...
Страница 242: ...4 Locate the printhead wipers Maintaining the printer 242 ...
Страница 244: ...7 Slide the release lever to the right to lock the cover 8 Close the front door Maintaining the printer 244 ...
Страница 245: ...Emptying the hole punch box 1 Open door G 2 Pull out the hole punch box Maintaining the printer 245 ...
Страница 254: ...11 Close the cover 12 Rotate the release lever clockwise to lock the cover Maintaining the printer 254 ...
Страница 259: ...7 Lower the cover 8 Slide out the printhead wipers 3x 3x 3x Maintaining the printer 259 ...
Страница 260: ...9 Slide the printhead wipers back into place 10 Close the cover Maintaining the printer 260 ...
Страница 266: ...3 Hold the tabs on both sides of the staple cartridge Maintaining the printer 266 ...
Страница 267: ...4 Rotate the booklet staple cartridge at an angle Maintaining the printer 267 ...
Страница 285: ...2 Open the top cover 1 2 2 3 Firmly grasp the jammed paper on each side and then gently pull it out Clearing jams 285 ...


