GE
V
OLUSON
i / V
OLUSON
e
D
IRECTION
KTI106052, R
EVISION
10
S
ERVICE
M
ANUAL
10-8
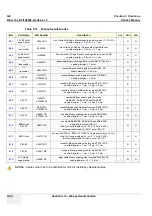
Section 10-5 - System Maintenance
10-5-3
Physical Inspection
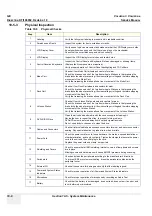
Table 10-8 Physical Checks
Step
Item
Description
1
Labeling
Verify that all system labeling is present and in readable condition.
2
Scratches and Dents
Inspect the system for dents, scratches or cracks.
3
LCD Display Cover
Verify ease of
up
/
down
movement and make sure that the LCD Display cover holds
its set position when open and that there is no play on the mechanism.
Check that the cover latches
open
and
lock
correctly.
4
LCD Display
Inspect the LCD Display for scratches and raster burns.
5
Control Panel and Keyboard
Inspect the Control Panel and Keyboard. Note any damaged or missing items.
(Replace faulty components, as required).
Verify proper operation of Control Panel backlighting and TGC sliders.
6
Modo Cart
Check all four Modo Cart wheels and castors for wear.
Check the brakes on each of the two front wheels. Make sure that pressing the
brake locks the wheel, preventing it from swivelling or rolling and therefore stopping
movement of the Modo Cart.
Verify that releasing the brakes allows free movement of the Modo Cart.
7
Dock Cart
Check all four Dock Cart wheels and castors for wear.
Check the brakes on each of the two front wheels. Make sure that pressing the
brake locks the wheel, preventing it from swivelling or rolling and therefore stopping
movement of the Dock Cart.
Verify that releasing the brakes allows free movement of the Dock Cart.
8
Voluson Station
Check all four Voluson Station wheels and castors for wear.
Check the brakes on each of the two front wheels. Make sure that pressing the
brake locks the wheel, preventing it from swivelling or rolling and therefore stopping
movement of the Voluson Station.
Verify that releasing the brakes allows free movement of the Voluson Station.
9
DVD+R/RW Drive
Clean the drive head and media with the vendor-supplied cleaning kit.
Advise the user to repeat this often, to prevent future problems.
DVDs/CDs must be stored away from dust and cigarette smoke.
Do not use alcohol or benzene to clean the drive.
10
Cables and Connectors
Check all internal cable harnesses and connectors for wear, and secure connector
seating. Pay special attention to probe strain or bend reliefs.
11
Power Cord
Check the power cord for cuts, loose hardware, tire marks, exposed insulation or
other deterioration, and verify continuity. Tighten the clamps that secure the power
cord to the unit and the outlet plug to the cord.
Replace the power cord and clamp, as required.
12
Shielding and Covers
Check to ensure that all EMI shielding, internal covers, air flow panels and screws
are in place.
Missing covers and hardware could cause EMI/RFI problems during scanning.
13
Peripherals
Check and clean the peripherals according to the manufacturer’s directions.
To prevent EMI or system overheating, dress the peripheral cables inside the
peripheral cover.
14
External I/O
Check all connectors for damage and verify that the labeling is good.
15
Power and System Status
Indicators
Check for proper operation of all Power and System Status Indicators.
16
Microphone
Check for proper operation of microphone by recording an Audio Test.
17
Battery
Check that the battery is not damaged, does not leak, does not emit an odor, and
is not deformed or discolored.
Содержание H48651KR
Страница 2: ......
Страница 11: ...GE VOLUSON i VOLUSON e DIRECTION KTI106052 REVISION 10 SERVICE MANUAL ix ZH CN KO ...
Страница 44: ...GE VOLUSON i VOLUSON e DIRECTION KTI106052 REVISION 10 SERVICE MANUAL xlii Table of Contents ...
Страница 514: ...GE VOLUSON i VOLUSON e DIRECTION KTI106052 REVISION 10 SERVICE MANUAL IV Index ...
Страница 515: ......


