background image


63


Practical Use


Practical Use of the PR-1000HD


7


You can make more detailed settings for projects in Presenter’s Edit mode.

In this case, you can make the following settings.


1.


Editing Palettes 


 “Editing Palettes” (p. 63)


You can alter names, rearrange palette sequences, delete clips in palettes, and perform other 
editing functions.


2.


Making the Palette Settings 


 “” (p. 65)


You can make the Loop mode settings for all of the clips in a palette simultaneously.


3.


Editing Clips 


 “Editing Clips” (p. 66)


You can edit clip names, rearrange the sequence of clips, and copy and delete clips.


4.


Making the Clip Settings 


 “Making the Clip Settings” (p. 68)


Here you can set each clip’s Loop Mode settings, In point and Out point, volume levels, and more.


5.


Changing the Material Settings 


 “Changing Material Settings” (p. 74)


You can edit material names as well as copy and delete materials.


6.


Setting Automatic Playback 


 “Setting Automatic Playback” (p. 75)


You can have specified clips play back automatically when projects are loaded.


Editing Palettes


Here you can change palette names, rearrange palette sequences, delete clips in palettes, and perform 
other editing functions.

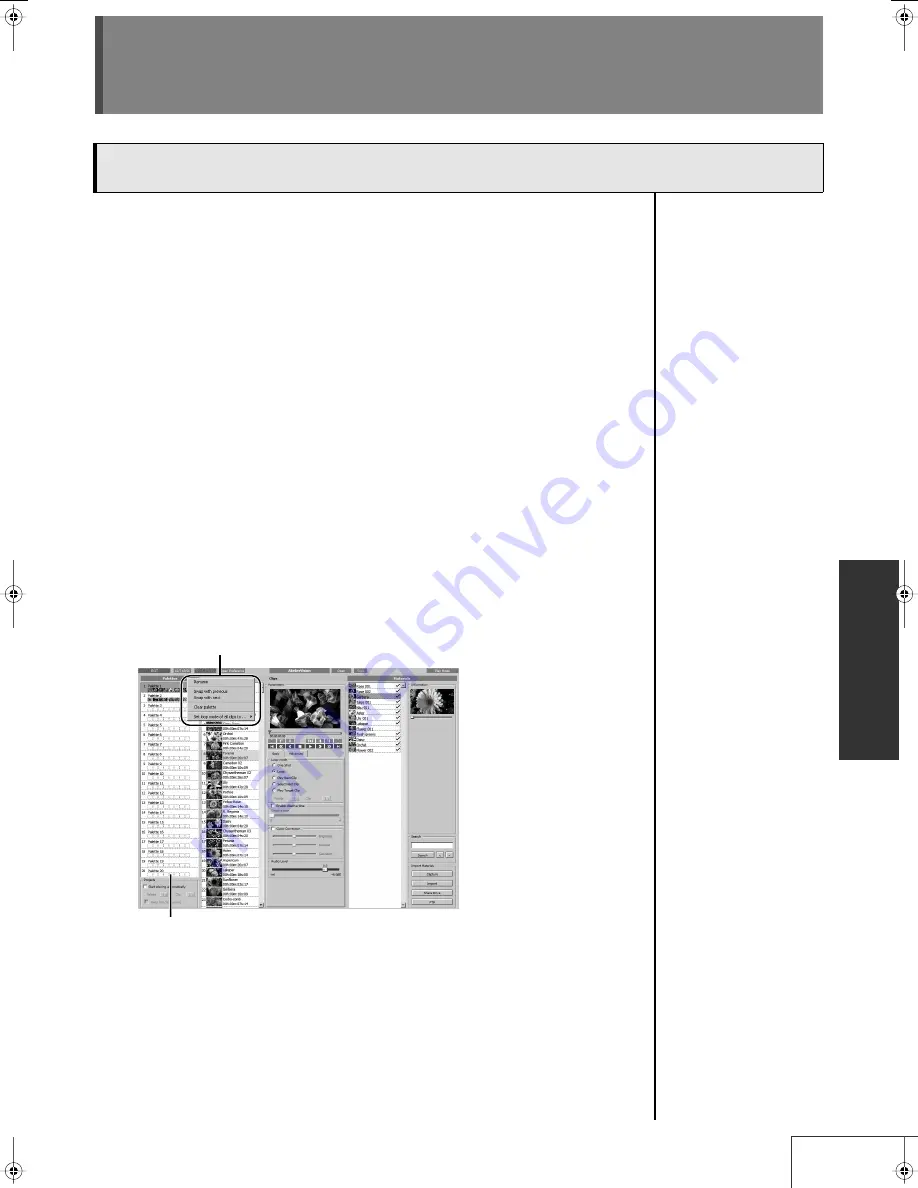
To edit a palette, right-click on the palette and work from the context menu that is displayed.


fig.edit.palette01.fig.edit.palette01.eps


Making the Settings for the Project

Context menu

Palettes list

PR-1000HD_e.book 63 ページ 2008年1月21日 月曜日 午後8時35分

Содержание PR-1000HD

Страница 1: ...TANT NOTES p 6 These sections provide important information concerning the proper operation of the unit Additionally in order to feel assured that you have gained a good grasp of every feature provided by your new unit Owner s Manual should be read in its entirety The manual should be saved and kept on hand as a convenient reference 201a 220 Copyright 2007 ROLAND CORPORATION All rights reserved No...

Страница 2: ...ype plug has two blades and a third grounding prong The wide blade or the third prong are provided for your safety If the provided plug does not fit into your outlet consult an electrician for replacement of the obsolete outlet WARNING IMPORTANT As the colours of the wires in the mains lead of this apparatus may not correspond with the coloured markings identifying the terminals in your plug proce...

Страница 3: ...al Use of the PR 1000HD 63 Making the Settings for the Project 63 Editing Palettes 63 Making the Palette Settings 65 Editing Clips 66 Making the Clip Settings 68 Changing Material Settings 74 Setting Automatic Playback 75 Importing Materials 76 Capturing Video from a Video Deck or Other Device 76 Importing Materials from Another Project 77 Importing Materials Created with a Computer 78 Organizing ...

Страница 4: ...d shock hazards 010 This unit either alone or in combination with an amplifier and headphones or speakers may be capable of producing sound levels that could cause permanent hearing loss Do not operate for a long period of time at a high volume level or at a level that is uncomfortable If you experience any hearing loss or ringing in the ears you should immediately stop using the unit and consult ...

Страница 5: ... contains water e g flower vases on this unit Also avoid the use of insecticides perfumes alcohol nail polish spray cans etc near the unit Swiftly wipe away any liquid that spills on the unit using a dry soft cloth 101a The unit should be located so that its location or position does not interfere with its proper ventilation 102b Always grasp only the plug on the power supply cord when plugging in...

Страница 6: ...ine thinners alcohol or solvents of any kind to avoid the possibility of discoloration and or deformation 401a For everyday cleaning wipe the unit with a soft dry cloth or one that has been slightly dampened with water To remove stubborn dirt use a cloth impregnated with a mild non abrasive detergent After wards be sure to wipe the unit thoroughly with a soft dry cloth Repairs and Data 452 Please ...

Страница 7: ... Do not leave the unit in any environment subject to temperature extremes for example in a closed automobile in summer or outdoors during winter Do not use the unit in conditions of high temperature and humidity or in any location subject to rapid temper ature changes Do not unplug the power cord or switch off any circuit breakers in the circuit to which the unit is connected while the power is tu...

Страница 8: ...eement only gives you some rights to use the software Roland SG Corporation and Microsoft reserve all other rights Unless applicable law gives you more rights despite this limitation you may use the software only as expressly permitted in this agreement In doing so you must comply with any technical limitations in the software that allow you to use it only in certain ways For more information see ...

Страница 9: ...o any Windows Update that you install or attempt to install on your device 5 Product Support Contact Roland SG Corporation for support options Refer to the support number provided with the device 6 Backup Copy You may make one backup copy of the software You may use it only to reinstall the software on the device 7 Proof Of License If you acquired the software on the device or on a disc or other m...

Страница 10: ...s may not be separated for use on more than one computer Rental You may not rent lease or sublicense the SOFTWARE Software Transfer You may permanently transfer all of your rights under this EULA provided you retain no copies you transfer all of the SOFTWARE including all component parts the media and printed materials any upgrades this EULA and if applicable the certificate of Authenticity along ...

Страница 11: ...n of multiple PR 1000HDs PR 80s PR 50s and DV 7PRs work with multichannel audio sources with the AR Roland AR Series control and more Connect Up to Two Removable Hard Disk Drive Units You can use removable hard disks drive units HDD series to transport or back up video data Since up to two removable hard disk drives can be connected it s easy and convenient to copy data Import Video Material Creat...

Страница 12: ...er enhanced version of the system e g includes newer sounds so what you actually see in the display may not always match what appears in the manual When First Operating the PR 1000HD If operating the PR 1000HD for the first time please read Basic Workflow p 29 This section provides a general overview of operations using the PR 1000HD from turning on the power to playing back and loading prepared d...

Страница 13: ...ing cannot occur because warm air is taken in When the back of the rack cannot be opened please install an exhaust fan or vent in the upper rear portion of the rack where warm air tends to collect When mounting in a moveable case portable rack remove the front or back cover of the case so the front or back of the PR 1000HD is not blocked Avoid mounting in rigid mount type racks Please use shock pr...

Страница 14: ...vers the DVD CD ROM drive i and the removable hard disk drive bays j and k To open the panel use your finger to pull the indentation located in the upper right of the cover panel i DVD CD ROM Drive and Eject Button Used for loading data from DVD R DVD RW CD R CD RW disks containing material created using computers and from future upgrade DVD CD ROMs Press the eject button to open the disk tray For...

Страница 15: ...a separately available USB mouse USB keyboard USB memory card reader e g DL CR2 or USB storage f i LINK Connector Here you can connect a video camera or similar device via an IEEE 1394 cable and capture a HDV stream For a detailed explanation of Capture refer to Capturing Video from a Video Deck or Other Device p 76 g RGB OUTPUT Connector Here you can connect a video projector plasma display etc f...

Страница 16: ...0HD Power cord Removable hard disk drive bay keys two DVI VGA conversion adaptors two Rubber feet four If you wish to place the PR 1000HD on a desk for use attach the rubber feet to the four corners of the bottom panel If you intend to place the PR 1000HD on a table for use attach the rubber feet to the four corners of the bottom surface Owner s manual Check the included items ...

Страница 17: ...rd from being accidentally disconnected To secure the power cord proceed as follows 1 Connect the power cord to the AC inlet on the PR 1000HD s rear panel Lift the power cord clamp up when doing so 2 Lower the power cord clamp to secure the plug of the power cord Using the AC Cord Clamp If you don t want to use the power cord clamp lower it until you hear it click ...

Страница 18: ...t malfunction and or damage to speakers or other devices always turn down the volume and turn off the power on all devices before making any connections Connecting a removable hard disk drive unit Connect removable hard disk drive units using the procedure described in About the Removable Hard Disk Drive Units p 121 Setting Up and Connecting Equipment You can select either digital DVI D or analog ...

Страница 19: ...a cable that has the appropriate type of connectors fig connection DV eps Electromagnetic interference produced by using the PR 1000HD near a television or radio may cause unevenness in the TV screen picture color or produce noise in the radio If connecting to a computer s IEEE1394 connector also called i LINK or FireWire be sure to use a DV cable that is compatible with your computer Other device...

Страница 20: ... network time server to adjust the PR 1000HD s timing Whenever making these connections always make sure that the power for all devices is turned off Connecting equipment with the power turned on may cause malfunctioning and other problems fig connection LAN eps When connecting the PR 1000HD to a computer make connections via a network hub Rear panel Router hub etc LAN Connector LAN cable LAN Conn...

Страница 21: ...rts and other stage events fig stage eps Exhibits and Other Presentations You can insert still images video narration and other material as clips with no need to make changes to the material and with full freedom to play the clips at whatever point desired fig presentation eps Examples of Using and Connecting the PR 1000HD Video camera etc PR 1000HD V 440HD Projector MIDI Keybord Power amplifier P...

Страница 22: ...liver video for extended durations of longer than ten hours such as for a museum or exhibition The scheduler can be used to automate system operation fig equipment eps Speaker Speaker Speaker Power amplifier Touch panel display AR 3000R AR 3000R PR 1000HD Power amplifier Power amplifier Projector ...

Страница 23: ...fig standalone eps Using the PR 1000HD with RS 232C Connecting with the RS 232C cable allows you to control the PR 1000HD with a computer or other external control device For more detailed information refer to Using the RS 232C Connector p 95 fig with pc eps PR 1000HD Mouse keybord Display for operation Power amplifier Speaker Projector Power amplifier Speaker PC RS 232C PR 1000HD Projector ...

Страница 24: ...ion to your performances For more detailed information refer to V LINK is a function that makes it easy to exhibit video material during musical performances Connecting a V LINK compatible MIDI device to the PR 1000HD and pressing the V LINK button on the MIDI device provides you with easy control of Presenter p 62 and Using MIDI Devices p 89 fig with um1 eps MIDI Patch Bay MIDI MIDI Mouse Mouse M...

Страница 25: ...onnect a touch panel display using an RS 232C cable and VGA cable and then control the PR 1000HD by directly touching the touch panel display screen For more detailed information about setting up touch panel displays refer to Using a Touch Panel Display p 96 fig with panel eps Mouse Keybord Display for operation MIDI Patchbay MIDI MIDI MIDI MIDI PR 1000HD Speakers Power amplifier AR 3000R Speakers...

Страница 26: ... make settings for starting and stopping playback of clips selecting palettes and clips and setting switch effect times For more details about setting the PR 1000HD to control other Presenters refer to Controlling Another Presenter p 93 fig with DV 7PR eps Mouse Display for operation MIDI Patchbay MIDI MIDI MIDI PR 80 PR 1000HD Projector Projector PR 1000HD Mouse Keybord Mouse Projector ...

Страница 27: ...o performs operations similar to those of a personal computer mouse The following describes the four common options performed by the mouse Mouse Pointer The mouse cursor on the screen moves in sync with the mouse movement in your hand Move the pointer to the desired position on the screen click the left or right mouse button to select a menu then click to perform the function Single Click The mous...

Страница 28: ... below Selector fig selector eps This is what first appears when the PR 1000HD is turned on Various different functions use this as their starting point Presenter fig playmode eps Included here are functions used in playing back and switching video materials How the PR 1000HD is Organized ...

Страница 29: ...er starts up Presenter cannot be started up if no removable hard disk drive unit is inserted If Presenter will not start up even though a removable hard disk drive unit is inserted verify that the unit is inserted correctly as described in About the Removable Hard Disk Drive Units p 121 Presenter features two screens one for Play mode and another for Edit mode Play Mode Play Mode p 38 In this mode...

Страница 30: ...flow 2 Starting Up Presenter Click Presenter in Selector The Presenter Play mode screen appears after a few seconds fig playmode01 eps Play Mode Screen p 38 You can t start up Presenter if no removable hard disk drive unit is connected to the PR 1000HD ...

Страница 31: ...ble HDD then click and then click Open In Operation flow we will use a project named as an example fig play project01 eps Projects are the most basic unit managed with the PR 1000HD Clips are played back and materials are saved in project units What is a Project p 50 Creating Projects p 51 Opening Projects p 52 Click Open Select a disk drive Select a project ...

Страница 32: ...e to Play Back Clips p 53 Using the Keyboard to Play Back Clips p 54 Viewing the Video Output Monitor p 54 Switching the Palette p 55 Setting the Switching Effects p 56 Turning Loop Playback On and Off p 58 Setting the Palette s Loop Mode p 65 Making Clip Loop Mode Settings p 72 Setting Projects to Play Automatically When Loaded p 75 Setting the Scheduler p 87 When you play back an HDV clip the fo...

Страница 33: ... just by dragging them with the mouse The materials list shows the materials that are saved to projects The content edited in this screen is carried over in Play mode with no further changes necessary Just click Play Mode at the upper right to immediately play back the edited data Edit Mode Screen p 41 Assigning Materials to Palettes p 59 Making the Palette Settings p 65 Editing Palettes p 63 Maki...

Страница 34: ...apture window for capturing video appears fig edit capture01 eps The time code count will begin when you start playback on the video deck or other device so press the Start button to capture the material The material can also be automatically divided at the start of recording Click Close button in the Capture window to return to Edit mode Capturing Video form a Video Deck or Other Device p 76 Sele...

Страница 35: ...m another project drive or other source fig edit import01 eps Importing Materials from Another Project p 77 Importing Materials Created with a Computer p 78 If you ve connected two removable hard disks drive units the unit connected to removable hard disk drive bay 1 is shown in the upper position within the Drive list while the unit connected to removable hard disk drive bay 2 appears below it Se...

Страница 36: ...ange of visual effects that are linked to the expressive elements of a music performance With V LINK you can easily control the PR 1000HD with a V LINK compatible MIDI device fig connection Vlink01 fig connection Vlink01 eps For more detailed information on how to use the V LINK function refer to Using V LINK p 62 What is V LINK Projector Projector PR 1000HD MC 909 PR 1000HD MIDI keyboard Remote c...

Страница 37: ... and is not a malfunction fig selector01 fig selector01 eps a Presenter Button This starts up the Presenter The Presenter features two modes Play mode p 38 and Edit mode p 41 b Utility Button This calls up the Utility window p 44 This is used for organizing the projects on the hard disk drives c System Preferences Button This calls up the System Preferences window p 46 These settings affect the PR...

Страница 38: ...if a V LINK connection is present p 62 If this is lit you can click it to forcibly turn off the V LINK connection d Palette List This displays 20 palettes You can switch palettes by clicking here For more details about working with this feature refer to Switching the Palette p 55 e Open Preference Button This is used for setting the MIDI preferences and the Video output adjustment For more detaile...

Страница 39: ...tton This stops playback l Loop Button This turns loop playback of clips on and off Click here to switch the function on or off When this is turned on each clip plays in accordance with its own Loop Mode setting You can have the same clip play repeatedly loop play the subsequent clip or play back another specified clip When this is turned off the clip stops playing at the last frame or at the out ...

Страница 40: ... the three sliders to the standard values The standard settings are shown below Transition Effect Time Slider 0 0 sec Audio Slider 0 dB Playback Speed Slider 100 s Palette Area Displayed here are thumbnails of the clips contained in the palette and their settings Clicking on a thumbnail starts playback of the clip and the video images are displayed in the monitor Also displayed are the clips Loop ...

Страница 41: ...en a V LINK device is connected p 62 You can switch V LINK off by clicking this while it is lit d Open Preference Button This is used for setting the MIDI preferences and the Video output adjustment For more detailed information refer to Using MIDI Devices p 89 amd Adjusting the output image p 97 e Project Name This indicates the name of the current project f Open Button The Open dialog appears ju...

Страница 42: ...e made for clips selected in the Clips list Here you can set each clip s In point and Out point Loop Mode settings volume levels and more For more details about making the clip settings refer to Making the Clip Settings p 68 m Materials List This displays the materials included in the project You can import materials from other projects as well as from video tape decks and other devices You can al...

Страница 43: ...his displays the Capture window Here you can import data from video decks and other devices For more details about these procedures refer to Capturing Video from a Video Deck or Other Device p 76 q Import Button This displays the Import material dialog Here materials are imported from other projects hard disk drives or other such sources For more details about these procedures refer to Importing M...

Страница 44: ...owing operations by right clicking b 1 Duplicate This creates copies of projects on the same drive b 2 Change Name This changes the name of the project b 3 Delete This deletes a project Before deletion occurs you will be asked whether you really want to delete the project If you are sure you want to delete the project hold down the Shift key of the keyboard and click the Delete button On the PR 10...

Страница 45: ... PR 1000HD Names of Things in Screens What They Do Introduction c Project Information This area shows information about the selected project or materials d Done Button This quits Utility and returns you to the Selector window p 28 ...

Страница 46: ...ime server to adjust the time and date automatically c Power On Off This sets the method used to turn on and shut off the PR 1000HD s power For more details about using this function refer to Automatically Starting Up Presenter p 98 d Network This setting is used when the PR 1000HD is connected to a computer network Included here are settings for time servers used in adjusting the PR 1000HD s time...

Страница 47: ...ult button restores the factory settings g Mouse This is used for making the mouse settings Clicking the Default button restores the factory settings h Factory Reset button This returns the system settings to the factory set state You will need to restart the PR 1000HD at this time i Done Button This quits the System Preferences and returns you to the Selector window ...

Страница 48: ...r to all of the peripheral devices connected to the PR 1000HD 3 Lower the volume on all audio equipment amps mixers etc to their minimum level 4 Set the PR 1000HD s rear panel power switch to the position fig front power eps 5 Press the PR 1000HD s front panel POWER switch fig front power fig front power eps This unit is equipped with a protection circuit A brief interval a few seconds after power...

Страница 49: ... button 2 1 Press the PR 1000HD s POWER button fig front power eps 2 2 The message Are you sure you want to shut down appears click the OK button fig poweroff eps After the step above the front panel PWR indicator will go out After this please continue with the following steps to complete the procedure 3 Switch off the power on all peripheral equipment that is connected to the PR 1000HD 4 Set the ...

Страница 50: ...written to tape or burned to CD R or DVD R as MPEG 2 TS files compliant with the HDV specification and imported Using the network function you can also copy materials to the PR 1000HD from computers You can import copy materials from other projects A single project contains twenty palettes You can arrange up to 32 materials in one palette using the imported materials within a project The materials...

Страница 51: ...ghlighted in the Projects list Use the keyboard to enter the project name 5 After entering the name confirm it by pressing the Enter key on the keyboard 6 Click the Open button The created project opens Make sure that you have some extra space in the removable hard disk drives on which you re creating your project If you ve connected two removable hard disk drive units the unit connected to remova...

Страница 52: ... Copy or Delete a Project These operations are performed in the Utility window p 44 For details on the Utility window refer to Organizing Projects p 84 If you ve connected two removable hard disk drive units the unit connected to removable hard disk drive bay 1 is shown in the upper position within the Drives list while the unit connected to removable hard disk drive bay 2 appears below it Open Pr...

Страница 53: ...ayback continues after the shift if you click this while the clip is paused the clip remains paused in the shifted position Playing Back Clips Palette area select the clip Stop button Transport control When you play back an HDV clip the following phenomena will occur on the PR 1000HD There will be no sound for the first few and last few frames of the clip If you loop the clip playback the image wi...

Страница 54: ...an also play back clips using the keyboard The number row on the keyboard 1 2 3 4 corresponds to the first row in the Palette Area the next row Q W E R to the Palette Area s second row the next row A S D F to the Palette Area s third row and the next row Z X C V to the Palette Area s fourth row and each clip is played back when the corresponding key is pressed fig playmode06 eps The key correspond...

Страница 55: ...rocedures refer to Editing Palettes p 63 and p 65 For instructions on how to assign materials to palettes refer to Assigning Materials to Palettes p 59 Switching Palettes with the Keyboard You can also switch palettes using the keyboard You can select palettes 1 12 by pressing the corresponding function keys on the keyboard F1 F2 F3 and palettes 11 20 by holding down the Shift key while pressing t...

Страница 56: ...elects the transition effect type you prefer The current clip fades to black then the next clip fades in from black The current clip fades to white then the next clip fades in from white The current clip fades to black then the next clip starts playing back immediately The current clip fades to white then the next clip starts playing back immediately 3 Click one clip in the palette area to start p...

Страница 57: ...1 Click the color correction button to access the color correction palette 2 Click the color palette to adjust the hue H and color S 3 Move the brightness slider to adjust the brightness V Color Correction button Audio Level button INIT button Color Palette Brightness slider By clicking the INIT button you can return the color settings to the default state ...

Страница 58: ...ng to its loop mode setting and the automatic playback settings When setting the loop mode you can either assign the same setting to clips of the entire palette or to each video clip individually To assign the same setting to clips of an entire palette refer to p 65 To set each clip refer to Setting Loop Mode for Each Clip p 72 To set the automatic playback refer to Setting Automatic Playback p 75...

Страница 59: ...n materials to the palettes as clips Select and drag one material from the Materials list and drop it in the position in the Clips list to which you want the material assigned You can confirm the clip in the video output monitor and the material in the thumbnails fig editmode04 eps When you select multiple materials select materials while holding down the Shift key and drop them into the Clips lis...

Страница 60: ...ect p 60 Importing Materials from External Media You can import materials from videos CD Rs and other sources For more details about these procedures refer to Capturing Video from a Video Deck or Other Device p 76 and Importing Materials Created with a Computer p 78 Editing Palettes and Clips You can change palette and clip names change their sequence and perform various other editing functions Fo...

Страница 61: ...u want to revert the settings for a project restoring the settings as they were when last saved click the Open button to open the project again At this point a message asking whether or not you want to save the project appears Select Discard Saving Projects You cannot change a project s name and then save the project under the different name For more on backing up projects refer to Copying Project...

Страница 62: ...ting and stopping playback of clips Changing the retrigger point Changing the playback speed Changing the transition effect time Changing audio levels Controlling Time Trip Controlling output fades Refer to the owner s manual for each MIDI device for more information on the device s compatibility In addition for details on controlling with MIDI without using the V LINK function refer to Controllin...

Страница 63: ...s 4 Making the Clip Settings Making the Clip Settings p 68 Here you can set each clip s Loop Mode settings In point and Out point volume levels and more 5 Changing the Material Settings Changing Material Settings p 74 You can edit material names as well as copy and delete materials 6 Setting Automatic Playback Setting Automatic Playback p 75 You can have specified clips play back automatically whe...

Страница 64: ...nces Drag and drop the palettes you want to reorder right inside the Palettes list The palettes are inserted where dropped You can also do this with the following procedure 1 Right click on a palette whose position you want to change in the Palettes list A context menu appears 2 Select Swap with previous or Swap with next The palette switches positions with the one before or after it Deleting Cont...

Страница 65: ...nt set in the clip settings p 68 Loop The clips are played back continuously Play Next Clip The current clip is played back to the end and the next clip is played Select Next Clip The current clip is played to the end and then playback pauses at the first frame of the next clip Play Target Clip When playback of the current clip is finished the clip specified in the loop mode settings p 72 is playe...

Страница 66: ...t A context menu appears 2 Select Rename to highlight the clip name Enter the new name using the keyboard 3 When you have finished typing the name press the Enter key to confirm it Rearranging Clip Sequences Drag and drop the clips in the Clips list to rearrange the clip sequence Searching Clip Materials This searches for materials assigned to the clips 1 Right click on the name of the clip contai...

Страница 67: ...ssigned to that location Cutting and Moving Clips to Other Locations and Palettes 1 Right click on the name of the clip you want to cut in the Clips list A context menu appears 2 Select Cut 3 Right click on the location even in another palette where you want to paste the cut clip in the Clips list A context menu appears 4 Select Paste The cut clip is assigned that location Removing Clips 1 Right c...

Страница 68: ...ck segment you want to change in the Clips list 2 Use the time slider in the Parameters Area to move the preview cursor to the frames you want to set as the In point and Out point You can move the cursor in any of the following ways Use the mouse to drag the preview cursor p 69 Use the mouse to right click the time slider p 69 Use the transport controls p 69 Use the in point out point settings ico...

Страница 69: ...rt Control fig clip03 fig clip03 eps Using the In point Out point movement icons fig clip04 eps Return to first frame Go back 1 frame Go back 1 frame Start playback Advance to last frame Advance 1 frame Advance 10 frames Stop playback Jump to In point Jump to Out point While scrubbing the video output from the RGB OUTPUT connector will be the image at the preview cursor location The video output m...

Страница 70: ... point Sets the Out point Plays back from the In point to the Out point Time slider Context menu When you play back an HDV clip the following phenomena will occur on the PR 1000HD There will be no sound for the first few and last few frames of the clip If you loop the clip playback the image will stop for several frames at the out point of the clip In order to minimize the effect of such phenomena...

Страница 71: ...e You can delete the In point and Out point in the following ways Right click the Time Slider with the Mouse Select Delete In point Out point Using the In Point and Out Point Settings Icons Deletes the In point Deletes the Out point Time slider Context menu Deletes the In point Deletes the Out point When you set the In point the In point is then automatically assigned to each of the clip thumbnail...

Страница 72: ...rk enabling color adjustment 2 Move each of the sliders to adjust the color values fig loop eps One shot Playback stops at the final clip in the frame or at the Out point set in the clip settings p 68 Loop The clips are played back continuously Play Next Clip The current clip is played back to the end and the next clip is played Select Next Clip Playback stops at the final frame in the clip or at ...

Страница 73: ...ick the desired setting to select it fig loop eps You can return the parameters to their standard settings by right clicking the slider and then selecting Defaults The number above the slider indicates the playback speed Whether you can specify the scaler setting will depend on the output resolution p 97 The scaler setting can be made if one of the following output resolutions is selected 640 x 48...

Страница 74: ...s 2 Select Copy 3 Right click on the location in the Clips list where you want to paste the clip copied in the Materials list A context menu appears 4 Select Paste The copy of the material is assigned to that location Deleting Materials 1 Right click on the material you want to delete in the Materials list A context menu appears 2 Select Delete The material is completely deleted from the hard disk...

Страница 75: ... automatically when projects are loaded These settings are made in Edit mode fig editmode08 eps 1 Put a check in the check box in the Project Area fig project eps 2 Select the palette number and clip number The selected clip plays back automatically when the project is loaded If you check Keep this clip running the screen does not go black when a clip is finished playing this includes stopping pla...

Страница 76: ...Title 0002 7 Click the Close button to close the Capture window 8 The captured material appears in the material list in Edit mode The imported material is indicated by a name such as Title 0001 Importing Materials When capturing HDV you should also capture several seconds before and after the desired portion Due to the characteristics of HDV capturing with frame unit precision at the beginning and...

Страница 77: ... want to load 3 Select the material you want to import then click the Import button You can confirm the material in the Project Area to the right To select multiple materials hold down the Shift key as you select 4 When you have finished importing press Cancel to close the dialog If you ve connected two removable hard disk drive units the unit connected to removable hard disk drive bay 1 is shown ...

Страница 78: ...ial dialog is displayed fig import02 eps Media format CD ROM CD R CD RW ISO9660 Level 2 HFS or Microsoft Joliet Mode 1 format not compatible with other operating systems extended formats DVD ROM DVD R DVD R DVD RW DVD RW DVD RAM UDF File format Animation HDV MPEG2 TS m2t Data format CODEC Animation HDV MP ML 1080 59 94i 1080 50i 25Mbps CBR 720 29 97p 720 25p 19Mbps CBR Audio 48kHz 16bit 328kbps St...

Страница 79: ...mport material from a USB storage You can t play back material directly from a USB storage IEEE1394 storages cannot be used However only the following formats are supported Formats for memory cards and USB storages USB memory card reader FAT12 FAT16 FAT32 NTFS format USB 2 0 mass storage class USB memory USB hard disk drive File format Animation HDV MPEG2 TS m2t Data format CODEC Animation HDV MP ...

Страница 80: ...maged and may cause problems with the system 6 When you re finished importing click the Close button to close the dialog Before you disconnect the USB memory card reader USB memory or USB hard disk drive you must click the Close button to close the Import material dialog For details refer to the owner s manual of your computer and of the video editing software you re using Video you ve created on ...

Страница 81: ... won t be able to assign a name to the material while the capture is occurring The Capture window cannot be closed during the capture To close the Capture window stop the capture as described in step 6 and then click the Close button 8 Click the Close button to stop the capture When you stop the capture the video that has been captured up to that point will be treated as one item of material 9 Cli...

Страница 82: ...mode screen click the Import button The Import Material dialog box will appear fig import02 eps File format Animation HDV MPEG2 TS m2t Data format CODEC Animation HDV MP ML 1080 59 94i 1080 50i 25Mbps CBR 720 29 97p 720 25p 19Mbps CBR Audio 48kHz 16bit 328kbps Stereo MPEG 1 Layer 2 Avoid connecting directly to the Internet HDV 720 59 94p 720 50p is not supported Supported frame rates differ accord...

Страница 83: ... list select the folder that contains the material 8 In the Materials list select the material that you want to import and click the Import button If you want to select more than one item hold down the Shift key while you make your selections 9 When you ve finished importing click the Close button to close the dialog ...

Страница 84: ... Click Selector s Utility button The Utility window appears 2 Select the copy source drive in the Drives list 3 Drag the project you want to copy from the Projects list 4 Drop the project in the copy destination drive in the Drives list Copying to the removable hard disk drive on which you dropped the project will begin please wait 5 When you ve finished the operations press the Close button to cl...

Страница 85: ...Deleting a project 1 In the selector click the Utility button The utility window will appear 2 In the Drive list select the drive containing the project you want to delete 3 In the Project list right click the project you want to delete A context menu will appear 4 Choose Delete 5 When you are asked to confirm the operation hold down the Shift key and click the Delete button 6 When youÅfve finishe...

Страница 86: ...k defragmentation may require several hours so be sure to allow plenty of time 5 When you ve finished the operations press the Close button to close the window Formatting a removable hard disk drive 1 Click Selector s Utility button The Utility window appears 2 Right click on a removable hard disk drive in the Drives list 3 Select Initialize 4 When the confirmation dialog appears hold down the Shi...

Страница 87: ...ed for Minute Select the operation you want performed at the specified time 3 Select the action that you want to perform at the specified time Play Begins playback at the specified time Stop Stops playback at the specified time Shutdown Shuts down the PR 1000HD at the specified time Reboot Restarts the PR 1000HD at the specified time Time Adj Accesses the time server over the network at the specif...

Страница 88: ...bottom of the Schedule Editor dialog to highlight it in orange The Scheduler function is switched on The selected operation is then carried out at the time specified in the settings Any playback or stop settings specified by the scheduler will not be applied while the Presenter is in Edit mode The operating status of the scheduler is shown by the lit state of the Clock button in Presenter If the C...

Страница 89: ...3 Setting the Transition Effect Time This is set in Step 4 Adjusting the Volume You can adjust the volume level This is set in Step 5 Stopping Playback of Clips Playback of the clips stops when an All Note Off message is received followed by a black screen Switching the playback speed and resetting the transition time Reset All Controllers will reset the playback speed to normal and the transition...

Страница 90: ...nge indicate from left to right the minimum MIDI value 0 center value 64 and maximum value 127 When selecting a range starting from 0 in the Speed Control Range playback is paused when the value is set at 0 5 If the transition effect time is controlled via MIDI set the MIDI message to be used in Trans Time Control controls are not accepted via MIDI when this is set to OFF The transition effect tim...

Страница 91: ...one button Controlling the color correction You can control color correction p 57 via MIDI Color correction lets you independently control the hue H color S and brightness V of the image This setting is saved without regard to the project 1 In Play mode or Edit mode click the Open Preferences button 2 Click the MIDI Preferences button 3 To specify the MIDI channel that will be used for controlling...

Страница 92: ...is function enables you to set the Device ID required for receiving these messages In addition when using the PR 1000HD to control another Presenter such as another PR 1000HD or the DV 7PR or when setting the PR 1000HD as the controlled device make sure that the Presenter Control Device ID set in the MIDI preferences for the controlling device matches the PR 1000HD s Device ID Set the MIDI prefere...

Страница 93: ... the Device ID for the slave Presenter For instructions on how to set the Device ID refer to About System Exclusive Messages p 92 2 Click the MIDI Preferences button in Play mode or Edit mode on the master Presenter 3 Set the Device ID used for Presenter Control Match this to the slave s Device ID fig midi14 eps 4 Check the Presenter Control check box The Presenter Control function is enabled and ...

Страница 94: ...AR Series device with a MIDI cable 1 Click the MIDI Preferences button in Play mode or Edit Mode 2 Check the AR Control check box The AR Control function is enabled fig midi21 eps 3 Set the MIDI channel to be used in controlling the AR in Tx Channel in AR Control The AR Control function will be turned on fig midi20 eps The AR Series phrases correspond to the PR 1000HD s clips as described below 4 ...

Страница 95: ... is male To connect to a computer use a female to female cross cable fig 232c connecter j eps Cable Connections fig 232c cable eps Setup Procedure Use the procedure below when setting up the external device and the PR 1000HD 1 Connect both devices with a RS 232C cable 2 Turn on the power to the control device 3 Set the communications protocol for the control device 4 Turn on the power to the PR 10...

Страница 96: ...h panel display and then control Presenter by directly touching the touch panel display For some examples showing how you can connect such a display refer to Making the Touch Panel Display Settings p 104 and for more detailed information about setting touch panel displays refer to Making the Touch Panel Display Settings p 104 ...

Страница 97: ...ge if you are outputting at 1920x1080 59 94p 1920x1080 59 94i 1280x720 59 94p 1920x1080 50p and 1920x1080 50i and 1280x720 50p The play mode and clip parameter color correction effect will not be applied The transition effect will not be applied The scaling effect will not be applied The video output adjustment effect will not be applied However the above effects will be applied to the actual vide...

Страница 98: ...cally Starting Up Presenter 1 Click the System Preferences button in Selector The System Preferences screen appears 2 Select the Boot up method setting Launch Presenter automatically When you turn on the power to the PR 1000HD it automatically starts up Presenter in Play mode Wait indefinitely After the power is turned on the PR 1000HD stands by in Selector 3 Click the Done button Making the Syste...

Страница 99: ...down a key 3 Adjust the Key Repeat Delay This adjusts the time until input will begin repeating when you hold down a key 4 Click the Close button Mouse settings 1 Click the System Preferences button in Selector The System Preferences window appears 2 Specify the Double Click Speed This specifies the speed at which double clicking will be detected 3 Adjust the Mouse Speed This specifies the speed o...

Страница 100: ...t Auto then proceed to step 5 Enter the IP address Subnet mask and Gateway address For details on each address ask your network administrator 5 Enter the Workgroup and Host Name Ask the network administrator for the workgroup and host name 6 Click Save You will return to the System Preferences window Click the Restart button and the PR 1000HD will restart After the restart you ll be able to use th...

Страница 101: ...terials from the computer to the IMPORT folder The video material copied to the import folder can be imported by the Import Material dialog box p 81 For details on the formats that can be imported refer to Importing material via the network p 82 5 Click the Stop Sharing button The drive sharing function will stop and you will return to the Edit mode screen fig network01 eps Share Drive button When...

Страница 102: ...rted by the Import Material dialog box p 81 For details on the formats that can be imported refer to Importing material via the network p 82 5 Click the Stop Sharing button The FTP function will stop and you will return to the Edit mode screen fig network01 eps FTP button When you import material from the IMPORT folder at the Import Material dialog that material is automatically deleted from the I...

Страница 103: ...ences window will appear 2 In the Network section click Open Network Setting Panel The Network Settings dialog will appear fig network02 eps 3 Specify NTP Server Enter the address of the time server you want to use You will need to provide a time server 4 Put a check mark in Adjust time NTP 5 Click Save The network function will restart and the time server function will be turned on Please provide...

Страница 104: ...lect Use in the Touch Panel Display settings then click Calibration The system restarts automatically When the system has started up the Calibration screen appears fig touchpanel eps 3 Touch the center of the target It will be displayed three times The target will disappear successively and when you touch the last target the and will disappear 4 When you ve finished making the setting touch The ta...

Страница 105: ...ialog box Ctrl O Displays the Open dialog box Ctrl B Turns on and off the display of the color bar Ctrl E Changes to the Edit Mode Shortcut Function Ctrl O Displays the Open dialog box Ctrl S Saves the changes to the project Ctrl P Changes to the Play Mode Ctrl Move backward 1 frame Ctrl Move forward 1 frame Ctrl Shift Move backward 10 frames Ctrl Shift Move forward 10 frames ...

Страница 106: ...lette 7 4BH Palette 17 34H Clip 10 4CH Clip 24 35H Clip 11 4DH Clip 25 36H Palette 8 4EH Palette 18 37H Clip 12 4FH Clip 26 38H Palette 9 50H Palette 19 39H Clip 13 51H Clip 27 3AH Palette 10 52H Palette 20 3BH Clip 14 53H Clip 28 Control Change You can set various controls at the MIDI preferences window Assignable functions are follows Playback speed control Transition time control Volume control...

Страница 107: ...y MIDI Keyboard Mode When the unit receives an unselectable Bank Select message it is ignored Channel After Touch Status Second DnH vvH You can set various controls at the MIDI preferences window For the details of the function that you can set see the item of the Control Change Pitch Bend Change Status Second Third EnH llH mmH mm ll Pitch bend value 00 00H 40 00H 7F7FH 8192 0 8191 You can set var...

Страница 108: ... Pitch Bend Change Status Second Third EnH llH mmH mm ll Pitch bend value 00 00H 40 00H 7F7FH 8192 0 8191 You can set various controls at the MIDI preferences window For the details of the function that you can set see the item of the Control Change Channel Mode Message Reset All Controller Status Second Third BnH 79H 00H Set the various parameters back to their standard values VFX off Output fade...

Страница 109: ...Clip1 32 15H 3AH 5BH A0161 A0192 Palette7 Clip1 8 15H 5CH 63H A0193 A0200 Palette7 Clip9 32 16H 00H 1BH A0201 A0224 Palette8 Clip1 32 16H 1AH 3BH A0225 A0256 Palette9 Clip1 32 16H 3AH 5BH A0257 A0288 Palette10 Clip1 12 16H 5CH 63H A0289 A0300 Palette10 Clip13 32 17H 00H 1BH A0301 A0320 Palette11 Clip1 32 17H 1AH 3BH A0321 A0352 Palette12 Clip1 32 17H 3AH 5BH A0353 A0384 Palette13 Clip1 16 17H 5CH ...

Страница 110: ...e channel number is set from 1 Controls the VFX 1 4 of the V 4 Program Change Status Second CnH ppH pp Program number 00H 1FH prog 1 prog 32 j Only transmit when the Presenter control is on The transmit channel number for the AR control is the channel that is set in AR control The transmit channel number for the Presenter control is the channel number that is added 1 to the number that is set in A...

Страница 111: ...d Mode 00H 01H OFF 49 keys Assignable 01H 00H 02H Velocity Curve Type 00H 08H Linear Exp Shallow Exp Deep Log Shallow Log Deep Tangent ArcT angent 49 Steps OFF 01H 00H 03H Playback Speed Control Range 00H 09H 14H 17H 1EH 1FH See Note 3 1 1 01H 00H 04H Assignable Note Mode Lower Key 00H 7FH Note Number 01H 00H 05H Assignable Note Mode Upper Key 00H 7FH Note Number 01H 10H 00H Playback Speed Control...

Страница 112: ... 10H 40H 00H V LINK Color Control Preference Area See 3 2 5 Address Parameter Name Sys Ex Value Meaning of Value 10H 00H 00H V LINK Enabled 00H 01H OFF ON 10H 00H 01H V LINK Rx MIDI Channel Clip 00H 10H 1 16 Ch OFF 10H 00H 02H V LINK Rx MIDI Channel Color 00H 10H 1 16 Ch OFF 10H 00H 03H V LINK Note Message Enabled 00H 02H Note Mode OFF 49 keys Assignable 10H 00H 04H V LINK Fast Control Enabled 10H...

Страница 113: ...10H 20H 16H V LINK Rx Setting VFX B 1 10H 20H 18H V LINK Rx Setting VFX B 2 10H 20H 1AH V LINK Rx Setting VFX B 3 10H 20H 1CH V LINK Rx Setting VFX B 4 10H 20H 1EH V LINK Reserved 10H 20H 20H V LINK Rx Setting Output Fader V 4 Output Fader 01H 05H 07H 1FH 40H 5FH D0H E0H FFH Output Fader Control Change Channel Press Pitch Bend OFF Address Parameter Name Sys Ex Value Meaning of Value 10H 30H 00H V ...

Страница 114: ...checksum In the case of the exclusive message of Roland RQ1 DT1 the message is transmitted with checksum after the data to check if the message is received correctly The checksum value depends on the transmitted address data or size of the exclusive message To calculate checksum Hexadecimal numbers are described with H The checksum is the value that regard the value of the lower 7bit that is added...

Страница 115: ...System Reset X X X X X X X X X X X X O O O O X X X X X X X X X X X X X X X 1 16 X X X X 0 127 X O O O X X X X X X X O X O X X Presenter can receive these messages in the Play Mode only 1 Only when the Note Mode is on The range depends on the settings 2 Only when the Note Mode is on 3 Can be switched between O and X Realtime Video Presenter Model PR 1000HD Date May 5 2005 Version 1 00 MIDI Implemen...

Страница 116: ...l Sound Off Reset All Controllers Local On Off All Notes Off Active Sensing System Reset X X X X X X X X X X X X X O O O X X X X X X X X X X X X X X X 1 16 X X X X X O O X X X X X X X X O X X X X Presenter can receive these messages in the Play Mode only 1 Can be switched between O and X Realtime Video Presenter Model PR 1000HD Date May 5 2007 Version 1 00 MIDI Implementation Chart Mode 1 OMNI ON ...

Страница 117: ...ers Local On Off All Notes Off Active Sensing System Reset X X X X X 1 127 X X X O O X X X X O O X X X X X X X X O X X X X X X X X X X O X X X X X X X X X X X 1 Only when the AR control is on 2 Only when the Presenter control is on 3 Only when the AR Presenter control is on 4 Only when the Presenter control is on Realtime Video Presenter Model PR 1000HD Date May 5 2007 Version 1 00 MIDI Implementa...

Страница 118: ... the protocol Depending on the command there are three different types of communication protocols Specifying an action and making a setting to Presenter 1 Transmit the command from the control device to Presenter 2 If received correctly Presenter returns ACK and if an error occurs Presenter returns ER ACK is an ASCII code signal name code number 06H0 the tells the control device that the command w...

Страница 119: ...0 0 This specifies the ratio for playback speed You may specify a decimal number Once you specify this it will be maintained until you re specify it or close Presenter If Presenter receives the command correctly ACK will be returned ST Stop playback of video clip stxST Stops the playback of the video clip If Presenter was able to stop the playback it returns ACK AC Active sense request stxAC Send ...

Страница 120: ... 31 If a video clip is being played back when Presenter receives an AC command Presenter sends the information regarding the video clip being played back ACK Proper reception response ACK Sent when Presenter correctly receives command sent to it ER Error stxER a a Error number 0 SYNTAX ERROR Syntax error in command received 2 BUSY ERROR Presenter is busy and cannot process command This error is al...

Страница 121: ...o not move the unit immediately from a hot humid location to one with low temperatures This may cause damage to the hard disk drive Condensation may form on the hard disk drive s exterior and interior when it is moved from one location room to another with different heating or cooling conditions Using the unit in this condition may damage it so leave it as is for several hours before using it Do n...

Страница 122: ...push the unit all the way into the bay Press the location shown in the illustration When you push the HDD series unit all the way in the handle will fold 4 Lock the unit After inserting the HDD series unit into the PR 1000HD lock it so that the unit does not come out Insert the included key into the lock and turn it clockwise Once again check that the unit was inserted correctly You will be unable...

Страница 123: ...ust release the lock Insert the included key in the location shown and turn it counterclockwise 3 Lift the handle and pull out the removable hard disk drive unit Pull up the handle of the HDD series unit as shown in the illustration and pull the unit straight out The handle will not lift up unless you release the lock as described in step 2 Managing removable hard disk drives The PR 1000HD s Utili...

Страница 124: ...ut Output i LINK IN OUT 6 pin type conforms to IEEE1394 Video Output DVI I DVI 29 pin type x 1 Analog RGB Digital RGB Audio Output L R XLR type Maximum Output level 10 dBu Nominal Output Level 4 dBu RCA Pin type Maximum Output level 6 dBu Nominal Output Level 0 dBu Display Output DVI I type Analog RGB resolution 1024 x 768 fixed Digital RGB resolution 1024 x 768 fixed Storage Devices Internal Syst...

Страница 125: ...Done 45 47 Duplicate 44 Duplicating Projects 84 E Edit Mode 33 39 41 Editing 33 Clips 66 Palettes 63 EXIT 38 41 F Fade out 56 Fades in 56 Frame 53 H Hard Disk 13 I Import 35 43 Importing Materials 35 76 In Point 53 70 Interlace 54 K Keyboard 27 47 L Loop 39 Loop Mode 72 Loop Playback 58 M Material 35 50 Materials List 42 MIDI 89 MIDI Preferences 38 41 mount fitting 13 Mouse 27 System Preferences 4...

Страница 126: ...ettes 89 Selector 28 37 Setting Automatic Playback 75 Clip 68 Clip Playback Segment 68 Materials 74 Network 100 Palette 65 Project 63 System 98 Touch Panel Display 104 Volume 73 Setting the Playback Speed 73 Setting the Transition Effect Time 89 Shortcut Key 105 106 Shortcuts 70 Stop 39 53 Stopping Playback of Clips 89 System Exclusive Messages 92 System Preferences 37 46 T Thumbnail 40 59 71 Thum...

Страница 127: ...MEMO 127 ...

Страница 128: ...MEMO 128 ...

Страница 129: ...MEMO 129 ...

Страница 130: ...MEMO 130 For EU Countries For China ...

Страница 131: ...MEMO 131 ...

Страница 132: ... 00 20 BRAZIL Roland Brasil Ltda Rua San Jose 780 Sala B Parque Industrial San Jose Cotia Sao Paulo SP BRAZIL TEL 011 4615 5666 Other CENTRAL LATIN AMERICA Roland Systems Group U S 425 Sequoia Drive Suite 114 Bellingham Washington 98226 USA TEL 360 594 4282 AUSTRIA GERMANY ITALY IRELAND UNITED KINGDOM EDIROL Europe Ltd Studio 3 4 114 Power Road London W4 5PY U K TEL 0 20 8747 5949 BELGIUM FRANCE L...

Отзывы: