269
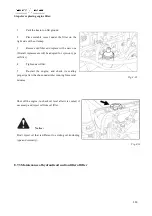
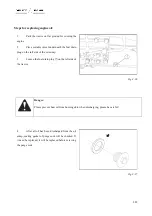
Discharging water from sedimentation glass will be
conducted as per the following steps:
1.
Place one vessel underneath the sedimentation
glass
①
.
2.
Take out the sedimentation glass and pour out
liquid (fuel oil and water).
3.
Re-install sedimentation glass.
Fig. 8-12
8.5.10.Check of electronic system
Check all electronic systems including Low-beam headlamp and high-beam headlamp, direction indicator lamp,
side lamp, working light and so on to confirm whether their functions are normal or not.
8.5.11.Check of tire inflation pressure
Tire pressure will be checked by using pressure meter. Inflation pressure of tire is shown in the technical
specification of the tractor.
Important:
If tire pressure is too high or too low, it will shorten the lifetime of the tire and will cause adverse
influence to driving and control of the tractor.
Notice:
When replacing tire or regularly maintaining or repairing, the tractor shall be put up by using safety
stand.
Regularly check tire status. Please timely replace if necessary. The tire will be inflated in accordance with pressure
data and specific utilization requirement provided by the manufacturer.
When fixing the wheel, please follow the tightening torque that has been recommended.
8.6.Maintain Every 50 Hours
Содержание FL35-70HP Series
Страница 21: ...Product Mark 20 1 Security Considerations ...
Страница 57: ...Product Mark 56 Fig 1 35 Fig 1 36 ...
Страница 58: ...Product Mark 57 Fig 1 37 Fig 1 38 ...
Страница 62: ...Product Mark 61 Rear transverse board safety label To prevent personal injury do not ride or stand here ...
Страница 70: ...69 2 Product Mark ...
Страница 74: ...73 Page Left Intentionally Blank ...
Страница 75: ...Product Description 74 3 Product Description ...
Страница 77: ...Product Description 76 Fig 3 2 3 1 2 Appearance of tractor equipped with cab ...
Страница 81: ...Product Description 80 ...
Страница 84: ...Product Description 83 3 7 Notice Check whether the steering wheel is fixed firmly before driving ...
Страница 113: ...Product Description 112 ...
Страница 124: ...Electrical system 123 4 Operation Instructions ...
Страница 157: ...Electrical system 156 ...
Страница 162: ...Electrical system 161 Fig 4 32 Three point linkage Model 2 ...
Страница 168: ...Electrical system 167 Fig 4 41 Diagram for movement of the hitch mechanism configuration 3 Wheels ...
Страница 189: ...Electrical system 188 5 Wheels ...
Страница 208: ...Electrical system 207 6 Electrical System ...
Страница 230: ...Electrical system 229 requirements 6 6 Electrical Schematic Diagram ...
Страница 235: ...234 7 On board Spare Parts Tools and Quick wear Parts ...
Страница 241: ...240 ...
Страница 242: ...241 8 Maintenance Specification ...
Страница 288: ...287 Fig 8 35 ...
Страница 338: ...Operation Instructions 337 9 Troubleshooting ...
Страница 353: ...352 10 Tractor Storage and Unpack ...
Страница 358: ...Tractor Storage and Unpack 357 11 Delivery Acceptance and Transportation ...
Страница 361: ...360 ...
Страница 362: ...361 12 Disassembly and Disposal ...
Страница 365: ...Warranty Contents 364 13 Warranty Contents ...
Страница 411: ...Appendix 410 15 Appendix ...


