7-33
T
roub
leshooting
7
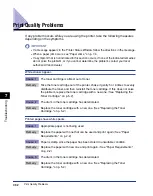
Print Quality Problems
The overall print result is faint.
Cause 1
The setting for [Toner Density] is not appropriate.
Remedy
Drag the [Toner Density] slider in the printer driver toward [Dark].
In order to specify the setting for [Toner Density], display the [Detailed Settings]
dialog box by clicking [Details] in the [Quality] sheet.
Cause 2
[Use Draft Mode] is enabled.
Remedy
Clear the [Use Draft Mode] check box in the printer driver.
In order to specify the setting for [Use Draft Mode], display the [Detailed
Settings] dialog box by clicking [Details] in the [Quality] sheet.
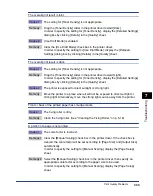
The overall print result is dark.
Cause 1
The setting for [Toner Density] is not appropriate.
Remedy
Drag the [Toner Density] slider in the printer driver toward [Light].
In order to specify the setting for [Toner Density], display the [Detailed Settings]
dialog box by clicking [Details] in the [Quality] sheet.
Cause 2
The printer is exposed to direct sunlight or strong light.
Remedy
Move the printer to a place where it will not be exposed to direct sunlight or
strong light. Alternatively, move the strong light source away from the printer.
Front or back of the printed paper has smudge marks.
Cause
The fixing roller is dirty.
Remedy
Clean the fixing roller. (See "Cleaning the Fixing Roller," on p. 5-18)
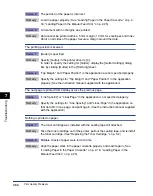
A portion of a page is not printed.
Cause 1
The scale factor is incorrect.
Remedy 1 Clear the [Manual Scaling] check box in the printer driver. If the check box is
cleared, the scale factor will be set according to [Page Size] and [Output Size]
automatically.
In order to specify the setting for [Manual Scaling], display the [Page Setup]
sheet.
Remedy 2 Select the [Manual Scaling] check box in the printer driver, then specify an
appropriate scale factor according to the paper size to be used.
In order to specify the setting for [Manual Scaling], display the [Page Setup]
sheet.
Содержание laser Shot LBP 3300
Страница 2: ...LBP3300 Laser Printer User s Guide ...
Страница 25: ...xxii ...
Страница 45: ...1 20 Before You Start 1 Connecting to a Computer ...
Страница 90: ...2 45 Loading and Outputting Paper 2 Setting Up the Printer Driver and Printing 7 Click OK to start printing ...
Страница 99: ...2 sided Printing 2 54 Loading and Outputting Paper 2 12 Click OK to start printing ...
Страница 105: ...2 sided Printing 2 60 Loading and Outputting Paper 2 ...
Страница 305: ...5 32 Routine Maintenance 5 Handling the Printer ...
Страница 391: ...7 52 Troubleshooting 7 Confirming the Printer Features ...
Страница 397: ...8 6 Appendix 8 Dimensions of Each Part Paper Feeder Unit PF 35 117 4 116 6 369 7 421 1 mm ...
Страница 411: ...8 20 Index Appendix 8 V Ventilation Slots 1 4 W Watermark 4 28 4 51 When Nothing is Printed 7 37 Windows Firewall 8 10 ...
Страница 413: ...8 22 Appendix 8 Location of the Serial Number ...
Страница 414: ...R IE 700AC CANON INC 2005 ...

