background image

4-73

Pr

inting a Document

4

How to Use Online Help

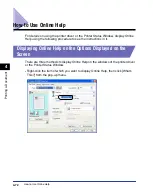
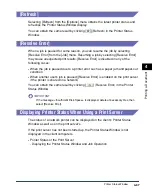
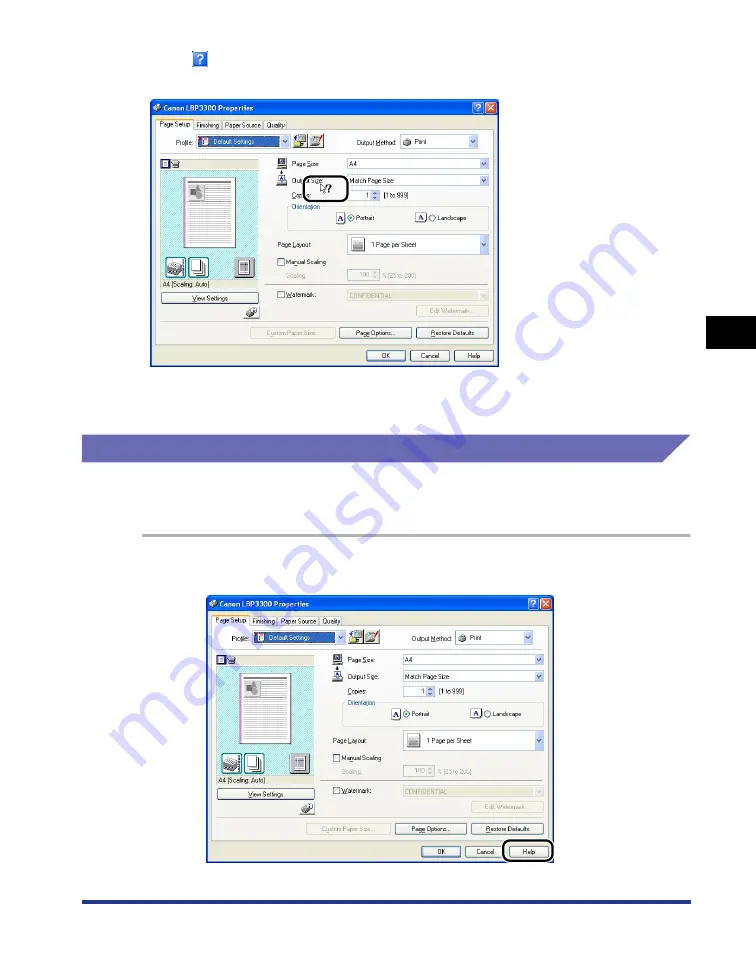
Click [

] (Help) on [Titlebar], move the [?]-attached cursor to the item of which 

you want to display Help, then click it.

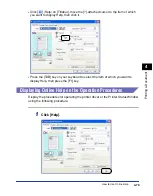
Press the [TAB] key on your keyboard to select the item of which you want to 
display Help, then press the [F1] key.

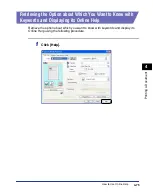
Displaying Online Help on the Operation Procedures

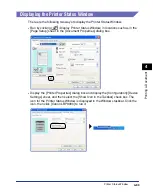
Display the procedures for operating the printer driver or the Printer Status Window 
using the following procedure.

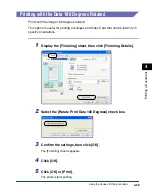
1

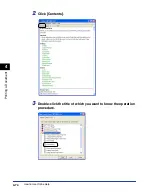
Click [Help].

Содержание laser Shot LBP 3300

Страница 1: ...Laser Beam Printer ENG IMPORTANT Read this manual carefully before using your printer Save this manual for future reference User s Guide User s Guide ...

Страница 2: ...LBP3300 Laser Printer User s Guide ...

Страница 3: ... s Guide This Manual CD ROM Setting Up the Network Environment for Printing Managing the Printer in the Network Environment Only when the optional network board is installed Network Guide CD ROM Operating Setting the Printer from the Web Browser Only when the optional network board is installed Remote UI Guide CD ROM To view the manual in PDF format Adobe Reader Adobe Acrobat Reader is required If...

Страница 4: ...intenance Optional Accessories Troubleshooting Appendix Chapter 1 Chapter 2 Chapter 3 Chapter 4 Chapter 5 Chapter 6 Chapter 7 Chapter 8 Considerable effort has been made to ensure that this manual is free of inaccuracies and omissions However as we are constantly improving our products if you need an exact specification please contact Canon ...

Страница 5: ...gram xiii WEEE Directive xiii Trademarks xiv Copyright xiv Disclaimers xiv Legal Limitations on the Usage of Your Product and the Use of Images xv Important Safety Instructions xvi Installation xvi Power Supply xviii Handling xix Maintenance and Inspections xx Consumables xxi Others xxi Chapter 1 Before You Start Features and Benefits 1 2 Parts and Their Functions 1 4 Printer Unit 1 4 Front View 1...

Страница 6: ...ce up Output Slot 2 15 Paper Capacity of the Output Trays 2 16 Selecting an Output Tray 2 17 Switching to the Face up Output Slot 2 17 Switching to the Face down Output Tray 2 17 Loading Paper in the Paper Cassette 2 18 Loading Paper in the Manual Feed Slot 2 25 Loading Plain Paper Heavy Paper Transparency or Label in the Manual Feed Slot 2 26 Loading Index Card 2 29 Loading Envelope 2 32 Loading ...

Страница 7: ...rinting Preferences 4 9 For Windows 98 Me 4 9 Displaying the Document Properties Dialog Box from an Application 4 9 Displaying the Printer Properties Dialog Box from the Printers Folder 4 11 For Windows 2000 XP Server 2003 4 12 Displaying the Document Properties Dialog Box from an Application 4 12 Displaying the Document Properties Dialog Box from the Printers and Faxes Folder or the Printers Fold...

Страница 8: ...g a Profile 4 66 Editing Deleting a Profile 4 68 Editing Jobs with PageComposer 4 69 How to Use Online Help 4 72 Displaying Online Help on the Options Displayed on the Screen 4 72 Displaying Online Help on the Operation Procedures 4 73 Retrieving the Option about Which You Want to Know with Keywords and Displaying its Online Help 4 75 Manuals 4 78 Installing the Manuals 4 78 Uninstalling the Manua...

Страница 9: ...rk Board 6 26 Problems on Installing the Network Board 6 29 Resetting the Network Board 6 30 Removing the Network Board 6 33 Chapter 7 Troubleshooting Troubleshooting Map 7 2 Alarm Indicator 7 3 Paper Jams 7 4 Procedure for Clearing Paper Jams 7 7 Service Call Display 7 25 When a Fixing Unit Error Appears 7 27 When a Scanner Error or Service Error Appears 7 29 Print Quality Problems 7 32 Paper Pro...

Страница 10: ...ce Installer 8 7 Print Monitor Installer 8 8 NetSpot Console 8 9 Windows Firewall 8 10 Configuring Windows Firewall to Unblock Communication with the Client Computers 8 11 Configuring Windows Firewall to Block Communication with Client Computers 8 13 Configuring Windows Firewall to Unblock Communication with the Print Server 8 14 Index 8 16 Location of the Serial Number 8 21 ...

Страница 11: ... safely always pay attention to these warnings CAUTION Indicates a caution concerning operations that may lead to injury to persons or damage to property if not performed correctly In order to use the printer safely always pay attention to these cautions IMPORTANT Indicates operational requirements and restrictions Be sure to read these items carefully in order to operate the printer correctly and...

Страница 12: ... below When multiple buttons can be pressed on the screen shot of computer operation screen all buttons are marked Select the button which suits your needs Illustrations Used in This Manual The illustrations of the toner cartridge used in this manual mean the toner cartridge Canon Genuine Cartridge of which printable pages are approximately 2 500 pages 9 Click Next Click this button for operation ...

Страница 13: ...ion Attach the panel sheet to the control panel as needed Abbreviations Used in This Manual In this manual product names and model names are abbreviated as follows Microsoft Windows 95 operating system Windows 95 Microsoft Windows 98 operating system Windows 98 Microsoft Windows Millennium Edition operating system Windows Me Microsoft Windows 2000 operating system Windows 2000 Microsoft Windows XP...

Страница 14: ...unications However there is no guarantee that interference will not occur in a particular installation If this equipment does cause harmful interference to radio or television reception which can be determined by turning the equipment off and on the user is encouraged to try to correct the interference by one or more of the following measures Reorient or relocate the receiving antenna Increase the...

Страница 15: ... is in conformity with the relevant requirements at nominal mains input 230 V 50 Hz although the rated input of the product is 220 240 V 50 60 Hz Laser Safety 110 127 220 240 V models Laser radiation could be hazardous to the human body For this reason laser radiation emitted inside this printer is hermetically sealed within the protective housing and external cover No radiation can leak from the ...

Страница 16: ...iency The International ENERGY STAR Office Equipment Program is an international program that promotes energy saving through the use of computers and other office equipment The program backs the development and dissemination of products with functions that effectively reduce energy consumption It is an open system in which business proprietors can participate voluntarily The targeted products are ...

Страница 17: ...t Copyright 2005 by Canon Inc All rights reserved No part of this publication may be reproduced or transmitted in any form or by any means electronic or mechanical including photocopying and recording or by any information storage or retrieval system without the prior written permission of Canon Inc Disclaimers The information in this manual is subject to change without notice CANON INC MAKES NO W...

Страница 18: ...print or otherwise reproduce any particular document and or of the use of the images scanned printed or otherwise reproduced you should consult in advance with your legal advisor for guidance Paper Money Travelers Checks Money Orders Food Stamps Certificates of Deposit Passports Postage Stamps canceled or uncanceled Immigration Papers Identifying Badges or Insignias Internal Revenue Stamps cancele...

Страница 19: ...ay not be covered under your Limited Warranty Installation WARNING Do not install the printer near alcohol paint thinner or other flammable substances If flammable substances come into contact with electrical parts inside the printer it may result in a fire or electrical shock Do not place the following items on the printer If these items come into contact with a high voltage area inside the print...

Страница 20: ...s this may result in a fire or electrical shock A damp or dusty location A location exposed to smoke and steam such as cookeries and humidifiers A location exposed to rain or snow A location near water faucets or water A location exposed to direct sunlight A location subject to high temperatures A location near open flames When installing the printer gently lower the printer onto the floor or othe...

Страница 21: ...he following points on user s own authority If you use extension cords improperly this may result in a fire or electrical shock Do not connect one extension cord to another Make sure that the voltage of the power plug is the one indicated in the rating label attached on the inside of the printer when you use the printer Use an extension cord that allows the current value greater than the necessary...

Страница 22: ...etc inside the printer If these items come into contact with a high voltage area inside the printer it may result in a fire or electrical shock If these items are dropped or slipped inside the printer immediately turn OFF the power switch and disconnect the USB cable if it is connected Then unplug the power plug from the AC power outlet and contact your local authorized Canon dealer When plugging ...

Страница 23: ...with water or a mild detergent diluted with water Do not use alcohol benzene paint thinner or other flammable substances If flammable substances come into contact with electrical parts inside the printer it may result in a fire or electrical shock There are some areas inside the printer which are subject to high voltages When removing jammed paper or when inspecting the inside of the printer do no...

Страница 24: ...physician When loading paper or removing jammed paper take care not to cut your hands with the edges of the paper When removing a used toner cartridge from the toner cartridge slot remove the cartridge carefully to prevent the toner from scattering and getting into your eyes or mouth If the toner enters your eyes or mouth wash them immediately with cold water and immediately consult a physician Co...

Страница 25: ...xxii ...

Страница 26: ...atures and Benefits 1 2 Parts and Their Functions 1 4 Printer Unit 1 4 Control Panel 1 7 Connecting the Power Cord 1 8 Connecting the Power Cord 1 8 Turning the Printer ON OFF 1 10 Turning the Printer ON 1 10 Turning the Printer OFF 1 11 Connecting to a Computer 1 13 Using a USB Cable 1 13 Using a LAN Cable 1 16 ...

Страница 27: ...Canon Furthermore because the grayscale makes use of a dithering pattern photographs and graphics can be printed with beautifully subtle reproduction Duplex Unit Installed as Standard LBP3300 is supplied with the duplex unit Therefore you can automatically perform 2 sided printing with paper A4 Legal and Letter size loaded in the manual feed slot or paper cassette By doing so you can save paper an...

Страница 28: ...a on A4 size paper by using the function to reduce the standard paper sizes You can also print irregular custom size paper Network capable Printer LBP3300 can be used as an Ethernet network printer by installing the optional network board The network board enables the operation of the printer using a built in web browser Remote UI allowing you to specify settings and manage the printer from a comp...

Страница 29: ...on slots are provided for proper ventilation of working parts inside the printer Blocking the ventilation slots can cause the printer to overheat resulting in a fire Front View The following are the parts on the front side of the printer and their functions a a a a Face down Output Tray Outputs paper with the printed side facing down See p 2 14 b b b b Control Panel The indicator lights show the p...

Страница 30: ...to release the pressure in the fixing unit See p 7 7 b b b b Expansion Slot Cover Opened when installing the optional network board or connecting a USB cable c c c c Expansion Slot The optional network board is installed in this slot See p 6 19 d d d d USB Connector Connected to the USB cable Connect the other end of the cable to the USB port on the computer See p 1 13 e e e e Lift Handles Hold th...

Страница 31: ...their functions a a a a Toner Cartridge Guide When setting the toner cartridge push it while aligning the projections on each side of the toner cartridge with this guide See p 5 6 b b b b Transport Guide Lift the guide when removing paper jammed inside the front cover See p 7 9 c c c c Rating Label The current value indicated in this rating label shows the average power current consumption a c b ...

Страница 32: ...eeded a a a a Load Paper Indicator Orange On There is no paper in any paper source Blinking No paper or paper of an inappropriate size is loaded b b b b Paper Jam Indicator Orange Blinking A paper jam is occurring disabling printing c c c c Alarm Indicator Orange On Service call is occurring Blinking An error is occurring disabling printing d d d d Ready Indicator Green On The printer is ready to ...

Страница 33: ...necting the Power Cord IMPORTANT Do not plug the power plug into the auxiliary outlet on a computer One AC power outlet should be used exclusively for the printer Do not connect this printer to an uninterruptible power source This may cause printer malfunction or breakdown at the occurrence of a power failure 1 Make sure that the power switch of the printer is OFF The printer is OFF when of the po...

Страница 34: ...1 9 Before You Start 1 Connecting the Power Cord 2 Plug the supplied power cord into the power socket 3 Plug the power plug into the AC power outlet ...

Страница 35: ...want to turn the printer ON again after turning it OFF wait at least 10 seconds after turning the printer OFF before turning it ON again If the printer does not operate properly or an error message appears in the Printer Status Window see Troubleshooting on p 7 1 When turning the power ON make sure that no paper is loaded in the manual feed slot If the power is turned ON when any paper is loaded i...

Страница 36: ...edure IMPORTANT If the printer is used on a network make sure that it is not printing data from another computer before turning the power OFF If you turn the printer OFF all print data remaining in the printer memory will be erased So wait for the necessary print data to be printed before turning the power OFF Do not turn the power OFF when the printer is in any of the following status While the p...

Страница 37: ...rinter ON OFF IMPORTANT Even if the power switch is turned OFF power is consumed only slightly while the power plug is inserted into the AC power outlet To cut the power consumption completely unplug the power plug from the AC power outlet ...

Страница 38: ...printer This printer uses bi directional communication Operation of the printer when connected via unidirectional communication equipment has not been tested and as a result Canon cannot guarantee printer operation when the printer is connected using unidirectional print servers USB hubs or switching devices NOTE The appropriate USB interface varies depending on the operating system of the connect...

Страница 39: ...1 14 Before You Start 1 Connecting to a Computer 1 Make sure that the printer and computer are OFF 2 Open the expansion slot cover ...

Страница 40: ...ng to a Computer 3 Connect the B type square end of the USB cable to the USB connector on the rear side of the printer then close the expansion slot cover 4 Connect the A type flat end of the USB cable to the USB port on the computer ...

Страница 41: ...nter can be connected to the network using a Category 5 twisted pair cable Have cables or a hub ready as needed NOTE For details on the procedure for installing the network board see Network Board on p 6 19 If this printer is connected to a network network settings will need to be configured the printer will need to be installed as a network printer the print server will need to be configured For ...

Страница 42: ...l be connected An additional hub must be installed if there is no free port NOTE When connecting to the 100BASE TX Ethernet network all the devices to be connected to LAN such as hub LAN cable and network board for computer must support 100BASE TX For more details contact your local authorized Canon dealer 1 Open the expansion slot cover Computer with 100BASE TX Connector Computer without 100BASE ...

Страница 43: ... Start 1 Connecting to a Computer 2 Attach the ferrite core to the LAN cable as shown in the figure Attach the ferrite core at 5 cm or less from the end of the connector which is connected to the printer 5 cm or less ...

Страница 44: ...nect the LAN cable to the LAN connector of the network board then close the expansion slot cover Connect a LAN cable that is compatible with the LAN connector of the network board according to the network 4 Connect the other end of the LAN cable to the hub ...

Страница 45: ...1 20 Before You Start 1 Connecting to a Computer ...

Страница 46: ...ecautions for Handling the Manual Feed Slot or Paper Cassette 2 12 Output Tray 2 14 Output Tray Type 2 14 Paper Capacity of the Output Trays 2 16 Selecting an Output Tray 2 17 Loading Paper in the Paper Cassette 2 18 Loading Paper in the Manual Feed Slot 2 25 Loading Plain Paper Heavy Paper Transparency or Label in the Manual Feed Slot 2 26 Loading Index Card 2 29 Loading Envelope 2 32 Loading Cus...

Страница 47: ...72 mm long or less the safety function that prevents damages caused by heat may slow the print speed down in stages The print speed may be as slow as approximately 4 ppm Paper Size The following shows the paper sizes that can be used with this printer The symbol indicates that the paper is available for the 1 sided printing and automatic 2 sided printing the symbol indicates that the paper is avai...

Страница 48: ...pes the printer automatically applies the appropriate print mode to each type by specifying Output Size in the Page Setup sheet Envelope Envelope DL 110 0 mm x 220 0 mm x x Envelope COM10 104 9 mm x 241 3 mm x x Envelope C5 162 0 mm x 229 0 mm x x Envelope Monarch 98 5 mm x 190 5 mm x x Index Card 76 2 mm x 127 0 mm x x Paper Type Printer Driver Setting Paper Source Manual Feed Slot Cassette 1 Cas...

Страница 49: ...ettes and manual feed slot Custom paper size or heavy paper that weighs between 121 163 g m2 can be loaded in the manual feed slot Also paper at a size of A4 Legal or Letter that weighs between 91 120 g m2 is available for automatic 2 sided printing Transparency This printer can print A4 and Letter size transparencies Transparencies can be loaded in the manual feed slot Label This printer can prin...

Страница 50: ... snaps Envelopes with address windows Envelopes with adhesive on the surface Wrinkled or creased envelopes Poorly manufactured envelopes in which the glued parts are uneven Irregularly shaped envelopes Before loading the envelopes flatten the stack of envelopes to release any remaining air and press the fold lines along the edges tight Do not print on the reverse side glued side of envelopes When ...

Страница 51: ...ows the abbreviations of paper sizes that are marked on the paper cassette or manual feed slot Printable Area The following shows the printable area of this printer Plain Paper Heavy Paper Transparency Label You cannot print on any area within 5 mm of the edges of paper Paper Size Paper Guides Legal LGL Letter LTR Executive EXEC 5 mm 5 mm 5 mm 5 mm ...

Страница 52: ...s with backing sheet that is easily peeled off Paper that has already been printed by a copy machine or another laser printer The reverse side of the paper is also unusable Using the manual feed slot however you can perform 2 sided printing manually on the back of previously printed paper You cannot print on the printed side again Paper with jagged edges Wrinkled paper Paper with the corners folde...

Страница 53: ... quality deteriorates in a moist environment Paper wrappers help avoiding moisture and dryness Keep paper in the wrapper until it is ready to be used Store all unused paper in a wrapper Store paper on a flat surface Do not store paper on the floor where water and moisture can accumulate Avoid physical damage to stored paper Do not store paper vertically or store too many stacks of paper in one pil...

Страница 54: ...e printed paper is completely dry before placing one over another Toner may melt if they are placed together half dried Store paper on a flat surface Toner may peel when they are folded or creased Avoid storing printouts at high temperatures Otherwise toner may melt and blot Put printouts in a binder when storing them for a long period of time two years or longer Printouts may discolor when they a...

Страница 55: ...assette 1 C Cassette 2 Optional IMPORTANT If you are printing from Cassette 2 make sure that Cassette 1 is set before printing If you print from Cassette 2 when Cassette 1 is not set this will cause paper jams Paper Level Indicator The paper cassette has a paper level indicator A that shows the amount of paper remaining in the cassette If the cassette is full the paper level indicator is at the to...

Страница 56: ...etails on the procedure for displaying the Paper Source sheet in the printer driver see Specifying the Printing Preferences on p 4 9 Paper Type Paper Source Manual Feed Slot Cassette 1 Cassette 2 Optional Plain paper 64 g m2 1 sheet Approx 250 sheets Approx 250 sheets Heavy paper 91 g m2 1 sheet Approx 200 sheets Approx 200 sheets Heavy paper 128 g m2 1 sheet x x Transparency 1 sheet x x Label 1 s...

Страница 57: ...l feed slot you cannot feed paper from the paper cassette If you are printing from the paper cassette remove any paper loaded in the manual feed slot Setting Setting Value Description Paper Selection Same Paper for All Pages Feeds all the pages from the same paper source Different for First Others and Last Paper can be selected for each page such as for printing the front cover on a different type...

Страница 58: ...ack rubber pad A in the paper cassette This may result in misfeeds Make sure that the printer is not operating and the Ready indicator green is on when loading paper in the manual feed slot However when printing multiple copies or multiple pages from the manual feed slot make sure that the printer is not operating and the Load Paper indicator orange is blinking before loading the second and subseq...

Страница 59: ... in paper jams Face down Output Tray Printed paper is output to the face down output tray with the printed side facing down IMPORTANT Printed paper can be output only to the face down output tray when performing automatic 2 sided printing During 2 sided printing do not touch the paper until it is output to the face down output tray completely During 2 sided printing the paper is once output partia...

Страница 60: ... varies depending on the paper size or paper type For more details see Paper Capacity of the Output Trays on p 2 16 Face up Output Slot Printed paper is output to the face up output slot on the rear of the printer unit with the printed side facing up The face up output slot is suitable to print transparencies labels or envelopes which tend to curl since the printed paper is output flattened IMPORT...

Страница 61: ...eration Paper Capacity of the Output Trays Actual paper capacity varies depending on the installation environment paper type or paper size Paper Type Output Trays Face down Output Tray Face up Output Slot Plain paper 64 g m2 Approx 125 sheets X Heavy paper 91 g m2 Approx 50 sheets X Heavy paper 128 g m2 Approx 30 sheets 1 sheet Transparency Approx 10 sheets 1 sheet Label Approx 10 sheets 1 sheet I...

Страница 62: ...he Face up Output Slot When switching an output tray to the face up output slot open the output selection cover as shown in the figure Switching to the Face down Output Tray When switching an output tray to the face down output tray close the output selection cover as shown in the figure ...

Страница 63: ...r Load paper in the paper cassette using the following procedure Be sure to load paper in portrait orientation when loading it in the paper cassette IMPORTANT For more details on the usable paper see Usable Paper on p 2 2 For details on handling the paper cassette see Precautions for Handling the Manual Feed Slot or Paper Cassette on p 2 12 Do not load any media other than plain paper 60 90 g m2 a...

Страница 64: ...ly pulled out the paper cassette may drop or the printer may become damaged resulting in personal injury 2 When changing the size of the paper to be loaded change the positions of the paper guides While holding the lock release lever of the side paper guides slide the guides to the mark for the size of the paper to be loaded The side paper guides move together Align the position of A with the mark...

Страница 65: ...r guide to JIS B5 While holding the lock release lever of the rear paper guide slide the guide to the size mark for the paper to be loaded Align the position of A with the mark for the size of the paper to be loaded IMPORTANT Do not use the 8 5 x 13 position 3 Load the paper stack so that the rear edge is aligned with the paper guide A ...

Страница 66: ...he loaded paper If the paper guide is set at a wrong position this may result in misfeeds If you use paper that has been poorly cut multiple sheets of paper may be fed at once In this case fan the paper thoroughly and then align the edges of the stack on a hard flat surface NOTE To print letterhead paper or paper printed with a logo load the paper so that the printing side is facing down as shown ...

Страница 67: ...htly reduce the amount of paper IMPORTANT The following shows the paper capacity of the paper cassette Be sure that the paper stack does not exceed the load limit marks If the paper stack exceeds the load limit marks this may result in misfeeds Plain paper Approx 250 sheets When plain paper that weighs 64 g m2 is used Heavy paper Approx 200 sheets When heavy paper that weighs 91g m2 is used 5 Set ...

Страница 68: ...nter Status Window For details on methods for displaying the Printer Status Window see Displaying the Printer Status Window on p 4 83 8 From the Options menu select Device Settings Register Paper Size in Cassettes 9 Select the size of the paper loaded in the paper cassette then click OK When A4 Letter or Legal size is selected the following screen appears When performing 2 sided printing set the p...

Страница 69: ...ading and Outputting Paper 2 When you do not perform 2 sided printing simply click OK NOTE For details on the procedure for setting the paper size switch lever see Automatic 2 sided Printing on p 2 46 Next configure the printer driver See p 2 40 ...

Страница 70: ...abel and envelope can be loaded in the manual feed slot The paper loading procedure varies depending on the paper type Refer to the respective procedures for each paper type Plain Paper Heavy Paper Transparency Label See Loading Plain Paper Heavy Paper Transparency or Label in the Manual Feed Slot on p 2 26 Index Card See Loading Index Card on p 2 29 Envelope See Loading Envelope on p 2 32 Custom ...

Страница 71: ... be loaded with only one sheet of paper Make sure that the printer is not operating and the Ready indicator green is on when loading paper in the manual feed slot However when printing multiple copies or multiple pages from the manual feed slot make sure that the printer is not operating and the Load Paper indicator orange is blinking before loading the second and subsequent paper If paper is load...

Страница 72: ...l feed slot cover 2 Adjust the paper guides to the width of the loaded paper as shown in the figure The paper guides move together IMPORTANT Be sure to align the paper guides with the width of the paper If the paper guides are too loose or too tight this may result in misfeeds or paper jams ...

Страница 73: ...print letterhead paper or paper printed with a logo load the paper so that the printing side is facing up as shown in the following figure Feeding direction 3 Gently insert the paper until it touches the back of the printer while supporting the paper with hands as shown in the figure ...

Страница 74: ... orientation so that the printing side is facing up Feeding direction IMPORTANT The manual feed slot can be loaded with only one sheet of Index Card size paper Make sure that the printer is not operating and the Ready indicator green is on when loading Index Card in the manual feed slot However when printing multiple copies or multiple pages from the manual feed slot make sure that the printer is ...

Страница 75: ...d slot cover 2 Adjust the paper guides to the width of the loaded Index Card as shown in the figure The paper guides move together IMPORTANT Be sure to align the paper guides with the width of the Index Card If the paper guides are too loose or too tight this may result in misfeeds or paper jams ...

Страница 76: ...ith hands as shown in the figure When the paper is loaded it is sent into the slot a little CAUTION When loading paper take care not to cut your hands with the edges of the paper IMPORTANT Load Index Card so that it is straight If Index Card is curled flatten the curls by warping it in the opposite direction before loading it Next configure the printer driver See p 2 40 ...

Страница 77: ...oaded with only one envelope Make sure that the printer is not operating and the Ready indicator green is on when loading an envelope in the manual feed slot However when printing multiple copies or multiple pages from the manual feed slot make sure that the printer is not operating and the Load Paper indicator orange is blinking before loading the second and subsequent envelopes If an envelope is...

Страница 78: ...eed slot cover 2 Adjust the paper guides to the width of the loaded envelope as shown in the figure The paper guides move together IMPORTANT Be sure to align the paper guides with the width of the envelope If the paper guides are too loose or too tight this may result in misfeeds or paper jams ...

Страница 79: ...ack of the printer while supporting the envelope with hands as shown in the figure When the envelope is loaded it is sent into the slot a little CAUTION When loading paper take care not to cut your hands with the edges of the paper IMPORTANT Load the envelope so that it is straight Next configure the printer driver See p 2 40 ...

Страница 80: ...inter is not operating and the Ready indicator green is on when loading paper in the manual feed slot However when printing multiple copies or multiple pages from the manual feed slot make sure that the printer is not operating and the Load Paper indicator orange is blinking before loading the second and subsequent paper If paper is loaded in the manual feed slot while the printer is operating suc...

Страница 81: ... 2 Adjust the paper guides to the width of the loaded paper as shown in the figure The paper guides move together IMPORTANT Be sure to align the paper guides with the width of the paper If the paper guides are too loose or too tight this may result in misfeeds or paper jams ...

Страница 82: ...print letterhead paper or paper printed with a logo load the paper so that the printing side is facing up as shown in the following figure Feeding direction 3 Gently insert the paper until it touches the back of the printer while supporting the paper with hands as shown in the figure ...

Страница 83: ...ter 4 Register the size of the loaded custom size paper using the following procedure When printing custom size paper you need to register the custom paper size in the printer driver previously NOTE To specify a custom paper size display the following dialog box For Windows 2000 XP Server 2003 Display the Document Properties dialog box from the Printers and Faxes folder the Printers folder for Win...

Страница 84: ...ext configure the printer driver See p 2 40 Paper List Displays Name and Size of standard paper sizes and added custom paper sizes Name of Custom Paper Size You can enter the name of the custom paper size to be added Up to 31 characters can be entered Unit Specify the unit Millimeter or Inch to be used when setting the custom paper size Paper Size Specify the height and width of the custom paper s...

Страница 85: ...gure the printer driver using the following procedure before printing NOTE For more details on the settings for the printer driver see Online Help For details on methods for displaying Online Help see How to Use Online Help on p 4 72 1 Select Print from the File menu in the application Select the name of this printer for Name or Printer Name and then click Properties ...

Страница 86: ...ay the Page Setup sheet then from Page Size select the size of a document that you have created with the application NOTE If you set Page Size to Index Card Envelope DL Envelope COM10 Envelope C5 or Envelope Monarch the following message appears and Paper Type is automatically specified ...

Страница 87: ... needed Leave the setting at Match Page Size when the paper size specified for Page Size and that of the paper loaded in the paper source are the same since there is no need to change the setting IMPORTANT The print will be automatically reduced or enlarged to fit on the page when the settings for Page Size and Output Size are different ...

Страница 88: ...per Source sheet then select Paper Source Specify the same setting as the one for Paper Source although the setting for Paper Source changes to ones such as First Page or Other Pages when Paper Selection is set to other than Same Paper for All Pages 5 Select the paper type specified in Paper Type ...

Страница 89: ...n printing Index Card or envelopes the printer automatically applies the appropriate print mode to each type by specifying Output Size in the Page Setup sheet 6 Click OK to close the Properties dialog box Paper Type Printer Driver Setting Plain paper 60 74 g m2 Plain Paper L 75 90 g m2 Plain Paper Heavy paper 91 120 g m2 Heavy Paper 1 121 163 g m2 Heavy Paper 2 Heavy Paper H 1 Transparencies Trans...

Страница 90: ...2 45 Loading and Outputting Paper 2 Setting Up the Printer Driver and Printing 7 Click OK to start printing ...

Страница 91: ...c 2 sided printing NOTE When the last page for the 2 sided printing is 1 sided printing the printer prints faster than normal 2 sided printing by clicking Finishing Details in the Finishing sheet and Advanced Settings in the Finishing Details dialog box and then selecting the Print Last Page in 1 sided Mode when 2 sided Printing is Set check box in the Advanced Settings dialog box However when pri...

Страница 92: ...2 47 Loading and Outputting Paper 2 2 sided Printing When paper is fed from the paper cassette Load the paper so that the printing side is facing up as shown in the following figure Feeding direction ...

Страница 93: ... is fed from the manual feed slot Load the paper so that the printing side is facing down as shown in the following figure Feeding direction Load paper in Cassette 2 Only when the optional paper feeder is installed in the same manner as you load paper in Cassette 1 ...

Страница 94: ... according to the paper size for 2 sided printing For A4 size draw the paper size switch lever toward you For Letter or Legal size push the paper size switch lever into the printer IMPORTANT When performing 2 sided printing be sure to confirm the paper size switch lever is set to the appropriate position When the paper size switch lever is not set to the appropriate position this may result in pap...

Страница 95: ...tting Paper 2 4 Close the duplex unit cover Holding the opening of the duplex unit cover close it gently 5 Select Print from the File menu in the application Select the name of this printer for Name or Printer Name and then click Properties ...

Страница 96: ... select the size of a document that you have created with the application 7 From Output Size select the size of the loaded paper as needed Leave the setting at Match Page Size when the page size and the size of the paper loaded in the paper source are the same since there is no need to change the setting ...

Страница 97: ...nd Output Size are different 8 Display the Finishing sheet and select 2 sided Printing for Print Style 9 Display the Paper Source sheet then select Paper Source Specify the same setting as the one for Paper Source although the setting for Paper Source changes to ones such as First Page or Other Pages when Paper Selection is set to other than Same Paper for All Pages ...

Страница 98: ...per type specified in Paper Type NOTE Load paper based on the following Paper Type criteria 11 Click OK to close the Properties dialog box Paper Type Printer Driver Setting Plain paper 60 74 g m2 Plain Paper L 75 90 g m2 Plain Paper Heavy paper 91 120 g m2 Heavy Paper 1 ...

Страница 99: ...2 sided Printing 2 54 Loading and Outputting Paper 2 12 Click OK to start printing ...

Страница 100: ...iously printed paper you can print both sides of the paper to which automatic 2 sided printing cannot be applied 1 Load paper in the manual feed slot NOTE When printing the reverse side of previously printed paper from the manual feed slot load the paper so that the printing side is facing up as shown in the following figure Feeding direction ...

Страница 101: ...Select Print from the File menu in the application Select the name of this printer for Name or Printer Name and then click Properties 3 Display the Page Setup sheet then from Page Size select the size of a document that you have created with the application ...

Страница 102: ...ze when the page size and the size of the paper loaded in the manual feed slot are the same since there is no need to change the setting IMPORTANT The print will be automatically reduced or enlarged to fit on the page when the settings for Page Size and Output Size are different 5 Display the Paper Source sheet and set Paper Source to Manual Feed Slot ...

Страница 103: ...when printed with Heavy Paper 2 selected select Heavy Paper H 2 When printing Index Card the printer automatically applies the appropriate print mode to Index Card type by specifying Output Size in the Page Setup sheet Paper Type Printer Driver Setting Plain paper 60 74 g m2 Plain Paper L 75 90 g m2 Plain Paper Heavy paper 91 120 g m2 Heavy Paper 1 121 163 g m2 Heavy Paper 2 Heavy Paper H 1 Index ...

Страница 104: ...2 59 Loading and Outputting Paper 2 2 sided Printing 7 Click OK to close the Properties dialog box 8 Click OK to start printing ...

Страница 105: ...2 sided Printing 2 60 Loading and Outputting Paper 2 ...

Страница 106: ... Printer 3 2 Tasks to Perform Each Time You Print 3 2 System Requirements 3 3 Installing the CAPT Software 3 5 Installing from CD ROM Setup 3 6 Installing with Plug and Play 3 15 Installing from Add Printer Wizard 3 37 After Completing Installation 3 53 Checking the Operations by Configuration Page Print 3 55 Printing from a Network Computer by Sharing the Printer on a Network 3 58 Print Server Se...

Страница 107: ...the computer connected by LAN See Network Guide Sharing the printer on a network See p 3 58 If you share this printer on a network and use it from a computer on the network you must specify the settings for the computer and install the printer driver on the client computers Tasks to Perform Each Time You Print The following shows the tasks that should be performed each time you print Specifying pr...

Страница 108: ...figuration of the computer or application you are using the above environment does not guarantee printing in all cases 2 This indicates free hard disk space required for installing the printer driver and manuals using Easy Installation Required free hard disk space varies depending on the system environment or installation method System Requirements recommended Windows 98 Me Windows 2000 XP Server...

Страница 109: ...BASE T or 100BASE TX Protocol TCP IP NOTE When using Sound a PC synthesizer and the driver for PCM synthesizer must be installed in your computer Do not use a PC Speaker driver speaker drv etc This printer uses bi directional communication Operation of the printer when connected via unidirectional communication equipment has not been tested and as a result Canon cannot guarantee printer operation ...

Страница 110: ...lation and increase the free space and then install the CAPT software again Installation method Contents Reference page Easy Installation Installs the manuals when installing the printer driver from the CD ROM supplied with the printer CD ROM Setup p 3 6 Custom Installation You can choose to install only the printer driver or only the manuals from the CD ROM supplied with the printer CD ROM Setup ...

Страница 111: ... see Printing from a Network Computer by Sharing the Printer on a Network on p 3 58 A USB cable is only supplied with 220 240 V model for countries and regions of Asia In other countries and regions prepare according to the specifications of your computer Use a USB cable with the following symbol Installing from CD ROM Setup The screen shots used in this section are from Windows XP IMPORTANT If yo...

Страница 112: ...etting Up the Printing Environment 3 3 Connect the B type square end of the USB cable to the USB connector on the printer then close the expansion slot cover 4 Connect the A type flat end of the USB cable to the USB port on the computer ...

Страница 113: ...D ROM is already in the drive eject the disk and re insert it into the drive IMPORTANT If CD ROM Setup does not appear select Run from the Start menu enter D English MInst exe and then click OK The CD ROM drive name is indicated as D in this manual The CD ROM drive name may differ depending on the computer you are using 7 Click Easy Installation or Custom Installation Easy Installation allows you ...

Страница 114: ... 9 Installing the CAPT Software Setting Up the Printing Environment 3 8 Click Install If you selected Custom Installation in Step 7 clear the Online Manuals check box and then click Install 9 Click Next ...

Страница 115: ...ing the CAPT Software Setting Up the Printing Environment 3 10 Confirm the contents and select I accept the terms in the license agreement and then click Next 11 Select Manually Set Port to Install then click Next ...

Страница 116: ...stem equipped with Windows Firewall the following screen is displayed Specify whether to configure Windows Firewall to unblock communication with the client computers when sharing the printer on a network Click Yes when you share the printer on a network Click No when you do not share the printer on a network NOTE Even after the installation you can change the Firewall settings using CAPT Windows ...

Страница 117: ...pears click Continue Anyway 14 When the following screen is displayed turn the printer ON Press of the power switch to turn the printer ON Installation of the USB class driver and the printer driver starts automatically NOTE If the printer is not recognized automatically even after the USB cable is connected see Installation Problems on p 7 38 If you are using Windows XP Server 2003 and the Hardwa...

Страница 118: ...Software Setting Up the Printing Environment 3 15 The screen that informs you of the completion of the printer driver installation is displayed Click Exit 16 If Easy Installation is selected in Step 7 the manuals are installed ...

Страница 119: ...tallation results then click Next NOTE If the printer driver is not installed properly see Installation Problems on p 7 38 18 Select the Restart Computer Now Recommended check box then click Restart Windows restarts The installation of the USB class driver and the printer driver is completed ...

Страница 120: ...ware Setting Up the Printing Environment 3 Installing with Plug and Play For Windows 98 Me The screen shots used in this section are from Windows Me 1 Make sure that the printer and computer are OFF 2 Open the expansion slot cover ...

Страница 121: ...etting Up the Printing Environment 3 3 Connect the B type square end of the USB cable to the USB connector on the printer then close the expansion slot cover 4 Connect the A type flat end of the USB cable to the USB port on the computer ...

Страница 122: ... 5 Press of the power switch to turn the printer ON 6 Turn the computer on and start up Windows 98 Me The Add New Hardware Wizard dialog box appears For Windows Me If the following dialog box appears proceed to Step 7 If the following dialog box appears proceed to Step 14 ...

Страница 123: ...following dialog box appears click Next then proceed to Step 7 If the following dialog box appears click Next then proceed to Step 14 7 Select Specify the location of the driver Advanced then click Next For Windows 98 Select Search for the best driver for your device Recommended then click Next ...

Страница 124: ...heck box and then select the Specify a location check box For Windows 98 Clear the Floppy disk drives check box and the CD ROM drives check box and then select the Specify a location check box 10 Click Browse then select the folder For Windows Me Select D English USBPORT WinMe and then click OK For Windows 98 Select D English USBPORT Win98 and then click OK The CD ROM drive name is indicated as D ...

Страница 125: ...inting Environment 3 11 Make sure that the folder to be browsed is displayed for Specify a location and then click Next 12 Click Next Installation of the USB class driver starts 13 Click Finish The printer is detected automatically Please wait a moment ...

Страница 126: ... Next 14 Select Specify the location of the driver Advanced then click Next For Windows 98 Select Search for the best driver for your device Recommended then click Next 15 If the supplied LBP3300 User Software CD ROM is not in the CD ROM drive insert the LBP3300 User Software CD ROM into the CD ROM drive If CD ROM Setup appears click Exit ...

Страница 127: ... and then select the Specify a location check box For Windows 98 Clear the Floppy disk drives check box and the CD ROM drives check box then select the Specify a location check box 17 Click Browse then select the folder Select D English Win98_Me then click OK The CD ROM drive name is indicated as D in this manual The CD ROM drive name may differ depending on the computer you are using ...

Страница 128: ...Specify a location and then click Next 19 Click Next 20 Enter a new name in Printer name if you want to change the printer name NOTE If another printer driver has already been installed in the computer the message Do you want your Windows based programs to use this printer as the default printer appears In this case select Yes or No ...

Страница 129: ...ing Up the Printing Environment 3 21 Click Finish Copying files is started 22 When the dialog box for completing the installation appears click OK 23 Click Finish The installation of the USB class driver and the printer driver is completed ...

Страница 130: ...3 25 Installing the CAPT Software Setting Up the Printing Environment 3 For Windows 2000 1 Make sure that the printer and computer are OFF 2 Open the expansion slot cover ...

Страница 131: ...etting Up the Printing Environment 3 3 Connect the B type square end of the USB cable to the USB connector on the printer then close the expansion slot cover 4 Connect the A type flat end of the USB cable to the USB port on the computer ...

Страница 132: ...ss of the power switch to turn the printer ON 6 Turn the computer on and start up Windows 2000 7 Log on as a member of Administrators The Found New Hardware Wizard dialog box appears NOTE Full Control Permission is required for the installation of the printer driver 8 Click Next ...

Страница 133: ...3 9 Select Search for a suitable driver for my device recommended then click Next NOTE Unknown may be displayed as the name of the device 10 Clear the Floppy disk drives check box and the CD ROM drives check box select the Specify a location check box and then click Next ...

Страница 134: ...hen click Browse If CD ROM Setup appears click Exit 12 Select D English Win2K_XP Select CNAB5STK INF then click Open The CD ROM drive name is indicated as D in this manual The CD ROM drive name may differ depending on the computer you are using 13 Make sure that the folder to be browsed is displayed for Copy manufacturer s files from and then click OK ...

Страница 135: ...nting Environment 3 14 Click Next Copying files is started NOTE If the Digital Signature Not Found dialog box appears click Yes 15 Click Finish The installation of the USB class driver supplied with an operating system and the printer driver is completed ...

Страница 136: ...e CAPT Software Setting Up the Printing Environment 3 For Windows XP Server 2003 The screen shots used in this section are from Windows XP 1 Make sure that the printer and computer are OFF 2 Open the expansion slot cover ...

Страница 137: ...etting Up the Printing Environment 3 3 Connect the B type square end of the USB cable to the USB connector on the printer then close the expansion slot cover 4 Connect the A type flat end of the USB cable to the USB port on the computer ...

Страница 138: ...indows XP Server 2003 7 Log on as a member of Administrators NOTE Full Control Permission is required for the installation of the printer driver 8 Insert the supplied LBP3300 User Software CD ROM into the CD ROM drive If CD ROM Setup appears click Exit If the following screen is displayed Select Install from a list or specific location Advanced then click Next ...

Страница 139: ...lling the CAPT Software Setting Up the Printing Environment 3 If the following screen is displayed Select No not this time then click Next Select Install from a list or specific location Advanced then click Next ...

Страница 140: ...clear the Search removable media floppy CD ROM check box and then select the Include this location in the search check box 10 Click Browse then select the folder Select D English Win2K_XP then click OK The CD ROM drive name is indicated as D in this manual The CD ROM drive name may differ depending on the computer you are using ...

Страница 141: ... Hardware Installation dialog box appears click Continue Anyway 12 Click Finish IMPORTANT If you are using a computer with Windows XP Service Pack 2 or another operating system equipped with Windows Firewall as the print server you need to configure Windows Firewall to unblock communication with the client computers See p 8 10 The installation of the USB class driver supplied with an operating sys...

Страница 142: ...ws 98 Me The screen shots used in this section are from Windows Me 1 From the Start menu select Settings Printers to open the Printers folder Then double click Add Printer The Add Printer Wizard dialog box is displayed NOTE The Add Printer Wizard dialog box can also be displayed using the following procedure Double click My Computer Control Panel Printers Add Printer For Windows Me Double click My...

Страница 143: ...3 3 Select Local printer then click Next NOTE This screen does not appear when the network settings have not been configured 4 Click Have Disk 5 Insert the supplied LBP3300 User Software CD ROM into the CD ROM drive and then click Browse If CD ROM Setup appears click Exit ...

Страница 144: ...e name is indicated as D in this manual The CD ROM drive name may differ depending on the computer you are using 7 Confirm the contents of Copy manufacturer s files from then click OK For example when your CD ROM drive is drive D it is displayed as D English Win98_Me 8 Select the name of this printer for Printers then click Next ...

Страница 145: ...r driver has already been installed in the computer the message Do you want your Windows based programs to use this printer as the default printer appears In this case select Yes or No 11 Click Finish Copying files is started 12 When the dialog box for completing the installation appears click OK 13 If the printer and computer are not connected turn the computer off connect the computer and printe...

Страница 146: ...N before installing the CAPT software 1 Turn the computer on and start up Windows 2000 2 Log on as a member of Administrators IMPORTANT If a Wizard appears by the Plug and Play automatic setup click Cancel and then install the CAPT software using this procedure NOTE Full Control Permission is required for the installation of the printer driver 3 From the Start menu select Settings Printers to open...

Страница 147: ...the Printing Environment 3 5 Make sure that Local printer is selected then click Next NOTE Do not select the Automatically detect and install my Plug and Play printer check box 6 Select the USB port for connecting this printer and then click Next ...

Страница 148: ...pplied LBP3300 User Software CD ROM into the CD ROM drive and then click Browse If CD ROM Setup appears click Exit 9 Select D English Win2K_XP Select CNAB5STK INF then click Open The CD ROM drive name is indicated as D in this manual The CD ROM drive name may differ depending on the computer you are using ...

Страница 149: ...ment 3 10 Confirm the contents of Copy manufacturer s files from then click OK For example when your CD ROM drive is drive D it is displayed as D English Win2K_XP 11 Click Next 12 Enter a new name in Printer name if you want to change the printer name then click Next ...

Страница 150: ... you want your Windows based programs to use this printer as the default printer appears In this case select Yes or No 13 Click Next NOTE When sharing this printer on a network select Share as and then click Next The window for entering Location and Comment is displayed Enter them as needed then click Next 14 When printing a test page click Yes then click Next ...

Страница 151: ... off connect the computer and printer with a USB cable and then turn them ON The installation of the printer driver is completed For Windows XP Server 2003 IMPORTANT When printing a test page make sure that the printer is properly connected to the computer and the printer is ON before installing the CAPT software 1 Turn the computer on and start up Windows XP Server 2003 2 Log on as a member of Ad...

Страница 152: ...r driver 3 Display the Printers and Faxes folder For Windows XP Professional Server 2003 From the Start menu select Printers and Faxes For Windows XP Home Edition From the Start menu select Control Panel and then click Printers and Other Hardware Printers and Faxes 4 Click Add a printer For Windows Server 2003 Double click Add Printer 5 Click Next ...

Страница 153: ...at Local printer attached to this computer is selected then click Next NOTE Do not select the Automatically detect and install my Plug and Play printer check box 7 Make sure that Use the following port is selected select the USB port to which this printer is connected and then click Next ...

Страница 154: ...pplied LBP3300 User Software CD ROM into the CD ROM drive and then click Browse If CD ROM Setup appears click Exit 10 Select D English Win2K_XP Select CNAB5STK INF then click Open The CD ROM drive name is indicated as D in this manual The CD ROM drive name may differ depending on the computer you are using ...

Страница 155: ...ment 3 11 Confirm the contents of Copy manufacturer s files from then click OK For example when your CD ROM drive is drive D it is displayed as D English Win2K_XP 12 Click Next 13 Enter a new name in Printer name if you want to change the printer name then click Next ...

Страница 156: ...he message Do you want to use this printer as the default printer appears In this case select Yes or No 14 Click Next NOTE When sharing this printer on a network select Share name and then click Next The window for entering Location and Comment is displayed Enter them as needed then click Next 15 When printing a test page click Yes then click Next ...

Страница 157: ... click Continue Anyway 17 If the printer and computer are not connected turn the computer off connect the computer and printer with a USB cable and then turn them ON IMPORTANT If you are using a computer with Windows XP Service Pack 2 or another operating system equipped with Windows Firewall as the print server you need to configure Windows Firewall to unblock communication with the client comput...

Страница 158: ...of the CAPT software is completed an icon and folder for this printer will be created as follows For Windows 98 Me 2000 The icon for the printer is displayed in the Printers folder Canon Printer Uninstaller is added to Programs under the Start menu If the manuals are installed LBP3300 Online Manuals is created on the desktop ...

Страница 159: ...nvironment 3 For Windows XP Server 2003 The icon for this printer is displayed in the Printers and Faxes folder Canon Printer Uninstaller is added to All Programs under the Start menu If the manuals are installed LBP3300 Online Manuals is created on the desktop ...

Страница 160: ...gned to be printed on A4 size paper Load A4 size paper The screen shots used in this section are from Windows XP Professional 1 Display the Printers and Faxes folder or the Printers folder For Windows 98 Me 2000 From the Start menu select Settings Printers For Windows XP Professional Server 2003 From the Start menu select Printers and Faxes For Windows XP Home Edition From the Start menu select Co...

Страница 161: ...Printing Environment 3 3 Display the Page Setup sheet then click Display Printer Status Window to run the Printer Status Window NOTE For details on the Printer Status Window see Printer Status Window on p 4 81 4 From the Options menu select Utility Configuration Page Print ...

Страница 162: ...nvironment 3 5 Click OK Configuration Page Print is printed IMPORTANT This is a sample of Configuration Page Print The contents may differ from the Configuration Page Print printed by your computer NOTE If Configuration Page Print is not printed properly see Chapter 7 Troubleshooting ...

Страница 163: ...ers on a network perform the following configuration In this manual the computer directly connected to the printer is called print server and the other computers which use the printer via the network are called clients Network Environment Print Server Windows 98 Me Windows 98 Me Client Windows 98 Me Client Windows 2000 XP Server 2003 Client Windows 2000 XP Server 2003 Client Print Server Windows 2...

Страница 164: ...r Microsoft Networks then click OK 5 Click File and Printer Sharing make sure that I want to be able to allow others to print to my printer s is selected then click OK 6 Display the Access Control sheet select Share level access control or User level access control and then click OK to restart Windows 7 After Windows restarts from the Start menu select Settings Printers 8 Right click the icon for ...

Страница 165: ...ons For Windows 2000 From the Start menu select Settings Network and Dial up Connections For Windows Server 2003 From the Start menu select Control Panel Network Connections Local Area Connection click Properties and then proceed to Step 3 For Windows 2000 The Network and Dial up Connections folder is displayed For Windows XP The Network Connections folder is displayed 2 Right click the Local Area...

Страница 166: ... settings immediately after the installation Printer sharing settings require running Network Setup Wizard to enable the sharing settings For more details see Windows online Help 1 Display the Printers and Faxes folder or the Printers folder For Windows 2000 From the Start menu select Settings Printers For Windows XP Professional Server 2003 From the Start menu select Printers and Faxes For Window...

Страница 167: ... 2 Right click the icon for this printer then select Sharing from the pop up menu 3 Select Share this printer Change the share name as needed For Windows 2000 Select Shared as NOTE You can also specify the sharing settings during the local installation Do not enter blank or special characters for the share name ...

Страница 168: ...anges to the shared printer icon and the printer sharing settings are completed 5 Select the Windows 95 98 and Me check box then click OK For Windows 2000 Select the Windows 95 or 98 check box then click OK For Windows XP Server 2003 Select the Windows 95 Windows 98 and Windows Millennium Edition check box then click OK 6 Insert the supplied LBP3300 User Software CD ROM into the CD ROM drive If th...

Страница 169: ... 8 Click Close The printer icon changes to the shared printer icon IMPORTANT To clear the printer sharing settings select Do not share this printer Not shared for Windows 2000 in the Sharing sheet If you cleared the printer sharing settings with Windows XP Service Pack 2 or another operating system equipped with Windows Firewall you need to delete the settings registered in Windows Firewall using ...

Страница 170: ...displayed If you clicked Yes Windows Firewall was configured to allow communication with the client computers If you clicked No however Windows Firewall was configured to block communication with the client computers and you will need to use the following method to clear that block 1 From the Start menu select Control Panel and then click Network and Internet Connections Windows Firewall 2 In the ...

Страница 171: ...There are the following two ways to download and install the printer driver Installing from Add Printer Wizard See p 3 74 Installing from Windows Explorer See p 3 78 IMPORTANT If you are using Windows 2000 XP Server 2003 be sure to log on as a member of Administrators when starting up If you are using Windows XP Service Pack 2 or another operating system equipped with Windows Firewall on a client ...

Страница 172: ...wnload and install the driver on Windows 2000 XP Server 2003 The screen shots used in this section are from Windows XP Professional Installing from CD ROM Setup 1 Insert the supplied LBP3300 User Software CD ROM into the CD ROM drive If the CD ROM is already in the drive eject the disk and re insert it into the drive IMPORTANT If CD ROM Setup does not appear select Run from the Start menu enter D ...

Страница 173: ...asy Installation or Custom Installation Easy Installation allows you to install the printer driver and the instruction manuals simultaneously If you do not install the manuals select Custom Installation 3 Click Install If you selected Custom Installation in Step 2 clear the Online Manuals check box and then click Install ...

Страница 174: ... by Sharing the Printer on a Network Setting Up the Printing Environment 3 4 Click Next 5 Confirm the contents and select I accept the terms in the license agreement and then click Next 6 Select Manually Set Port to Install then click Next ...

Страница 175: ...he Printing Environment 3 7 If the Install Printer driver through a USB Connection check box is selected clear the check box then click Next NOTE Do not select the Install Printer Driver through a USB Connection check box 8 Select Use Network Printer for Port Settings then click Settings ...

Страница 176: ...haring the Printer on a Network Setting Up the Printing Environment 3 9 Select the icon for the shared printer in the print server then click OK 10 Select whether or not to use this printer as the default printer then click Next 11 Click Start ...

Страница 177: ...he following screen is displayed Click No Select Yes only when the computer on which you are currently installing the printer driver is to be used as a print server 12 The message Installation cannot be stopped once it starts Do you want to continue appears Click Yes Installation of the printer driver starts 13 The screen that informs you of the completion of the printer driver installation is dis...

Страница 178: ...on a Network Setting Up the Printing Environment 3 14 If Easy Installation is selected in Step 2 the manuals are installed 15 Confirm the installation results then click Next NOTE If the printer driver is not installed properly see Installation Problems on p 7 38 ...

Страница 179: ...perly in the Printer Status Window and some of the printer functions may not operate properly See p 8 10 Installing from Add Printer Wizard 1 Display the Printers and Faxes folder or the Printers folder For Windows 98 Me 2000 From the Start menu select Settings Printers For Windows XP Professional Server 2003 From the Start menu select Printers and Faxes For Windows XP Home Edition From the Start ...

Страница 180: ...er by Sharing the Printer on a Network Setting Up the Printing Environment 3 3 Click Next 4 Select A network printer or a printer attached to another computer then click Next For Windows 98 Me 2000 Select Network printer then click Next ...

Страница 181: ...printer or to browse for a printer select this option and click Next then click Next For Windows 98 Me click Browse 6 Select the directory of the print server then click Next For Windows 98 Me Proceed to Step 8 NOTE If you are using Windows XP Server 2003 and the Connect to Printer dialog box appears follow the directions in the message ...

Страница 182: ...lick Finish IMPORTANT If you are using Windows XP Service Pack 2 or another operating system equipped with Windows Firewall on the client computers configure Windows Firewall to unblock communication with the print server If you do not clear the block the printer status may not be displayed properly in the Printer Status Window and some of the printer functions may not operate properly See p 8 10 ...

Страница 183: ... Network Neighborhood for Windows 98 then double click the icon for this printer Alternatively you can drag and drop the icon for the printer into the Printers and Faxes folder or Printers folder 3 Follow the instructions on the screen IMPORTANT If you are using Windows XP Service Pack 2 or another operating system equipped with Windows Firewall on the client computers configure Windows Firewall t...

Страница 184: ...llation If you are using a computer with Windows XP Service Pack 2 or another operating system equipped with Windows Firewall the printer is registered in the Exceptions sheet in the Windows Firewall dialog box When you uninstall the CAPT software using the uninstaller the settings for this printer are also removed from the Exceptions sheet in the Windows Firewall dialog box If the manuals are ins...

Страница 185: ...lete NOTE Even if Canon LBP3300 is not on the list in the Delete Printer dialog box you can delete the file and information related to this printer by clicking Delete 4 Click Yes Uninstallation starts Please wait a moment 5 Click Exit NOTE If the CAPT software cannot be uninstalled see When Uninstallation Fails on p 7 39 ...

Страница 186: ...4 45 Printing Multiple Pages on One Sheet 4 46 Scaling Print Output 4 48 Poster Printing 4 50 Watermark Printing 4 51 Printing Borders and Printing Date 4 53 Selecting an Objective 4 55 Printing with a Gutter 4 56 Specifying the Paper Output Method 4 58 Printing with the Data 180 Degrees Rotated 4 59 Smoothing Out Rough Textured Images 4 60 Printing with Toner Density Adjusted 4 61 Specifying the ...

Страница 187: ...nstalling the Manuals 4 80 Printer Status Window 4 81 Functions on the Printer Status Window 4 81 Displaying the Printer Status Window 4 83 Preferences Menu 4 84 Utility Menu 4 86 Device Settings Menu 4 86 Refresh 4 87 Resolve Error 4 87 Displaying Printer Status When Using a Print Server 4 87 ...

Страница 188: ...d Faxes folder or the Printers folder For Windows 98 Me 2000 From the Start menu select Settings Printers For Windows XP Professional Server 2003 From the Start menu select Printers and Faxes For Windows XP Home Edition From the Start menu select Control Panel and then click Printers and Other Hardware Printers and Faxes 2 Select the icon for this printer then select Properties from the File menu ...

Страница 189: ...isplay the Device Settings for Windows 2000 XP Server 2003 or Configuration for Windows 98 Me sheet then specify the settings for Paper Source Options NOTE You can also obtain the printer status such as the paper feeder automatically by clicking Get Device Status 4 Click OK ...

Страница 190: ...al feed slot NOTE When loading paper in the paper cassette see Loading Paper in the Paper Cassette p 2 18 when loading paper in the manual feed tray see Loading Paper in the Manual Feed Slot p 2 25 and when performing 2 sided printing see 2 sided Printing p 2 46 2 Open the PDF file to print with Adobe Reader and then select Print Setup from the File menu 3 Specify the paper size of the document an...

Страница 191: ...er for Name or Printer Name and then specify the printing preferences NOTE The printer name displayed in this dialog box can be changed in the Printers and Faxes folder the Printers folder for Windows 98 Me 2000 6 If you want to specify more detailed printing preferences click Properties ...

Страница 192: ...ntents of the Document Properties dialog each time you print In particular it is recommended that you confirm the contents of the Page Setup sheet and the Paper Source sheet The default settings for all files can be configured using the following dialog box For Windows 98 Me Open the Printer Properties dialog box from the Printers folder See Displaying the Printer Properties Dialog Box from the Pr...

Страница 193: ...ny problems with printing see Chapter 7 Troubleshooting Using the Various Printing Functions see p 4 20 describes how to use the various functions of the printer and printer driver By specifying the settings for the printer and printer driver for each job you can make the best use of the printer and its functions ...

Страница 194: ... the job If you display the Printer Properties dialog box from the Printers folder you can specify various settings for the printer and default values for all jobs NOTE The Configuration sheet that allows you to specify various settings for the printer can be displayed only by using the procedure described in Displaying the Printer Properties Dialog Box from the Printers Folder See p 4 11 Displayi...

Страница 195: ...4 10 Printing a Document Specifying the Printing Preferences 4 2 Select the name of this printer for Name or Printer Name and then click Properties The Document Properties dialog box is displayed ...

Страница 196: ...Folder 1 From the Start menu select Settings Printers 2 Select the icon for this printer then select Properties from the File menu The Printer Properties dialog box is displayed NOTE The Printer Properties dialog box can also be displayed by right clicking the icon for this printer and selecting Properties from the pop up menu ...

Страница 197: ...s for the Printers and Faxes folder or the Printers folder If you cannot display the Document Properties dialog box from the Printers and Faxes folder or the Printers folder display the dialog box from the application The Device Settings sheet that allows you to specify various settings for the printer can be displayed only by using the procedure described in Displaying the Printer Properties Dial...

Страница 198: ...4 13 Printing a Document 4 Specifying the Printing Preferences 2 Confirm the printer name then click Properties The Document Properties dialog box is displayed ...

Страница 199: ...s folder For Windows 2000 From the Start menu select Settings Printers For Windows XP Professional Server 2003 From the Start menu select Printers and Faxes For Windows XP Home Edition From the Start menu select Control Panel and then click Printers and Other Hardware Printers and Faxes 2 Select the icon for this printer then select Printing Preferences from the File menu The Document Properties d...

Страница 200: ...om the Printers and Faxes Folder or the Printers Folder 1 Display the Printers and Faxes folder or the Printers folder For Windows 2000 From the Start menu select Settings Printers For Windows XP Professional Server 2003 From the Start menu select Printers and Faxes For Windows XP Home Edition From the Start menu select Control Panel and then click Printers and Other Hardware Printers and Faxes 2 ...

Страница 201: ...ifying the Printing Preferences 4 The Printer Properties dialog box is displayed NOTE The Printer Properties dialog box can also be displayed by right clicking the icon for this printer and selecting Properties from the pop up menu ...

Страница 202: ...rring and that in a printing process Deleting Pausing Resuming a Print Job Using the Printer Status Window 1 Start printing The Printer Status Window appears NOTE The Printer Status Window may not appear depending on the settings for Display Printer Status Window in the Preferences menu in the Printer Status Window See Preferences Menu on p 4 84 2 When deleting or pausing the job click the Pause J...

Страница 203: ...ayed and the My Job Operation tab is selected on the top by clicking the Pause Job button in the Current Print Job tab 3 Click the button for the desired operation from among the Job Operation buttons Deleting a Job Click Delete Job Pausing a Job Click Pause Job Resuming the Job Click Resume Job ...

Страница 204: ...y is pressed and the job when the key is released are different the both jobs cannot be canceled Depending on the settings for Enable to Cancel Error Jobs or Enable to Cancel Any Processing Print Job in the Settings of the Cancel Job Key menu in Device Settings you may not be able to cancel the job See Device Settings Menu on p 4 86 NOTE The Cancel Job indicator orange comes on while pressing the ...

Страница 205: ...variety of ways by using the printer driver as follows Printing Multiple Pages on One Sheet See p 4 46 Multiple pages can be printed on one sheet of paper Scaling Print Output See p 4 48 Specify this option when A4 size data is reduced in size and printed on B5 size paper or B5 size data is enlarged and printed on A4 size paper You can specify an arbitrary scaling ...

Страница 206: ... on multiple sheets of paper You can join these printouts together to make one large poster Watermark Printing See p 4 51 You can superimpose watermarks such as COPY DRAFT etc over the documents created by an application Printing Borders and Printing Date See p 4 53 You can print with borders printing date and or page numbers etc 13 June 2006 ...

Страница 207: ... ready to be bound into a booklet Therefore 4 pages in total are printed on a single sheet of paper For example when making a booklet of 12 pages 3 sheets are used in total since 2 pages are printed on each side of paper To make a booklet you only have to fold the printouts into two and bind them The booklet printing function arranges the page order so that the pages are aligned properly when they...

Страница 208: ...outs of a complete job are grouped arranged in this page order 1 1 1 2 2 2 3 3 3 Collate Printouts of a complete job are collated For example if you are printing three copies of a 3 page document printouts of a complete job are collated arranged in this page order 1 2 3 1 2 3 1 2 3 Printing with the Data 180 Degrees Rotated See p 4 59 You can print with the image 180 degrees rotated This option is...

Страница 209: ... p 4 60 Specify this option when printing by smoothing out this kind of low resolution image data Printing with Toner Density Adjusted See p 4 61 You can print with toner density adjusted Specifying the Brightness and Contrast See p 4 62 You can perform printing with the brightness and contrast specified ...

Страница 210: ...See p 4 64 You can print an adjusted grayscale sample after specifying the settings in the Grayscale Adjustment sheet Editing Jobs with PageComposer See p 4 69 You can combine two jobs into one and change the job settings for the combined job You can edit a job in another application You can also preview the job JobA JobB Job ...

Страница 211: ... in each sheet For Windows 98 Me Document Properties Dialog Box Page Setup Sheet Finishing Sheet Paper Source Sheet Quality Sheet Printer Properties Dialog Box General Sheet Details Sheet Sharing Sheet Page Setup Sheet Finishing Sheet Paper Source Sheet Quality Sheet Configuration Sheet NOTE The General Details and Sharing sheets in the Printer Properties dialog box are displayed by Windows For de...

Страница 212: ...ties dialog box are displayed by Windows For details on these sheets see Windows Help Page Setup Sheet The Page Setup sheet allows you to specify the following printing preferences Setting Button Contents Page Size You can select the paper size of the document created by an application Output Size You can specify the actual paper size to be printed Copies You can specify the number of copies to be...

Страница 213: ...gle page image and print it out on multiple sheets of paper You can join these printouts together to make one large poster Page Order You can specify the page order layout for printing when Page Layout is set to N Pages per Sheet N 2 4 6 8 9 16 Manual Scaling See p 4 49 Selecting this check box allows you to enter the value for scaling the printed document manually Watermark See p 4 51 You can sup...

Страница 214: ... standard paper sizes and Custom Name Fixed These standard paper sizes and Custom Name Fixed cannot be deleted Name of Custom Paper Size You can enter the name of the custom paper size to be added Unit Specify the unit Millimeter or Inch to be used when setting the custom paper size Paper Size Specify the height and width of the custom paper size Height Width Specify the custom paper size in portr...

Страница 215: ...e deleted Add Allows you to add and specify a new watermark in the Edit Watermark dialog box Up to 50 watermarks can be added Delete Deletes the watermark selected in Watermark List However you cannot delete the default watermarks Name You can enter the name for the added watermark to be displayed in Watermark in the Page Setup sheet Text Enter the characters to be printed as a watermark Font Sele...

Страница 216: ...to specify the font for printing date and page number Setting Button Contents Edging You can select the type of edging to print as a border When a border is applied the original print data will be reduced slightly in size to make room for the border Print Date You can print the date Print User Name You can print a user name that is registered in the computer Print Page Number You can print page nu...

Страница 217: ...ting Booklet Displays a dialog box for Booklet Printing Print in Different Orientations When there are data of different orientations in a job select the Print in Different Orientations check box and specify the settings for Paper Alignment or Gutter Click Details to specify the settings Details Finishing Sheet Displays a dialog box for detailed settings for Paper Alignment Paper Alignment Display...

Страница 218: ...thod Finishing Details Displays the Finishing Details dialog box for specifying the finishing details and print mode appropriate to the paper Setting Button Contents Booklet Printing Method Specify the unit for Booklet Printing printing all pages at once or by dividing into several portions Specify Booklet Gutter Select this check box when specifying the gutter for performing Booklet Printing Ente...

Страница 219: ... dialog box allows you to specify the width of the gutter and image processing method Setting Button Contents Paper Alignment You can select the pattern of Paper Alignment when printing in different orientations Gutter When a value is specified a margin of white space is created on one side of the printed paper This margin is called Gutter The gutter is useful when binding pages Valid values for G...

Страница 220: ...nd allows you to specify whether to pause a print job temporarily when Paper Source in the Paper Source sheet is set to Cassette 1 or Cassette 2 the optional paper feeder If this check box is selected a message is displayed and the job is paused when the paper size specified in Output Size in the Page Setup sheet is different from the paper size specified in the Register Paper Size in Cassettes di...

Страница 221: ...heck box for this option is selected blank paper is not output if the job includes blank pages Advanced Settings Allows you to specify the settings in the Advanced Settings dialog box when you want to print jagged lines of the text and graphics smoothly or specify whether to print the last page in the 1 sided mode during 2 sided printing Also if you are using Windows 2000 XP Server 2003 you can sp...

Страница 222: ... Selection Auto Automatically selects the paper source according to the size or type of paper Manual Feed Slot Cassette 1 Cassette 2 Displayed only when the optional paper feeder is installed Feeds paper from the selected paper source The following types of paper can be loaded in each paper source Manual Feed Slot Plain paper 60 90 g m2 Heavy paper 91 163 g m2 Index Card Envelope Label Transparenc...

Страница 223: ...e printing preferences Manual Grayscale Settings Select this check box when customizing the grayscale To specify the grayscale in detail click Grayscale Settings to display the Grayscale Settings dialog box Grayscale Settings After selecting the Manual Grayscale Settings check box click this button to customize the grayscale Print Grayscale Sample Windows 2000 XP Server 2003 only See p 4 64 When t...

Страница 224: ...lack Select this check box when colored text or thin lines of CAD data etc drop out or appear broken in the printed paper You may be able to print thin lines finely Enable Image Correction See p 4 60 When image data such as photographic images are enlarged in size in an application and printed the printed images can look rough or jagged Specify this option when printing by smoothing out this kind ...

Страница 225: ...ent sheet and the Matching sheet Grayscale Adjustment Sheet This sheet allows you to adjust brightness and contrast for printing Setting Button Contents Preview Displays a sample image after adjustment Original Displays a sample of the original image before adjustment Brightness See p 4 62 You can adjust the brightness for the print data Contrast See p 4 62 You can adjust the contrast for the prin...

Страница 226: ...u can select the appropriate option the profiles registered in your computer are displayed for the monitor or scanner in use Gamma When Matching Mode is set to Gamma Adjustment color is adjusted by brightness without performing matching In Gamma you can adjust the brightness of the printout results without spoiling the lightest parts and darkest parts Apply this option when printed colors in the p...

Страница 227: ...computer whether the jobs are processed in the computer When Spooling at Host is not performed in the computer some options become disabled You can select either Auto or Disabled When Auto is selected the spooling status is automatically determined by the printer settings Show Icon in the Taskbar When this check box is selected an icon for displaying the Printer Status Window appears in the taskba...

Страница 228: ... can view and confirm all of the current page settings Add Displays the Add Edit Profile dialog box and allows you to add a new Profile Edit Selecting the desired Profiles in Profile List and clicking this button display the Add Edit Profile dialog box and allow you to change Name Icon Comment and the settings for the added Profile However you cannot edit the default Profiles Delete Deletes the se...

Страница 229: ...log box Allow Profile Selection When the check box for this option is selected you can select a Profile in the Document Properties dialog box Clear the check box for this option to disable selection of a Profile in the Document Properties dialog box Allow Setting Edition When this check box is selected you can add a new Profile setting that is different from the default Profiles in the Document Pr...

Страница 230: ...Page Layout and Print Style 1 sided Printing and 2 sided Printing only Left clicking the edge of the document image allows you to specify Binding Location The setting for Page Layout changes successively among 1 Page per Sheet 2 Pages per Sheet and 4 Pages per Sheet by repeatedly left clicking within the document image Right clicking on Preview selects 1 Page per Sheet 1 sided 2 Pages per Sheet 1 ...

Страница 231: ...ifies Finishing If Paper Selection is set to Different for First Others and Last Different for First Second Others and Last or Different for Cover and Others you can specify the paper source for each page Printing Multiple Pages on One Sheet Multiple pages can be printed on one sheet of paper 1 If you are using Windows 2000 XP Server 2003 display the Device Settings sheet and then make sure that S...

Страница 232: ...or 16 Pages per Sheet Page Order appears Specify how the pages are aligned NOTE The options under the Page Order pull down menu differ depending on the paper orientation or the number of pages to be printed on one sheet 4 Confirm the settings then click OK 5 Click OK or Print The printer starts printing ...

Страница 233: ...rom each other the scale factor is adjusted automatically The scale factor can also be specified manually You can specify from 25 to 200 Scaling a Document Automatically 1 Display the Page Setup sheet then specify the page size in Page Size 2 Specify the paper size in Output Size 3 Confirm the settings then click OK The scaling will be set automatically according to the sizes specified in Page Siz...

Страница 234: ...ctions Scaling a Document Manually 1 Display the Page Setup sheet then specify the page size in Page Size 2 Specify the paper size in Output Size 3 Select the Manual Scaling check box then specify the value in the spin box 4 Confirm the settings then click OK ...

Страница 235: ...together to make one large poster 1 If you are using Windows 2000 XP Server 2003 display the Device Settings sheet and then make sure that Spooling at Host is set to Auto 2 Display the Page Setup sheet then select Poster N x N N 2 3 4 from Page Layout A layout image of the printed paper appears on Preview 3 Confirm the settings then click OK 4 Click OK or Print The printer starts printing ...

Страница 236: ...rmarks or edit the already registered watermarks by clicking Edit Watermark in the Page Setup sheet Watermark Printing 1 If you are using Windows 2000 XP Server 2003 display the Device Settings sheet and then make sure that Spooling at Host is set to Auto 2 Display the Page Setup sheet select the Watermark check box and then select the watermark to print with the document from the drop down list o...

Страница 237: ... Watermarks 1 If you are using Windows 2000 XP Server 2003 display the Device Settings sheet and then make sure that Spooling at Host is set to Auto 2 Display the Page Setup sheet select the Watermark check box and then click Edit Watermark 3 Specify the options as needed ...

Страница 238: ...watermark click Add You cannot change the settings for the default watermarks 4 Confirm the settings then click OK The Page Setup sheet reappears Printing Borders and Printing Date You can print with borders printing date and or page numbers 1 If you are using Windows 2000 XP Server 2003 display the Device Settings sheet and then make sure that Spooling at Host is set to Auto 2 Display the Page Se...

Страница 239: ... as needed NOTE For more details on the settings see Windows online Help For details on methods for displaying Online Help see How to Use Online Help on p 4 72 4 Confirm the settings then click OK The Page Setup sheet reappears 5 Click OK 6 Click OK or Print The printer starts printing ...

Страница 240: ... sided printing or booklet printing set the paper size switch lever on the rear of the main unit to the appropriate position When the switch is not set to the appropriate position this may result in paper jams For details on the procedure for setting the paper size switch lever see Automatic 2 sided Printing on p 2 46 1 sided Printing Prints on one side of paper 2 sided Printing Prints on both sid...

Страница 241: ...o Use Online Help on p 4 72 3 Confirm the settings then click OK The Finishing sheet reappears 4 Confirm the settings then click OK 5 Click OK or Print The printer starts printing Printing with a Gutter You can specify a gutter on the printouts Valid gutter values range from 0 to 30 mm When a gutter is specified the position of the page image is adjusted to make room for the gutter At this point y...

Страница 242: ...ocation and then click Gutter 2 Specify the options as needed NOTE For more details on the settings see Windows online Help For details on methods for displaying Online Help see How to Use Online Help on p 4 72 3 Confirm the settings then click OK The Finishing sheet reappears 4 Confirm the settings then click OK 5 Click OK or Print The printer starts printing ...

Страница 243: ...e document printouts of a complete job are grouped arranged in this page order 1 1 1 2 2 2 3 3 3 Collate Printouts of a complete job are collated For example if you are printing three copies of a 3 page document printouts of a complete job are collated arranged in this page order 1 2 3 1 2 3 1 2 3 1 Display the Finishing sheet then select the output method in Finishing 2 Confirm the settings then ...

Страница 244: ...ted This option is useful for printing envelopes and Index Card that can be fed only in specific orientations 1 Display the Finishing sheet then click Finishing Details 2 Select the Rotate Print Data 180 Degrees check box 3 Confirm the settings then click OK The Finishing sheet reappears 4 Click OK 5 Click OK or Print The printer starts printing ...

Страница 245: ...c images are enlarged in size in an application and printed the printed images can look rough or jagged You can print this kind of low resolution image data with smoothing it out 1 Display the Quality sheet then click Details 2 Select the Enable Image Correction check box 3 Confirm the settings then click OK The Quality sheet reappears ...

Страница 246: ...r starts printing Printing with Toner Density Adjusted You can print with toner density adjusted 1 Display the Quality sheet then click Details 2 Adjust the toner density by dragging the Toner Density slider from side to side Move the slider to the right to make it denser and to the left to make it lighter ...

Страница 247: ...The Quality sheet reappears 4 Click OK 5 Click OK or Print The printer starts printing Specifying the Brightness and Contrast You can perform printing with the brightness and contrast specified 1 Display the Quality sheet select the Manual Grayscale Settings check box and then click Grayscale Settings ...

Страница 248: ... make it lighter and to the left to make it darker Move the Contrast slider to the right to make it higher and to the left to make it lower 3 Confirm the settings then click OK The Quality sheet reappears If you are using Windows 2000 XP Server 2003 you can print a sample after adjusting the brightness and contrast For more details see Printing a Grayscale Sample Windows 2000 XP Server 2003 only o...

Страница 249: ...ast are changed by 1 unit in each of the corresponding directions This is useful to adjust the colors on the printed paper 1 If you are using Windows 2000 XP Server 2003 display the Device Settings sheet and then make sure that Spooling at Host is set to Auto 2 Display the Quality sheet select the Manual Grayscale Settings check box and then select the Print Grayscale Sample check box 3 Confirm th...

Страница 250: ...e Setup Finishing Paper Source and Quality sheets is displayed then perform the following procedure NOTE For Windows 98 Me up to 50 Profiles can be added To make it possible to add up to 50 Profiles for each user account double click My Computer Control Panel Passwords to display the User Profiles sheet and then select Users can customize their preferences and desktop settings For Windows 2000 XP ...

Страница 251: ...per Source and Quality sheets specify the printer settings that you want to add 2 Click Add Profile 3 Enter the name of the Profile in Name Icon allows you to select the icon for the Profile Enter any comments in Comment as needed NOTE You can enter up to 31 characters for Name and up to 255 characters for Comment ...

Страница 252: ...ious Printing Functions Confirming the Printer Settings Click View Settings When OK is clicked the Add Profile dialog box reappears 4 Click OK The Properties dialog box reappears Make sure that the name of the added Profile is in Profile List ...

Страница 253: ...ormation or delete it from Profile List 1 Click Edit Profile 2 Edit information about the Profiles Editing a Profile You can change the settings for Name Icon and Comment By clicking or you can change the order of the selected Profile When Import is clicked information about the Profiles is imported from the previously saved file ...

Страница 254: ... even if the Profiles is changed Deleting a Profile When Delete is clicked the Profile is deleted from the list IMPORTANT You can delete only custom Profiles You cannot delete the default Profiles Also you cannot delete the Profile currently selected in each sheet Editing Jobs with PageComposer You can combine two jobs into one and change the job settings for the combined job You can edit a job in...

Страница 255: ...at informs you that the output method is going to be switched to the Edit and Preview mode is displayed Click OK 3 Specify the printing preferences in each sheet then click OK The Print dialog box reappears 4 Click OK or Print Depending on the application you are using click Print ...

Страница 256: ... the jobs that you want to edit 6 Edit the jobs on the list in the Canon PageComposer dialog box NOTE For more details on the setting procedures for the Canon PageComposer dialog box see Help for Canon PageComposer When the Edit and Preview mode is selected in the Printer Properties dialog box and Lock is set the Canon PageComposer dialog box appears each time you print ...

Страница 257: ...Online Help using the following procedure to see the instructions in it Displaying Online Help on the Options Displayed on the Screen There are three methods to display Online Help on the windows of the printer driver or the Printer Status Window Right click the item of which you want to display Online Help then click What s This from the pop up menu ...

Страница 258: ... want to display Help then click it Press the TAB key on your keyboard to select the item of which you want to display Help then press the F1 key Displaying Online Help on the Operation Procedures Display the procedures for operating the printer driver or the Printer Status Window using the following procedure 1 Click Help ...

Страница 259: ...4 74 Printing a Document How to Use Online Help 4 2 Click Contents 3 Double click the title of which you want to know the operation procedure ...

Страница 260: ...nline Help Retrieving the Option about Which You Want to Know with Keywords and Displaying its Online Help Retrieve the option about which you want to know with keywords and display its Online Help using the following procedure 1 Click Help ...

Страница 261: ...4 76 Printing a Document How to Use Online Help 4 2 Click Index 3 Enter the keyword to display the option about which you want to know ...

Страница 262: ...e option about which you want to know NOTE Depending on your operating system a list of words created automatically may be displayed on Find You can also display Online Help by selecting a word that is related to the option about which you want to know from the displayed word list ...

Страница 263: ...inter on the computer using the following procedure 1 Insert the supplied LBP3300 User Software CD ROM into the CD ROM drive If the CD ROM is already in the drive eject the disk and re insert it into the drive IMPORTANT If CD ROM Setup does not appear select Run from the Start menu enter D English MInst exe and then click OK The CD ROM drive name is indicated as D in this manual The CD ROM drive n...

Страница 264: ...4 79 Printing a Document 4 Manuals 3 Clear the Printer Driver check box then click Install 4 When screen for completing the installation appears click Next 5 Click Exit ...

Страница 265: ...ling the CAPT software put ProgramFiles Canon LBP3300 Manuals in the drive of the operating system you are using and the following files created on the desktop in the Recycle Bin to delete them Program Files Canon LBP3300 Manuals Index pdf Manual_1 pdf Manual_2 pdf Manual_3 pdf Manual_4 pdf Desktop LBP3300 Online Manuals Shortcut for Index pdf IMPORTANT If the manuals are installed on Windows 2000...

Страница 266: ...ons on the Printer Status Window The functions on the Printer Status Window are the same on both Windows 98 Me and Windows 2000 XP Server 2003 For more details on operations see Online Help For details on methods for displaying Online Help see How to Use Online Help on p 4 72 Refresh Button Message Area Auxiliary Resolve Error Button Menu Bar Icon Message Area Animation Area Progress Bar Status Ba...

Страница 267: ...an animated graphic The background color changes from blue normal to orange when user action is required or to red when a warning is issued Refresh Button Obtains the printer status and refreshes the Printer Status Window display Resolve Error Button Allows you to resume a job when the job is paused for some reason Current Print Job Tab Progress Bar Indicates the progress of the current job by sho...

Страница 268: ...y Printer Status Window in locations such as in the Page Setup sheet in the Document Properties dialog box Display the Printer Properties dialog box and display the Configuration Device Settings sheet and then select the Show Icon in the Taskbar check box The icon for the Printer Status Window is displayed in the Windows taskbar Click the icon then click Canon LBP3300 to run it ...

Страница 269: ...r Status Window does not appear during printing See Preferences Menu on p 4 84 Preferences Menu The Preferences menu allows you to display the Printer Status Window automatically specify the sound settings and make the Printer Status Window monitor the printer status For more details on each setting see Online Help For details on methods for displaying Online Help see How to Use Online Help on p 4...

Страница 270: ...4 85 Printing a Document 4 Printer Status Window 1 Select Preferences from the Options menu The Preferences dialog box is displayed 2 Confirm each of the settings then click OK ...

Страница 271: ...Device Settings Menu You can specify the settings related to the printer such as specifying the size of the paper in the paper cassette and specifying the network settings Register Paper Size in Cassettes Specifies the size of the paper loaded in the paper cassette For more details see Loading Paper in the Paper Cassette on p 2 18 Settings of the Cancel Job Key The job that can be canceled using t...

Страница 272: ...rinter error such as a paper jam and paper out condition When another user s job is paused Resolve Error is enabled on the print server if the printer is shared on a network You can obtain the same result by clicking Resolve Error in the Printer Status Window IMPORTANT If the message Insufficient Disk Space is displayed delete unnecessary files then select Resolve Error Displaying Printer Status W...

Страница 273: ...ed by the print server NOTE To display the printer status when printing a job over the network a network environment that uses one of the following protocols is required TCP IP NetBEUI Current Print Job Tab My Job Operation Tab Job Operation Job Information Area Pause Job Button Job Information Area Job Operation Buttons Displays the first job Enabled 1 Displays the first job 2 Enabled Pause Job P...

Страница 274: ...ge and cleaning the printer Replacing the Toner Cartridge 5 2 Before Replacing the Toner Cartridge 5 2 Replacing Toner Cartridge 5 7 Precautions for Handling Toner Cartridge 5 14 Storing Toner Cartridges 5 17 Cleaning the Fixing Roller 5 18 Cleaning the Outside of the Printer 5 20 Moving the Printer 5 23 Handling the Printer 5 30 ...

Страница 275: ...on the basis of ISO IEC 19752 when printing A4 size paper with the default print density setting The level of toner consumption varies depending on the type of documents printed If your average document contains a lot of graphics tables or charts the life of the toner cartridge will be shorter as they consume more toner ISO IEC 19752 is the global standard related to Method for the determination o...

Страница 276: ...thing If they become dirty wash them immediately with cold water Washing with warm water will set the toner and make it impossible to remove the toner stains NOTE For details on handling the toner cartridge see Precautions for Handling Toner Cartridge on p 5 14 1 Open the front cover Holding the opening of the front cover open it gently 2 Remove the toner cartridge from the printer ...

Страница 277: ... the toner cartridge as shown in the figure shake it gently 5 or 6 times to evenly distribute the toner inside the cartridge Be careful not to spill the toner IMPORTANT If toner is not distributed evenly this may result in deterioration in print quality Be sure to carry out this procedure properly Be sure to shake the toner cartridge gently If you do not shake the cartridge gently toner may spill ...

Страница 278: ...5 5 Routine Maintenance 5 Replacing the Toner Cartridge 4 Hold the toner cartridge properly with the arrowed side facing up as shown in the figure ...

Страница 279: ...5 Replacing the Toner Cartridge 5 Push the toner cartridge into the printer until it touches the back of the printer while aligning A on both sides of the toner cartridge with the toner cartridge guides inside the printer A A ...

Страница 280: ...new one using the following procedure WARNING Do not throw a used toner cartridge into open flames as this may cause the toner remaining inside the cartridge to ignite resulting in burns or a fire CAUTION Take care not to allow the toner to come into contact with your hands or clothing as this will dirty your hands or clothing If they become dirty wash them immediately with cold water Washing with...

Страница 281: ...r Cartridge The packing materials may be changed in form or position to be placed or may be added or removed without notice 1 Open the front cover Holding the opening of the front cover open it gently 2 Remove the toner cartridge from the printer ...

Страница 282: ...toner cartridge out of the protective bag after taking it out of the package There is a cut near the arrow on the protective bag so you can open it by hand However if you cannot open it by hand use scissors to open the protective bag so as not to damage the toner cartridge IMPORTANT Keep the protective bag for the toner cartridge It may be required after taking out the toner cartridge for printer ...

Страница 283: ...print quality Be sure to carry out this procedure properly Be sure to shake the toner cartridge gently If you do not shake the cartridge gently toner may spill out 5 Place the toner cartridge on a flat surface fold back the tab of the sealing tape a and then pull out the sealing tape approx 45 cm long gently b while supporting the toner cartridge Remove the sealing tape by hooking your fingers int...

Страница 284: ...nsult a physician IMPORTANT Do not pull the sealing tape diagonally upwards or downwards If the tape is severed it may become difficult to pull out completely Pull out the sealing tape completely from the toner cartridge If any tape remains in the toner cartridge this may result in poor print quality When pulling out the sealing tape be careful not to touch the toner cartridge memory A or not to h...

Страница 285: ...5 12 Routine Maintenance 5 Replacing the Toner Cartridge 6 Hold the toner cartridge properly with the arrowed side facing up as shown in the figure ...

Страница 286: ... 5 Replacing the Toner Cartridge 7 Push the toner cartridge into the printer until it touches the back of the printer while aligning A on both sides of the toner cartridge with the toner cartridge guides inside the printer A A ...

Страница 287: ...rtridge or deterioration in print quality Be careful of the following points when removing or installing the toner cartridge WARNING Do not throw a used toner cartridge into open flames as this may cause the toner remaining inside the cartridge to ignite resulting in burns or a fire CAUTION Take care not to allow the toner to come into contact with your hands or clothing as this will dirty your ha...

Страница 288: ...damage to the cartridge Also print quality may deteriorate if you touch or damage the photosensitive drum inside the toner cartridge Be sure not to touch or open the drum protective shutter B Be careful not to hold or touch areas that are not specified in this procedure such as the electrical contacts C This may result in damage to the cartridge A B C ...

Страница 289: ...d or humidity If you move the toner cartridge to a location that is warmer or has higher humidity leave the cartridge in the new location for 2 hours or longer without opening the protective bag to allow it to adjust to the new temperature Be sure to use a new toner cartridge before the expiration date indicated on the package Keep the toner cartridge away from products that generate magnetic wave...

Страница 290: ... place exposed to direct sunlight Do not store the cartridge in a hot or humid place or a place where the temperature and humidity can change significantly Storing environment temperature 0 to 35 C 32 to 95 F Storing humidity range 35 to 85 RH no condensation Do not store the toner cartridge in a place where corrosive gases such as ammonia are generated or where a considerable amount of salt is co...

Страница 291: ...ty deterioration can be prevented by cleaning the fixing roller 1 Load A4 size Letter size blank paper in the manual feed slot or paper cassette 2 Display the Printer Status Window For details on methods for displaying the Printer Status Window see Displaying the Printer Status Window on p 4 83 3 From the Options menu in the Printer Status Window select Utility Cleaning A confirmation message is d...

Страница 292: ...ssage Cleaning appears in the Printer Status Window then the cleaning starts When the paper is output and the message is cleared the cleaning is completed NOTE Cleaning takes approximately 90 seconds The cleaning process cannot be canceled Please wait until it is completed ...

Страница 293: ...r plug Failure to observe these steps may result in a fire or electrical shock Do not use alcohol benzene paint thinner or other flammable substances If flammable substances come into contact with electrical parts inside the printer it may result in a fire or electrical shock IMPORTANT Be careful not to use a cleaning agent other than water or a mild detergent diluted with water as this may deform...

Страница 294: ... the USB cable b and then disconnect the power plug from the AC power outlet c 3 Firmly wring a soft cloth dampened with water or a mild detergent diluted with water and wipe off the dirt If you use a mild detergent for cleaning be sure to wipe away the detergent with a soft cloth dampened with water a a c b ...

Страница 295: ...ng the Outside of the Printer 4 After wiping off the dirt wipe the printer with a dry cloth 5 When the printer is completely dry plug the power plug into the AC power outlet connect the USB cable and then close the expansion slot cover ...

Страница 296: ...he printer or moving the printer for maintenance be sure to perform the following procedure IMPORTANT Make sure that the front cover and manual feed slot cover are closed before carrying the printer NOTE For details on the installation site see Getting Started Guide 1 Open the expansion slot cover ...

Страница 297: ...disconnect the power plug from the AC power outlet c c c c WARNING Be sure to turn the printer and computer OFF unplug the power plug and then disconnect all the interface cables from the printer before moving the printer Otherwise the power cord or interface cables may be damaged resulting in a fire or electrical shock a a c b ...

Страница 298: ...5 25 Routine Maintenance 5 Moving the Printer 3 Remove all the interface cables and the power cord from the printer 4 Close the expansion slot cover 5 Pull out the paper cassette ...

Страница 299: ...the front side securely hold the printer by the lift handles located on the lower portion of the printer with both hands CAUTION This printer weighs approximately 10 8 kg without the paper cassette installed Please be careful not to hurt your back or other portions of your body when carrying the printer ...

Страница 300: ...so you may drop the printer resulting in personal injury The back portion A of the printer is relatively heavy Be careful not to get off balanced when lifting the printer If you do so you may drop the printer resulting in personal injury Do not carry the printer with the paper cassette attached If you do so the paper cassette may drop resulting in personal injury A ...

Страница 301: ...er on the new installation site before carrying the printer to the site For details on the procedure for installing the paper feeder see Installing the Paper Feeder on p 6 14 7 Put the printer down carefully at the new installation site CAUTION Put the printer down slowly and carefully Be careful not to hurt your hands IMPORTANT Secure sufficient space around the printer at the installation site s...

Страница 302: ...g the power plug into the AC power outlet 12 Connect the USB cable then close the expansion slot cover Transporting the Printer When transporting the printer for reasons such as relocating remove the toner cartridge and store the printer and the parts in the package that they came in with the packing materials attached in order to prevent them from being damaged while being transported If the orig...

Страница 303: ...y Instructions See p xvi Do not place any heavy objects on the printer trays or covers This may result in damage to the printer Do not leave the front cover open longer than required Exposing the printer to direct sunlight or strong light may result in deterioration in print quality Avoid vibration while the printer is printing This may result in deterioration in print quality Be sure not to open ...

Страница 304: ... printer to cool down sufficiently before covering the printer If you do not plan to use the printer for a long period of time unplug the power plug from the AC power outlet Do not use or store the printer in a room where chemicals are used The face down output tray and its surroundings and face up output slot become hot during or immediately after using the printer Do not touch the face down outp...

Страница 305: ...5 32 Routine Maintenance 5 Handling the Printer ...

Страница 306: ... Paper Feeder 6 4 Installation Space 6 6 Removing the Packing Materials 6 7 Moving the Printer 6 10 Installing the Paper Feeder 6 14 Removing the Paper Feeder 6 17 Network Board 6 19 Parts and Their Functions 6 21 Installing the Network Board 6 21 Setting the Network Board 6 26 Problems on Installing the Network Board 6 29 Resetting the Network Board 6 30 Removing the Network Board 6 33 ...

Страница 307: ... paper cassette and manual feed slot By installing the optional paper feeder up to 3 paper sources can be used The paper feeder unit PF 35 consists of a paper feeder and paper cassette The paper cassette can be loaded with up to approximately 250 sheets of plain paper 64 g m2 at sizes of A4 B5 A5 Legal Letter and Executive NOTE The paper feeder is designed for LBP3300 You cannot use a paper feeder...

Страница 308: ...ettings and manage the printer from a computer on the network Also you can use NetSpot Device Installer and NetSpot Console that configure and manage a printer connected to a network on a computer NOTE For details on Remote UI see Remote UI Guide For more details on NetSpot Device Installer see Network Guide For details on NetSpot Console see NetSpot Console User s Guide For details on the procedu...

Страница 309: ...please contact your local authorized Canon dealer WARNING Be sure to turn the printer OFF unplug the power plug and then disconnect all the interface cables and power cord from the printer before installing the paper feeder Otherwise the power cord or interface cables may be damaged resulting in a fire or electrical shock IMPORTANT Do not touch the connector A in the paper feeder This may result i...

Страница 310: ...make sure that Cassette 1 is set before printing If you print from Cassette 2 when Cassette 1 is not set this will cause paper jams NOTE Load paper in the paper feeder in the same manner as you load paper in Cassette 1 For more details see Chapter 2 Loading and Outputting Paper ...

Страница 311: ...t are 7 8 mm high and their top surface is 12 mm square The rear feet are 7 8 mm high the left top surface has a rectangular shape of 21 7 mm x 40 mm and the right top surface is 31 7 mm x 40 mm and is L shaped Front Surface Front Surface Front Surface 26 7 294 40 3 26 7 293 8 40 5 41 9 276 51 8 42 7 282 4 44 6 mm mm 100 100 100 1063 7 500 569 7 200 Paper cassette 546 5 Output selection cover Fron...

Страница 312: ...f there is any packing material remaining inside the paper feeder this may result in misfeeds or damage to the printer when operating the printer Be sure to remove all the packing materials following the procedure The removed packing materials are required when transporting the printer for relocation or maintenance Keep them where they will not get lost NOTE The packing materials may be changed in...

Страница 313: ...Accessories 6 Paper Feeder IMPORTANT Do not touch the black rubber pad A in the paper cassette This may result in misfeeds 2 Remove the tape that is securing the packing material in the paper cassette 2 locations A ...

Страница 314: ...er cassette is provided with a packing material Be sure to take out the paper cassette to remove the packing material 4 Set the paper cassette in the paper feeder Push the paper cassette into the paper feeder firmly until the front side of the paper cassette is flush with the front surface of the paper feeder ...

Страница 315: ...NING Be sure to turn the printer and computer OFF unplug the power plug and then disconnect all the interface cables from the printer before moving the printer Otherwise the power cord or interface cables may be damaged resulting in a fire or electrical shock CAUTION Do not carry the printer with the paper cassette attached If you do so the paper cassette may drop resulting in personal injury 1 Op...

Страница 316: ...eder 2 Turn the printer and computer OFF a remove the USB cable b and then disconnect the power plug from the AC power outlet c 3 Remove all the interface cables and the power cord from the printer 4 Close the expansion slot cover a a c b ...

Страница 317: ...es 6 Paper Feeder 5 Pull out the paper cassette 6 Move the printer unit from the installation site From the front side securely hold the printer by the lift handles located on the lower portion of the printer with both hands ...

Страница 318: ...he paper cassette installed Please be careful not to hurt your back or other portions of your body when carrying the printer Be sure not to hold the printer by the front panel delivery slots or any portions other than the lift handles If you do so you may drop the printer resulting in personal injury ...

Страница 319: ...ont cover and manual feed slot cover are closed before carrying the printer Installing the Paper Feeder The paper feeder is to be installed at the bottom of the printer unit CAUTION Put the printer or paper feeder down slowly and carefully Be careful not to hurt your hands Do not carry the printer with the paper cassette attached If you do so the paper cassette may drop resulting in personal injur...

Страница 320: ...ch the connector A in the paper feeder This may result in damage to the printer or misfeeds Do not install the paper feeder on a platform that may warp from the weight of the printer and optional accessories or where the printer is liable to sink such as a carpet or mat Secure sufficient space around the paper feeder so that you can install the printer and connect cords such as the power cord and ...

Страница 321: ... unit IMPORTANT If the printer unit cannot be placed on the paper feeder properly lift the printer unit once hold it horizontally and place it again If you try to set the printer unit forcefully without lifting it the connector and positioning pins may be broken 4 Set the paper cassette in the printer unit and paper feeder 5 Open the expansion slot cover 6 Connect the interface cables except for t...

Страница 322: ...e Settings sheet Removing the Paper Feeder Remove the paper feeder using the following procedure WARNING Be sure to turn the printer and computer OFF unplug the power plug and then disconnect all the interface cables and power cord from the printer before removing the paper feeder Otherwise the power cord or interface cables may be damaged resulting in a fire or electrical shock CAUTION Do not car...

Страница 323: ... cover 5 Pull out the paper cassette from the printer unit and all the paper feeder 6 Lift the printer unit and remove it from the paper feeder 7 Move the paper feeder 8 Move back the printer unit to the installation site 9 Set the paper cassette in the printer 10 Open the expansion slot cover 11 Connect the interface cables except for the USB cable and connect the power cord 12 Plug the power plu...

Страница 324: ...ndows 98 Me 2000 XP Server 2003 Client Windows 98 Me 2000 XP Server 2003 Client Windows 98 Me 2000 XP Server 2003 Client Windows 98 Me 2000 XP Server 2003 Client Windows 98 Me 2000 XP Server 2003 Connecting the network board on the printer directly to the computer Connecting the printer to the computer via a print server LBP3300 Network board installed LBP3300 Network board installed If your print...

Страница 325: ...tricity Observe the following precautions when handling the network board to prevent damage from static electricity Touch a metal object to dissipate static electricity before handling the network board When handling the network board do not touch anything that generates static electricity such as the computer display Do not touch the network board parts printed wire or connectors with your hands ...

Страница 326: ... board is connected to the network properly e e e e ERR Indicator Orange Comes on or blinks when the network board is not working properly f f f f MAC Address It is required when setting the IP address using the ARP PING command It may be also required when installing the printer driver Installing the Network Board Install the network board in the expansion slot of the printer using the following ...

Страница 327: ...USB cable b and then disconnect the power plug from the AC power outlet c 3 Remove the power cord If there is not enough space to install the network board move the printer to a place where you can work easier 4 Remove the screws and remove the protective plate for the expansion slot a a c b ...

Страница 328: ...the metal panel portions of the network board and insert the board while aligning it with the guide rails inside the expansion slot IMPORTANT Do not touch the network board parts printed wire or connectors with your hands Insert the printer connector of the network board securely into the connector inside the expansion slot 6 Secure the top and bottom portions of the network board with the two scr...

Страница 329: ...his network board does not come with a LAN cable A Category 5 twisted pair cable is required for installing the network board and connecting the printer to a network Have cables or a hub ready as needed 8 Connect the LAN cable Connect a LAN cable that is compatible with the LAN connector of the network board according to the network 9 Connect the power cord 10 Plug the power plug into the AC power...

Страница 330: ...he LNK indicator green on the network board is on If the network board is connected by 10BASE T the board is working properly when the LNK indicator is on If the network board is connected by 100BASE TX the board is working properly when the LNK indicator and 100 indicator are on A ERR Indicator B LNK Indicator C 100 Indicator If the network board is not working properly turn the printer OFF and t...

Страница 331: ...network board Before setting the DIP switches turn the printer OFF then remove the network board A Phillips screwdriver is required for removing the network board Have a screwdriver ready in advance that matches the size of the screws Set the DIP switches according to the transmission speed of the connected network as follows IMPORTANT When setting the DIP switches be careful not to damage the mai...

Страница 332: ... the interface cables and the power cord from the printer 4 Remove the two screws and remove the network board IMPORTANT Do not touch the network board parts printed wire or connectors with your hands Communication speed and Transmission mode of LAN 10BASE T Half duplex ON OFF ON OFF ON OFF ON OFF ON OFF Auto detect default setting 10BASE T Full duplex 100BASE TX Half duplex 100BASE TX Full duplex...

Страница 333: ... guide rails inside the expansion slot IMPORTANT Do not touch the network board parts printed wire or connectors with your hands Insert the printer connector of the network board securely into the connector inside the expansion slot 7 Secure the top and bottom portions of the network board with the two screws supplied with the network board 8 Connect the LAN cable 9 Connect the power cord 10 Plug ...

Страница 334: ...ub Remedy 1 Connect the LAN cable to a port with a X mark Remedy 2 If the hub has a UP LINK cascade switch switch to X Cause 3 A cross LAN cable is being used Remedy 1 Replace the cable with a straight LAN cable Remedy 2 Connect the cross LAN cable to the UP LINK cascade port on the hub If the hub has a UP LINK cascade switch switch to NOTE A cross LAN cable is a cable used to connect a printer an...

Страница 335: ...s ON Remedy Set the DIP switch 1 to OFF once The ERR indicator on the network board keeps blinking Cause The hardware of the network board is in an abnormal condition Remedy Contact your local authorized Canon dealer for servicing Resetting the Network Board If you want to reset the network board to the default values use the Remote UI or FTP Client For details on the Remote UI see Chapter 3 Vario...

Страница 336: ...your hands 5 Switch the DIP switch 1 to ON Set the DIP switches with the tip of a ball point pen etc IMPORTANT When setting the DIP switches be careful not to damage the main board with the tip of a ball point pen etc Do not use a sharp object such as a mechanical pencil 6 Insert the network board into the expansion slot Hold the metal panel portions of the network board and insert the board while...

Страница 337: ...er switch to turn the printer ON wait until the Ready indicator comes on and then press of the power switch to turn the printer OFF 11 Disconnect the power plug from the AC power outlet 12 Remove the power cord 13 Remove the network board then reset the DIP switch 1 to OFF Set the DIP switches with the tip of a ball point pen etc IMPORTANT When setting the DIP switches be careful not to damage the...

Страница 338: ...s and power cord from the printer before removing the network board If a USB cable is connected turn the computer off and then remove the USB cable If you attempt to remove the network board when the printer is ON or any cable is connected to the printer this may result in an electrical shock Be careful when handling the network board Touching the edges or a sharp portion of the network board may ...

Страница 339: ...re required when the network board is installed Keep them where they will not get lost 5 Attach the protective plate to the expansion slot and secure it with the screws 6 Connect the interface cables except for the USB cable and connect the power cord 7 Plug the power plug into the AC power outlet 8 Connect the USB cable then close the expansion slot cover ...

Страница 340: ...nit Error Appears 7 27 When a Scanner Error or Service Error Appears 7 29 Print Quality Problems 7 32 Paper Problems 7 36 When Nothing is Printed 7 37 Installation Problems 7 38 When Uninstallation Fails 7 39 Uninstalling the USB Class Driver 7 41 Problems on Local Installation 7 44 Installation Problems When the Printer is Shared on a Network 7 45 Problems on Installing the Network Board 7 46 Mis...

Страница 341: ...n p 4 81 The power cord is not connected The power switch is turned OFF See Turning the Printer ON OFF on p 1 10 The Alarm indicator is on or blinking See Alarm Indicator on p 7 3 The printer is installed in an adverse environment See the Getting Started Guide Other Problems See Print Quality Problems on p 7 32 Paper Problems See Paper Problems on p 7 36 The printer driver is not installed properl...

Страница 342: ... occurred in the printer the Alarm indicator orange comes on or blinks When the Alarm indicator is on a service error is occurring In this case see Service Call Display on p 7 25 If the Alarm indicator is blinking follow the directions displayed in the Printer Status Window ...

Страница 343: ...t is completely cool before removing the jammed paper Touching the fixing unit when it is still hot may result in burns When removing jammed paper take care not to allow the toner to come into contact with your hands or clothing as this will dirty your hands or clothing If they become dirty wash them immediately with cold water Washing with warm water will set the toner and make it impossible to r...

Страница 344: ...e most appropriate direction judging from the position of the paper If paper is torn be sure to find and remove any remaining pieces of paper The error message may remain if jammed paper is removed without opening the front cover In this case open and close the front cover once Do not touch the high voltage contact A or the electrical contacts B shown in the figure as this may result in damage to ...

Страница 345: ...ray and its surroundings and face up output slot become hot during or immediately after using the printer Do not touch the face down output tray and its surroundings and face up output slot when removing the jammed paper or performing the related operation ...

Страница 346: ...structions below to remove the jammed paper 1 Open the output selection cover 2 Tilt the green pressure release levers on both sides of the fixing unit towards you to release the pressure in the fixing unit Even if paper is jammed here do not remove it but proceed to the next step ...

Страница 347: ... Holding the opening of the front cover open it gently 4 Remove the toner cartridge from the printer NOTE For details on handling the toner cartridge see Precautions for Handling Toner Cartridge on p 5 14 5 Place the toner cartridge into the protective bag ...

Страница 348: ...iquely upward unfixed toner may spill When removing the jammed paper pull it as horizontally as possible Dirt inside the printer may cause deterioration in print quality 7 Raise the transport guide and tilt it toward you Raise the transport guide by holding the green tab tilt the guide toward you CAUTION Do not take your hands off the transport guide The transport guide may snap back to its origin...

Страница 349: ...y jammed paper by pulling it in the direction of the arrow Remove the jammed paper gently to prevent unfixed toner from spilling IMPORTANT If the jammed paper cannot be removed easily do not try to remove it forcefully but proceed to the next step ...

Страница 350: ...ansport guide back to its original position slowly CAUTION Do not take your hands off the transport guide until it moves back to its original position The transport guide may snap back to its original position and this may result in personal injury ...

Страница 351: ...7 12 Troubleshooting 7 Paper Jams 10 Remove any jammed paper on the face down output tray or face up output slot side by pulling it in the direction of the arrow ...

Страница 352: ...leshooting 7 Paper Jams In case the automatic 2 sided printing has been performed 11 Move the green pressure release levers of the fixing unit back to their original positions 12 Close the output selection cover ...

Страница 353: ...inting has not been performed proceed to Step 16 13 Open the duplex unit cover 14 Remove any jammed paper by pulling it in the direction of the arrow IMPORTANT If the jammed paper cannot be removed easily do not try to remove it forcefully but proceed to the next step ...

Страница 354: ...7 15 Troubleshooting 7 Paper Jams 15 Close the duplex unit cover 16 Close the front cover Holding the opening of the front cover close it gently ...

Страница 355: ...7 16 Troubleshooting 7 Paper Jams 17 If you are using the manual feed slot remove any paper jammed in the manual feed slot 18 Pull out the paper cassette ...

Страница 356: ...oubleshooting 7 Paper Jams If the paper feeder is installed pull out the paper cassette of the paper feeder also 19 Remove any jammed paper while pushing it downward to some extent In case of the printer unit ...

Страница 357: ...e of the paper feeder In case the automatic 2 sided printing has not been performed proceed to Step 23 IMPORTANT Do not touch the feed rollers A in the printer unit and paper feeder This may result in damage to the printer or printer error A ...

Страница 358: ...roubleshooting 7 Paper Jams 20 Open the duplex print transport guide Holding the green tab push the duplex print transport guide downward 21 Remove any jammed paper by pulling it in the direction of the arrow ...

Страница 359: ...PORTANT Be sure to check if the duplex print transport guide is closed completely If the duplex print transport guide is not closed completely this may result in misfeeds or paper jams 23 Set the paper cassette in the printer Push the paper cassette into the printer firmly until the front side of the paper cassette is flush with the front surface of the printer ...

Страница 360: ... Paper Jams If the paper feeder is installed set the paper cassette of the paper feeder also 24 Open the front cover Holding the opening of the front cover open it gently 25 Take the toner cartridge out of the protective bag ...

Страница 361: ...7 22 Troubleshooting 7 Paper Jams 26 Hold the toner cartridge properly with the arrowed side facing up as shown in the figure ...

Страница 362: ...hooting 7 Paper Jams 27 Push the toner cartridge into the printer until it touches the back of the printer while aligning A on both sides of the toner cartridge with the toner cartridge guides inside the printer A A ...

Страница 363: ...cover close it gently IMPORTANT If you cannot close the front cover check if the toner cartridge is installed properly If you try to close the front cover forcefully this may result in damage to the printer Do not leave the front cover open for a long time after installing the toner cartridge ...

Страница 364: ... Display 7 Troubleshooting Service Call Display When a problem has occurred and the printer does not work properly the Alarm indicator orange comes on and the following service call appears in the Printer Status Window ...

Страница 365: ...nit Error Appears on p 7 27 to contact your local authorized Canon dealer A problem occurred in the scanner See When a Scanner Error or Service Error Appears on p 7 29 to cycle the power of the printer A problem occurred in the printer See When a Scanner Error or Service Error Appears on p 7 29 to cycle the power of the printer ...

Страница 366: ...ears When a fixing unit error appears contact your local authorized Canon dealer using the following procedure 1 Open the expansion slot cover 2 Turn the printer and computer OFF a remove the USB cable b and then disconnect the power plug from the AC power outlet c a a c b ...

Страница 367: ...RTANT Do not turn the printer ON after the fixing unit error appears and the power of the printer is turned OFF 3 Close the expansion slot cover 4 Contact your local authorized Canon dealer When contacting your Canon dealer please report the problems ...

Страница 368: ...er of the printer using the following procedure This may clear the message 1 Turn the power OFF wait for 10 seconds or longer and then turn it ON again If the message does not reappear the printer can be used as normal If the error message still appears proceed to the next step 2 Note down the error code displayed in the Printer Status Window OFF ON ...

Страница 369: ...30 Troubleshooting 7 Service Call Display 3 Open the expansion slot cover 4 Turn the printer and computer OFF a remove the USB cable b and then disconnect the power plug from the AC power outlet c a a c b ...

Страница 370: ...leshooting 7 Service Call Display 5 Close the expansion slot cover 6 Contact your local authorized Canon dealer When contacting your Canon dealer please report the problems and the error code that you have noted ...

Страница 371: ...it gently 5 or 6 times to evenly distribute the toner and then reinstall the toner cartridge If this does not solve the problem replace the toner cartridge with a new one See Replacing the Toner Cartridge on p 5 2 Cause 2 The drum in the toner cartridge has deteriorated Remedy Replace the toner cartridge with a new one See Replacing the Toner Cartridge on p 5 2 Printed pages have white specks Caus...

Страница 372: ... Settings dialog box by clicking Details in the Quality sheet Cause 2 The printer is exposed to direct sunlight or strong light Remedy Move the printer to a place where it will not be exposed to direct sunlight or strong light Alternatively move the strong light source away from the printer Front or back of the printed paper has smudge marks Cause The fixing roller is dirty Remedy Clean the fixing...

Страница 373: ...y the settings for Top Margin and Paper Position in the application properly See the instruction manual supplied with the application The next page is printed from halfway across the previous page Cause Line Spacing or Lines Page in the application is not specified properly Remedy Specify the settings for Line Spacing and Lines Page in the application so that data fits in one page and print again ...

Страница 374: ...n the toner cartridge has deteriorated Remedy Replace the toner cartridge with a new one See Replacing the Toner Cartridge on p 5 2 The back of the printed paper has smudge marks Cause The size of the print data was larger than that of the loaded paper Remedy Check if the size of the print data matches that of the loaded paper ...

Страница 375: ...is inappropriate Remedy Replace the paper with one that can be used with this printer See Paper Requirements on p 2 2 Cause 3 The paper is too thin Remedy Set Paper Type to Plain Paper L in the printer driver In order to specify the setting for Paper Type display the Paper Source sheet Cause 4 Paper that curls easily is output to the face down output tray Remedy Switch the output tray to the face ...

Страница 376: ... test page For Windows 98 Me Click Print Test Page in the General sheet in the Printer Properties dialog box For Windows 2000 XP Server 2003 Click Print Test Page in the General sheet in the Printer Properties dialog box When the test page is printed correctly Printing can be performed from the CAPT software Check the application to make sure that all the settings are specified properly When the t...

Страница 377: ...move Programs Properties for Windows 98 Me Add Remove Programs for Windows 2000 See When Uninstallation Fails on p 7 39 Install the CAPT software again See Installing the CAPT Software on p 3 5 Install the CAPT software again See Installing the CAPT Software on p 3 5 Canon Printer Uninstaller is displayed in All Programs Programs for Windows 98 Me 2000 from the Start menu Canon LBP3300 is displaye...

Страница 378: ...double click Add Remove Programs For Windows Server 2003 From the Start menu select Control Panel Add or Remove Programs 2 Select Canon LBP3300 in the Add or Remove Programs dialog box then click Change Remove For Windows 2000 Select Canon LBP3300 in the Add Remove Programs dialog box then click Change Remove For Windows 98 Me Select Canon LBP3300 in the Add Remove Programs Properties dialog box t...

Страница 379: ...bleshooting 7 Installation Problems 3 Select the name of this printer then click Delete 4 Click Yes Uninstallation starts Please wait a moment 5 Click Exit The Delete Printer dialog box closes 6 Restart Windows ...

Страница 380: ...anel and then click Add or Remove Programs For Windows 98 Me 2000 From the Start menu select Settings Control Panel and then double click Add Remove Programs For Windows Server 2003 From the Start menu select Control Panel Add or Remove Programs 3 Make sure that Canon LBP3300 is not displayed in the Add or Remove Programs dialog box and then click For Windows 2000 Make sure that Canon LBP3300 is n...

Страница 381: ...Windows 2000 the Add Remove Programs Properties dialog box for Windows 98 Me 4 From the Start menu select Control Panel and then click Performance and Maintenance System For Windows 98 Me 2000 From the Start menu select Settings Control Panel and then double click the System icon For Windows Server 2003 From the Start menu select Control Panel System 5 Click Hardware Device Manager and then double...

Страница 382: ...properly According to your operating system select and delete any one of Canon LBP3300 Canon CAPT USB Device or Unknown device Never delete any drivers for other devices If you delete them by mistake Windows may not operate properly If the USB class driver is not installed properly USB Printing Support for Windows 2000 XP Server 2003 Canon CAPT USB Device for Windows Me or Canon LBP3300 for Window...

Страница 383: ...nect the USB cable Then connect the USB cable again and turn the printer ON Cause 2 The printer is OFF Remedy Turn the printer ON Cause 3 The USB cable is not connected properly Remedy Make sure that the printer and computer are connected with the USB cable properly Cause 4 An inappropriate USB cable is being used Remedy Use a USB cable appropriate for the USB interface of this printer The USB int...

Страница 384: ...h the correct permissions to install the software On Windows 2000 this becomes Local Printer Installation Problems When the Printer is Shared on a Network The print server to be connected cannot be found Cause 1 The print server has not been started up Remedy Start up the print server Cause 2 The printer is not specified as a shared printer Remedy Specify the printer as a shared printer in the Pri...

Страница 385: ...connect it Cause 2 The cable is connected to the UP LINK cascade port on the hub Remedy 1 Connect the LAN cable to a port with a X mark Remedy 2 If the hub has a UP LINK cascade switch switch to X Cause 3 A cross LAN cable is being used Remedy 1 Replace the cable with a straight LAN cable Remedy 2 Connect the cross LAN cable to the UP LINK cascade port on the hub If the hub has a UP LINK cascade s...

Страница 386: ...rly Remedy 2 Replace the network cable with a proper one and check if there is no disconnection or damage Remedy 3 If the ERR indicator still comes on even after applying the Remedy 1 and 2 contact your local authorized Canon dealer for servicing The ERR indicator on the network board blinks at an interval of four times Cause The DIP switch 1 on the network board is ON Remedy Set the DIP switch 1 ...

Страница 387: ...ware and install it again See Uninstalling the CAPT Software on p 3 79 Installing the CAPT Software on p 3 5 Excessive time is required until the next job starts after finishing a job Cause The printer cools down the fixing unit so that the print quality is maintained Especially after paper with a narrower width is printed Remedy Please wait a moment The printer cools down the fixing unit automati...

Страница 388: ...Remedy Start up the print server then configure Windows Firewall to unblock communication with the client computers See Windows Firewall on p 8 10 The printer status is not displayed properly in the Printer Status Window when the printer is shared over a network Cause You are using a computer with Windows XP Service Pack 2 or another operating system equipped with Windows Firewall as a client comp...

Страница 389: ...ork board or confirm the TCP IP settings Use these functions when required after installing and connecting the printer for example when you want to check the operation NOTE Configuration Page Print is designed to be printed on A4 size paper Load A4 size paper For details on Network Status Print see Chapter 4 Troubleshooting in Network Guide 1 Display the Printer Status Window For details on method...

Страница 390: ...ation Page Print Configuration Page Print prints information as shown in the following figure You can confirm the optional settings of the printer and printer status such as Number of Total Printed Pages IMPORTANT This is a sample of Configuration Page Print The contents may differ from the Configuration Page Print printed by your computer ...

Страница 391: ...7 52 Troubleshooting 7 Confirming the Printer Features ...

Страница 392: ...etSpot Device Installer 8 7 Print Monitor Installer 8 8 NetSpot Console 8 9 Windows Firewall 8 10 Configuring Windows Firewall to Unblock Communication with the Client Computers 8 11 Configuring Windows Firewall to Block Communication with Client Computers 8 13 Configuring Windows Firewall to Unblock Communication with the Print Server 8 14 Index 8 16 Location of the Serial Number 8 21 ...

Страница 393: ...as the toner cartridge you are using menu setting availability of the optional accessories and installation environment First print time When printing A4 outputting face down Approx 9 seconds or less May vary depending on the toner cartridge you are using or output environment Paper size Cassette 1 A4 B5 A5 Legal Letter Executive Paper capacity approx 250 sheets 64 g m2 Cassette 2 Optional Manual ...

Страница 394: ...er consumption at temperature of 20 C 68 F 110 127 V Average during operation approx 446 W 1 Average during standby approx 4 W 1 Maximum 790 W 2 or less 220 240 V Average during operation approx 436 W 1 Average during standby approx 4 W 1 Maximum 806 W 2 or less 1 When the printer is with standard equipment 2 However the instantaneous peak on startup shall not be counted Consumables Toner Cartridg...

Страница 395: ...dge Canon Genuine Cartridge Printable pages approx 2 500 pages approx 0 8 kg Toner Cartridge Canon Genuine Cartridge Printable pages approx 6 000 pages approx 1 0 kg Paper Feeder Unit PF 35 Including the cassette approx 3 3 kg Printing software CAPT Canon Advanced Printing Technology Printable area Data cannot be printed within a 5 mm margin on all sides of the paper For envelopes and Index Card 1...

Страница 396: ...tate with the paper feeder installed Front Surface 383 5 375 7 88 114 2 369 7 23 4 257 7 mm Paper cassette Output selection cover Front cover Expansion slot cover Front Surface 383 5 375 7 88 114 2 369 7 23 4 346 5 mm Paper cassette Output selection cover Front cover Expansion slot cover ...

Страница 397: ...8 6 Appendix 8 Dimensions of Each Part Paper Feeder Unit PF 35 117 4 116 6 369 7 421 1 mm ...

Страница 398: ...Spot Device Installer is software that allows you to easily initialize the settings of printers connected to the network For more details on NetSpot Device Installer see Network Guide NOTE When the printer driver is installed from CD ROM Setup the initial settings for the network are performed automatically Use NetSpot Device Installer as needed when you want to reset the IP address manually witho...

Страница 399: ...nnecting your computer to the printer on a TCP IP network as well as the printing software CAPT For details on Canon CAPT Print Monitor see Network Guide NOTE When the printer driver is installed from CD ROM Setup a port Canon CAPT Print Monitor is created automatically Use Print Monitor Installer as needed when you want to create the port without using CD ROM Setup ...

Страница 400: ...nsole allows you to view a list of printers display a printer map specify detailed protocol settings monitor printer states perform job operations and configure and view a variety of printer information using a web browser For more details on NetSpot Console see NetSpot Console User s Guide NOTE You can download NetSpot Console from the Canon website ...

Страница 401: ...etwork IMPORTANT If you want to copy CAPT Windows Firewall Utility to your hard disk to run it copy all of the files CNAB5FW EXE CAPTRGFW DLL and CNAB5FW INI from the WF_UTIL folder on the supplied LBP3300 User Software CD ROM to your hard disk Setting See Print server When installing CAPT Software from CD ROM Setup The Warning dialog box appears during the installation Click Yes to configure Wind...

Страница 402: ...lect Open from the pop up menu 3 Double click English WF_UTIL CNAB5FW EXE CAPT Windows Firewall Utility runs IMPORTANT You can also run the utility by selecting Run from the Start menu entering D English WF_UTIL CNAB5FW EXE and then clicking OK The CD ROM drive name is indicated as D in this manual The CD ROM drive name may differ depending on the computer you are using 4 Click Unblock NOTE You ca...

Страница 403: ...select Control Panel from the Start menu then click Network and Internet Connections Windows Firewall Make sure that the Canon LBP3300 RPC Server Process check box is selected in the Exceptions sheet in the Windows Firewall dialog box Windows Firewall is now configured to unblock communication with client computers ...

Страница 404: ...ct Open from the pop up menu 3 Double click English WF_UTIL CNAB5FW EXE CAPT Windows Firewall Utility runs IMPORTANT You can also run the utility by selecting Run from the Start menu entering D English WF_UTIL CNAB5FW EXE and then clicking OK The CD ROM drive name is indicated as D in this manual The CD ROM drive name may differ depending on the computer you are using 4 Click Block NOTE You cannot...

Страница 405: ...ck Communication with the Print Server IMPORTANT If you do not perform the following settings on the client computers the printer status may not be displayed properly in the Printer Status Window and some of the printer functions may not operate properly 1 From the Start menu select Control Panel 2 Click Network and Internet Connections then click Windows Firewall ...

Страница 406: ...indows Firewall 3 In the Exceptions sheet in the Windows Firewall dialog box select the File and Printer Sharing check box and then click OK Windows Firewall is configured to unblock communication with the print server ...

Страница 407: ...Printing Technology 3 5 Cleaning Fixing Roller 5 18 Outside of the Printer 5 20 Client 3 58 3 66 Configuration Sheet Windows 98 Me 4 42 Contrast 4 62 Control Panel 1 4 Copies 4 27 Custom Installation 3 5 Custom Paper Size 4 28 D Deleting Pausing Resuming a Print Job 4 17 Detailed Settings for Booklet 4 33 Details 4 34 4 38 4 39 Device Settings Sheet Windows 2000 XP Server 2003 4 42 Dimensions 8 5 ...

Страница 408: ...2 4 LAN Cable 1 16 Connector 6 21 Laser Beam xx Lift Handles 1 5 LNK Indicator 6 21 Load Paper Indicator 1 7 Loading Paper Custom Size Paper 2 35 Envelope 2 32 Heavy Paper 2 18 2 26 Index Card 2 29 Label 2 26 Manual Feed Slot 2 25 Paper Cassette 2 18 Plain Paper 2 18 2 26 Transparency 2 26 Local Installation 3 58 Local Printer 3 38 3 42 3 48 M MAC Address 6 21 Manual Feed Slot 1 5 2 12 2 25 Manual...

Страница 409: ...aper Source 2 10 Paper Capacity 2 11 Precautions for Handling 2 12 Selection 2 11 Type 2 10 Paper Source Options 4 42 Paper Source Sheet 4 37 Paper Type 4 37 Paper Type List 2 3 Parts and Their Functions 1 4 Peripheral Space Required 6 6 Plain Paper 2 4 Plug and Play Windows 2000 3 25 Windows 98 Me 3 15 Windows XP Server 2003 3 31 Poster Printing 4 50 Power Cord 1 8 Power Socket 1 5 Power Supply C...

Страница 410: ...lection 4 44 Allow Setting Edition 4 44 Comment 4 43 Define Document Property 4 44 Delete 4 43 Export 4 43 Import 4 43 Name 4 43 Profile List 4 43 Specifying Profiles 4 65 Profile Sheet 4 43 Q Quality Sheet 4 38 R Rating Label 1 6 Ready Indicator 1 7 S Scaling 4 48 Self diagnostic Test 1 10 Serial Number 8 21 Service Call Display 7 25 Shared Printer 3 58 Show Icon in the Taskbar 4 42 Specification...

Страница 411: ...8 20 Index Appendix 8 V Ventilation Slots 1 4 W Watermark 4 28 4 51 When Nothing is Printed 7 37 Windows Firewall 8 10 ...

Страница 412: ...ving maintenance service The serial number for this printer is indicated at the location shown in the following figure IMPORTANT The label on which the serial number is indicated is required for service or maintenance Be sure not to remove them Rear View Outside View of the Packaging Box Serial Number Serial Number ...

Страница 413: ...8 22 Appendix 8 Location of the Serial Number ...

Страница 414: ...R IE 700AC CANON INC 2005 ...

Отзывы: