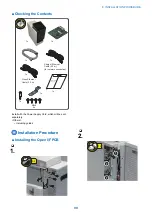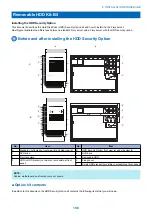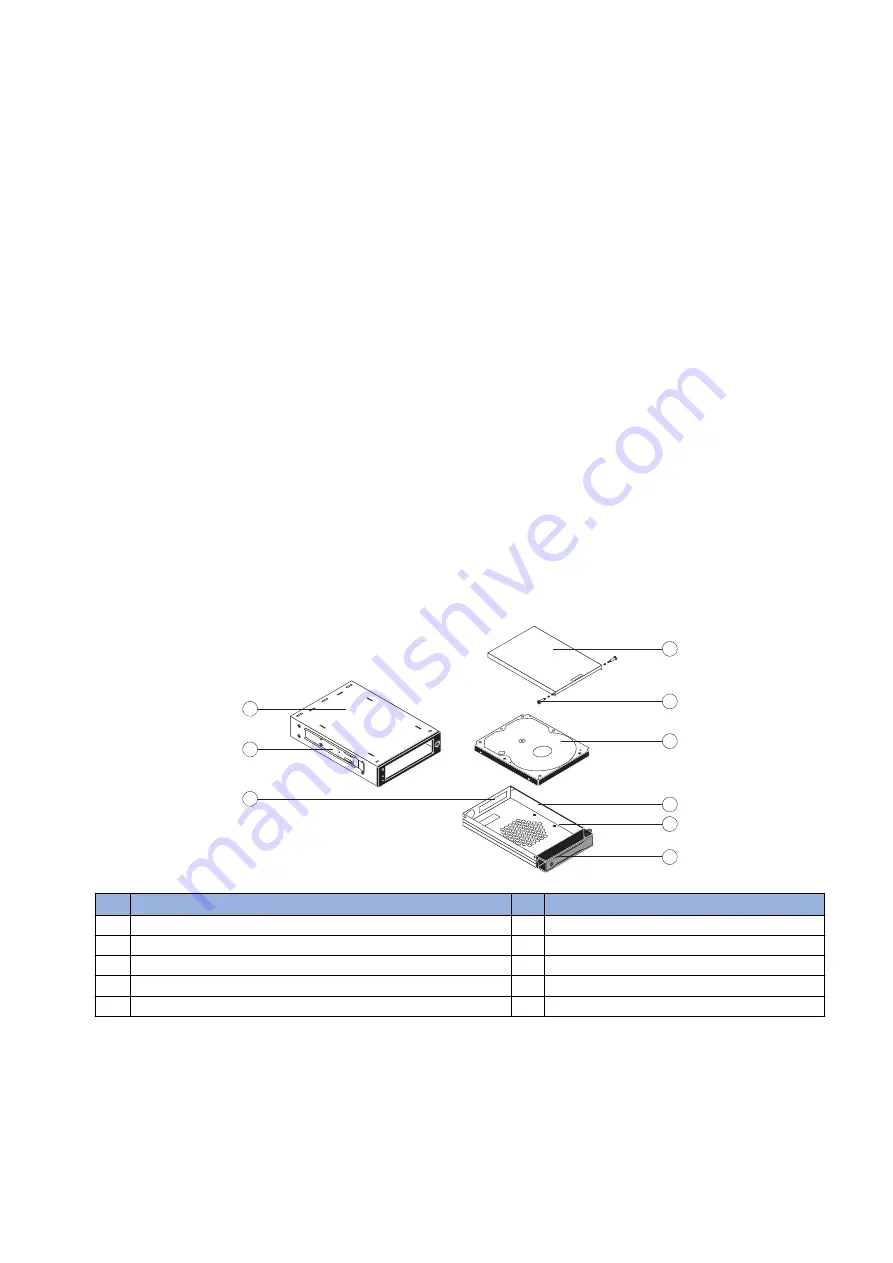
• Removable HDD Enclosure kit
• HDD enclosure, assembled (drive cover; drive carrier board; receiving frame with side guide rails)
•
Security keys—one set of three identical keys
•
Screws—Use four flathead screws to attach the HDD to the base of the enclosure; use two short-stemmed
flathead screws to attach the cover. Other screws in the kit are not required.
• 2-bay cover
• Manufacturer’s documentation—for reference, but not required
• Using, Handling, and Storing a Removable HDD—Give this document to the site administrator.
• 500mm SATA data cable
■ Procedures
To install the HDD Security Option, perform the following three procedures in the order listed:
1. Prepare the Fiery server
Refer to the Installation and Service Guide for instructions on removing the front panel, side panels, and the HDD from the
HDD bracket.
2. Remove the HDD and the bracket
Refer to the Installation and Service Guide for instructions on removing the front panel, side panels, and the HDD from the
HDD bracket.
3. Install the HDD in a removable enclosure
“To install the HDD in a removable enclosure” on page 109
4. Complete the installation
“To complete the installation” on page 110
.
● To install the HDD in a removable enclosure
1. Unpack the Removable HDD Enclosure kit.
2. Separate the drive cover and drive carrier from the receiving frame. Remove the bag of screws, the set of security keys, and
any other loose items from the drive carrier.
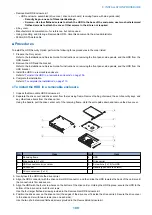
Using the handle, pull the drive carrier out of the receiving frame. Hold the unit upside down and remove the drive cover.
1
2
3
4
5
6
7
8
9
No.
Item
No.
Item
1
Receiving frame
6
HDD
2
Side guide rail (1 of 2)
7
Drive carrier
3
HDD connector on drive carrier
8
Screw hole (1 of 4) for HDD
4
Drive cover
9
Handle (push here to unlatch)
5
Drive cover screw (1 of 2)
3. Gently insert the HDD into the drive carrier.
4. Align the HDD connector with the drive carrier HDD connector, and then slide the HDD towards the back of the carrier until
the connection is firm and secure.
5. Align the HDD with the four screw holes on the bottom of the drive carrier. Holding the HDD in place, secure the HDD to the
bottom of the drive carrier with four screws.
Use the four larger flathead screws provided in the Removable HDD Enclosure kit.
6. Position the drive cover on the drive carrier (the edges of the drive cover fit inside the drive carrier). Secure the drive cover
to the drive carrier with two screws (one on each side).
Use the two short-stemmed flathead screws provided in the Removable Enclosure kit.
8. INSTALLATION PROCEDURE
109
Содержание ImagePRESS Server H350 V2
Страница 8: ...Introduction 1 Introduction 2 Specifications 7 ...
Страница 17: ...INSTALLING HARDWARE 2 Installing Hardware 11 ...
Страница 26: ...USING THE IMAGEPRESS SERVER 3 Using the imagePRESS Server 20 ...
Страница 35: ...REPLACING PARTS 4 Replacing parts 29 ...
Страница 38: ...1 2 Figure 19 Inside the front panel No Item 1 DVD drive 2 DVD eject button 4 REPLACING PARTS 31 ...
Страница 86: ...INSTALLING SYSTEM SOFTWARE 6 Installing System Software 80 ...
Страница 91: ...TROUBLESHOOTI NG 7 Troubleshooting 85 ...
Страница 104: ...INSTALLATION PROCEDURE 8 Installation 98 Removable HDD Kit B5 108 ...

