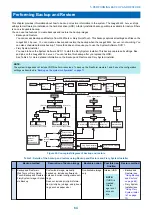
Fiery Deployable Image
CAUTION:
The process of creating a deployable image will erase the current Fiery system software. You must create a backup Fiery
system image (see
“To backup manually” on page 69
) before creating a deployable image. After you make the Fiery
deployable image, reinstall the backup onto the original Fiery server. This action requires less time and effort than installing
the deployable image.
This feature creates a distributable image of a fully configured Windows-based
imagePRESS Server
and omits the system specific
information, which enables it to be installed on multiple systems. This image includes all installed Fiery patches, Windows security
updates, and user configurations.
The system-specific information that are omitted includes:
• Server Name
• IP address
• Network SID
• Information stored in Windows user profiles
Making and deploying a Fiery deployable image
■ Prerequisites
The prerequisites for creating a Fiery deployable image are as follows:
• Make sure that Enable USB Storage option is selected in the Configure > Job Submission.
• Obtain two USB flash drives:
• The first (bootable) USB flash drive must have minimum 2GB and a maximum of 32GB available space respectively.
NOTE:
Due to a Windows file system restriction, the maximum size of the bootable USB flash drive you can use is 32GB.
• The second USB drive can have more than 32GB of available space. The minimum size required for the second USB
drive depends on the actual size of the backup file. Use a USB HDD formatted with NTFS file system.
NOTE:
The
imagePRESS Server
will calculate the size required for backup file based on the available free space on the USB
drive. The existing content on the USB drive will not be erased during the backup process.
■ To create a deployable image
1. Create a backup for the
imagePRESS Server
“To backup manually” on page 69
2. Attach the first USB flash drive (which is to be used as a bootable drive) to one of the USB3.0 ports on the
imagePRESS
Server
.
CAUTION:
The
imagePRESS Server
will format the USB flash drive with the FAT32 file system and erase all the content on the USB
flash drive.
3. Access WebTools and select Backup and Restore.
4. In Backup and Restore window, click on vertical three-dot icon on the top-right corner and select Get Started.
5. Log in to the
imagePRESS Server
as Administrator and click OK.
6. In USB flash drive detected window, click Continue.
7. In USB Location window, click Get Started.
5. PERFORMING BACKUP AND RESTORE
77
Содержание ImagePRESS Server H350 V2
Страница 8: ...Introduction 1 Introduction 2 Specifications 7 ...
Страница 17: ...INSTALLING HARDWARE 2 Installing Hardware 11 ...
Страница 26: ...USING THE IMAGEPRESS SERVER 3 Using the imagePRESS Server 20 ...
Страница 35: ...REPLACING PARTS 4 Replacing parts 29 ...
Страница 38: ...1 2 Figure 19 Inside the front panel No Item 1 DVD drive 2 DVD eject button 4 REPLACING PARTS 31 ...
Страница 86: ...INSTALLING SYSTEM SOFTWARE 6 Installing System Software 80 ...
Страница 91: ...TROUBLESHOOTI NG 7 Troubleshooting 85 ...
Страница 104: ...INSTALLATION PROCEDURE 8 Installation 98 Removable HDD Kit B5 108 ...


