1
4
2
A
B
6
7
11
12
10
14
8
9
5
3
13
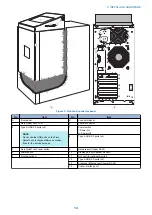
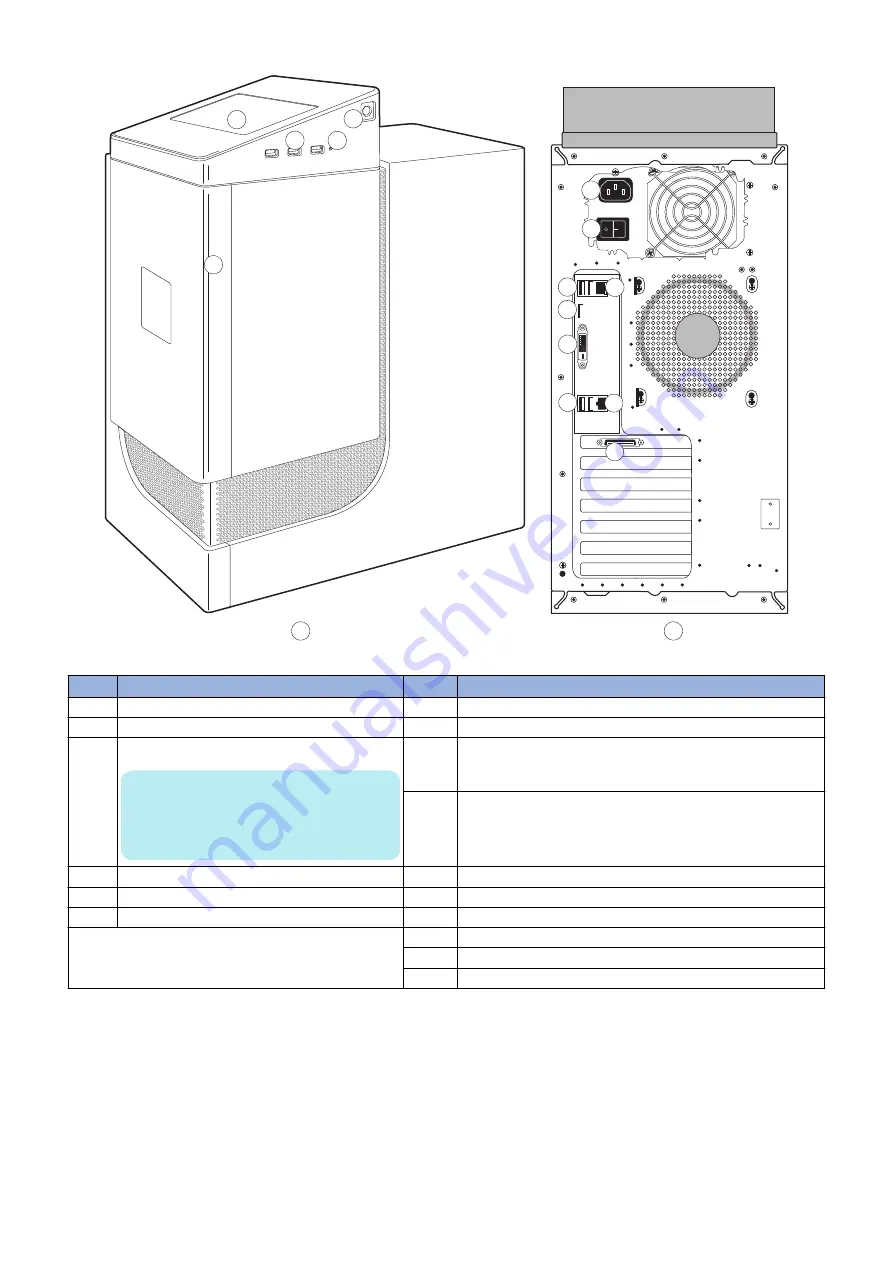
Figure 3: Front and connector panel
No.
Item
No.
Item
A
Front panel
B
Connector panel
1
Fiery QuickTouch LCD
6
Power connector
2
Type A USB 3.0 ports (x3)
NOTE:
Do not use the USB ports on the Fiery
QuickTouch for keyboard/mouse connec-
tions for the service purpose.
7
Power switch
|: Power On
O: Power Off
8
Type A USB 2.0 ports (x2)
3
Fiery QuickTouch reset button
9
Network port (Upper RJ-45)
4
Power button
10
Display port (for optional monitor)
5
Front panel door
11
DVI port (for optional monitor)
12
Type A USB 3.0 ports (x2)
13
Crossover Ethernet port (Lower RJ-45)
14
Printer interface port
2. INSTALLING HARDWARE
14
Содержание ImagePRESS Server H350 V2
Страница 8: ...Introduction 1 Introduction 2 Specifications 7 ...
Страница 17: ...INSTALLING HARDWARE 2 Installing Hardware 11 ...
Страница 26: ...USING THE IMAGEPRESS SERVER 3 Using the imagePRESS Server 20 ...
Страница 35: ...REPLACING PARTS 4 Replacing parts 29 ...
Страница 38: ...1 2 Figure 19 Inside the front panel No Item 1 DVD drive 2 DVD eject button 4 REPLACING PARTS 31 ...
Страница 86: ...INSTALLING SYSTEM SOFTWARE 6 Installing System Software 80 ...
Страница 91: ...TROUBLESHOOTI NG 7 Troubleshooting 85 ...
Страница 104: ...INSTALLATION PROCEDURE 8 Installation 98 Removable HDD Kit B5 108 ...


