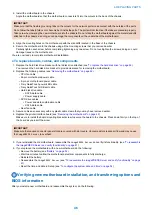
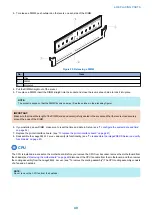


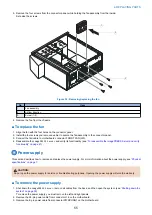

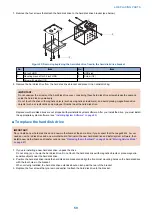


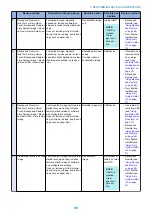


3. Remove the power supply cable from the hard disk drive.
4. Remove the hard disk drive data cable from the hard disk drive.
5. Remove the screw securing the hard disk drive bracket to the bracket shelf.
6. Slide the hard disk drive bracket off the shelf and lift it out of the chassis.
Unlock the hard disk drive bracket by moving the latch toward the connector panel, and then sliding the bracket off the bracket
shelf.
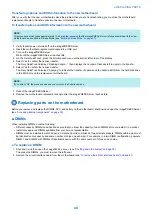
IMPORTANT:
Avoid striking the DIMMs as you remove the hard disk drive bracket.
NOTE:
You will encounter slight resistance as you slide the bracket off the shelf. The resistance is caused by two tension points on the
bottom of the bracket. The resistance helps control the bracket’s movement during removal and installation.
1
2
3
4
5
Figure 34:Removing/replacing the hard disk drive bracket
No.
Item
No.
Item
1
Tension points
4
Shelf
2
Latch
5
Screw
3
Hard disk drive bracket
NOTE:
Printer interface board and internal cables are not shown.
4. REPLACING PARTS
58
Содержание ImagePRESS Server H350 V2
Страница 8: ...Introduction 1 Introduction 2 Specifications 7 ...
Страница 17: ...INSTALLING HARDWARE 2 Installing Hardware 11 ...
Страница 26: ...USING THE IMAGEPRESS SERVER 3 Using the imagePRESS Server 20 ...
Страница 35: ...REPLACING PARTS 4 Replacing parts 29 ...
Страница 38: ...1 2 Figure 19 Inside the front panel No Item 1 DVD drive 2 DVD eject button 4 REPLACING PARTS 31 ...
Страница 86: ...INSTALLING SYSTEM SOFTWARE 6 Installing System Software 80 ...
Страница 91: ...TROUBLESHOOTI NG 7 Troubleshooting 85 ...
Страница 104: ...INSTALLATION PROCEDURE 8 Installation 98 Removable HDD Kit B5 108 ...