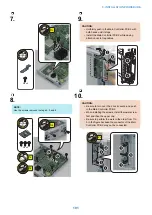
7.
1x
M3x6
8.
NOTE:
Use the screws removed in steps 4, 5, and 6.
M3x6
6x
1x
2x
9.
CAUTION:
• Uniformly push in the Main Controller PCB 2 with
both hands until it stops.
• Install the Main Controller PCB 2 while paying
attention not to trap cables.
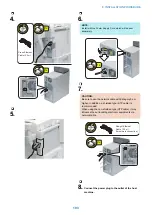
10.
CAUTION:
• Be sure to turn over the 2 Lock Levers, and push
in the Main Controller PCB 2.
• When installing the screws, install the lower screw
first and then the upper one.
• Be sure to perform the work in the order from 1 to
5 in the figure because the connector of the Main
Controller PCB 2 may not be connected.
2x
8. INSTALLATION PROCEDURE
101
Содержание ImagePRESS Server H350 V2
Страница 8: ...Introduction 1 Introduction 2 Specifications 7 ...
Страница 17: ...INSTALLING HARDWARE 2 Installing Hardware 11 ...
Страница 26: ...USING THE IMAGEPRESS SERVER 3 Using the imagePRESS Server 20 ...
Страница 35: ...REPLACING PARTS 4 Replacing parts 29 ...
Страница 38: ...1 2 Figure 19 Inside the front panel No Item 1 DVD drive 2 DVD eject button 4 REPLACING PARTS 31 ...
Страница 86: ...INSTALLING SYSTEM SOFTWARE 6 Installing System Software 80 ...
Страница 91: ...TROUBLESHOOTI NG 7 Troubleshooting 85 ...
Страница 104: ...INSTALLATION PROCEDURE 8 Installation 98 Removable HDD Kit B5 108 ...

