IMPORTANT:
Follow standard ESD and other safety precautions when handling components (see
service to the motherboard, avoid using excessive force and always place the motherboard on a grounded, non-metallic,
static-free surface. Never allow any metal to touch the solder contacts on the underside of the motherboard, especially
beneath the battery socket. Improper handling can short-circuit and permanently damage the motherboard.
1
4
8
2
7
3
5
10
6
MH
MH
MH
MH
MH
MH
MH
MH
11
13
14
15
16
17
18
12
MH
9
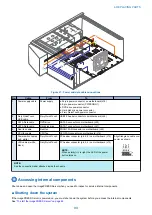
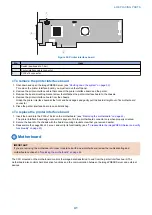
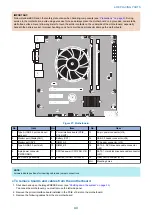
Figure 27: Motherboard
No.
Item
No.
Item
No.
Item
1
Type A USB 2.0 ports and net-
work port
7
Printer interface board (PCIE_
X16_SLOT)
13
24-pin power connector (J18)
2
Monitor port (DisplayPort)
8
Battery (CR1)
14
USB 3.0 header connector (J26)
3
Monitor port (DVI)
9
DIMM_A0
15
FP header connector (J15)
4
Type A USB 3.0 ports (x2)
10
DIMM_B0
16
SATA 0, DVD drive data cable connector
(J50)
5
8-pin power connector
(PWRCONN1)
11
CPU fan power (CPU FAN, J16) 17
SATA 1, Hard disk drive data cable connector
(J41)
6
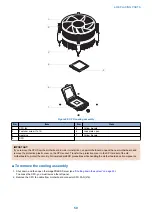
CPU cooling assembly
12
Rear fan (FRONT FAN, J20)
18
Clear CMOS Jumper (J101)
MH
Mounting holes
NOTE:
Arrows indicate positions for inserting cable and jumper connections.
● To remove boards and cables from the motherboard
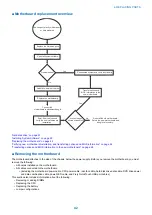
1. Shut down and open the imagePRESS Server (see
“Shutting down the system” on page 33
To access the motherboard, you must remove the left side panel.
2. Remove the printer interface board installed in the PCIE x16 slot on the motherboard.
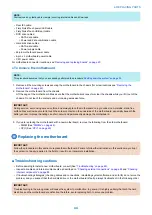
3. Remove the following cables from the old motherboard:
4. REPLACING PARTS
43
Содержание ImagePRESS Server H350 V2
Страница 8: ...Introduction 1 Introduction 2 Specifications 7 ...
Страница 17: ...INSTALLING HARDWARE 2 Installing Hardware 11 ...
Страница 26: ...USING THE IMAGEPRESS SERVER 3 Using the imagePRESS Server 20 ...
Страница 35: ...REPLACING PARTS 4 Replacing parts 29 ...
Страница 38: ...1 2 Figure 19 Inside the front panel No Item 1 DVD drive 2 DVD eject button 4 REPLACING PARTS 31 ...
Страница 86: ...INSTALLING SYSTEM SOFTWARE 6 Installing System Software 80 ...
Страница 91: ...TROUBLESHOOTI NG 7 Troubleshooting 85 ...
Страница 104: ...INSTALLATION PROCEDURE 8 Installation 98 Removable HDD Kit B5 108 ...

