Before Using the Scanner
13
Chapter 1
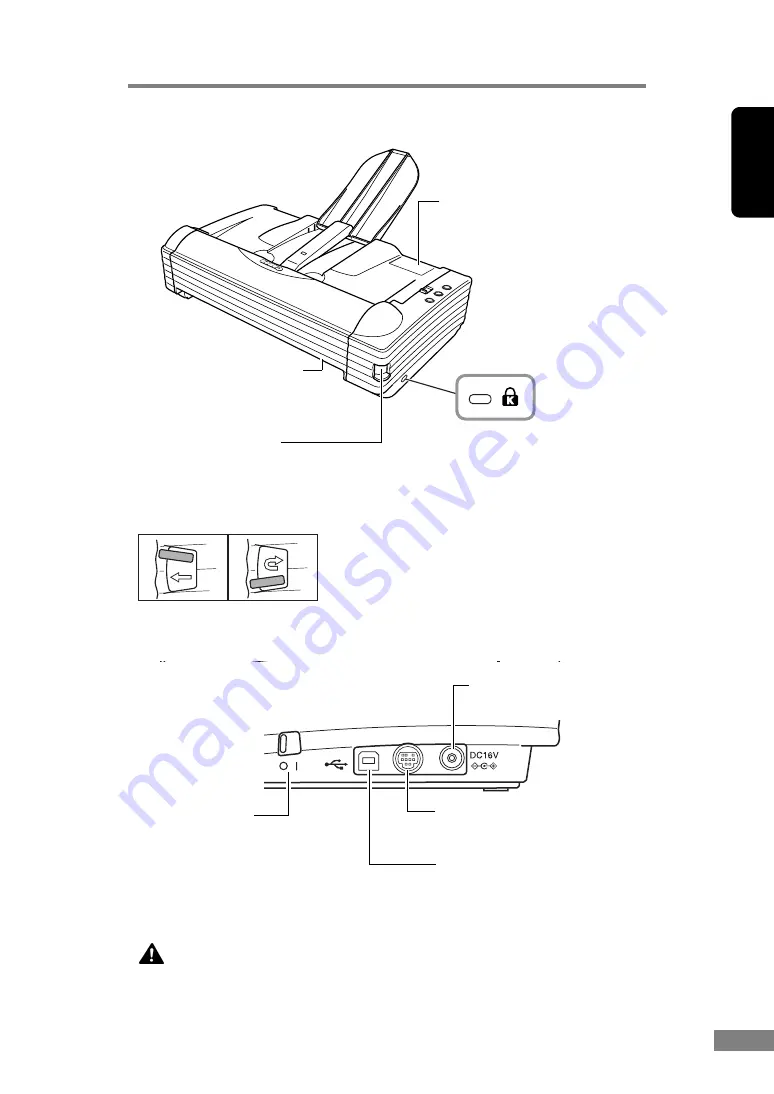
Rear
Side (Interfaces)
CAUTION
Do not touch the connector’s pins or contacts. Doing so may
damage the scanner.
Job Label Location
Location for affixing job labels
that describe what is assigned
to the Job buttons. (See p. 39.)
Eject Selection Lever
Raise or lower this lever to switch the
document eject direction. (See p. 23
and p. 24)
Up: Straight Path
Down: U-Turn Path
Kensington Slot
Used for anti-theft measures.
Theft can be prevented by
attaching a chain, etc.
Document Eject Opening
Document ejected from here
when the straight path is being
used. (See p. 22.)
Power Connector
Connect the bundled AC
adaptor.
Option Connector
Interface connector for the
optional flatbed scanner unit.
USB Connector
Connect the USB cable
provided or one that supports
Hi-Speed USB 2.0. (See p. 14.)
Power Switch
This switch is used to turn the
scanner ON.
Содержание 0080B002
Страница 46: ...42 Using the Scanner 3 Double click Scanners and Cameras 4 Select CANON DR 2580C USB and then click Properties ...
Страница 47: ...Using the Scanner 43 Chapter 2 Canon DR 2580C USB Properties is displayed 5 Click the Events tab ...
Страница 56: ...52 Using the Scanner 3 Double click Scanners and Cameras 4 Select CANON DR 2580C USB and then click Properties ...
Страница 57: ...Using the Scanner 53 Chapter 2 CANON DR 2580C USB Properties is displayed 2 Click the Maintenance tab ...
Страница 72: ...68 Using the Scanner ...
Страница 80: ...76 Appendices 3 Double click Scanners and Cameras 4 Select CANON DR 2580C USB and then click Properties ...
Страница 81: ...Appendices 77 Chapter 3 Canon DR 2580C USB Properties is displayed 2 Click the Maintenance tab ...
Страница 103: ...Appendices 99 Chapter 3 3 After uninstallation is complete click the Finish button to exit the uninstaller ...


