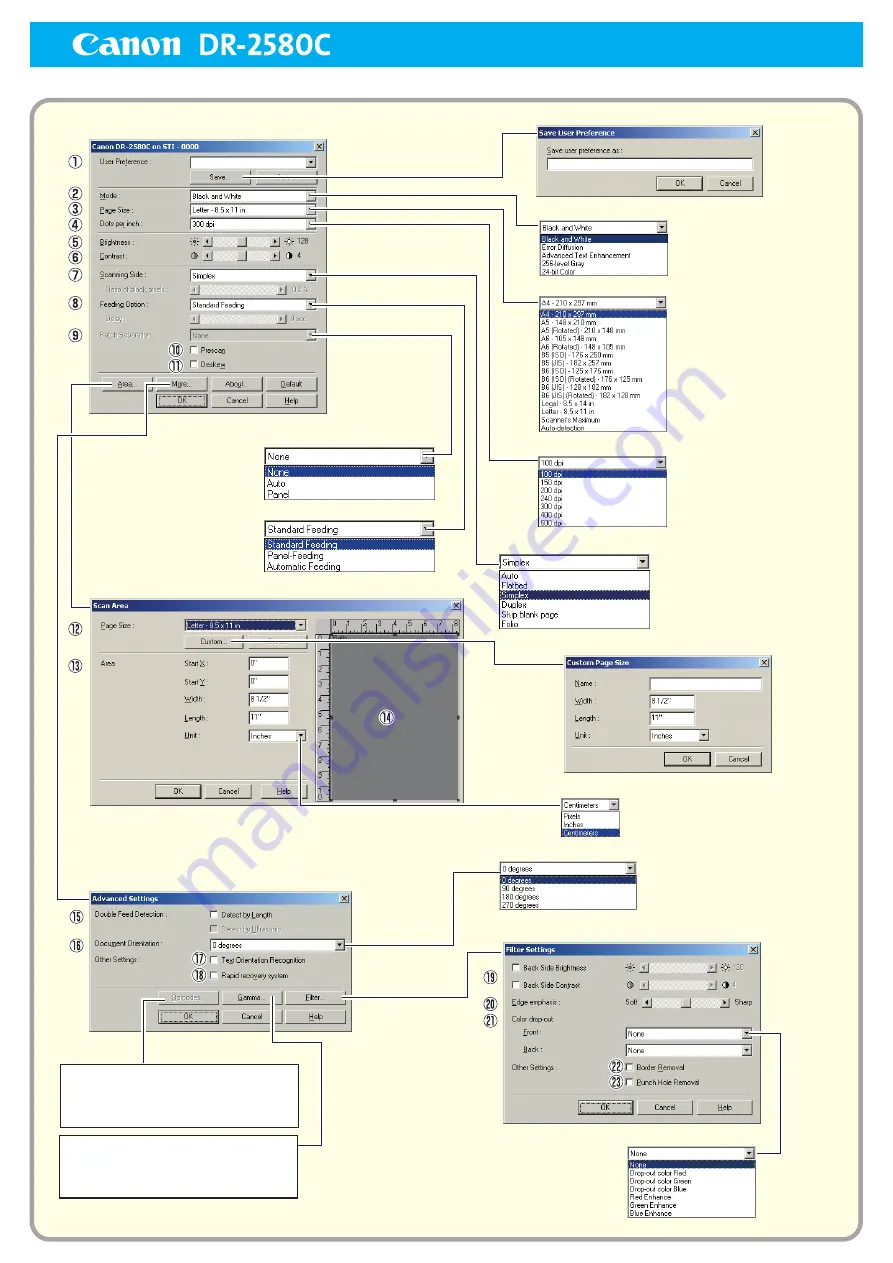
Keep this Quick Guide near the scanner for ready reference.
Mode
Page Size
Dots per inch
Scanning Side
Feeding Option
Batch Separation
Basic Setup Dialog Box
Scan Area Dialog Box
Advanced Settings Dialog Box
Custom Page Size registration
Unit
Color drop-out
Document Orientation
Save User Preferences
*
[Contrast] is set
automatically when
Advanced Text
Enhancement is selected.
*
When the optional flatbed unit is
attached, [Auto] and [Flatbed] are
added to the Scanning Side settings.
*
Area setting is not available when the [Auto-detection] Page Size is
selected.
*
Scanning of the specified area may be shifted when Deskew is enabled.
*
Batch Separation is not
available when the
[Standard Feeding]
Feeding Option is selected.
*
The Delay setting is
available when the
[Automatic Feeding]
Feeding Option is selected.
Filter Settings Dialog Box
*
When [Custom] gamma setting
is selected, [Brightness] and
[Contrast] are set
automatically, but Page Size
[Auto-detection] may not
function normally.
Opens the Gamma Settings dialog box to
adjust gamma. Click the [Help] button to
see details of the settings in the Gamma
Settings dialog box.
The optional BarCode module is enabled
when it is installed, to detect bar codes
in documents open the BarCode dialog
box.
ISIS Driver Quick Guide
Содержание 0080B002
Страница 46: ...42 Using the Scanner 3 Double click Scanners and Cameras 4 Select CANON DR 2580C USB and then click Properties ...
Страница 47: ...Using the Scanner 43 Chapter 2 Canon DR 2580C USB Properties is displayed 5 Click the Events tab ...
Страница 56: ...52 Using the Scanner 3 Double click Scanners and Cameras 4 Select CANON DR 2580C USB and then click Properties ...
Страница 57: ...Using the Scanner 53 Chapter 2 CANON DR 2580C USB Properties is displayed 2 Click the Maintenance tab ...
Страница 72: ...68 Using the Scanner ...
Страница 80: ...76 Appendices 3 Double click Scanners and Cameras 4 Select CANON DR 2580C USB and then click Properties ...
Страница 81: ...Appendices 77 Chapter 3 Canon DR 2580C USB Properties is displayed 2 Click the Maintenance tab ...
Страница 103: ...Appendices 99 Chapter 3 3 After uninstallation is complete click the Finish button to exit the uninstaller ...


