311
Step recording
Recording
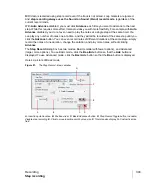
whole note
or as small as a 64th note
. You can increase the step size you choose by
50% or 75% by clicking the dot icon
, or double-dot icon
, respectively. You can add
different step sizes together by holding down the CTRL key while you click extra icons, or by
pressing the + key on the NumPad.
• For a tuplet step size, click a notehead icon to choose the “tuplet unit” (for example, for eighth-
note triplets, choose an eighth note). Then enable the
Tuplet
check box and fill in the
“n” in
time of “n”
fields. For example, if you want quarter-note triplets, click the quarter-note icon
, enable the
Tuplet
check box, and fill in
3
in the time of
2
, which means 3 quarter notes in
the time of 2 quarter notes. If you want eighth-note triplets, click the eighth-note icon
,
enable the
Tuplet
check box, and fill in
3
in the time of
2
. If you wanted 5 notes in one beat,
click the quarter-note icon, enable the
Tuplet
check box, and fill in
5
in the time of
1
.
• If you want to create a custom step size, click the
n
button
, and fill in the number of ticks in
the
Ticks
field.
6.
Choose a duration by doing one of the following:
• If you want duration and step size to be the same, enable the
Follow Step Size
check box.
• If you want duration and step size to be different, disable the
Follow Step Size
check box and
fill in a percentage value in the
% of Note Value
field.
7.
Choose a destination track for your recording in the
Destination Track
field.
8.
If you want the insertion point to advance automatically when you play your MIDI controller,
enable the
Auto Advance
check box.
9.
Play a note or chord on your MIDI controller. When you release the note(s), the insertion point
moves by the step size, if the
Auto Advance
check box is enabled. If
Auto Advance
is not
enabled, you can release the notes and record more notes, or you can use the Navigation
controls to advance the insertion point. If you are still holding down a note or notes when you
advance the insertion point, the step size of the held notes is extended by the current step size.
10.
Continue recording notes of the same step size and duration to the same track, or change any of
those parameters and continue recording. To create a rest, advance the insertion point without
playing any notes. To delete notes on previous steps, you can press CTRL+Z for each recorded
step. If you want to delete previous steps and move the insertion point back at the same time,
check the
Delete
on
Back Step
check box, and click the
Step Backward
button.
11.
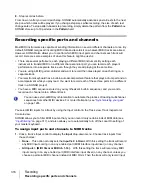
When you’re finished recording, close the dialog by clicking the
X
icon in the upper right corner,
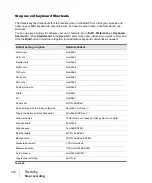
or by pressing SHIFT+R.
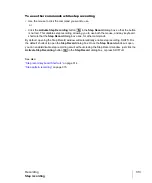
You can press CTRL+Z during or after recording to undo your recording one step at a time.
Note:
Options that you choose in Advanced mode, such as
Link to Now Time
, are still in force
when you use Basic mode.
Содержание sonar x3
Страница 1: ...SONAR X3 Reference Guide...
Страница 4: ...4 Getting started...
Страница 112: ...112 Tutorial 1 Creating playing and saving projects Saving project files...
Страница 124: ...124 Tutorial 3 Recording vocals and musical instruments...
Страница 132: ...132 Tutorial 4 Playing and recording software instruments...
Страница 142: ...142 Tutorial 5 Working with music notation...
Страница 150: ...150 Tutorial 6 Editing your music...
Страница 160: ...160 Tutorial 7 Mixing and adding effects...
Страница 170: ...170 Tutorial 8 Working with video Exporting your video...
Страница 570: ...570 Control Bar overview...
Страница 696: ...696 AudioSnap Producer and Studio only Algorithms and rendering...
Страница 720: ...720 Working with loops and Groove Clips Importing Project5 patterns...
Страница 820: ...820 Drum maps and the Drum Grid pane The Drum Grid pane...
Страница 848: ...848 Editing audio Audio effects audio plug ins...
Страница 878: ...878 Software instruments Stand alone synths...
Страница 1042: ...1042 ProChannel Producer and Studio only...
Страница 1088: ...1088 Sharing your songs on SoundCloud Troubleshooting...
Страница 1140: ...1140 Automation Recording automation data from an external controller...
Страница 1178: ...1178 Multi touch...
Страница 1228: ...1228 Notation and lyrics Working with lyrics...
Страница 1282: ...1282 Synchronizing your gear MIDI Machine Control MMC...
Страница 1358: ...1358 External devices Working with StudioWare...
Страница 1362: ...1362 Using CAL Sample CAL files...
Страница 1386: ...1386 Troubleshooting Known issues...
Страница 1394: ...1394 Hardware setup Set up to record digital audio...
Страница 1400: ...1400 MIDI files...
Страница 1422: ...1422 Initialization files Initialization file format...
Страница 1463: ...1463 Misc enhancements New features in SONAR X3...
Страница 1470: ...1470 Comparison...
Страница 1518: ...1518 Included plug ins Instruments...
Страница 1532: ...1532 Cyclone Using Cyclone...
Страница 1694: ...1694 Beginner s guide to Cakewalk software Audio hardware sound cards and drivers...
Страница 1854: ...1854 Preferences dialog Customization Nudge Figure 518 The Nudge section...
Страница 1856: ...1856 Preferences dialog Customization Snap to Grid Figure 519 The Snap to Grid section...
Страница 1920: ...1920 Snap Scale Settings dialog...
Страница 2042: ...2042 View reference Surround panner...


