


182
Transferring Another TeraStation's Settings
You can transfer saved settings from another series TeraStation to a TS3000 series TeraStation using the "NS-SHFT"
software. The following settings can be transferred:
• Shared folders
• Access restrictions
*
• Users
• Groups
*NT domain access restrictions cannot be transferred.
Note:
This feature is currently supports the TS-HTGL/R5 series TeraStations and TS-X series TeraStations (as of
June 2015). The latest compatibility information will be on the Buffalo website.
Follow the procedure below to transfer settings from another series TeraStation.
1
Create the config file (.nas_config) using NS-SHFT. The "NS-SHFT" software can be downloaded from the
Buffalo website.
For instructions on creating the config file, refer to the NS-SHFT user guide.
2
Before transferring access restrictions with Active Directory domain users or external users, make sure the
migration target TeraStations are joined to the same domain controller. To have the unit join the domain
network, read and follow the instructions on either the "Active Directory" section or "User Authentication with
an External SMB Server" section in chapter 3.
If you didn't configure access restrictions with Active Directory domain users and external users, skip to step 3.
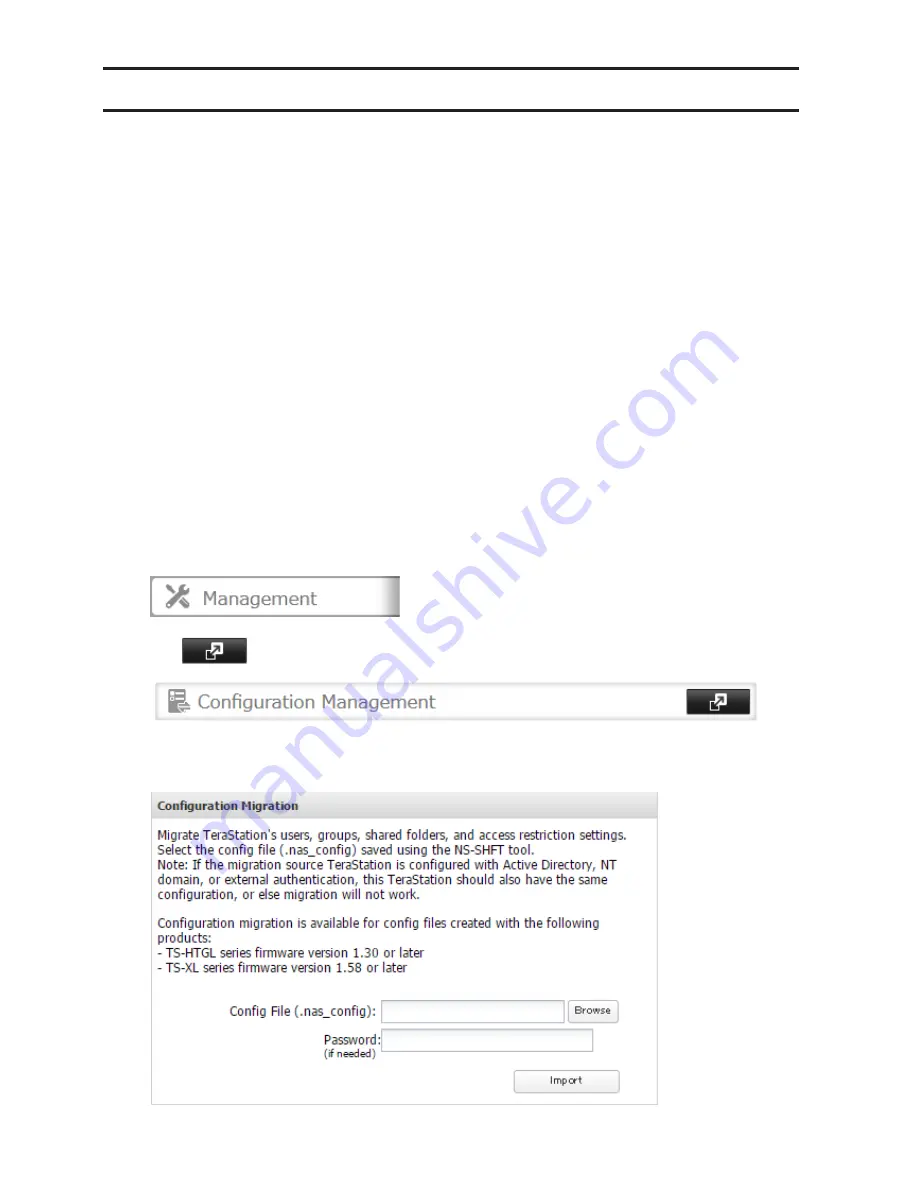
3
In Settings, click
Management
.
4
Click
to the right of "Configuration Management".
5
Click
Browse
and select the config file (.nas_config) that was created with another TeraStation.
If the config file was created with a password, enter it in the "Password" field.
Содержание TeraStation TS3200D
Страница 22: ...21 4 Configure the desired settings then click OK...
Страница 63: ...62 2 Select the TeraStation name from the drop down menu of Target and click Register iSCSI Device 3 Click OK...
Страница 84: ...83 2 Click to the right of Backup 3 Click List of LinkStations and TeraStations...
Страница 86: ...85 3 Click Create New Job Note Up to 8 backup jobs can be configured...
Страница 99: ...98 18Click Time Machine 19Click Select Backup Disk 20Select the TeraStation then click Use Disk...
Страница 118: ...117 3 Click Edit 4 Click Browse 5 Select the shared folder that you want to make available to iTunes then click OK...
Страница 119: ...118 6 Click OK then OK again 7 Move the iTunes server switch to the position...
Страница 124: ...123 4 Open the License tab then click Activate Free License To deactivate the license click...
Страница 126: ...125 3 Click Next 4 Click Find Cameras...
Страница 132: ...131 2 Select the search criteria on the left side of the search screen then click Search...
Страница 133: ...132 3 The search results are displayed Click a thumbnail to start the media viewer...
Страница 214: ...213 For Customers in Taiwan BSMI For Customers in China CCC A...


