16
or off. The stock remains straight. They only adjust drop at comb.
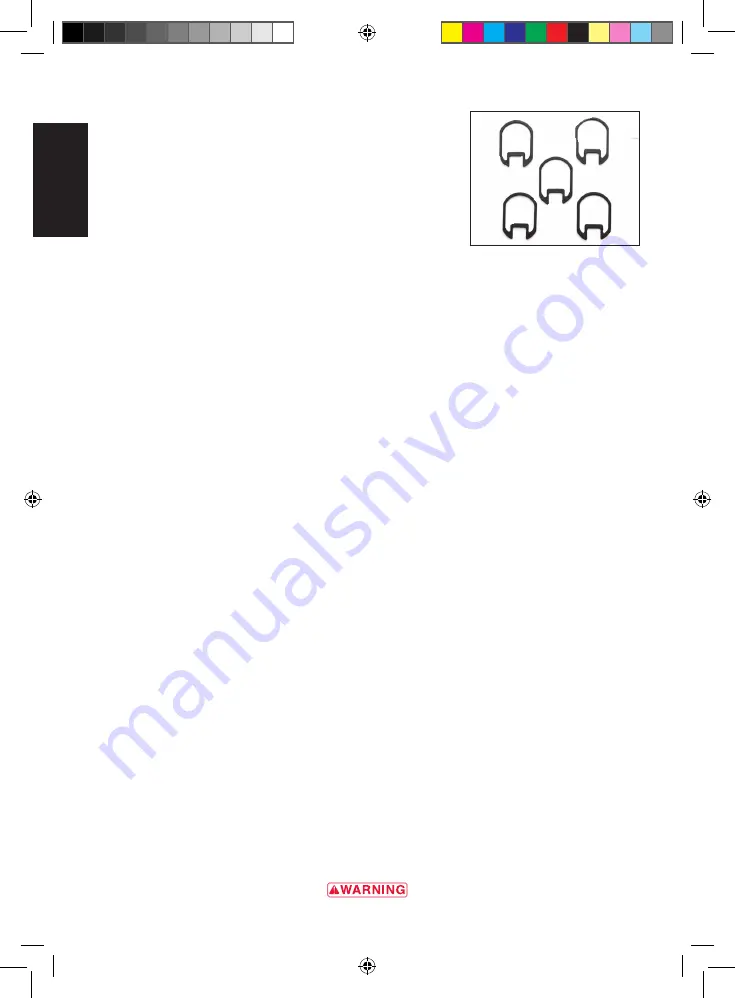
These shims with their respective stamps are further clarified here:
• Shim 1 raises the comb approximately
1
/
16
”, and the heel
approximately
1
/
8
”.
• Shim 2 is neutral. This shim is already installed on the firearm.
• Shim 3 lowers the comb approximately
1
/
16
”, and the heel
approximately
1
/
8
”.
Cast is the offset of the buttstock from the longitudinal center line of
the firearm. Some right-handed shooters like the stock to angle away
(cast off) from their face, making their line of sight more directly in
line with the barrel. Angling the stock to the left for left-handed
shooters is ˝cast on.” Shims marked 1R1L, 2R2L, and 3R3L, will all
adjust drop at comb the same amount as shims 1, 2 and 3, and will also adjust the cast right or left
approximately
1
/
8
”. You will notice that the two opposing edges of these spacers are different in thickness.
For right-handed shooters, install shims between the receiver and the stock with the R facing the end of
the buttstock, so its thicker side is on the left side. This casts the stock slightly to the right, away from the
face of a right-handed shooter. If you turn the shim around so the L is facing the end of the buttstock,
and it will cast the stock to the left. These shims with their respective stamps are further clarified below:
• Shim 1R1L raises the comb approximately
1
/
16
”, and the heel approximately
1
/
8
” and will adjust the
cast on or cast off approximately
1
/
8
”.
• Shim 2R2L adds the same amount of cast to the stock as shim 1R1L with neutral drop like shim 2.
• Shim 3R3L adds the same amount of cast to the stock as shims 1R1L and 2R2L, and lowers the comb
approximately
1
/
16
” and the heel approximately
1
/
8
”.
i n s tA l l i n G A s h i m
1 Make sure your shotgun is completely unloaded and the ˝safety” is in the on safe position.
2 Use a #2 cross tip or Phillips screwdriver to remove the recoil pad at the end of the buttstock (Figure
20). Place a small amount of petroleum jelly on the screw access slits on the top and bottom of the
rear of the buttstock to prevent damaging the recoil pad.
Insert the screwdriver into each of the two access holes. Make certain the tip of the screwdriver
engages the head of the screw. Turn the screw counterclockwise until the screw is completely loose
from the stock. When both screws are free, remove the recoil pad.
3 Remove the stock insert to access the stock bolt nut (Figure 23).
4 Use a ½” socket wrench to remove the two stock bolt nuts and stock bolt washer. (Figure 24).
5 Completely remove the buttstock from the receiver, along with the existing shim, and install the shim
you have selected (Figure 25). Make certain you have the proper shim installed and in position before
reattaching the buttstock and recoil pad.
6 When you are satisfied with the fit, reattach the buttstock to the receiver with the washer and the
nuts.
7 Snug the nuts down with the socket wrench, do not overtighten.
8 Reinstall the stock insert.
9 Reinstall the recoil pad with care, so as not to scratch or mar the finish of the stock.
e x t r A b A r r e l s
Figure 22
cast and drop adjustment shims. shim 2 comes
on your shotgun and is not shown.
E
N
BRO5180_Maxus A5_v7.indd 16
02/03/10 13:30
Содержание MAXUS
Страница 6: ...4 E N BRO5180_Maxus A5_v7 indd 4 02 03 10 13 30 ...
Страница 26: ...24 E N BRO5180_Maxus A5_v7 indd 24 02 03 10 13 30 ...
Страница 27: ...25 Browning maxus Fusils semi automatiques F R BRO5180_Maxus A5_v7 indd 25 02 03 10 13 30 ...
Страница 52: ...50 F R BRO5180_Maxus A5_v7 indd 50 02 03 10 13 30 ...
Страница 53: ...51 Browning maxus HALBAUTOMATISCHE FLINTE D E BRO5180_Maxus A5_v7 indd 51 02 03 10 13 30 ...
Страница 78: ...76 D E BRO5180_Maxus A5_v7 indd 76 02 03 10 13 31 ...
Страница 79: ...77 Browning Maxus fucilE semiautomaticO I T BRO5180_Maxus A5_v7 indd 77 02 03 10 13 31 ...
Страница 104: ...102 I T BRO5180_Maxus A5_v7 indd 102 02 03 10 13 31 ...
Страница 105: ...103 Browning Maxus Escopeta SEMIautomática E S BRO5180_Maxus A5_v7 indd 103 02 03 10 13 31 ...
Страница 130: ...128 NOTES E S BRO5180_Maxus A5_v7 indd 128 02 03 10 13 31 ...


