9
r e m o v i n G t h e t h r e e - s h o t A d A p t o r ( p l u G )
1 Lock the bolt rearward by pulling the operating handle fully
to the rear.
NOTICE!
never allow the action to slaM closed by Pressing the
bolt release button without the barrel installed. iF the bolt
is released Forward with the barrel reMoved, the oPerating
handle will striKe the receiver and cause daMage.
2 Remove the forearm as explained previously.
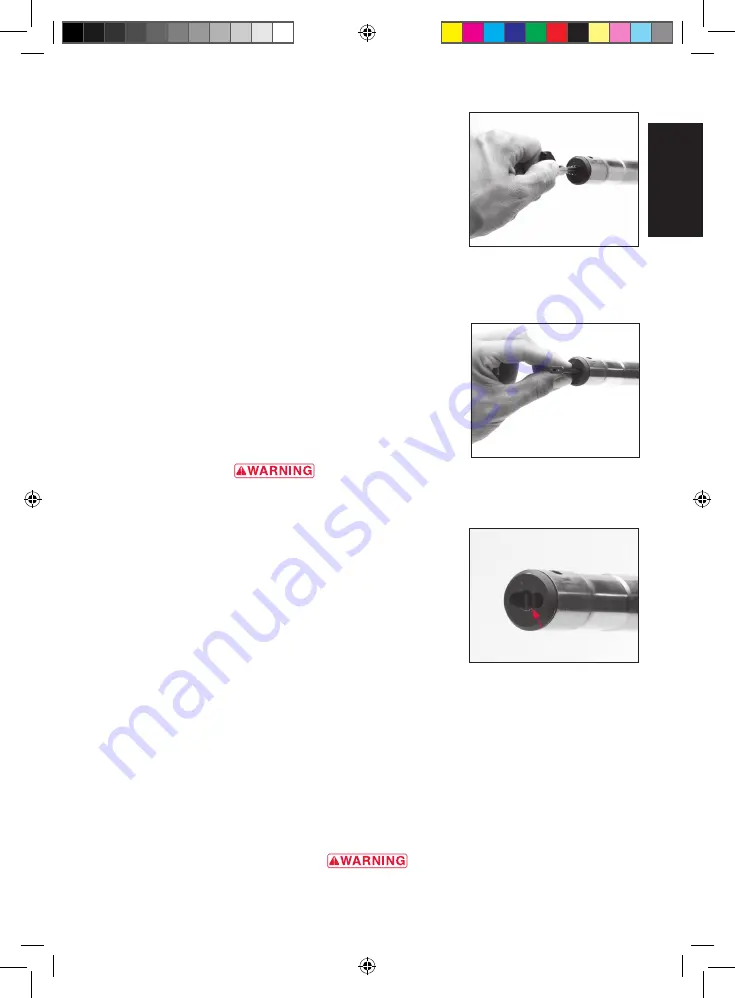
3 The Maxus features the unique TurnKey Magazine Plug which
is quickly and easily removed by inserting a key or standard
screwdriver into the slot in the end of the magazine tube. To
remove the three-shot magazine adaptor, press inward and turn
the key or flat-blade screwdriver a quarter-turn to align the three-
shot adaptor with the slot in the end of the magazine (Figure 10).
This unlocks the three-shot adaptor, allowing it to be removed.
4 If the barrel is on the shotgun, hold it to prevent it from falling
out of the receiver while pointing the magazine tube down to
allow the three-shot adaptor (plug) to fall out of the end of the
magazine tube. Grasp and remove it (Figure 11).
5 Reinstall the forearm as explained previously. When the forearm
is in place and the Speed Lock lever is fully locked, the release
button is flush with the surface of the forearm (Figure 8).
always ensure the ForearM is Fully locKed and the sPeed locK
lever release button is Flush with the surFace oF the ForearM.
Failure to Follow this warning could result in serious injury,
death or daMage to your FirearM.
i n s tA l l i n G t h e t h r e e - s h o t A d A p t o r ( p l u G )
If you need to install the magazine three-shot adaptor (plug) to
limit your shotgun magazine to three shells, again perform the
following operation:
1 Lock the bolt rearward by pulling the operating handle fully to the
rear.
NOTICE!
never allow the action to slaM closed by Pressing the
bolt release button without the barrel installed. iF the bolt is
released Forward with
the barrel reMoved, the oPerating handle will striKe the receiver and cause daMage.
2 Remove the forearm as explained previously.
3 Insert the magazine three-shot adapter into the slot in the end of the magazine tube.
4 Insert a key or flat-blade screwdriver into the slot in the end of the magazine tube. Press inward and
turn the key or screwdriver a quarter-turn to secure the three-shot adaptor in the magazine (Figure
12).
5 Reinstall the forearm as explained previously. When the forearm is in place and the Speed Lock lever
is fully locked, the release button is flush with the surface of the forearm (Figure 9).
always ensure the ForearM is Fully locKed and the sPeed locK lever release button is Flush
with the surFace oF the ForearM. Failure to Follow this warning could result in serious
Figure 10
use a key or small screwdriver to press in
on the three-shot adaptor, then rotate a
quarter-turn.
Figure 11
remove the three-shot adaptor.
Figure 12
the three-shot adaptor shown secured in the
magazine tube.
E
N
BRO5180_Maxus A5_v7.indd 9
02/03/10 13:30
Содержание MAXUS
Страница 6: ...4 E N BRO5180_Maxus A5_v7 indd 4 02 03 10 13 30 ...
Страница 26: ...24 E N BRO5180_Maxus A5_v7 indd 24 02 03 10 13 30 ...
Страница 27: ...25 Browning maxus Fusils semi automatiques F R BRO5180_Maxus A5_v7 indd 25 02 03 10 13 30 ...
Страница 52: ...50 F R BRO5180_Maxus A5_v7 indd 50 02 03 10 13 30 ...
Страница 53: ...51 Browning maxus HALBAUTOMATISCHE FLINTE D E BRO5180_Maxus A5_v7 indd 51 02 03 10 13 30 ...
Страница 78: ...76 D E BRO5180_Maxus A5_v7 indd 76 02 03 10 13 31 ...
Страница 79: ...77 Browning Maxus fucilE semiautomaticO I T BRO5180_Maxus A5_v7 indd 77 02 03 10 13 31 ...
Страница 104: ...102 I T BRO5180_Maxus A5_v7 indd 102 02 03 10 13 31 ...
Страница 105: ...103 Browning Maxus Escopeta SEMIautomática E S BRO5180_Maxus A5_v7 indd 103 02 03 10 13 31 ...
Страница 130: ...128 NOTES E S BRO5180_Maxus A5_v7 indd 128 02 03 10 13 31 ...


