11
magazine to the chamber as the bolt closes. Another shell can then
be inserted into the magazine to load to full capacity.
the shotgun is now ready to Fire by siMPly Moving the ˝saFety”
to the oFF saFe Position and Pulling the trigger.
l o A d i n G t h e c h A m b e r t h r o u G h t h e e j e c t i o n p o rt
1 Pull the operating handle to the rear until the bolt locks in the
open position. Visually inspect the chamber, feed mechanism and
magazine to make sure they are clear of any obstructions.
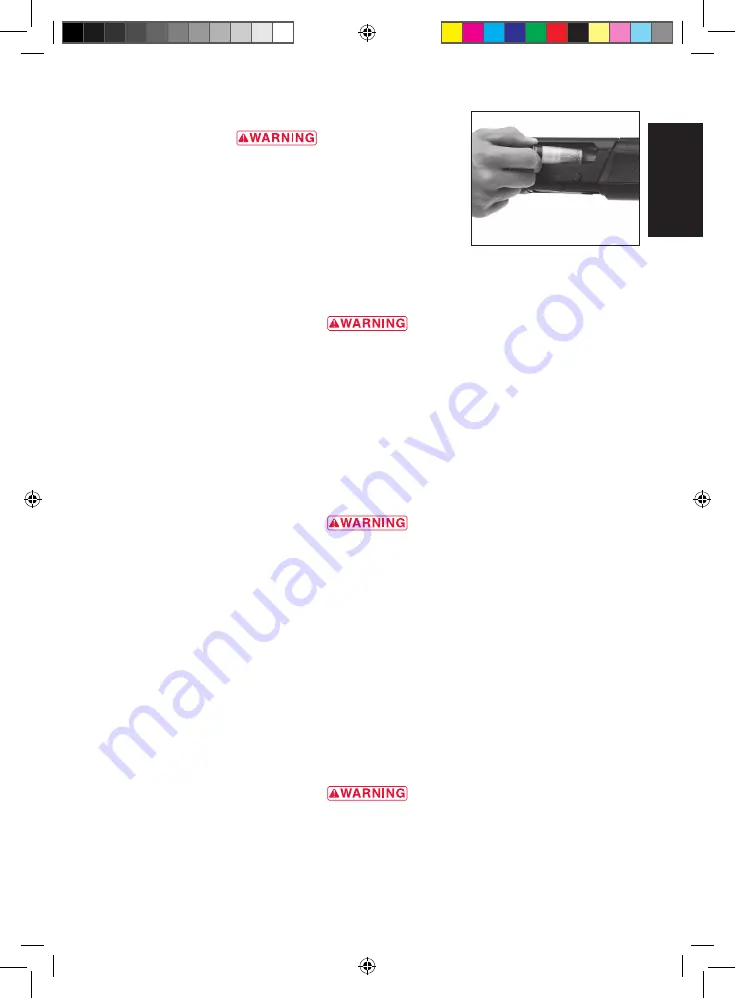
2 If shooting is imminent, insert a shell of the proper gauge and
length through the ejection port into the open breech (Figure 14).
3 Press the bolt release button to deliver the shell into the chamber.
KeeP your Fingers clear oF the ejection Port whenever closing the action with the bolt release
button. Failure to Follow this warning could result in injury.
the shotgun is now ready to Fire by siMPly Moving the ˝saFety” to the oFF saFe Position and
Pulling the trigger.
4 With a shell in the chamber, you may load the magazine to full capacity. To load the magazine, insert a
shell of proper gauge and length through the loading port at the bottom of the receiver up into the
magazine, using your thumb to position it fully forward in the magazine tube. Make sure the rim of
the shell engages the shell stop and is held fully inside the magazine tube. It will make an audible click
when fully inserted.
F i r i n G
never load a shell into the chaMber or Place the ˝saFety” in the oFF saFe Position unless
shooting is iMMinent. always KeeP the MuZZle Pointed in a saFe direction. Failure to Follow
these warnings could result in serious injury or death.
1 Place the ˝safety” in the on safe position.
2 Load a shell into the chamber as explained previously.
3 With a shell in the chamber, you need only move the ˝safety” to the off safe position to fire the
shotgun.
4 When ready to fire, move the ˝safety” into the off safe position, take aim and squeeze the trigger.
After a shell is fired, the gas system operates the bolt, ejects the fired shell and picks up a loaded shell
from the magazine and automatically chambers it. You may continue to fire the shotgun until the
magazine is empty by pulling the trigger to fire each shell. After the last shell is fired, the breech of the
shotgun remains open, with the bolt locked to the rear. This allows convenient and fast reloading.
If you are done shooting, leave the bolt locked to the rear, with the breech in the open position so that you
may visually inspect the chamber, bore, carrier and magazine to be sure they contain no shells.
aFter Firing, or when shooting is no longer iMMinent, iMMediately Place the ˝saFety” in the on
saFe Position. Failure to Follow these warnings could result in serious injury or death.
even with the bolt locKed oPen aFter shooting, do not assuMe the shotgun is unloaded.
always insPect the chaMber, barrel, Feed MechanisM and MagaZine to be certain the shotgun is
coMPletely unloaded. Failure to Follow these warnings could result in serious injury or
death.
Figure 14
insert a shell through the ejection port into
the breech.
E
N
BRO5180_Maxus A5_v7.indd 11
02/03/10 13:30
Содержание MAXUS
Страница 6: ...4 E N BRO5180_Maxus A5_v7 indd 4 02 03 10 13 30 ...
Страница 26: ...24 E N BRO5180_Maxus A5_v7 indd 24 02 03 10 13 30 ...
Страница 27: ...25 Browning maxus Fusils semi automatiques F R BRO5180_Maxus A5_v7 indd 25 02 03 10 13 30 ...
Страница 52: ...50 F R BRO5180_Maxus A5_v7 indd 50 02 03 10 13 30 ...
Страница 53: ...51 Browning maxus HALBAUTOMATISCHE FLINTE D E BRO5180_Maxus A5_v7 indd 51 02 03 10 13 30 ...
Страница 78: ...76 D E BRO5180_Maxus A5_v7 indd 76 02 03 10 13 31 ...
Страница 79: ...77 Browning Maxus fucilE semiautomaticO I T BRO5180_Maxus A5_v7 indd 77 02 03 10 13 31 ...
Страница 104: ...102 I T BRO5180_Maxus A5_v7 indd 102 02 03 10 13 31 ...
Страница 105: ...103 Browning Maxus Escopeta SEMIautomática E S BRO5180_Maxus A5_v7 indd 103 02 03 10 13 31 ...
Страница 130: ...128 NOTES E S BRO5180_Maxus A5_v7 indd 128 02 03 10 13 31 ...


