


Understanding Page Tiling
|
77
To print a drawing using the current settings
1
On the File menu, click Print. The Print dialog box appears.
2
Click OK.
OR
■
Click the Print button on the Standard toolbar.
To cancel printing
■
Press ESC.
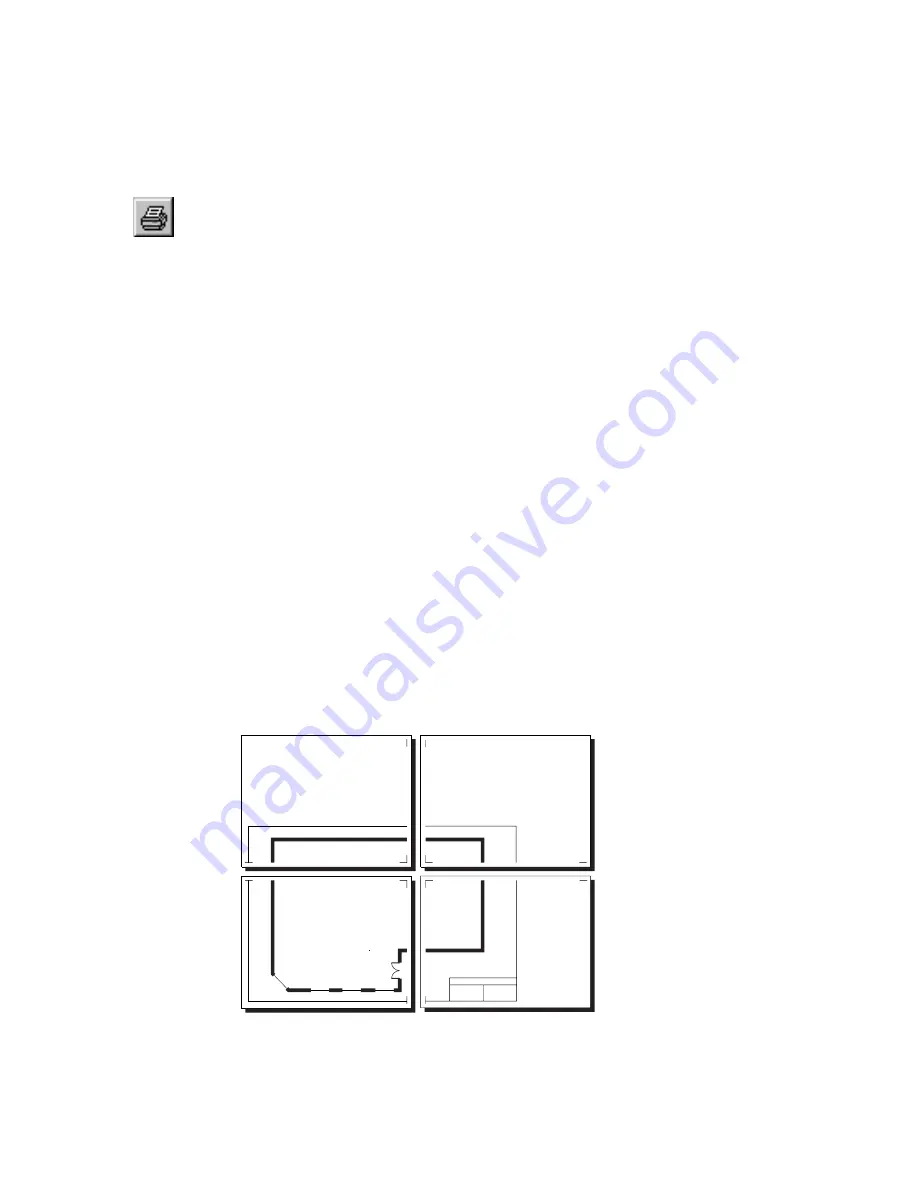
Understanding Page Tiling
If you create a drawing that is larger than a single printer page, AutoSketch
automatically tiles it across multiple pages. This gives you the flexibility to
generate large output on any printer. AutoSketch prints tick marks to indicate
the margins on tiled output. Before connecting the printed pages together,
you must first cut away the margin area indicated by the tick marks.
For example, let’s assume you have created a drawing using an 11'' x 17'' page
with a landscape orientation. However, your printer only supports 8.5'' x 11''
pages. In addition, you discover that there is a .25'' wide margin at all sides
of the printer page that the printer can’t print on. This means that you only
have an active printing area of 8'' x 10.5''.
Fortunately, AutoSketch can print this drawing using four printer pages tiled
together. When you print the drawing, four pages emerge from your printer.
Tick marks at the corners indicate the printable area and margins for each
printer page. These serve as a guide for splicing the pages together.
Содержание AUTOSKETCH 8
Страница 1: ...October 2001 AutoSketch User s Guide RELEASE 8...
Страница 11: ...1 Part 1 First Things to Know Chapter 1 Welcome Chapter 2 Important Concepts Chapter 3 Screen Layout...
Страница 12: ...2...
Страница 20: ...10 Chapter 1 Welcome...
Страница 28: ...18 Chapter 2 Important Concepts...
Страница 42: ...32 Chapter 3 Screen Layout...
Страница 44: ...34...
Страница 68: ...58 Chapter 5 Setting Up a New Drawing...
Страница 84: ...74 Chapter 6 Customizing the Grid...
Страница 136: ...126 Chapter 10 Entering Lengths Angles...
Страница 138: ...128...
Страница 164: ...154 Chapter 12 Polylines Polygons Curves...
Страница 176: ...166 Chapter 13 Arcs Circles...
Страница 194: ...184 Chapter 14 Symbols...
Страница 206: ...196 Chapter 15 3D Effects...
Страница 219: ...209 Part 4 Annotating a Drawing Chapter 17 Working With Text Chapter 18 Creating Dimensions Chapter 19 Markers...
Страница 220: ...210...
Страница 256: ...246 Chapter 19 Markers...
Страница 258: ...248...
Страница 270: ...260 Chapter 20 Selecting Deleting Entities...
Страница 274: ...264 Chapter 21 Undoing Redoing Repeating Actions...
Страница 308: ...298 Chapter 23 Trimming Entities...
Страница 340: ...330 Chapter 26 Making Inquiries...
Страница 342: ...332...
Страница 350: ...340 Chapter 27 Storing Data in a Drawing...
Страница 360: ...350 Chapter 28 Retrieving Data From a Drawing...
Страница 366: ...356 Chapter 29 Using Web Tools...
Страница 388: ...378 Glossary...
Страница 400: ...390 Index...


