


Drawing Polylines
|
139
Drawing Polylines
A polyline is useful for drawing entities that have a fixed width, such as a wall
in a floor plan. As you create each polyline segment, text boxes for the
segment width and bulge appear on the edit bar. Polyline width is a real-
world measurement, like the thickness of a wall. The Width of Segment text
box allows you to create a tapered polyline segment by entering one width
that is greater than the other. The constrain option forces both widths equal
to the value in the Width of Segment text box.
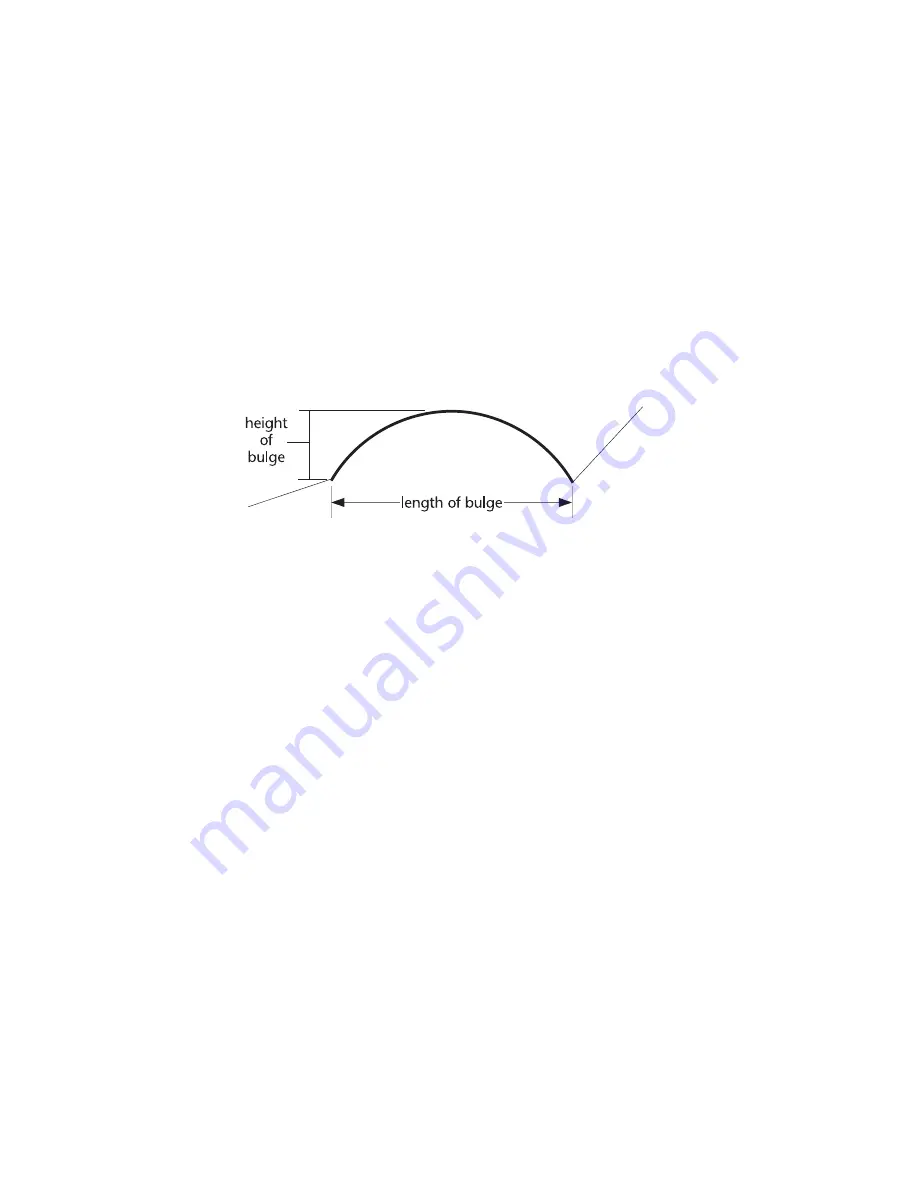
The Bulge text box allows you to create a curved polyline segment. The value
that defines a bulge is a ratio of two times the height of the bulge, divided by
the length between its startpoint and endpoint.
Another way to measure the bulge factor is the tangent of one-quarter of the
angle of the bulge. For example: for a bulge of 180 degrees, one quarter is
45 degrees. The tangent of 45 degrees is 1, so typing
1
in the Bulge text box
yields a bulge of 180 degrees between the startpoint and endpoint of the
polyline segment. If you enter the bulge as a numeric expression, AutoSketch
calculates the trigonometry. For example, to calculate the bulge factor for a
segment with a 180 degree arc, enter the following:
=tan(180/4)
You can substitute a different angle for 180 in the example above. For more
information, see “Using Numeric Expressions” in online Help.
Each segment of a polyline can be edited individually. Selecting an existing
polyline in your drawing allows you to edit its poly entity type and its width
on the edit bar. For more information, see online Help.
Vertex editing allows you to change the shape of an existing polyline, and to
add or delete vertices. For more information, see “Editing the Properties of a
Polyline or Polygon Segment” on page 305.
Содержание AUTOSKETCH 8
Страница 1: ...October 2001 AutoSketch User s Guide RELEASE 8...
Страница 11: ...1 Part 1 First Things to Know Chapter 1 Welcome Chapter 2 Important Concepts Chapter 3 Screen Layout...
Страница 12: ...2...
Страница 20: ...10 Chapter 1 Welcome...
Страница 28: ...18 Chapter 2 Important Concepts...
Страница 42: ...32 Chapter 3 Screen Layout...
Страница 44: ...34...
Страница 68: ...58 Chapter 5 Setting Up a New Drawing...
Страница 84: ...74 Chapter 6 Customizing the Grid...
Страница 136: ...126 Chapter 10 Entering Lengths Angles...
Страница 138: ...128...
Страница 164: ...154 Chapter 12 Polylines Polygons Curves...
Страница 176: ...166 Chapter 13 Arcs Circles...
Страница 194: ...184 Chapter 14 Symbols...
Страница 206: ...196 Chapter 15 3D Effects...
Страница 219: ...209 Part 4 Annotating a Drawing Chapter 17 Working With Text Chapter 18 Creating Dimensions Chapter 19 Markers...
Страница 220: ...210...
Страница 256: ...246 Chapter 19 Markers...
Страница 258: ...248...
Страница 270: ...260 Chapter 20 Selecting Deleting Entities...
Страница 274: ...264 Chapter 21 Undoing Redoing Repeating Actions...
Страница 308: ...298 Chapter 23 Trimming Entities...
Страница 340: ...330 Chapter 26 Making Inquiries...
Страница 342: ...332...
Страница 350: ...340 Chapter 27 Storing Data in a Drawing...
Страница 360: ...350 Chapter 28 Retrieving Data From a Drawing...
Страница 366: ...356 Chapter 29 Using Web Tools...
Страница 388: ...378 Glossary...
Страница 400: ...390 Index...


