


132
|
Chapter 11
Lines
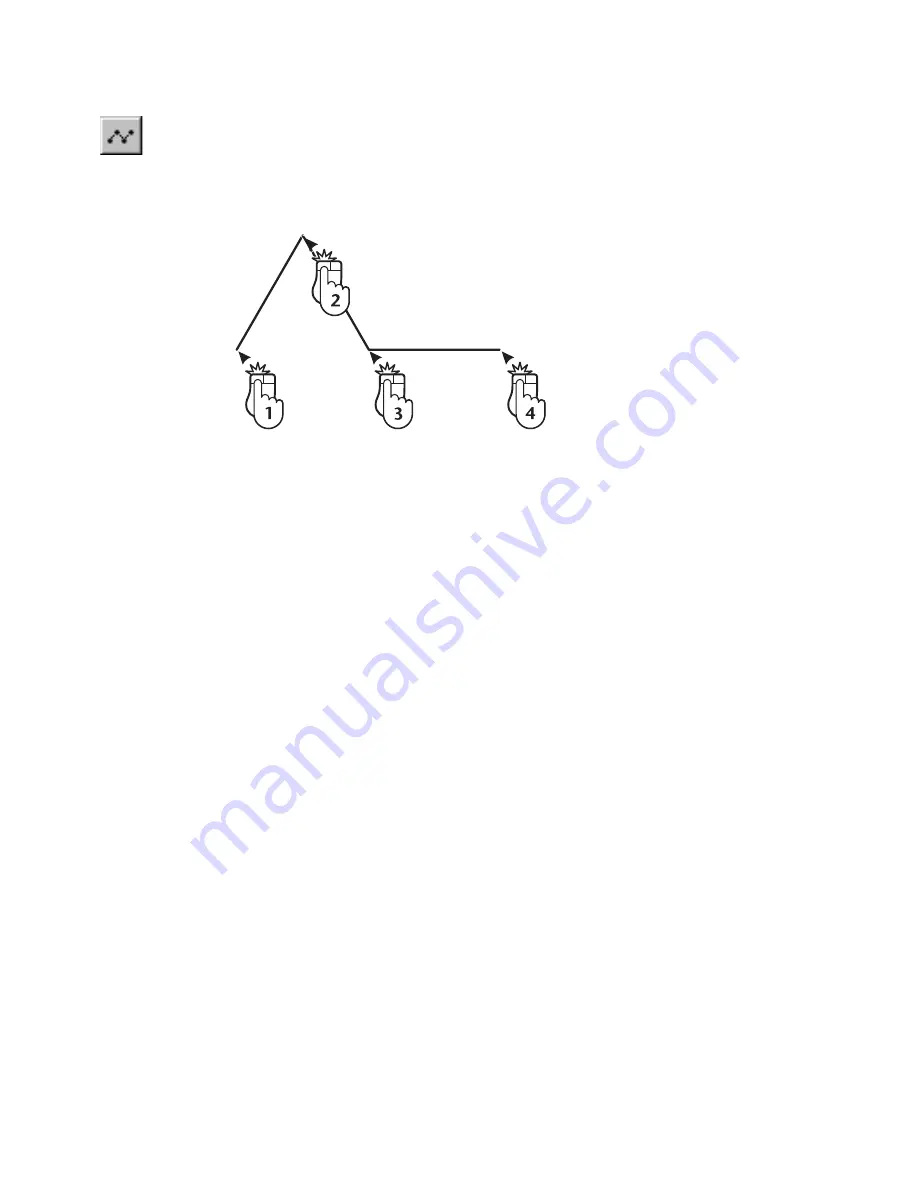
To draw a series of connected lines
1
On the Draw menu, click Line, Multiple, or click the Multiple Line button
on the All-In-One toolbar.
2
Enter a point to start the first line. A rubber-band line appears from that
point.
3
Click one or more points. Each point ends the previous line and starts a
new line. If you press CTRL and enter a point, AutoSketch moves to that
point without drawing a line and starts a new line.
AutoSketch also allows you to draw two parallel lines at once. The Draw
menu’s double line command operates like the multiple line command,
except that this command uses the points you enter to define two parallel
lines. AutoSketch trims the intersections automatically as you draw.
From controls on the edit bar, you can specify the:
■
Width
■
Offset method
■
Offset distance
The Width text box allows you to specify the distance between the double
lines. The offset method determines how AutoSketch draws the double lines
with respect to the points you enter—either left, centered, right, or user-
defined offset. The left and right methods determine which of the two lines
intersect the points you enter. The center method centers the double lines on
either side of the points you enter. The user-defined method requires you to
enter an offset distance on the edit bar. AutoSketch draws the double lines
with the center of the two lines offset from the points you enter by the
specified distance.
You can determine when lines are prevented from doubling back on them-
selves, by entering the Double Line Minimum Angle value in the Drawing
page tab of the Drawing Options dialog box. The default value is 10 degrees.
Содержание AUTOSKETCH 8
Страница 1: ...October 2001 AutoSketch User s Guide RELEASE 8...
Страница 11: ...1 Part 1 First Things to Know Chapter 1 Welcome Chapter 2 Important Concepts Chapter 3 Screen Layout...
Страница 12: ...2...
Страница 20: ...10 Chapter 1 Welcome...
Страница 28: ...18 Chapter 2 Important Concepts...
Страница 42: ...32 Chapter 3 Screen Layout...
Страница 44: ...34...
Страница 68: ...58 Chapter 5 Setting Up a New Drawing...
Страница 84: ...74 Chapter 6 Customizing the Grid...
Страница 136: ...126 Chapter 10 Entering Lengths Angles...
Страница 138: ...128...
Страница 164: ...154 Chapter 12 Polylines Polygons Curves...
Страница 176: ...166 Chapter 13 Arcs Circles...
Страница 194: ...184 Chapter 14 Symbols...
Страница 206: ...196 Chapter 15 3D Effects...
Страница 219: ...209 Part 4 Annotating a Drawing Chapter 17 Working With Text Chapter 18 Creating Dimensions Chapter 19 Markers...
Страница 220: ...210...
Страница 256: ...246 Chapter 19 Markers...
Страница 258: ...248...
Страница 270: ...260 Chapter 20 Selecting Deleting Entities...
Страница 274: ...264 Chapter 21 Undoing Redoing Repeating Actions...
Страница 308: ...298 Chapter 23 Trimming Entities...
Страница 340: ...330 Chapter 26 Making Inquiries...
Страница 342: ...332...
Страница 350: ...340 Chapter 27 Storing Data in a Drawing...
Страница 360: ...350 Chapter 28 Retrieving Data From a Drawing...
Страница 366: ...356 Chapter 29 Using Web Tools...
Страница 388: ...378 Glossary...
Страница 400: ...390 Index...


