


Creating an “Alcove” in a Line or Polyline
|
293
To divide a line, polyline segment, arc or circle into equal segments
1
On the Edit menu, click Trim, Subdivide, or click the Subdivide button on
the All-In-One toolbar.
2
Enter the number of segments you want AutoSketch to divide the entity
by in the text box on the edit bar and press ENTER.
3
Click the entity.
Creating an “Alcove” in a Line or Polyline
On the Edit menu, click Trim, Alcove to create an offset in a line or a polyline
segment by adding four vertices. It is useful primarily for creating alcoves,
bay windows, and so on in architectural floor plans that use wide polylines
to represent walls.
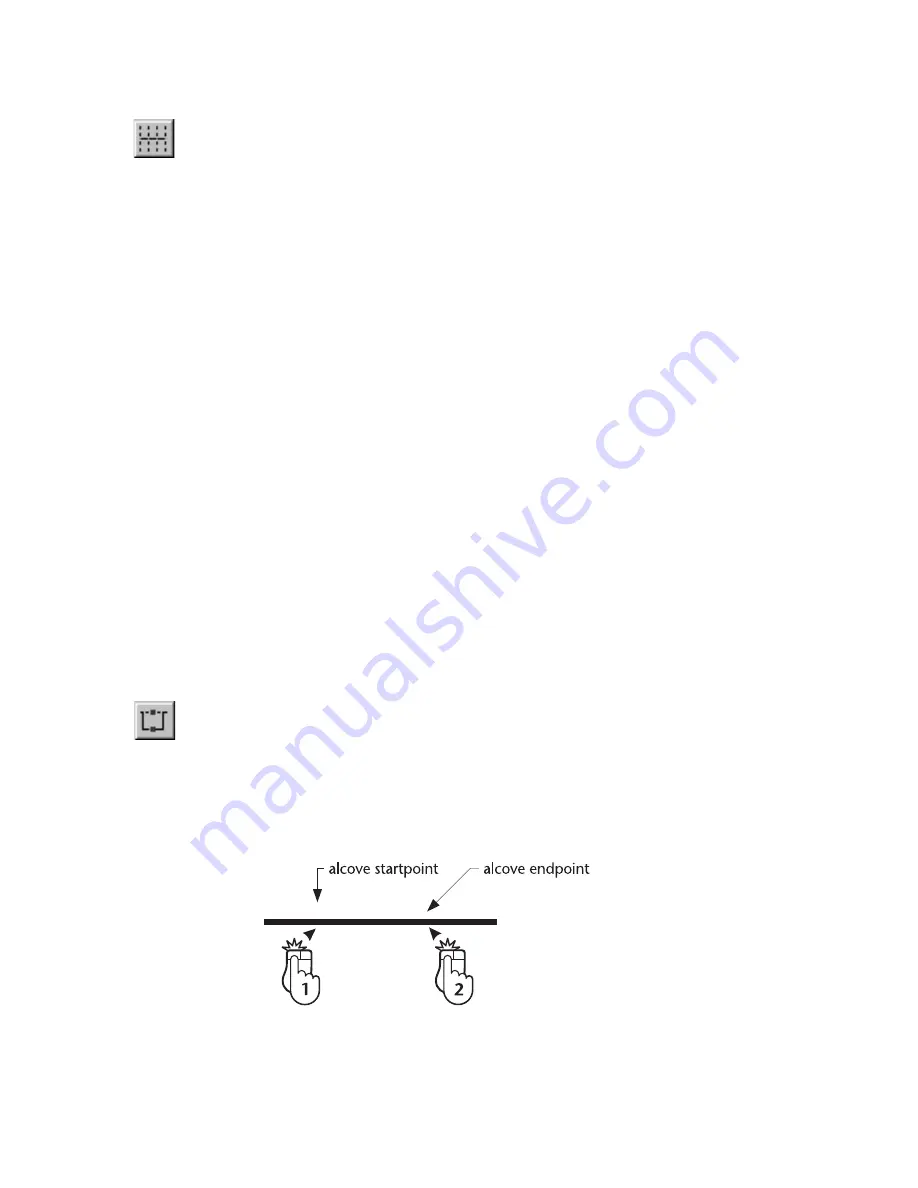
You create an alcove by entering two points that specify the width of the
alcove opening and another point that specifies its depth. AutoSketch breaks
the line or polyline at the first set of points and moves that segment the
distance specified by another point. AutoSketch creates polyline segments
between the break opening and the moved segment at the angle set in the
angle text box on the edit bar. Specifying a 45 or 60 degree angle results in
an alcove that resembles a bay window.
Adding a alcove to a line entity converts the line to a polyline. Performing
an alcove on a polyline results in a single polyline with vertices and segments
necessary to create the alcove.
To create an alcove in a line or polyline
1
On the Edit menu, click Trim, Alcove, or click the Alcove button on the
All-In-One toolbar.
2
(optional) Enter an angle in the Alcove Angle text box on the edit bar and
press ENTER.
3
Click the entity to which you want to add the alcove.
4
Enter the startpoint and the endpoint of the alcove.
Содержание AUTOSKETCH 8
Страница 1: ...October 2001 AutoSketch User s Guide RELEASE 8...
Страница 11: ...1 Part 1 First Things to Know Chapter 1 Welcome Chapter 2 Important Concepts Chapter 3 Screen Layout...
Страница 12: ...2...
Страница 20: ...10 Chapter 1 Welcome...
Страница 28: ...18 Chapter 2 Important Concepts...
Страница 42: ...32 Chapter 3 Screen Layout...
Страница 44: ...34...
Страница 68: ...58 Chapter 5 Setting Up a New Drawing...
Страница 84: ...74 Chapter 6 Customizing the Grid...
Страница 136: ...126 Chapter 10 Entering Lengths Angles...
Страница 138: ...128...
Страница 164: ...154 Chapter 12 Polylines Polygons Curves...
Страница 176: ...166 Chapter 13 Arcs Circles...
Страница 194: ...184 Chapter 14 Symbols...
Страница 206: ...196 Chapter 15 3D Effects...
Страница 219: ...209 Part 4 Annotating a Drawing Chapter 17 Working With Text Chapter 18 Creating Dimensions Chapter 19 Markers...
Страница 220: ...210...
Страница 256: ...246 Chapter 19 Markers...
Страница 258: ...248...
Страница 270: ...260 Chapter 20 Selecting Deleting Entities...
Страница 274: ...264 Chapter 21 Undoing Redoing Repeating Actions...
Страница 308: ...298 Chapter 23 Trimming Entities...
Страница 340: ...330 Chapter 26 Making Inquiries...
Страница 342: ...332...
Страница 350: ...340 Chapter 27 Storing Data in a Drawing...
Страница 360: ...350 Chapter 28 Retrieving Data From a Drawing...
Страница 366: ...356 Chapter 29 Using Web Tools...
Страница 388: ...378 Glossary...
Страница 400: ...390 Index...


