6
- 17
INSTALACIÓN ELÉCTRICA
ELECTRICAL SYSTEM
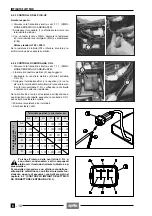
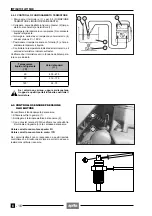
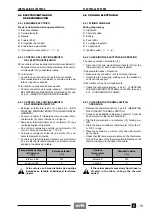
6.4.3 CONTROL DEL FUNCIONAMIENTO DEL
TERMISTOR
◆
Extraiga el termistor (1), véase 5.5 (DESMONTAJE
TERMISTOR LIQUIDO REFRIGERANTE).
◆
Conecte un tester (2)(ajustado como ohmetro) al ter-
mistor (1), como indicado en la figura.
◆
Sumerja el termistor en un recipiente (3) que contenga
líquido refrigerante.
◆
Sumerja en el mismo recipiente, un termómetro (4)
con un campo de medida de 0˚ ÷ 150˚C.
◆
Coloque el recipiente arriba de un hornillo (5) y calien-
te lentamente el líquido.
◆
Controle la temperatura indicada por el termómetro y
el valor del termistor indicado en el tester.
Verifique que el termistor varíe de acuerdo con la tempe-
ratura, como indicado a continuación.
Si los valores no varían, o bien, son muy dife-
rentes de aquéllos indicados en la tabla, subs-
tituya el termistor.
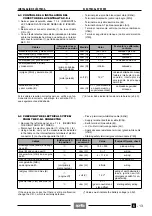
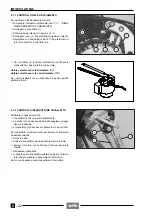
6.5 CONTROL DEL SENSOR DE LA PRESIÓN
DEL ACEITE DEL MOTOR
Para controlar el funcionamiento del sensor:
◆
Extraiga la protección de goma (1).
◆
Desconecte el terminal eléctrico del sensor (2).
◆
Con un tester (escala x 100
Ω
), compruebe la continui-
dad entre el terminal de lengüeta (3) y la carcasa del
sensor.
Valor correcto con el motor apagado: 0
Ω
Valor correcto con el motor en funcionamiento:
∞
Ω
Si los valores no corresponden con aquéllos indicados,
controle que el nivel de aceite del motor sea correcto y,
eventualmente, substituya el sensor.
Temperatura del líquido
refrigerante
(˚C)
Valores estándar
(
Ω
)
60˚
600 - 470
90˚
215 - 175
120˚
93 - 73
a
6.4.3 CHECKING THE THERMISTOR
OPERATION
◆
Remove thermistor (1), see 5.5 (REMOVING THE
COOLANT THERMISTOR).
◆
Connect, as indicated in the figure, a tester (2) (set as
an ohmmeter) to the thermistor (1).
◆
Dip the thermistor in a container (3) holding coolant.
◆
Dip in the same container a thermometer (4) with a 0˚
to 150˚ C range.
◆
Place the container on a burner (5) and slowly warm
up the coolant.
◆
Check the temperature indicated on thermometer and
the thermistor value indicated by the tester.
Make sure that the thermistor varies according to the
temperature, as indicated.
If values do not vary, or if they depart excessi-
vely from those indicated in the table, change
the thermistor.
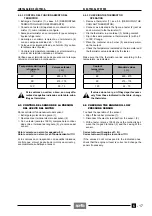
6.5 CHECKING THE ENGINE OIL LOW
PRESSURE SENSOR
To check the operation of the sensor:
◆
Slip off the rubber protection (1).
◆
Disconnect the electric terminal from the sensor (2).
◆
With a tester (scale x 100
Ω
) check the continuity bet-
ween the tongued terminal (3) and the casing of the
sensor.
Correct value with engine off : 0
Ω
Correct value with engine in motion:
∞
Ω
If the values do not correspond to the indicated ones,
check that the engine oil level is correct and change the
sensor if necessary.
Coolant
temperature
(˚C)
Standard values
(
Ω
)
60˚
600 - 470
90˚
215 - 175
120˚
93 - 73
a
Содержание Pegaso 650
Страница 1: ......
Страница 3: ...0 4 NOTE NOTES ANMERKUNGEN ...
Страница 4: ...1 1 1 2 3 4 5 6 7 8 INFORMAZIONI GENERALI INFORMACIONES GENERALES GENERAL INFORMATION ...
Страница 42: ......
Страница 69: ...3 1 1 2 3 4 5 6 7 8 MOTORE MOTOR ENGINE ...
Страница 90: ...3 22 MOTORE NOTE NOTAS NOTES ...
Страница 91: ...4 1 1 2 3 4 5 SISTEMA DI ALIMENTAZIONE SISTEMA DE ALIMENTACIÓN FUEL SYSTEM ...
Страница 116: ...4 26 SISTEMA DI ALIMENTAZIONE NOTE NOTAS NOTES ...
Страница 117: ...5 1 1 2 3 4 5 6 7 8 IMPIANTO DI RAFFREDDAMENTO SISTEMA DE REFRIGERACIÓN COOLING SYSTEM ...
Страница 130: ...5 14 IMPIANTO DI RAFFREDDAMENTO SISTEMA DE REFRIGERACIÓN COOLING SYSTEM NOTE NOTAS NOTES ...
Страница 131: ...6 1 6 1 2 3 4 5 6 7 8 IMPIANTO ELETTRICO INSTALACIÓN ELÉCTRICA ELECTRICAL SYSTEM ...
Страница 176: ...IMPIANTO ELETTRICO INSTALACIÓN ELÉCTRICA ELECTRICAL SYSTEM 6 46 NOTE NOTAS NOTES ...
Страница 177: ...7 1 1 2 3 4 5 6 7 8 CICLISTICA PARTE CICLO CHASSIS PARTS ...
Страница 226: ... 67 3 57 2 66 6 3 576 7 50 5827 3267 5 25 58 75 6 5 5 5 ...
Страница 242: ... 67 3 57 2 66 6 3 576 7 66 5 12 17 5 25 5 12 17 52 5217 5 ...
Страница 246: ... 67 3 57 2 66 6 3 576 7 70 5 12 3267 5 25 5 12 75 6 52 5 5 5 ...
Страница 272: ... 67 3 57 2 66 6 3 576 7 96 NOTE NOTAS NOTES ...
Страница 273: ...8 1 1 2 3 4 5 6 7 8 INFORMAZIONI PER LE RIPARAZIONI INFORMACIONES PARA LAS REPARACIONES REPAIRS ...
Страница 301: ...INFORMAZIONI PER LE RIPARAZIONI INFORMACIONES PARA LAS REPARACIONES REPAIRS 8 29 E F E F G H G H ...
Страница 302: ...INFORMAZIONI PER LE RIPARAZIONI INFORMACIONES PARA LAS REPARACIONES REPAIRS 8 30 I L I M L N M N ...
Страница 303: ...INFORMAZIONI PER LE RIPARAZIONI INFORMACIONES PARA LAS REPARACIONES REPAIRS 8 31 O P Q P O R Q R ...
Страница 310: ...INFORMAZIONI PER LE RIPARAZIONI INFORMACIONES PARA LAS REPARACIONES REPAIRS 8 38 NOTE NOTAS NOTES ...
Страница 311: ...INFORMAZIONI PER LE RIPARAZIONI INFORMACIONES PARA LAS REPARACIONES REPAIRS 8 39 ...

