3
- 19
MOTOR
ENGINE
3.3 REINSTALLING THE ENGINE ON THE
FRAME
Read 1.4 (PRECAUTIONS AND GENERAL INFORMA-
TION) carefully.
◆
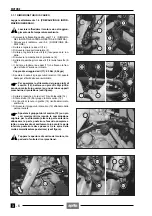
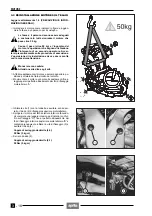
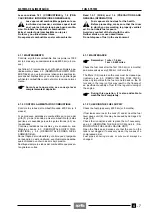
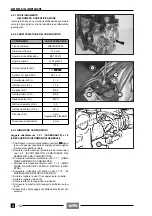
Sling the engine as indicated in the figure and hook the
bands to a hoist for support.
The bands and the hoist must be suitable for
bearing the weight of the engine, which is
about 50 kg, in total safety.
Due to the weight (about 50 kg) and dimen-
sions of the engine, the following operations
must be performed by two persons. Previous-
ly check the execution procedures. The reinstallation
must be carried out with the greatest care.
Handle with caution.
Be careful not to hurt your fingers, arms or
legs.
◆
Firmly grasp the engine and put it in the right position
on the frame on the left side of the vehicle.
◆
Shift the engine with slight movements until reaching
the perfect alignment of the holes "A" for the fastening
of the engine to the frame.
◆
Introduce the screw (1) with the washer and screw the
upper nut (2) that fastens the engine to the frame,
without tightening it.
◆
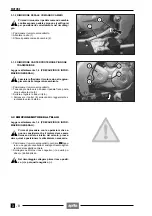
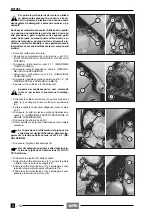
Push the engine from the front lower side, making it
perform a slight backward rotation (with fulcrum on the
holes "A"), until the rear lower holes "B" for the fasten-
ing of the engine to the frame are perfectly aligned,
and at the same time introduce the fastening screw (3)
and screw the nut (4).
Nut/screw (4-3) driving torque:
50 Nm (5 kgm).
◆
Tighten the nut (2).
Nut/screw (2-1) driving torque:
50 Nm (5 kgm).
a
a
a
3.3 INSTALACION MOTOR SOBRE BASTIDOR
Lea con cuidado 1.4 (PRECAUCIONES E INFORMA-
CIONES GENERALES).
◆
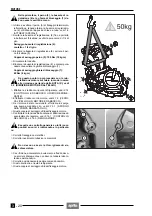
Suspenda el motor según lo indicado en figura y en-
ganche las fajas en un aparejo para soportarlo.
Las fajas y el aparejo deben resultar adecua-
dos para soportar con la mayor seguridad el
motor que pesa unos 50 kg.
Como consecuencia del peso (unos 50 kg) y
del espacio que ocupa el motor, las operacio-
nes que siguen necesitan la intervención de
un segundo operador. Antes de empezar el trabajo
compruebe de antemano los procedimientos que hay
que realizar. La operación de instalación debe reali-
zarse con el mayor cuidado.
Opere con precaución.
Cuidado con los dedos, con los brazos y con
las piernas.
◆
Aguante fijamente el motor acompañándolo en posi-
ción sobre el bastidor desde el lado izquierdo del vehí-
culo.
◆
Sacuda ligeramente el motor hasta alcanzar la perfec-
ta alineación de los agujeros de fijación motor/bastidor
“A”.
◆
Introduzca el tornillo (1) con la arandela y atornille, sin
apretarla, la tuerca (2) de fijación superior motor/basti-
dor.
◆
Empuje el motor desde el lado delantero inferior dán-
dole una ligera rotación hacia atrás (con fulcro sobre
el elemento de bloqueo “A”) hasta alcanzar la perfecta
alineación de los agujeros de fijación inferiores trase-
ros motor/bastidor “B” y al mismo tiempo introduzca el
tornillo de fijación (3) y enrosque la tuerca (4).
Par de apriete tuerca/tornillo (4-3):
50 Nm (5 kgm).
◆
Apriete la tuerca (2).
Par de apriete tuerca/tornillo (2-1):
50 Nm (5 kgm).
a
a
a
Содержание Pegaso 650
Страница 1: ......
Страница 3: ...0 4 NOTE NOTES ANMERKUNGEN ...
Страница 4: ...1 1 1 2 3 4 5 6 7 8 INFORMAZIONI GENERALI INFORMACIONES GENERALES GENERAL INFORMATION ...
Страница 42: ......
Страница 69: ...3 1 1 2 3 4 5 6 7 8 MOTORE MOTOR ENGINE ...
Страница 90: ...3 22 MOTORE NOTE NOTAS NOTES ...
Страница 91: ...4 1 1 2 3 4 5 SISTEMA DI ALIMENTAZIONE SISTEMA DE ALIMENTACIÓN FUEL SYSTEM ...
Страница 116: ...4 26 SISTEMA DI ALIMENTAZIONE NOTE NOTAS NOTES ...
Страница 117: ...5 1 1 2 3 4 5 6 7 8 IMPIANTO DI RAFFREDDAMENTO SISTEMA DE REFRIGERACIÓN COOLING SYSTEM ...
Страница 130: ...5 14 IMPIANTO DI RAFFREDDAMENTO SISTEMA DE REFRIGERACIÓN COOLING SYSTEM NOTE NOTAS NOTES ...
Страница 131: ...6 1 6 1 2 3 4 5 6 7 8 IMPIANTO ELETTRICO INSTALACIÓN ELÉCTRICA ELECTRICAL SYSTEM ...
Страница 176: ...IMPIANTO ELETTRICO INSTALACIÓN ELÉCTRICA ELECTRICAL SYSTEM 6 46 NOTE NOTAS NOTES ...
Страница 177: ...7 1 1 2 3 4 5 6 7 8 CICLISTICA PARTE CICLO CHASSIS PARTS ...
Страница 226: ... 67 3 57 2 66 6 3 576 7 50 5827 3267 5 25 58 75 6 5 5 5 ...
Страница 242: ... 67 3 57 2 66 6 3 576 7 66 5 12 17 5 25 5 12 17 52 5217 5 ...
Страница 246: ... 67 3 57 2 66 6 3 576 7 70 5 12 3267 5 25 5 12 75 6 52 5 5 5 ...
Страница 272: ... 67 3 57 2 66 6 3 576 7 96 NOTE NOTAS NOTES ...
Страница 273: ...8 1 1 2 3 4 5 6 7 8 INFORMAZIONI PER LE RIPARAZIONI INFORMACIONES PARA LAS REPARACIONES REPAIRS ...
Страница 301: ...INFORMAZIONI PER LE RIPARAZIONI INFORMACIONES PARA LAS REPARACIONES REPAIRS 8 29 E F E F G H G H ...
Страница 302: ...INFORMAZIONI PER LE RIPARAZIONI INFORMACIONES PARA LAS REPARACIONES REPAIRS 8 30 I L I M L N M N ...
Страница 303: ...INFORMAZIONI PER LE RIPARAZIONI INFORMACIONES PARA LAS REPARACIONES REPAIRS 8 31 O P Q P O R Q R ...
Страница 310: ...INFORMAZIONI PER LE RIPARAZIONI INFORMACIONES PARA LAS REPARACIONES REPAIRS 8 38 NOTE NOTAS NOTES ...
Страница 311: ...INFORMAZIONI PER LE RIPARAZIONI INFORMACIONES PARA LAS REPARACIONES REPAIRS 8 39 ...


