7
- 65
3$57(&,&/2
&+$66,63$576
X
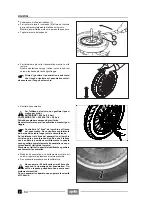
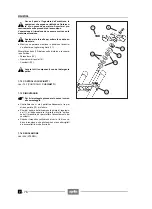
Coloque el rodillo para apretar el talón (1).
X
Haga girar la palanca de mando (2) alrededor de la llan-
ta, para introducir completamente el talón en la llanta.
Monte primero el talón inferior, luego el superior.
X
Quite la rueda del soporte.
X
Haga rebotar varias veces el neumático mientras lo
hace rodar.
Esta operación empuja los talones hacia los aloja-
mientos en la llanta, facilitando el inflado.
Antes de inflar el neumático, controle que la
referencia sobre el mismo coincida con la
marca sobre la llanta.
X
Infle el neumático.
Para utilizar el vehículo, no infle el neumático
más de:
DELANTERO 180 kPa (1,8 bar)
TRASERO 190 ÷ 220 kPa (1,9 ÷ 2,2 bar)
Podría explotar provocando heridas graves.
Nunca se ponga sobre el neumático cuando lo infle.
Controle la “línea” de la llanta en el flanco del
neumático. Tiene que quedar equidistante del
borde de la llanta en toda la circunferencia.
Si la distancia entre la línea del neumático y la llanta
varia en la circunferencia, significa que el talón no ha
entrado en la posición correcta.
En este caso desinfle completamente el neumático y
separe ambos talones de la llanta.
Extienda sobre los talones una capa de lubricante es-
pecial e infle nuevamente el neumático.
X
Tras haber instalado correctamente el neumático en la
llanta, regule la presión según el valor indicado.
X
Si es necesario efectúe el equilibrado.
No supere los 50 km/h durante las primeras 24
horas después de la reparación del neumáti-
co; el parche podría no estar completamente
pegado. Con un neumático reparado no supere los
130 km/h de velocidad.
X
Position the bead pressing roller (1).
X
Make the control lever (2) rotate around the rim in or-
der to insert the bead completely in the rim.
Position the lower bead first, then the upper bead.
X
Remove the wheel from the support.
X
Make the tyre bounce several times and at the same
time rotate it.
This operation pushes the beads towards the seats on
the rim, thus facilitating the inflation of the tyre.
Before inflating the tyre, make sure that the
mark on the tyre still coincides with the mark
on the rim.
X
Inflate the tyre.
To use the vehicle, do not inflate the tyre more
than:
FRONT TYRE 180 kPa (1.8 bar)
REAR TYRE 190-220 kPa (2.2 bar)
It may explode, causing serious injuries.
Never sit on the tyre while inflating it.
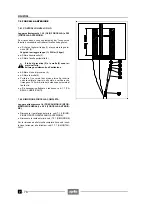
Check the “line” of the rim on the tyre side. It
must be equidistant from the edge of the rim
along its entire circumference.
If the distance between the line of the tyre and the rim
varies along the circumference, this means that the
bead is not positioned properly. In this case, deflate
the tyre completely and separate both beads from the
rim.
Spread the special lubricant on the beads and inflate
the tyre again.
X
When the tyre is properly installed on the rim, regulate
the pressure to the prescribed value.
X
If necessary, balance the wheel.
Do not exceed 50 km/h in the first 24 hours fol-
lowing the repair of the tyre; the insert or the
patch might not be completely glued.
Do not exceed the speed of 130 km/h with a repaired
tyre.
Содержание Pegaso 650
Страница 1: ......
Страница 3: ...0 4 NOTE NOTES ANMERKUNGEN ...
Страница 4: ...1 1 1 2 3 4 5 6 7 8 INFORMAZIONI GENERALI INFORMACIONES GENERALES GENERAL INFORMATION ...
Страница 42: ......
Страница 69: ...3 1 1 2 3 4 5 6 7 8 MOTORE MOTOR ENGINE ...
Страница 90: ...3 22 MOTORE NOTE NOTAS NOTES ...
Страница 91: ...4 1 1 2 3 4 5 SISTEMA DI ALIMENTAZIONE SISTEMA DE ALIMENTACIÓN FUEL SYSTEM ...
Страница 116: ...4 26 SISTEMA DI ALIMENTAZIONE NOTE NOTAS NOTES ...
Страница 117: ...5 1 1 2 3 4 5 6 7 8 IMPIANTO DI RAFFREDDAMENTO SISTEMA DE REFRIGERACIÓN COOLING SYSTEM ...
Страница 130: ...5 14 IMPIANTO DI RAFFREDDAMENTO SISTEMA DE REFRIGERACIÓN COOLING SYSTEM NOTE NOTAS NOTES ...
Страница 131: ...6 1 6 1 2 3 4 5 6 7 8 IMPIANTO ELETTRICO INSTALACIÓN ELÉCTRICA ELECTRICAL SYSTEM ...
Страница 176: ...IMPIANTO ELETTRICO INSTALACIÓN ELÉCTRICA ELECTRICAL SYSTEM 6 46 NOTE NOTAS NOTES ...
Страница 177: ...7 1 1 2 3 4 5 6 7 8 CICLISTICA PARTE CICLO CHASSIS PARTS ...
Страница 226: ... 67 3 57 2 66 6 3 576 7 50 5827 3267 5 25 58 75 6 5 5 5 ...
Страница 242: ... 67 3 57 2 66 6 3 576 7 66 5 12 17 5 25 5 12 17 52 5217 5 ...
Страница 246: ... 67 3 57 2 66 6 3 576 7 70 5 12 3267 5 25 5 12 75 6 52 5 5 5 ...
Страница 272: ... 67 3 57 2 66 6 3 576 7 96 NOTE NOTAS NOTES ...
Страница 273: ...8 1 1 2 3 4 5 6 7 8 INFORMAZIONI PER LE RIPARAZIONI INFORMACIONES PARA LAS REPARACIONES REPAIRS ...
Страница 301: ...INFORMAZIONI PER LE RIPARAZIONI INFORMACIONES PARA LAS REPARACIONES REPAIRS 8 29 E F E F G H G H ...
Страница 302: ...INFORMAZIONI PER LE RIPARAZIONI INFORMACIONES PARA LAS REPARACIONES REPAIRS 8 30 I L I M L N M N ...
Страница 303: ...INFORMAZIONI PER LE RIPARAZIONI INFORMACIONES PARA LAS REPARACIONES REPAIRS 8 31 O P Q P O R Q R ...
Страница 310: ...INFORMAZIONI PER LE RIPARAZIONI INFORMACIONES PARA LAS REPARACIONES REPAIRS 8 38 NOTE NOTAS NOTES ...
Страница 311: ...INFORMAZIONI PER LE RIPARAZIONI INFORMACIONES PARA LAS REPARACIONES REPAIRS 8 39 ...


