3
- 11
MOTOR
ENGINE
Para limpiar las partes exteriores del motor,
utilice detergente desengrasante, pinceles y
trapos.
Detergentes y disolventes corrosivos o penetrantes
pueden dañar las partes de goma y de plástico.
En caso de que use una maquina limpiadora de va-
por, no dirija chorros de agua o de aire a alta presión
o chorros de vapor sobre las siguientes partes: cubos
de las ruedas, mandos colocados en el lado derecho
e izquierdo del manillar, bombas de los frenos, instru-
mentos e indicadores, salidas de los silenciadores,
vano portadocumentos, interruptor de encendido/se-
guro de dirección, componentes eléctricos.
◆
Limpie con cuidado el motor.
◆
D e s c a r g u e d e l t o d o e l a c e i t e m o t o r , v é a s e
2.13 (CAMBIO DEL ACEITE MOTOR Y DEL FILTRO
DEL ACEITE DEL MOTOR).
◆
D e s m o n t e l o s t u b o s d e e s c a p e , v é a s e
3.1.1 (DESMONTAJE TUBOS DE ESCAPE).
◆
D e s m o n t e e l d e p ó s i t o d e e x p a n s i ó n , v é a s e
5.6 (DESMONTAJE DEPOSITO DE EXPANSION).
◆
D e s m o n t e l o s c a r b u r a d o r e s , v é a s e
4.5.3 (DESMONTAJE CARBURADORES).
◆
D e s m o n t e e l p e d a l m a n d o c a m b i o , v é a s e
3.1.2 (DESMONTAJE PEDAL MANDO CAMBIO).
◆
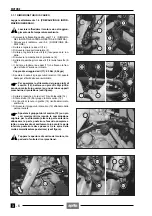
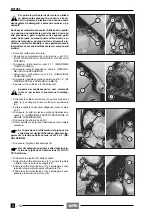
Desconecte el cable embrague (1) de la palanca (2).
Marque los cables, los manguitos, los tubos
etc. para evitar confusiones al instalarlos
.
◆
Levante el elemento de protección (3), destornille y
quite la tuerca (4) y desconecte el cable motor de
arranque (5).
◆
Destornille y quite el tornillo (6) desconectando el ca-
ble de masa (7).
◆
Desmonte el cárter protección piñón transmisión, véa-
se 3.1.3 (DESMONTAJE CARTER PROTECCION
PIÑON TRANSMISION).
◆
Quite el anillo de seguridad (8).
◆
Extraiga del eje el piñón transmisión (9) completo de
cadena.
En caso de que la operación de extracción pi-
ñón transmisión (9) resulte difícil, afloje algo
la tensión de la cadena, véase 2.16.3 (AJUSTE).
◆
Desmonte el piñón transmisión (9).
Durante la instalación aplique sobre el denta-
do interior del piñón de transmisión (9) LOC-
TITE
®
Anti-Seize.
◆
Saque la pipeta (10) de la bujía.
◆
Levante el elemento de protección (11), desenrosque
la tuerca y extraiga el cable del reenvío cuentarrevolu-
ciones (12).
◆
Extraiga el elemento de protección (13) y desconecte
el cable termistor temperatura líquido refrigerante
(14).
◆
Extraiga el elemento de protección (15) y desconecte
el cable sensor presión aceite motor (16).
a
a
c
c
To clean the outer parts of the engine, use a
degreaser, brushes and cloths.
Do not use corrosive detergents and solvents
or penetrants, in order to avoid damaging the rubber
and plastic parts.
If it is necessary to use a steam cleaning machine, do
not direct high pressure water or air jets towards the
following parts: wheel hubs, controls on the right and
left side of the handlebar, brake pumps, instruments
and indicators, silencer outlets, glove compartment,
ignition switch/steering lock, electrical components.
◆
Clean the engine thoroughly.
◆
D r a i n t h e e n g i n e o i l c o m p l e t e l y , s e e
2.13 (CHANGING ENGINE OIL AND OIL FILTER).
◆
Remove the exhaust pipes, see 3.1.1 (REMOVING
THE EXHAUST PIPES).
◆
Remove the expansion tank, see 5.6 (REMOVING
THE EXPANSION TANK).
◆
Remove the carburettors, see 4.5.3 (REMOVING
THE CARBURETTORS).
◆
R e m o v e t h e g e a r s h i f t f o o t l e v e r , s e e
3.1.2 (REMOVING THE GEARSHIFT FOOT LEVER).
◆
Disconnect the clutch cable (1) from the lever (2).
Mark the cables, couplings, pipes, etc., in or-
der to avoid confusing them during the reas-
sembly.
◆
Lift the protection element (3), unscrew and remove
the nut (4) and disconnect the starter cable (5).
◆
Unscrew and remove the screw (6), disconnecting the
earth cable (7).
◆
Remove the transmission pinion protection case, see
3.1.3 (REMOVING THE TRANSMISSION PINION
PROTECTION CASE).
◆
Remove the stop ring (8).
◆
Withdraw the transmission pinion (9) complete with
chain from the shaft.
If the withdrawing of the transmission pinion
(9) results difficult, slacken the chain slightly,
see 2.16.3 (ADJUSTMENT).
◆
Remove the transmission pinion (9).
Upon reassembly, apply LOCTITE
®
Anti-Seize
on the inner toothing of the transmission pi-
nion (9).
◆
Disconnect the cap (10) from the spark plug.
◆
Lift the protection element (11), unscrew the metal ring
and withdraw the cable from the revolution counter
control (12).
◆
Withdraw the protection element (13) and disconnect
the cable of the coolant temperature thermistor (14).
◆
Withdraw the protection element (15) and disconnect
the cable of the engine oil pressure sensor (16).
a
a
c
c
Содержание Pegaso 650
Страница 1: ......
Страница 3: ...0 4 NOTE NOTES ANMERKUNGEN ...
Страница 4: ...1 1 1 2 3 4 5 6 7 8 INFORMAZIONI GENERALI INFORMACIONES GENERALES GENERAL INFORMATION ...
Страница 42: ......
Страница 69: ...3 1 1 2 3 4 5 6 7 8 MOTORE MOTOR ENGINE ...
Страница 90: ...3 22 MOTORE NOTE NOTAS NOTES ...
Страница 91: ...4 1 1 2 3 4 5 SISTEMA DI ALIMENTAZIONE SISTEMA DE ALIMENTACIÓN FUEL SYSTEM ...
Страница 116: ...4 26 SISTEMA DI ALIMENTAZIONE NOTE NOTAS NOTES ...
Страница 117: ...5 1 1 2 3 4 5 6 7 8 IMPIANTO DI RAFFREDDAMENTO SISTEMA DE REFRIGERACIÓN COOLING SYSTEM ...
Страница 130: ...5 14 IMPIANTO DI RAFFREDDAMENTO SISTEMA DE REFRIGERACIÓN COOLING SYSTEM NOTE NOTAS NOTES ...
Страница 131: ...6 1 6 1 2 3 4 5 6 7 8 IMPIANTO ELETTRICO INSTALACIÓN ELÉCTRICA ELECTRICAL SYSTEM ...
Страница 176: ...IMPIANTO ELETTRICO INSTALACIÓN ELÉCTRICA ELECTRICAL SYSTEM 6 46 NOTE NOTAS NOTES ...
Страница 177: ...7 1 1 2 3 4 5 6 7 8 CICLISTICA PARTE CICLO CHASSIS PARTS ...
Страница 226: ... 67 3 57 2 66 6 3 576 7 50 5827 3267 5 25 58 75 6 5 5 5 ...
Страница 242: ... 67 3 57 2 66 6 3 576 7 66 5 12 17 5 25 5 12 17 52 5217 5 ...
Страница 246: ... 67 3 57 2 66 6 3 576 7 70 5 12 3267 5 25 5 12 75 6 52 5 5 5 ...
Страница 272: ... 67 3 57 2 66 6 3 576 7 96 NOTE NOTAS NOTES ...
Страница 273: ...8 1 1 2 3 4 5 6 7 8 INFORMAZIONI PER LE RIPARAZIONI INFORMACIONES PARA LAS REPARACIONES REPAIRS ...
Страница 301: ...INFORMAZIONI PER LE RIPARAZIONI INFORMACIONES PARA LAS REPARACIONES REPAIRS 8 29 E F E F G H G H ...
Страница 302: ...INFORMAZIONI PER LE RIPARAZIONI INFORMACIONES PARA LAS REPARACIONES REPAIRS 8 30 I L I M L N M N ...
Страница 303: ...INFORMAZIONI PER LE RIPARAZIONI INFORMACIONES PARA LAS REPARACIONES REPAIRS 8 31 O P Q P O R Q R ...
Страница 310: ...INFORMAZIONI PER LE RIPARAZIONI INFORMACIONES PARA LAS REPARACIONES REPAIRS 8 38 NOTE NOTAS NOTES ...
Страница 311: ...INFORMAZIONI PER LE RIPARAZIONI INFORMACIONES PARA LAS REPARACIONES REPAIRS 8 39 ...

