7
- 49
3$57(&,&/2
&+$66,63$576
7.2.4 INSTALACION
Lea con cuidado 1.4 (PRECAUCIONES E INFORMA-
CIONES GENERALES).
Durante la instalación ponga cuidado en no
dañar los tubos, el disco y las pastillas del fre-
no.
Actúe con precaución al introducir el disco en
la pinza del freno.
X
Coloque la rueda entre las barras de la horquilla.
Engrase el interior del cable reenvío velocíme-
tro/cuentakilómetros, véase 1.7 (TABLA DE
LOS LUBRICANTES).
X
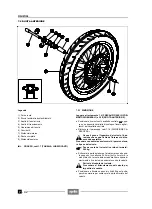
Coloque la lengüeta del reenvío velocímetro/cuentaki-
lómetros (1) en el alojamiento correspondiente del
cubo rueda.
X
Coloque correctamente el anillo de arrastre (2), el re-
tén (3) y el alojamiento del reenvío cuentakilómetros
en correspondencia de la espiga antirrotación (4).
X
Desplace el soporte guardabarros lo suficiente para in-
troducir parcialmente el eje de la rueda (desde lado
derecho del vehículo).
X
Introduzca el distanciador (7) entre el cubo de la rueda
y la barra izquierda de la horquilla.
Engrase el eje de la rueda, véase 1.7 (TABLA
DE LOS LUBRICANTES).
X
Introduzca del todo el eje de la rueda (6) (introducien-
do el distanciador) y apriételo.
Par de apriete eje rueda: 80 Nm (8 kgm)
X
Coloque correctamente el soporte guardabarros (5).
A causa del peso y del espacio que ocupa el
vehículo la operación que sigue a continua-
ción necesita la intervención de un segundo
operador. Siga adelante con cuidado y compruebe si
puede soportar el peso del vehículo.
Peso en vacío del vehículo (en orden de mar-
cha): 200 kg.
X
Levante la parte delantera del vehículo y desplace el
soporte colocado por debajo del motor durante el des-
montaje.
X
Baje el vehículo y colóquelo sobre el caballete.
X
Coloque correctamente el protector de cárter, véase
7.1.9 (DESMONTAJE PROTECTOR DE CARTER).
X
Con la palanca del freno delantera accionada, presio-
ne varias veces sobre el manillar empujando hacia el
fondo la horquilla. De tal forma las barras de la horqui-
lla se ajustarán de manera apropiada.
X
Atornille y apriete los dos tornillos (8).
X
Apriete el tornillo (9) de la brida del eje de la rueda.
Par de apriete tornillos brida eje rueda:
12 Nm (1,2 kgm).
Tras haber instalado la rueda, accione varias
veces la palanca del freno delantero y contro-
le el funcionamiento correcto del sistema de
frenado.
Controle el centrado y el equilibrado de la rueda.
7.2.4 REASSEMBLY
Read 1.4 (PRECAUTIONS AND GENERAL INFORMA-
TION) carefully.
While reassembling the wheel, be careful not
to damage the brake pipe, the disc and the
pads.
Insert the disc in the brake caliper with care.
X
Position the wheel between the fork tubes.
Grease the inside of the speedometer/odome-
ter control, see 1.7 (LUBRICANT CHART).
X
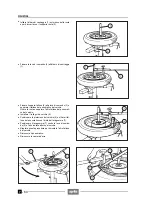
Position the speedometer/odometer control tang (1) in
the relevant seat in the wheel hub.
X
Correctly position the traction ring (2), the sealing ring
(3) and the odometer control seat in correspondence
with the apposite antirotation pin (4).
X
Shift the mudguard support as much as necessary to
insert the wheel pin partially (from the right side of the
vehicle).
X
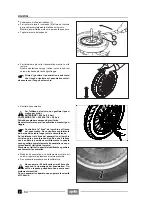
Insert the spacer (7) between the wheel hub and the
fork left tube.
Grease the wheel pin, see 1.7 (LUBRICANT
CHART).
X
Insert the wheel pin (6) completely (fitting the spacer)
and tighten it.
Wheel pin driving torque: 80 Nm (8 kgm).
X
Correctly position the mudguard support (5).
Due to the weight and dimensions of the vehi-
cle, the following operation cannot be per-
formed by one person only.
Proceed with care and make sure that you can sup-
port the weight of the vehicle.
Weight of the vehicle without driver (ready for
starting): 200 kg.
X
Raise the front part of the vehicle and remove the sup-
port positioned under the engine during the disassem-
bly.
X
Lower the vehicle and position it on the stand.
X
Correctly position the oil pan guard, see 7.1.9 (RE-
MOVING THE OIL PAN GUARD).
X
With pulled front brake lever, press the handlebars re-
peatedly, thrusting the fork downwards. In this way the
fork tubes will settle properly.
X
Screw and tighten the two screws (8).
X
Tighten the wheel pin clamp screws (9).
Wheel pin clamp screw driving torque:
12 Nm (1,2 kgm).
After reassembly, pull the front brake lever re-
peatedly and check the correct functioning of
the braking system.
Check the centering and balancing of the wheel.
Содержание Pegaso 650
Страница 1: ......
Страница 3: ...0 4 NOTE NOTES ANMERKUNGEN ...
Страница 4: ...1 1 1 2 3 4 5 6 7 8 INFORMAZIONI GENERALI INFORMACIONES GENERALES GENERAL INFORMATION ...
Страница 42: ......
Страница 69: ...3 1 1 2 3 4 5 6 7 8 MOTORE MOTOR ENGINE ...
Страница 90: ...3 22 MOTORE NOTE NOTAS NOTES ...
Страница 91: ...4 1 1 2 3 4 5 SISTEMA DI ALIMENTAZIONE SISTEMA DE ALIMENTACIÓN FUEL SYSTEM ...
Страница 116: ...4 26 SISTEMA DI ALIMENTAZIONE NOTE NOTAS NOTES ...
Страница 117: ...5 1 1 2 3 4 5 6 7 8 IMPIANTO DI RAFFREDDAMENTO SISTEMA DE REFRIGERACIÓN COOLING SYSTEM ...
Страница 130: ...5 14 IMPIANTO DI RAFFREDDAMENTO SISTEMA DE REFRIGERACIÓN COOLING SYSTEM NOTE NOTAS NOTES ...
Страница 131: ...6 1 6 1 2 3 4 5 6 7 8 IMPIANTO ELETTRICO INSTALACIÓN ELÉCTRICA ELECTRICAL SYSTEM ...
Страница 176: ...IMPIANTO ELETTRICO INSTALACIÓN ELÉCTRICA ELECTRICAL SYSTEM 6 46 NOTE NOTAS NOTES ...
Страница 177: ...7 1 1 2 3 4 5 6 7 8 CICLISTICA PARTE CICLO CHASSIS PARTS ...
Страница 226: ... 67 3 57 2 66 6 3 576 7 50 5827 3267 5 25 58 75 6 5 5 5 ...
Страница 242: ... 67 3 57 2 66 6 3 576 7 66 5 12 17 5 25 5 12 17 52 5217 5 ...
Страница 246: ... 67 3 57 2 66 6 3 576 7 70 5 12 3267 5 25 5 12 75 6 52 5 5 5 ...
Страница 272: ... 67 3 57 2 66 6 3 576 7 96 NOTE NOTAS NOTES ...
Страница 273: ...8 1 1 2 3 4 5 6 7 8 INFORMAZIONI PER LE RIPARAZIONI INFORMACIONES PARA LAS REPARACIONES REPAIRS ...
Страница 301: ...INFORMAZIONI PER LE RIPARAZIONI INFORMACIONES PARA LAS REPARACIONES REPAIRS 8 29 E F E F G H G H ...
Страница 302: ...INFORMAZIONI PER LE RIPARAZIONI INFORMACIONES PARA LAS REPARACIONES REPAIRS 8 30 I L I M L N M N ...
Страница 303: ...INFORMAZIONI PER LE RIPARAZIONI INFORMACIONES PARA LAS REPARACIONES REPAIRS 8 31 O P Q P O R Q R ...
Страница 310: ...INFORMAZIONI PER LE RIPARAZIONI INFORMACIONES PARA LAS REPARACIONES REPAIRS 8 38 NOTE NOTAS NOTES ...
Страница 311: ...INFORMAZIONI PER LE RIPARAZIONI INFORMACIONES PARA LAS REPARACIONES REPAIRS 8 39 ...

