


48
YORK INTERNATIONAL
ing message for 3 seconds before it reverts back to the
SET TIME display message to let the user know that
another try at reprogramming is necessary.
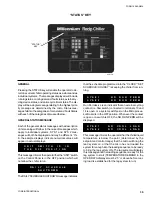
PROGRAMMING THE DAILY START/STOP AND
HOLIDAY SCHEDULE
Set Schedule/Holiday
Messages showing the start/stop schedule of each day
of the week as well as the holiday start/stop schedule
can be displayed after the SET SCHEDULE/HOLIDAY
key is pressed. The display can be scrolled through day-
by-day simply by repetitively pressing the ENTER or
ADVANCE DAY key. A typical daily schedule display is
shown below:
To reprogram any of the daily schedules, key in the
new START time. To change the AM/PM associated
with the START time, press the “AM/PM” key. This will
change the AM/PM message to the opposite time pe-
riod. The “AM/PM” key can only be pressed once. If an
error is made, press CANCEL and begin reprogram-
ming again.
After the START time and the associated AM/PM have
been programmed, the cursor will move to the STOP
time. Key in the STOP TIME and press the “AM/PM”
key if AM/PM requires changing.
When the ENTER key is pressed, the new START/STOP
time is entered and the display will scroll to the next
day. If an unacceptable time is entered, the following
message will be displayed.
For ease of programming, any values “ENTERED” for
MONDAY will automatically be put in for the other days
of the week. Be aware of this anytime the MONDAY
SCHEDULE is changed, since it changes times previ-
ously programmed into other days. For scrolling through
the days to view times programmed use the ADVANCE
DAY KEY, not the ENTER KEY. This will assure that
after viewing MONDAY, that the ENTER KEY is not
pressed changing times programmed for the rest of the
week.
If the chiller is not cycled by the DAILY SCHEDULE, but
is required to run whenever the system switches are on,
all 00.00s should be programmed into the daily sched-
ule. This can be done manually for each day or by press-
ing CANCEL and ENTER when the MONDAY START/
STOP schedule appears.
NOTE: This will have no effect on the holiday schedule.
Continue to program each day as needed. After MON
through SUN has been entered, the HOLIDAY message
will be displayed.
The Holiday (HOL) START/STOP allows the user to des-
ignate a specific day(s) for special requirements. This is
provided so that day(s) needing special start/stop re-
quirements can be programmed without disturbing the
normal working schedule.
The start/stop times for the Holiday schedule are pro-
grammed just as for any other day.
NOTE: Only one start/stop time can be programmed
which will apply to each of the “HOLIDAY” days
selected.
After the ENTER key is pressed, a new message will be
displayed to designate which days of the week are to be
holidays.
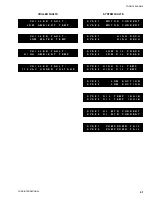
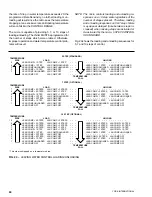
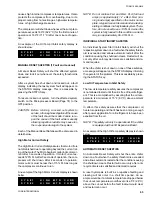
In the above sample display, an * designates Tuesday
as a holiday.
When the display appears, the cursor will first stop be-
hind Sunday. To designate a day as a holiday, press the
“*” key. If a day is not to be a holiday, press the “0” key.
Whenever the “*” or the “0” keys are pressed, the cursor
will advance to the next day. After all the holiday days
are programmed, press ENTER to store the new data
into memory. The display will then advance to the begin-
ning of the Daily Schedule (MON).
The Holiday Schedule is only executed once by the mi-
cro before it is erased from memory. This is done be-
cause in most cases a special Holiday Schedule is only
necessary once in a several month period. It also elimi-
nates the need for operator intervention to erase the
schedule after the holiday passes.
If an error is made while programming, press CANCEL.
This will clear all programmed (*) “holiday” days. The
schedule can then be reprogrammed.
The “0” key will not cancel out a “*” and cannot be used
for correcting a programming error.
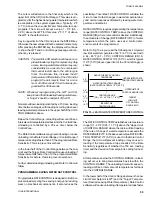
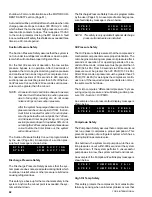
SET SCHEDULE/
HOLIDAY
O U T
O F
R A N G E
T R Y
A G A I N !
M O N
S T A R T
=
0 6 : 0 0 A M
S T O P
=
0 5 : 3 0 P M
O U T
O F
R A N G E
T R Y
A G A I N !
H O L
S T A R T
=
0 8 : 3 0 A M
S T O P
=
1 2 : 0 0 P M
S
M
T*
W
T
F
S
H O L I D A Y
N O T E D
B Y
*
Summary of Contents for Millennium YCAJ150
Page 21: ...FORM 150 65 NM4 21 YORK INTERNATIONAL LD02461 FIG 6 ELEMENTARY DIAGRAM Cont d...
Page 22: ...22 YORK INTERNATIONAL ELEMENTARY DIAGRAM...
Page 24: ...24 YORK INTERNATIONAL CONNECTION DIAGRAM FIG 7 CONNECTION DIAGRAM LD02463...
Page 25: ...FORM 150 65 NM4 25 YORK INTERNATIONAL FIG 7 CONNECTION DIAGRAM Cont d LD02462...
Page 30: ...30 YORK INTERNATIONAL FIG 8 SYSTEM WIRING Cont d LD02499...
Page 100: ...100 YORK INTERNATIONAL LD02654 FIG 37B LOUVER BRACKETS INSTALLATION...
Page 103: ...FORM 150 65 NM4 103 YORK INTERNATIONAL LD02656 FIG 39A LOUVER INSTALLATION SIDES...
Page 104: ...104 YORK INTERNATIONAL LD02654 FIG 39B LOUVER BRACKETS INSTALLATION...
Page 108: ...108 YORK INTERNATIONAL FIG 40B CONDENSER COIL LOUVER INSTALLATION FRONT AND BACK LD02659...
Page 110: ...110 YORK INTERNATIONAL FIG 41 REMOTE RESET BOARD LD02666 P1...