background image

Basic Copying Steps

Basic Copying with the Document Feeder (DADF)

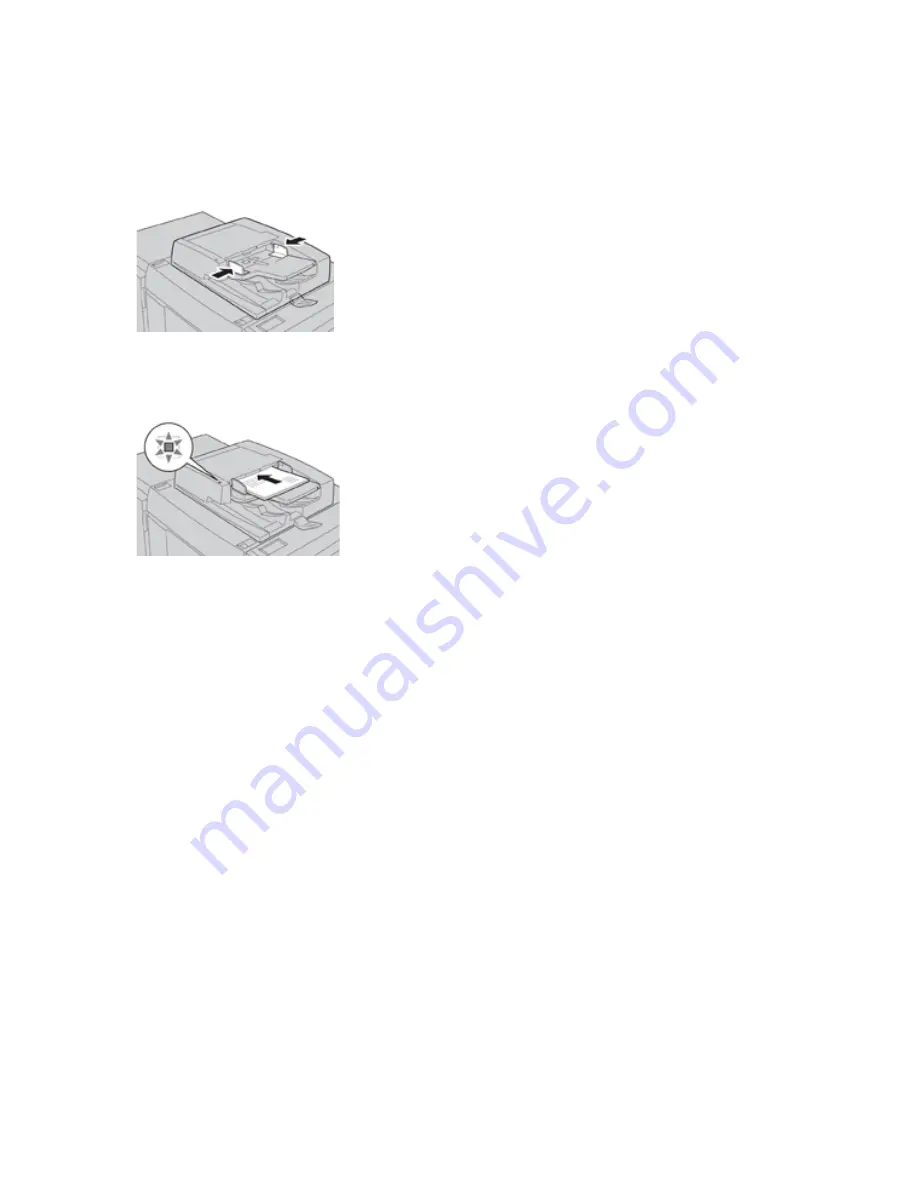
1. Adjust the movable document guides to their widest position.

2. Load the documents face up with the first page on top and with the headings toward the back or

left of the press.

The confirmation indicator lights to show that the documents are loaded correctly.

3. Press the

Home

button on the press UI.

4. Select

Copy

on the

Home

window.

5. Select the desired Copy features/options:

• Paper Supply
• Reduce/Enlarge
• Output Color
• 2-Sided Copying
• Original Type
• Lighten/Darken
The features displayed on the main Copy window vary depending on how it is configured by the
administrator.

6. Enter the quantity.

7. Press

Start

.

39

Summary of Contents for Versant 280 Press

Page 1: ...Xerox Versant 280 Press User Documentation ...

Page 2: ...on This symbol indicates a mandatory action to take in order to avoid damage to these areas Warning This symbol alerts users to areas where there is the possibility of personal injury Hot Warning This symbol alerts users to areas where there are heated surfaces which should not be touched Laser Warning This symbol indicates a laser is being used and alerts the user to refer to the appropriate safe...

Page 3: ...s refer to the recycling instructions for your region or marketplace for correct disposal information and procedures Do Not Incinerate the Drum Cartridge Always refer to the recycling instructions for your region or marketplace for correct disposal information and procedures Do Not Incinerate the Second Bias Transfer Roll Always refer to the recycling instructions for your region or marketplace fo...

Page 4: ... a White Strip or Overhead Projector Sheets with a White Strip Do Not Use Envelopes with Open Flaps Do Not Use Folded Creased Curled or Wrinkled Paper Do Not Use Ink Jet Paper Do Not Load Postcards in the Indicated Direction Do Not Use Media Attached with Staples or Paper or Metal Clips Do Not Copy Money 4 ...

Page 5: ...ymbol is confirmation that you should not dispose of items such as Customer Replaceable Units CRUs in the normal household waste stream You must dispose of these items in compliance with agreed national procedures This symbol often accompanies batteries and indicates that used electrical and electronic products and batteries should not be mixed with general household waste For more information abo...

Page 6: ...when performing these installations Disconnect the power cord when removing covers and guards for installing optional equipment Except for user installable options there are no parts that you can maintain or service behind these covers Emergency Power Off The following are hazards to your safety The power cord is damaged or frayed Liquid is spilled into the press The press is exposed to water The ...

Page 7: ... States Food and Drug Administration FDA implemented regulations for laser products This product complies with FDA performance standards for Laser products except for deviations pursuant to Laser Notice No 50 dated June 24 2007 These regulations apply to laser products marketed in the United States The label on the Production Press indicates compliance with CDRH regulations and must be attached to...

Page 8: ...ce the Press in locations susceptible to vibrations For optimum performance use the Press at the Altitude specified in Environmental Specifications section of the User Documentation Use the materials and supplies specifically designed for your Press The use of unsuitable materials may result in poor performance of the Press and possibly a hazardous situation Follow all warnings and instructions th...

Page 9: ...void touching any metallic surfaces Vacuum Cleaner Use for Dry Ink Toner Spills Use a broom or a wet cloth to wipe off spilled dry ink toner Sweep slowly to minimize generation of dust during clean up Avoid using a vacuum If a vacuum must be used the unit should be designed for combustible dusts for example explosion rated motor and non conductive hose C Co on ns su um ma ab blle e I In nf fo or r...

Page 10: ...azardouswaste perchlorate WARNING If the battery on a circuit board is installed incorrectly there is a risk of explosion E En nv viir ro on nm me en nt ta all H He ea allt th h a an nd d S Sa af fe et ty y C Co on nt ta ac ct t I In nf fo or rm ma at tiio on n For more information on Environment Health and Safety in relation to this Xerox product and supplies contact the following United States a...

Page 11: ... User Interface 2 Document Feeder 3 Document Glass 4 Press Power Switch 5 Dry Ink Toner Front Cover 6 Press Front Door 7 Trays 1 3 8 Bottom Left Door 9 Casters 10 Tray 5 Bypass 11 Tray 5 Bypass Top Cover 12 USB Memory Port 13 Offset Catch Tray OCT 11 ...

Page 12: ... devices are attached to the press For detailed information about an optional device refer to the appropriate section in this guide Locating the Press Serial Number The press serial number can be accessed from the User Interface UI or from the serial number plate which is located on the inside frame of Tray 1 1 Press the Machine Status button on the UI 2 From the Machine Status screen ensure that ...

Page 13: ...mation 2 Services Home button Press this button to display the main window Provides access to features such as Copy E Mail and Network Scanning just to name a few features Other features can be available depending on your marketplace 3 Services button This button lights when the main power is on 4 Job Status button Use to check the progress of active jobs and detailed information about completed j...

Page 14: ... as scanning and copying a document or printing a selected report from the print engine This button is also used by the Customer Service Engineer CSE during diagnostic routine procedures 11 Interrupt button Use this button to suspend a copy or print job in progress and have the press stop to process another job During the Interrupt mode the Interrupt button lights Pressing the Interrupt button aga...

Page 15: ...ct the Cancel button to return to the main screen P Pr re es ss s P Pe er rf fo or rm ma an nc ce e C Cu us st to om miiz za at tiio on n There are three different performance customization configurations available with the press Xerox Versant 280 Press with basic print engine configuration performance Xerox Versant 280 Press with All Stock Rated Speed ASRS configuration performance optional Xerox...

Page 16: ...iio on na all P Pe er rf fo or rm ma an nc ce e P Pa ac ck ka ag ge e Important The Performance Package is ordered prior to initial installation of the system It is not possible to upgrade an existing press with the Performance Package after the press is ordered and installed The optional Performance Package is a suite of technologies and tools that enhances the capabilities of the base press in t...

Page 17: ...placed strategically within the paper path automated processes are quick to perform and require less downtime for the press Automated processes include measurements for calibration and destination profiling Over time the ACQS software and the ILS hardware work together to provide accurate and more stable color In addition to the Inline Spectrophotometer ILS the Interface Decurler Module provides c...

Page 18: ...ay also be downloaded from www xerox com by searching for the press and selecting the Support link S Sp pe ec ciif fiic ca at tiio on ns s Rated Speed Full color or black only 80 pages per minute of Letter 8 5 x 11 in A4 paper size Print Modes Two print modes are supported and are specified at the print server 4 Color Mode CMYK Black and White Mode Grayscale Maximum Printable Area Default Border 4...

Page 19: ...engine 1200 x 1200 dpi F Fiir rs st t P Pr riin nt t O Ou ut t T Tiim me e First Print Out Time is measured from the time that the printer starts to the time the trailing edge of the sheet exits the Offset Catch Tray Note If the system is equipped with various types of finishing devices the First Print Out Time varies depending on the length of the paper path required to transport that paper From ...

Page 20: ...Weight 38 200 g m2 10 53 lb 2 sided 50 200 g m2 Type A5 A5 A4 A4 8 5 11 in 8 5 14 in SEF 11 17 in SEF Paper Capacity 250 sheets When you use Xerox 75 g m2 20 lb paper Document Productivity 8 5 x 11 in A4 portrait 1 sided A4 LEF or Letter LEF 1 sided to 1 sided full color 75 dpm or more 1 sided to 1 sided black and white 75 dpm or more 2 sided to 2 sided full color 75 dpm or more 2 sided to 2 sided...

Page 21: ...00 330 mm 4 13 in Copy Paper Trays 1 3 52 256 g m2 Tray 5 Bypass 52 400 g m2 Trays 6 7 optional Advanced OHCF 52 400 g m2 Use Xerox recommended papers for best results First Copy Output Time Values can differ depending on press configuration Trays 1 3 Black and white 5 2 seconds or less Full color 9 seconds or less These times apply when 100 Reduction Enlargement and 8 5 x 11 in or A4 are used Cop...

Page 22: ...can Size Maximum size 297 x 432 mm 11 x 17 in A3 for both sheets and books Scan Resolution 600 x 600 dpi 400 x 400 dpi 300 x 300 dpi 200 x 200 dpi Scan Graduation Color 10 bit input or 8 bit output for each RGB color Monochrome 1 bit input 1 bit output 2 tones or 8 bit Grayscale output 256 tones Document Scan Speed For 8 5 x 11 in or A4 200 dpi Black White 100 IPM Images per minute 600 dpi Full Co...

Page 23: ...e room where the press is located needs to be within the minimum and maximum allowable temperature and relative humidity limits Ambient temperature The operating temperature range is 10 32 C 50 90 F Ambient temperature for optimal image quality and paper handling performance is achieved at 20 24 C 68 76 F Note The press can operate outside of this range but the performance cannot be guaranteed Rel...

Page 24: ...re e I In nf fo or rm ma at tiio on n Refer to the following sources for more information about your press and its capabilities Resource Location Other documentation for your printer Print Server Documentation For more information refer to the documentation such as USB that shipped with the print server After installation is complete it is recommended that you or your System Administrator print th...

Page 25: ...n radiate radio frequency energy and if not installed and used in accordance with the instruction manual may cause harmful interference to radio communications Operation of this equipment in a residential area is likely to cause harmful interference in which case the user will be required to correct the interference at his or her own expense Changes or modifications to this equipment not specifica...

Page 26: ...llites mobiles utilisant les mêmes canaux This transmitter must not be co located or operating in conjunction with any other antenna or transmitter This equipment must be installed and operated with a minimum distance of 20 centimeters between the radiator and your body Cet émetteur ne doit pas être Co placé ou ne fonctionnant en même temps qu aucune autre antenne ou émetteur Cet équipement devrai...

Page 27: ...ork However you must require simplex or 1 sided printing you can change the print settings in the print driver Paper Types You can use this product to print on both recycled and virgin paper approved to an environmental stewardship scheme which complies with EN12281 or a similar quality standard Lighter weight paper 60 g m2 which contains less raw material and thus saves resources per print can be...

Page 28: ...d Network are not activated To change the Power Saver settings refer to the User Documentation at www xerox com VERSANT_ 280docs For more details contact your System Administrator or refer to the System Administrator Guide To enable Auto Power Off mode contact your System Administrator For details refer to the System Administrator Guide at www xerox com VERSANT_280docs To learn more about Xerox pa...

Page 29: ...ies of fine or imprisonment can be imposed on those guilty of making such reproductions 1 Obligations or Securities of the United States Government such as Certificates of Indebtedness National Bank Currency Coupons from Bonds Federal Reserve Bank Notes Silver Certificates Gold Certificates United States Bonds Treasury Notes Federal Reserve Notes Fractional Notes Certificates of Deposit Paper Mone...

Page 30: ...ar any of the following Registrant information Earnings or Income Court Record Physical or mental condition Dependency status Previous military service Exception United States military discharge certificates can be photographed 9 Badges Identification Cards Passes or Insignia carried by military personnel or by members of the various Federal Departments such as FBI Treasury and so on unless the he...

Page 31: ... or kind without the consent of the copyright or trademark owner This list is provided for your convenience and assistance but it is not all inclusive and no liability is assumed for its completeness or accuracy In case of doubt consult your solicitor Other Countries Copying certain documents may be illegal in your country Penalties of fine or imprisonment may be imposed on those found guilty of m...

Page 32: ...authorities Perchlorate Material This product may contain one or more perchlorate containing devices such as batteries Special handling may apply For more information go to www dtsc ca gov hazardouswaste perchlorate Battery Removal Only a manufacturer approved service facility can replace the batteries N No or rt th h A Am me er riic ca a Xerox operates an equipment take back and reuse or recycle ...

Page 33: ... free of charge For more information contact your retailer Business Users in the European Union in accordance with European legislation end of life electrical and electronic equipment subject to disposal must be managed within agreed procedures If you discard electrical and electronic equipment contact your dealer or supplier local reseller or Xerox representative for end of life take back informa...

Page 34: ...tton located on the top of the press near the Document Feeder This button is the primary way for you to power on or off the press It is used by the operator as the workflow requires Use the Power On Off button to power on or power off the press Important To power off always press the power button first Wait until the lights on the user interface stop blinking to allow the fuser to finish cooling M...

Page 35: ...er consumption mode when all print jobs have completed and there are no jobs currently processing There are two power saving modes Low Power and Sleep By default the press automatically enters the Low Power mode after 1 minute of inactivity After 1 minute of inactivity the press then enters Sleep mode These time intervals for both modes can be changed by the system administrator Refer to the follo...

Page 36: ...ument file to the print server At the print server importing adding a document file to a print queue Manage the job settings of the document and then submit to the press for printing Printing from a Computer The system supports Xerox EX print drivers Powered by Fiery Through print drivers installed on your computer or Mac you can send a document file from your desktop to the print server which can...

Page 37: ...e desired queue such as Process and Hold or Print and Hold The job is sent to the selected queue or to the press for immediate printing Printing on Tabs from the Print Server Basic Procedure for Printing on Tabs from a Print Server There are many types of tab stock and tab sequences available Precut tabs are commonly used and have two different orientations the single straight collated tab stock o...

Page 38: ...6 and 7 should be used for best results If you plan to apply staple or punch finishing use Trays 5 6 or 7 only Loading orientation depends on what tray you are using C Co op py y Document Feeder and Glass Document Feeder Tips Tips for using the Duplex Automatic Document Feeder DADF For best output ensure that the documents are in good condition A maximum of 250 documents can be scanned at one time...

Page 39: ...e press The confirmation indicator lights to show that the documents are loaded correctly 3 Press the Home button on the press UI 4 Select Copy on theHome window 5 Select the desired Copy features options Paper Supply Reduce Enlarge Output Color 2 Sided Copying Original Type Lighten Darken The features displayed on the main Copy window vary depending on how it is configured by the administrator 6 ...

Page 40: ...ocedure If your press has an optional third party Document Finishing Architecture DFA device attached then this profile feature is available and specific copy options may be selected for a job Prior to physically attaching the DFA device to the press device profiles are created The profiles represent the characteristics of your finishing device Refer to the third party customer documentation for i...

Page 41: ...ain different features than the ones listed here The Copy feature includes the following options Reduce Enlarge R E Paper Supply Auto Select Output Color Copy Output 2 Sided Copying Original Type Darken Lighten Reduce Enlarge Reduce and Enlarge The reduce enlarge R E feature provides a variety of reduction and enlargement options to adjust the size of the output image Originals can be enlarged or ...

Page 42: ...uces or enlarges the image so that it will fit onto your chosen paper If this option is selected you must also select a specific paper tray Independent X Y This option allows you to specify different height and width ratios to scale the height and width independently Auto X Y ensures copies are made with the height and width ratios set automatically to match the paper size Auto Center This option ...

Page 43: ...e source color is extracted from the original and replaced by the target area color The rest of the colors are replaced by the non target area color that you select Single Color This option allows you to copy in one of the preset or custom colors More This option allows you to customize the color for the copied output Copy Output Important Copy Output options vary depending on the finishing device...

Page 44: ...d to Head This option is sometimes called Top to Top For your original documents select this option when all the pages of your original documents have the same orientation For copy output select this option to copy or print the reverse side of a page so that the finished document opens like a book Head to Toe This option is sometimes called Top to Bottom For your original documents select this opt...

Page 45: ...ing copies of documents that have text on colored backgrounds such as maps Darken or Lighten Note The Darken Lighten option may be accessed from the main Copy screen or from the Image Quality tab and then by selecting Image Options The Darken Lighten option provides manual control to adjust the lightness or darkness of the scanned images Select the Left scroll button to darken the scanned image fr...

Page 46: ...xt on colored backgrounds such as maps Image Quality Feature Overview The Image Quality feature includes the following options Original Type Image Options Image Enhancement Color Effects Color Balance Color Shift Selecting Image Quality Options 1 Load the document or documents onto the Document Glass or into the Document Feeder 2 Press the Home button on the press UI 3 Select Copy on theHome windo...

Page 47: ... the output normal do not adjust the saturation Image Enhancement Use the Image Enhancement settings when your scanned image requires more than the basic image quality There are two features associated with Image Enhancement Suppress Background This option prevents reproduction of unwanted shading from originals where the opposite side printing shows through Off Auto Suppression This option automa...

Page 48: ...edium and high density ranges The default option is Normal Basic Color adjusts the density Advanced Color adjusts the Highlights Midtones and Shadows Color Shift This feature allows you to shift all hues in an image simultaneously in order to make the overall character of the output image warmer or cooler For example if you select one of the Normal This is the default option Plus buttons The red c...

Page 49: ... Size Edge Erase Image Shift Image Rotation Invert Image Original Orientation 6 Select the Copy tab 7 Select the desired Copy options including Paper Supply Reduce Enlarge Darken Lighten 8 Select any other desired Copy features options such as Image Quality Output Format 9 Enter the quantity 10 Press Start on the UI Book Copying Bound originals such as books can be placed on the document glass to ...

Page 50: ...ginal 2 Sided Book Copying options include Select a starting and ending page Select Starting Page Left Page or Right Page Selecting Ending Page Left Page or Right Page Original Size The press can detect the size of the document if it is a standard size If the document is not a standard size the machine does not know what size it is This does not matter if you select a specific reduction enlargemen...

Page 51: ... 2 54 mm and each edge can be adjusted in 0 1 in 2 54 mm increments up to 2 0 in 50 8 mm Presets With this option you choose pre programmed erase amounts that were previously created and saved by the system administrator Image Shift Image Shift allows you to move the position of the image on the output page Options include Off This is the default setting The image on the copy will be in the same p...

Page 52: ...s reversed Options include Mirror Image This option reverses the original image creating a mirror of the original This feature can be used when you want to change the apparent direction of an image or where the original is inked on the reverse of the paper for example engineering drawings Negative Image This option converts the black image areas in the original to white the white image areas to bl...

Page 53: ...r into the Document Feeder 2 Press the Home button on the press UI 3 Select Copy on theHome window 4 Select the Output Format tab 5 From the Output Format window select the desire options Booklet Creation Covers Transparency Options Page Layout Poster Annotations Watermark Tab Margin Shift Face Up Down Output ID Card Copying Transparency Options Folding optional 6 Select the Copy tab 7 Select the ...

Page 54: ...ements Covers This option allows you to attach covers to the booklet The front and back covers can be output before the first page and after the last page of the document and on a different type of paper Divide Output Use this option when you have a large number of original documents The original documents are divided to create subsets in order to reduce the thickness of each booklet The press fol...

Page 55: ...sets using stock from a different tray For example you can add colored stock card or transparencies to your copied sets to add a professional finish to your copy job The Covers feature includes the following options Front Cover and Back Cover Select an option for a front cover only back cover only or select options for both front and back covers Off Blank Cover Uses blank sheets of paper as the co...

Page 56: ...clude Confidential Urgent and Draft You can also create new or edit existing comments These can also be stored to the press memory You can also change the position and appearance of the comment using the Position and Font Size buttons Date This option allows you to place the current date in the margins of your output The date can be printed on only the first page of the output or it can be printed...

Page 57: ...tabbed stock You have the option to copy the entire original document onto the tabbed stock or you can choose to copy only the edge of the original document onto the tabbed stock Options include Shift to Tab This option prints the edge of the original document image onto the tab of the tabbed stock You can change the amount of shift required by using the Shift Value buttons on the touch screen Shi...

Page 58: ... feeder 3 Press the Home button on the press UI 4 Select Copy on the Home window 5 Select Output Format ID Card Copying 6 Select On 7 Select Save 8 Enter the quantity 9 Press Start to begin scanning side 1 10 Open the document feeder and turn the ID card over to copy side 2 11 Close the document feeder 12 Press Start to begin scanning side 2 Printing begins and copies are delivered to the output a...

Page 59: ... both your copy and network print jobs Depending on the copy print job the Folding option can be selected from the press UI or from the print driver on your workstation The Folding option can also be selected at the print server for the selected job In order to use the folding option the orientation of documents must be short edge feed SEF You must select a paper tray that contains SEF stock Foldi...

Page 60: ... category select Save Then on the Build Job window select Save Copy Output Booklet Creation Covers Annotations Segment Separators Watermark Face Up Down Orientation 9 Load only the first segment into the document feeder or place the segment on the document glass one page at a time 10 Press Start When the first segment has finished scanning the Copy Status screen will appear 11 Remove the originals...

Page 61: ... Upon completion press the Clear All button on the UI to return the settings to their default state Combine Original Sets This feature allows you to copy sets of documents that cannot be loaded into the document feeder This is useful when copying documents that may be damaged ripped or torn or too wrinkled to go through the document feeder Combine Original Sets allows you to copy each original by ...

Page 62: ...ete Outside or Delete Inside 6 If the originals are 2 sided select the applicable option Both Sides Side 1 Only Side 2 Only 7 Select the Area 1 button The Delete Outside Delete Inside Area 1 screen appears Use this screen to define the first area for deletion omission from the copy output 8 To define a specific area enter the two X and Y coordinates within a range 0 0 17 0 inches 0 0 431 8 mm Navi...

Page 63: ...lder on the press Store to USB Scans a document and saves the scanned data to a USB memory device This is an optional feature Store Send Link Send to Folder Scans a document and sends an e mail notifying the user of two URLs one is for the location where the scanned data can be retrieved and second is for the location from which the data can be deleted Store to WSD Web Services on Device Scan a jo...

Page 64: ... 4 After the confirmation select Close to close the preview screen Changing Scan Settings and Options While your job is scanning perform the following steps to change the settings to that job 1 Select Next Original 2 Select Change Settings 3 Select the appropriate section and make select features The following features can be adjusted Color Scanning 2 Sided Scanning Original Type Image Options Lig...

Page 65: ...ning options include Auto Detect The color of the document is determined automatically the press scans in full color when the document is colored otherwise scans in monochrome Color Select this option to scan a color document Black White Scans a document in monochrome two tones You can select the document type in Original Type Grayscale Scans a document in grayscale Adds shades to monochrome creat...

Page 66: ...e processing and compression Advanced Settings The options for Advanced Settings are shown on the second tab of the selected scan method these options include the following Image Options The Image Options include Lighten Darken This option provides manual control to adjust the lightness or darkness of the scanned images Scroll down to darken the scanned image of light originals such as pencil imag...

Page 67: ...fine lines and small fonts that have been enlarged and for documents with low image definition Quality File Size This feature allows you to select the ratio of data compression for color and grayscale scanned images Use the slider to choose from good image quality with small file size higher image quality with larger file size or highest image quality with largest file size Note This feature is un...

Page 68: ...option to scan pages from bound originals Options include Left Page then Right Scans the left page first and the right page of the facing pages for the bound original Right Page then Left Scans the right page first and the left page of the facing pages for the bound original Top Page then Bottom Scans the top page first and then the bottom page of the facing pages for the bound original The follow...

Page 69: ...pression Allows you to save PDF and XPS files with high compression Searchable Text Allows you to select whether to perform character recognition in PDF files PDF Security Allows you to configure security for the PDF output in order to prevent unauthorized access Optimize For Quick Web View Optimizes the PDF file so that it is displayed faster on a web browser Add Thumbnail Allows you to attach th...

Page 70: ...s encrypted with this method can be opened with Adobe Acrobat 9 0 or later File Open Password This option sets a password for opening the PDF The recipient of the PDF file must know the password before it can be opened Permissions This option adds restrictions to the PDF file which prevents unauthorized printing or editing of the file The recipient of the PDF must know the permissions password in ...

Page 71: ... faster on a web browser Add Thumbnail Allows you to attach thumbnails to XPS files when XPS is selected A thumbnail is a reduced small file size image that helps you check the file contents Single File for Each Page Saves each page as a single file in the specified format Compression Method options When Manual Select is chosen for the Compression Method some or all of the following options are av...

Page 72: ...l cannot be found in the address book select New Recipient option to add the address in the To Cc or Bcc field of the e mail A maximum of 128 characters may be entered for a single e mail address Address Book Use the address book to find and add recipients in the To Cc or Bcc fields of the e mail List all public entries This option displays the local address list which resides on the press Retriev...

Page 73: ...re recipients by choosing one of the following options New Recipient 1 Use the keyboard to enter the entire address 2 Select Add 3 If sending to multiple recipients repeat the previous sub steps until finished 4 Select Close Address Book 1 Select Address Book 2 Select one of the choices from the pull down menu such as List all public entries 3 Select the desired recipient 4 Select one of the field...

Page 74: ...r DEFAULT This is the default job template When a new template is created from CentreWare Internet Services it is based on the default template This template cannot be deleted It can be edited and returned to the factory default template only by the system administrator Go To Use the numeric keypad to enter a 3 digit job template number The job template then appears at the top of the list Template...

Page 75: ...P or SMB protocol Scan to PC Components Transfer Protocol The Scan to PC service allows you to scan documents and send the scanned data to a network computer using the FTP or SMB protocol Specify the protocol to use when selecting Transfer Protocol Choices include FTP SMB SMB UNC Format UNC stands for Universal Naming Convention and its format is as follows host name shared name directory name Add...

Page 76: ... the UI Keyboard 7 Load your original documents in the document feeder or on the document glass 8 If desired select Preview 9 Select the desired scan options 10 Press Start to begin scanning 11 Retrieve the original documents from the Document Feeder or the Document Glass Using the Address Book to Specify a Scan to PC Destination 1 From the main Scan to PC tab window select Address Book 2 The Addr...

Page 77: ...Select inside the Save In field and enter a directory path When the save location is in the DFS namespace on Windows enter a folder name Up to 128 characters This option is only available when you select FTP or SMB in Transfer Protocol 7 Select Save to save and return to the main Scan to PC tab window 8 Select inside the User Name field then enter the user name of the computer to which you are for...

Page 78: ... begin scanning 8 Retrieve the original documents from the Document Feeder or the Document Glass Store to USB Store to USB Overview The Store to USB feature allows you to scan documents and save the scanned data to a USB memory device Use the following USB memory devices A formatted USB memory device A USB 2 0 compliant memory device USB 1 1 is not supported A USB memory device with a storage capa...

Page 79: ...ct Save in 5 Select a folder in which to save the scanned data This will be a folder location on the USB memory device 6 Select Save The main Store to USB window displays 7 Select the desired scan options 8 If desired select Preview 9 Press Start to begin the scanning process 10 Retrieve the original documents from the Document Feeder or the Document Glass Store and Send Link Feature Send to Folde...

Page 80: ... restricted on the press If you want to avoid these restrictions use the Scan to PC or E mail service For more information refer to the System Administrator Guide You can customize the layout of the features displayed on the Store and Send Link feature For more information refer to System Administrator Guide Storing and Sending a Link Sending to Folder 1 Press the Log In Out button on the UI or se...

Page 81: ...ter that will receive the scanned data When This Device is selected a List of Components is displayed This list shows computer names and four processing methods including Scan to User PC this is a specified network computer Scan for Print to User PC Scan for E mail to User PC and Scan for OCR to User PC How to Use the Store to Web Services for Devices WSD Feature Using the Store to WSD Feature 1 F...

Page 82: ... job is completed and the press is ready for other copy print jobs 13 From the UI select Delete The scan operation is stopped The UI displays a Remove Your Original message 14 Remove your originals and select OK The scan job is completed and the press is ready for other copy print jobs Starting a Scan Job from This Device Ensure that the original documents are loaded and that This Device is select...

Page 83: ... Print Allows you to print selected files separately Batch Print Allows you to print multiple files as one file File Details Option For the File Details option these additional selections are available Whole Page Allows you to select whether to display the whole page or to enlarge the image by 200 You can select the view size from Whole Page and Enlarged View A small sized document cannot be enlar...

Page 84: ...l page of each file If a different size document is included in multiple files it may be printed in improper orientation These additional options are available with Batch Print Paper Supply Select the desired paper tray 2 Sided Printing Select 2 sided printing Output Select the desired output options including stapling hole punching and which finishing tray to deliver the printed output File Detai...

Page 85: ...option include the following Refresh Displays the updated file information Create Displays the Create New Job Flow Sheet window Edit Delete Displays the Details window Search by Name Searches for job flows that partially match the entry The press searches through job flow names that were registered upon each job flow creation The entry can be up to 128 characters Search by Keyword Searches for job...

Page 86: ...ess searches through keywords that were registered upon each job flow creation Sheet Filtering Displays the Sheet Filtering window Sheet Filtering allows you to filter the job flow sheets that are displayed Displayed job flow sheets may vary depending on the Authentication feature Sheet Filtering Options Sheet Filter options include the following Owner System Administrator If this box is checked t...

Page 87: ...r file is linked to a folder Manually selecting a Job Flow to act on the documents or files stored in the folder To automatically start a job flow you must create a link with a folder and a job flow sheet in advance Files are automatically processed with the job flow sheet when they are stored in the linked folder Acceptable Features to Register You can register the following features Forward Mult...

Page 88: ... The press searches through keywords that were registered upon each job flow creation Sheet Filtering Displays the Sheet Filtering window Sheet Filtering allows you to filter the job flow sheets that are displayed Displayed job flow sheets may vary depending on the Authentication feature Additional Job Flow Options Additional job flow options include the following Name Set the name for the job flo...

Page 89: ...nt Specify a new recipient The specified recipient appears in Recipient Name E mail Address in the Send as E mail screen Name E mail Address Displays the recipient name or e mail address specified Subject If desired set a specific subject Delete Recipient Deletes all the information for the selected recipient Edit Allows you to check or change the information for the selected recipient File Format...

Page 90: ... Maximum 64 single byte characters Save in Maximum 128 single byte characters User Name Maximum 97 single byte characters Password Maximum 32 single byte characters Print Options The additional settings available for Print option include the following Print Quantity Paper Supply 2 Sided Printing Output E mail Notification Options The additional settings available for E mail Notification option inc...

Page 91: ...Administrator 2 Press the Machine Status button 3 Select the Tools tab on the press User Interface UI 4 Select Setup Adjustment Setup Create Folder 5 Select a folder that is not being used Available The New Folder window displays 6 On the New folder Passcode window choose one of the following Off If you do not assign a passcode all users will be allowed access to the folder On 1 Enter a passcode w...

Page 92: ...r or on the appropriate server Confirming and Changing a Job Flow You can confirm a Job Flow and temporarily change its parameters However only fields that have change permission assigned when the Job Flow was created can be edited 1 From the UI press the Clear All button 2 Press the Home button 3 If enabled by the System Administrator select Job Flow Sheets then select OK 4 Select a listed Job Fl...

Page 93: ...s a job to the top of list and runs it after the job that is currently printing or copying Job Progress This option shows the details of the selected document Close Menu This option closes the pop up menu Completed Jobs Tab 1 Press the Job Status button on the UI 2 Select the Completed Jobs tab A list of the completed or deleted jobs display Use the scroll bar to navigate the list 3 To check the d...

Page 94: ...onfiguration Select the Device Configuration button to display a list of the various hardware components and options that are available on the press and their status Hardware components and options include any optional feeding and finishing devices attached to the press Software Version Select the Software Version button to display a list of the software versions for the various system components ...

Page 95: ...From the Faults screen select a fault to view instructions on how to fix the error Supplies Tab The Supplies tab provides status information about the customer replaceable units CRUs that are used in the press To access supplies information press the Machine Status button on the UI and then select theSupplies tab Each Customer Replaceable Unit and status is displayed Billing Information Tab Access...

Page 96: ...ssion is the image on one side of one sheet of media This counter shows the total impression amount for color and black only impressions Total Impressions This number represents the total number of impressions for all color and black only print jobs Black Impressions This number represents the total number of impressions for all black white print jobs includes Black Copied Impressions and Black Pr...

Page 97: ...red programs Create Job Flow Sheet Use this feature to create job flow sheets which contain transfer settings of scanned data such as a transfer method and destination These sheets simplify data transfer tasks Add Address Book Entry Select this feature to add Address and Recipient Information To add select an available entry and enter the information To view an entry select the entry and the infor...

Page 98: ...Before loading paper consider the following The press supports the ability to pull different stock sizes and paper types from various trays and assemble them as part of a single job To select multiple paper trays and insert different papers within one job program this custom job at the print server using features such as special pages The press supports Automatic Tray Switching which allows a job ...

Page 99: ...8 5 x 14 in SEF 9 x 11 in SEF and LEF 11 x 15 in SEF 11 x 17 in SEF 12 x 18 in SEF 12 6 x 19 2 in SEF 13 x 18 in SEF 16 kai TFX SEF and LEF 16 kai GCO SEF and LEF Pa kai TFX SEF pa kai GCO SEF Trays 1 3 Trays 5 6 and 7 52 256 52 400 Recycled paper coated and uncoated All Trays 64 105 Embossed coated and uncoated Trays 1 3 Trays 5 6 and 7 106 256 106 400 Transparency 8 5 x 11 in A4 LEF All Trays Po...

Page 100: ...g m2 18 lb Bond 95 lb Cover Paper sizes from 182 x 182 330 x 488 mm 7 2 x 7 2 13 x 19 2 in Stock types include transparencies heavyweight coated and uncoated predrilled and tabs Loading paper Long Edge Feed LEF or portrait or Short Edge Feed SEF or landscape dependent on the actual paper size Auto size detection capability Automatically adjusts the tray position in the front and back based on the ...

Page 101: ...int Engine Configuration Prints Per Minute All Stocks Rated Speed ASRS Configuration 1 Sided 2 Sided 1 Sided 2 Sided Postcard Uncoated Coated and Matte Coated 52 220 g m2 221 256 g m2 80 ppm 60 ppm 40 ppm 30 ppm 80 ppm 80 ppm 40 ppm 40 ppm 8 5 x 11 in Uncoated Coated and Matte Coated 52 220 g m2 221 256 g m2 64 ppm 48 ppm 32 ppm 24 ppm 64 ppm 64 ppm 32 ppm 32 ppm A4 Uncoated Coated and Matte Coate...

Page 102: ...22 ppm 22 ppm 12 x 18 in SRA3 Labels Cast Coated Embossed or Textured Film 52 256 g m2 20 ppm 20 ppm 13 x 19 in 330 2 x 488 mm Labels Cast Coated Embossed or Textured Film 52 256 g m2 19 ppm 19 ppm Table 3 Tray 5 Bypass Tray Paper Size and Paper Type Paper Feed Direc tion Paper Weight Prints Per Minute Basic Print Engine Configuration Prints Per Minute All Stocks Rated Speed ASRS Configuration 1 S...

Page 103: ...Uncoated Coated and Matte Coated SEF 52 220 g m2 22 350 g m2 351 400 g m2 34 ppm 28 ppm 28 ppm 17 ppm 14 ppm 34 ppm 34 ppm 34 ppm 17 ppm 17 ppm 12 x 18 in SRA3 Uncoated Coated and Matte Coated SEF 52 220 g m2 221 350 g m2 351 400 g m2 32 ppm 26 ppm 26 ppm 16 ppm 13 ppm 32 ppm 32 ppm 32 ppm 16 ppm 16 ppm 13 x 19 in Uncoated Coated and Matte Coated SEF 52 220 g m2 221 350 g m2 351 400 g m2 32 ppm 26...

Page 104: ...tured Film SEF 52 300 g m2 19 ppm 19 ppm 13 x 19 in 330 2 x 488 mm Labels Cast Coated Embossed or Textured Film SEF 52 300 g m2 19 ppm 19 ppm 13 x 19 in 330 2 x 488 mm Labels Cast Coated Embossed or Textured Film SEF 52 300 g m2 19 ppm 19 ppm 13 x 19 in 330 2 x 488 mm Labels Cast Coated Embossed or Textured Film SEF 52 300 g m2 19 ppm 19 ppm 13 x 19 in 330 2 x 488 mm Labels Cast Coated Embossed or...

Page 105: ...Configuration 1 Sided 2 Sided 1 Sided 2 Sided Postcard Uncoated Coated and Matte Coated SEF 52 220 g m2 221 350 g m2 351 400 g m2 80 ppm 60 ppm 60 ppm 40 ppm 30 ppm 30 ppm 80 ppm 80 ppm 80 ppm 40 ppm 40 ppm 40 ppm 8 5 x 11 in A4 Uncoated Coated and Matte Coated LEF 52 220 g m2 221 350 g m2 351 400 g m2 80 ppm 60 ppm 60 ppm 40 ppm 30 ppm 80 ppm 80 ppm 80 ppm 40 ppm 40 ppm 8 5 x 11 in Uncoated Coate...

Page 106: ...m 18 5 ppm 14 5 ppm 37 ppm 37 ppm 37 ppm 18 5 ppm 18 5 ppm 8 5 x 11 in A4 Labels Cast Coated Embossed or Textured Film LEF 52 300 g m2 40 ppm 40 ppm 8 5 x 11 in Labels Cast Coated Embossed or Textured Film SEF 52 300 g m2 32 ppm 32 ppm 8 5 x 14 in B4 A4 Labels Cast Coated Embossed or Textured Film SEF 52 300 g m2 25 ppm 25 ppm 11 x 17 in A3 Labels Cast Coated Embossed or Textured Film SEF 52 300 g...

Page 107: ...e of the tray Paper can be loaded in either the LEF portrait or SEF landscape direction 6 Adjust the paper guides by pressing in the guide release and carefully moving the Edge Guide until it lightly touches the edge of the material in the tray Do not load materials above the MAX line located on the rear Edge Guide 7 Gently push in the tray until it comes to a stop If enabled by your System Admini...

Page 108: ...ab cutout in the stack will be toward the front of the tray Note Tab stock is loaded so the straight edge of the stock is in the feed direction Also you can only load the tab stock LEF 4 Adjust the paper guides by pressing in the guide release and carefully moving the Edge Guide until it lightly touches the edge of the stock in the tray Do not load materials above the MAX line located on the rear ...

Page 109: ...n the rear Edge Guide 7 Gently push in the tray until it comes to a stop If enabled by your System Administrator the Paper Tray settings Tray Properties window displays on the UI 8 From the Paper Tray settings Tray Properties window enter the correct paper information including size type weight and if necessary paper curl and or alignment option 9 Select Confirm or OK to save the information and c...

Page 110: ...correct paper information including size type weight and if necessary paper curl and alignment option 9 Select Confirm or OK to save the information and close the Paper Tray settings Tray Properties window L Lo oa ad diin ng g M Me ed diia a iin n t th he e B By yp pa as ss s T Tr ra ay y 5 5 Note If any optional feeding devices are attached the Bypass Tray 5 is installed above or on top of that f...

Page 111: ...ts before loading them into the tray 6 Insert the paper or media into the tray until it stops 7 Adjust the paper guides so that they touch the edges of the stack If enabled by your System Administrator the Paper Tray settings Tray Properties window may be displayed on the UI 8 If the Paper Tray settings Tray Properties window displays on the UI confirm the correct tray to which it is printing and ...

Page 112: ...and close the Paper Tray settings Tray Properties window Loading Transparencies in the Bypass Tray 5 Note Do not use transparencies with a white side strip permanent or removable 1 Gently extend the Bypass tray Tray 5 as necessary to accommodate the paper 2 Hold the center of the paper guides and slide them to the desired paper size 3 Select the appropriate paper stock for your print copy job 4 Fa...

Page 113: ...wrinkling or embossing can occur when printing on envelopes Successful envelope printing depends on the quality and construction of the envelopes Try another envelope brand if problems occur When defining custom paper settings at the Paper Tray settings Tray Properties window assign the custom stock to the Bypass Tray Tray 5 or an Advanced Oversized High Capacity Feeder Tray 6 or 7 Select Auto Det...

Page 114: ...F stock Additionally the tray can accommodate B5 and Executive 7 25 x 10 5 in but requires an NVM change for the default size settings For changes to the NVM settings contact Xerox Technical Customer Support This tray supports stock weights 64 22 g m2 18 lb Bond 80 lb Cover This tray holds a maximum of 2000 sheets of 75 g m2 20lb paper Load stock in the LEF direction only Do not load materials abo...

Page 115: ...e for detailed information on the paper curl and alignment adjustment options c Select Save repeatedly until you return to the tray settings window 8 To close the window select Confirm Tray 6 Specifications Item Specification Paper Capacity 2 000 sheets Sheet Size 8 5 x 11 in or A4 B5 and Executive 7 25 x 10 5 in but requires NVM change for default size settings Contact your customer support repre...

Page 116: ...on on the optional Postcard Bracket refer to Paper and Media Loading Paper in Trays 6 and 7 1 Select the appropriate paper stock for your print copy job 2 Pull out the tray slowly until it stops 3 Open the ream of paper with the seam side facing up 4 Fan the sheets before loading them into the tray 5 Load paper into the tray 6 Adjust the paper guides by pressing in the guide release and carefully ...

Page 117: ... blank tab cutout in the stack will be toward the front of the tray For single reverse collated tabs the first blank tab cutout in the stack will be toward the rear of the tray Tab stock is loaded so the straight edge of the stock is in the feed direction Also you can only load the tab stock LEF 5 Adjust the paper guides by pressing in the guide release and carefully moving the Edge Guide until it...

Page 118: ...d on facing down 5 Adjust the paper guides by pressing in the guide release and carefully moving the Edge Guide until it lightly touches the edge of the material in the tray Do not load materials above the MAX line located on the rear Edge Guide 6 Gently push in the tray until it comes to a stop If enabled by your System Administrator the Paper Tray settings Tray Properties window displays on the ...

Page 119: ... enabled by your System Administrator the Paper Tray settings Tray Properties window displays on the UI 9 From the Paper Tray settings Tray Properties window enter the correct paper information including size type weight and if necessary paper curl and or alignment option 10 Select Confirm or OK to save the information and close the Paper Tray settings Tray Properties window Postcard Bracket The P...

Page 120: ... x 152 4 mm 4 x 6 in With the Postcard Bracket installed you can print envelopes from Trays 6 and 7 1 Slowly open one of the paper trays until it stops then remove the paper 2 Move the paper guides out to their largest position 3 To remove the postcard bracket loosen the screw on the left side of the tray 1 then remove the bracket 2 120 ...

Page 121: ...it sits on the locating pins on the upper frame and in the grooves on the bottom of the tray 5 Tighten the thumb screw so that it locks the Postcard bracket in place 6 Load the postcard stock and adjust the paper guides against the stock 121 ...

Page 122: ... if necessary at the print server 8 Run your print job 9 Upon completion of your print job remove the postcard stock and the Postcard bracket from the tray 10 Store the postcard bracket by inserting it into the storage area on the left side of the tray 1 and tightening the screw 2 122 ...

Page 123: ...paper information is being used including size type weight and paper curl or alignment option for the tray Select OK and close the Tray Properties window 3 At the tray slide the rear skew adjustment lever to the right 4 Gently push in the tray until it comes to a stop 5 Run your print job If the paper is fed accurately without skew and the printed output is satisfactory your task is complete If th...

Page 124: ...4 x 6 in to 330 x 488 mm 13 x 19 2 in SRA3 2 Tray with Postcard Bracket 98 x 148 mm minimum Paper Weight 52 400 g m2 D Du ua all A Ad dv va an nc ce ed d O Ov ve er rs siiz ze ed d H Hiig gh h C Ca ap pa ac ciit ty y F Fe ee ed de er r T Tr ra ay ys s 8 8 a an nd d 9 9 Trays 8 and 9 Overview Important The Dual Advanced Oversized High Capacity Feeder OHCF Trays 8 and 9 can be added only to a system...

Page 125: ...per guides by pressing in the guide release and carefully moving the Edge Guide until it lightly touches the edge of the material in the tray Do not load materials above the MAX line located on the rear Edge Guide 7 Gently push in the tray until it comes to a stop The Paper Tray settings Tray Properties window displays on the UI You can view and set stock attributes and verify trays are assigned w...

Page 126: ... blank tab cutout in the stack will be toward the front of the tray For single reverse collated tabs the first blank tab cutout in the stack will be toward the rear of the tray Tab stock is loaded so the straight edge of the stock is in the feed direction Also you can only load the tab stock LEF 5 Adjust the paper guides by pressing in the guide release and carefully moving the Edge Guide until it...

Page 127: ...d on facing down 5 Adjust the paper guides by pressing in the guide release and carefully moving the Edge Guide until it lightly touches the edge of the material in the tray Do not load materials above the MAX line located on the rear Edge Guide 6 Gently push in the tray until it comes to a stop If enabled by your System Administrator the Paper Tray settings Tray Properties window displays on the ...

Page 128: ...de 8 Gently push in the tray until it comes to a stop If enabled by your System Administrator the Paper Tray settings Tray Properties window displays on the UI 9 From the Paper Tray settings Tray Properties window enter the correct paper information including size type weight and if necessary paper curl and alignment option 10 Select Confirm or OK to save the information and close the Paper Tray s...

Page 129: ...idth and 182 488 mm 7 2 19 2 in Length Paper weight 52 400 g m2 Paper capacity 2 000 sheets per tray Important When using up to Xerox 24 lb 90 g m2 bond paper F Fiin niis sh hiin ng g D De ev viic ce es s Related Topics Business Ready BR Finisher and Optional Booklet Maker Interface Decurler Module and Interface Decurler Module with Inline Spectrophotometer ILS Inserter Device GBC AdvancedPunch Pr...

Page 130: ...let maker Business Ready BR Finisher without Booklet Maker The BR Finisher supports hole punching and stapling The Right Top Tray is used for stacked output and can receive up to 500 sheets of paper The Stacker is used for offset and stapled output and can hold up to 3 000 sheets Business Ready BR Finisher with the optional Booklet Maker The BR Finisher with the optional Booklet Maker supports hol...

Page 131: ...or Stapling Tray 3 000 sheets unstapled 100 sets dual or 4 position staple 11 x 17 in 8 5 x 14 in A4 200 sets single position staple A4 8 5 x 11 in Sizes Stacking A6 SRA3 4 x 6 12 x 19 in Stapling B5 A3 7 25 x 10 5 11 x 17 in Paper Weight Top Tray and Stacker Tray 52 400 g m2 uncoated and coated paper Stapling Single and multi position stapling Auto stapling 50 sheets maximum 90 g m2 24 lb Letter ...

Page 132: ...3 Hole Punch Europe 2 4 Hole Punch 4 Hole Swedish Punch Optional Booklet Maker Saddle stitch 2 16 sheets 7 sheets at 106 176 g m2 uncoated or 5 sheets at 177 220 g m2 coated Bi fold up to 5 sheets Letter Legal Tabloid A3 A4 12 x 18 in SRA3 supported I In nt te er rf fa ac ce e D De ec cu ur rlle er r M Mo od du ulle e a an nd d I In nt te er rf fa ac ce e D De ec cu ur rlle er r M Mo od du ulle e ...

Page 133: ...ted Speed ASRS performance option the user experiences a 25 percent increase in handling heavyweight stock The press does not require a standalone print server and comes with the integrated Xerox EX i 280 Print Server Powered by Fiery The optional Performance Package is a suite of technologies and tools that enhances the capabilities of the base press in three areas operational speed color managem...

Page 134: ...color faster and provides more stable color over time Besides the Inline Spectrophotometer ILS the Interface Decurler Module contains additional cooling to support the higher speeds of the press when running at higher speeds and a decurler component to ensure flat sheets for finishing Configuration Information Regarding the Performance Package 1 The Performance Package must be ordered when the pre...

Page 135: ...ockmatic Pro 35 and Plockmatic Pro 50 this device requires the PR Finisher Plus Interface Decurler Module Components 1 Paper Jam and Error Indicator Panel 2 Interface Decurler Module Front Cover Control Panel on the Interface Decurler Module 1 Paper Jam and Error Indicator 2 Curl Up and Down Indicators 3 Manual Curl Up Button 135 ...

Page 136: ...ower decurler rolls that apply pressure to the media based on the following System default Auto on Manual selections made from the IDM control panel If you want to adjust the paper curl on the printed output quickly use the manual curl up or down buttons After you use these buttons if the printed output contains too much curl refer to the System Administrator Guide the section entitled Custom Pape...

Page 137: ... 1 sided or 2 sided printing When Auto is selected the indicator to the right of the button is illuminated This mode has seven automated settings for controlling paper curl three upcurl settings three downcurl settings and mid range When Auto mode is in use an indicator flashes momentarily on the control panel The control panel shows the preselected curl direction and amount of decurl applied to t...

Page 138: ...urled upwards select the curl up button There are three upward curl correction values The top three indicators show which level of upward curl correction is selected The top indicator is the highest amount of upward curl correction that can be applied to a printed output 138 ...

Page 139: ...f downward curl correction is selected The bottom indicator is the lowest amount of downward curl correction that can be applied to a printed output Pressing the curl up button changes the curl correction levels as shown Pressing the curl down button changes the curl correction levels as shown I In ns se er rt te er r D De ev viic ce e Note This optional finishing device requires an Interface Decu...

Page 140: ...r the finished output Paper fed from the Inserter device is not printed on however the paper is placed into the printed output at selected locations Note The Inserter device sometimes is referred to as the post process inserter or the interposer Inserter Components 1 Tray T1 or Inserter Tray 2 Inserter Control Panel 3 Inserter Front Cover Inserter Control Panel 140 ...

Page 141: ...button 5 Auto Curl Button Automatically corrects the paper curl by selecting the curl direction and amount Paper and Media for Inserter Tray T1 Tip Paper fed from the Inserter device is not printed on however the paper is placed into the printed output at selected locations Supported Paper for the Inserter Tray T1 Paper Size Paper Weight Tray Capacity 182 x 148 30 x 488 mm 7 2 x 5 8 13 x 19 2 in A...

Page 142: ...r from the tray Load all the paper required for the job into the tray To use saddle stitch bi fold options ensure that the paper loaded in the main feeding tray for example tray 1 is the same size as the paper loaded in tray T1 For supported paper information refer to Supported Paper for the Inserter Tray T1 142 ...

Page 143: ...inted load the paper with the printed side facing up Note Do not load paper above the maximum fill line It may cause paper jams or press malfunctions 2 Hold the center of the paper guides and gently slide them to the desired paper size so that they are touching the edges of the paper If the distance between the guides is too long or short relative to the paper paper jams may occur If set by the sy...

Page 144: ...happens any printed output leaving the press is delivered to the inline finishing device output tray Tip Do not reuse the output that is ejected by the purge function as this may cause paper jams To prevent the purge function from occurring when tray T1 runs out of paper the function may be disabled or switched off from the press Tools mode Important Only a system administrator for the press can c...

Page 145: ...ettings 5 Select Maintenance The Maintenance screen displays 6 Use the up down arrows to scroll through the Maintenance screens until you see Print Action When Using Tray T1 Inserter 7 Select Print Action When Using Tray T1 Inserter The Tray T1 purge function screen displays 8 Select the desired purge function option Standard Select this option to switch off the purge function It decreases product...

Page 146: ...to enable most popular binding formats Operates at rated print engine speed for most paper sizes Quick change die sets that can be interchanged without any tools All die sets include an Identification Label providing the user with the hole pattern and name Convenient storage area for two extra Die Sets which is located above the sheet bypass on the device For detailed information and instructions ...

Page 147: ...ators light when a paper jam occurs in HCS areas E1 E8 2 Sample button Press this button to have the HCS deliver a sample sheet to the top tray The indicator to the left of the button blinks until a sample sheet is delivered to the top tray 3 Unload button Press this button to stop printing and remove paper 147 ...

Page 148: ... clear paper jams 7 Stacker tray cart Collated sets up to a total of 5000 sheets are transported to the stacker tray which is located on a movable stacker cart 8 Front door Open this door to remove paper printed output HCS Circuit Breaker The HCS circuit breaker is located on the rear of the HCS unit 1 On or Off Switch 2 Test Button The circuit breaker switch is normally in the ON position Note Wh...

Page 149: ... sheets Control Buttons 1 Sample button Press this button to output a sample sheet to the top tray 2 Unload button Press this button to stop printing and remove paper Unloading the Stacker Tray or Cart Note The HCS may be unloaded while it is running 1 Press the Unload button on the HCS control panel 2 After the Unload Indicator lights open the HCS front door 3 Position the securing bar on top of ...

Page 150: ...operate position HCS Specifications Item Specification Tray capacity Top tray 500 sheets Stacker tray or cart 5 000 sheets Note The values are based on paper less than 80 g m2 Paper size Top tray Standard size Minimum Postcard 4 x 6 in 100 x 148 mm Maximum 13 x 19 in A3 Custom size Height 3 9 13 in 98 0 330 2 mm Width 6 26 in 148 0 660 4 mm Stacker tray or cart Standard size Minimum JIS BS Maximum...

Page 151: ...Non standard papers shorter than 254 mm 10 in in the cross feed direction require 330 mm 13 in minimum measurement in the feed direction C Cr re ea as se e a an nd d T Tw wo o S Siid de ed d T Tr riim mm me er r Note This optional finishing device requires the Interface Decurler Module The Crease and Two Sided Trimmer is an optional finishing device that provides trimming on two sides of the outpu...

Page 152: ...empty the Trimmer Waste Container and blinks when the container is full 3 Upper cover Open this cover to clear paper jams 4 Lower cover Open this cover to empty the Trimmer Waste Container Crease and Two Sided Trimmer Specifications Item Specification Two sided Trim Paper size Standard size Minimum Letter 8 5 x 11 in A4 Maximum 13 x 19 in A3 Custom size Height 7 7 13 in 194 0 330 2 mm Width 8 26 1...

Page 153: ...arge sheet folding Half Sheet Z Fold for 11 x 17 in and A3 media Folded output is produced by selecting the Fold feature For network print jobs select the Fold feature from the print drive For copy and scan jobs select the Fold feature from the scanner Note Copy and scan jobs are applicable only if the press includes a scanner To use the Fold feature the orientation of documents must be short edge...

Page 154: ... a regular Z Fold and a Z Fold Half Sheet is that the Z Fold Half Sheet is not folded in two equal folds The two folds are unequal which allows one edge of the Z Fold Half Sheet to have a longer edge The longer edge allows for stapling or hole punching C Z Folder Components Note For detailed information about the folding feature refer to the System Administrator Guide 154 ...

Page 155: ...tray button When you press the button the indicator flashes When the output tray is unlocked and the indicator shows a steady light on no blinking pull out the output tray 2 C Z fold output tray C Fold or Z Fold jobs are delivered to this tray only Note C Z Fold jobs cannot be delivered to any other tray C Z Folder Specifications Item Specification Z Fold Half Sheet Paper size 11 x 17 in Tabloid A...

Page 156: ...her Plus Note Throughout this section the three PR Finishers are referred to simply as the Finisher Any differences between the finishers are distinguished by using the specific finisher name The Production Ready PR Finishers provide the following capabilities Handling media that is smaller than 5 83 x 8 27 in A5 Stapling up to 100 sheets with one or two staples Handling large sized paper maximum ...

Page 157: ...roduction Ready PR Booklet Maker Finisher provides all the same features as the PR Finisher plus it automatically creates saddle stitched booklets of up to 30 sheets and bi folding also called single folding The Production Ready PR Booklet Maker Finisher consists of Three output trays Top Tray Stacker Tray Booklet Output Tray Booklet Maker Unit Stapler Optional Basic Punch 157 ...

Page 158: ...n Ready PR Finisher Plus serves as an interface to transfer paper between the press and any third party Document Finishing Architecture DFA device attached to the press Finisher Components 1 Paper Jam and Error Indicator 2 Top Tray 3 Stacker Tray 4 Booklet Tray 5 Booklet Output Button 6 Front Cover 7 Staple Waste Container 8 Basic Staple Cartridge for Side Stitch 158 ...

Page 159: ...e angle of the top tray Refer to the following guidelines for changing the top tray angle For normal usage keep the tray in its lower default position Important Continual usage of the tray in the upper position may cause paper jams or output sheets to fall from the tray upon delivery When using the following paper types change the angle of the tray to its upper position These paper types may cause...

Page 160: ...ve downward curl may cause the output stack to fall out of the tray If this happens set the curl correction level on the Interface Decurler Module to its lowest level and set curl correction on the Inserter setting to downward For information refer to Paper Curl Correction with the PR Finishers Booklet Tray Note The booklet tray is attached to PR Booklet Maker Finisher However if the SquareFold Tr...

Page 161: ...e Top Tray Aligner Accessory aligns any small size stock that goes on the top tray such as small sheets postcards and envelopes To install the Top Tray Aligner Accessory on a Production Ready Finisher do the following 1 Empty the top tray of the Production Ready Finisher 2 Place the Top Tray Aligner Accessory on the top tray of the PR Finisher Adjust the alignment between the top tray and the Tray...

Page 162: ...t to downward Printing on paper weighing 157 g m2 or heavier with up curl may cause paper jams If this occurs set the curl correction level on the Interface Decurler Module to its highest setting and on the Inserter set it to upward For more information about the paper curl correction features refer to Curl Correction Modes and Functions on the Interface Decurler Module and Inserter Control Panel ...

Page 163: ... Positions in System Administrator Guide Booklet Output Button on the Production Ready Booklet Maker Finisher Press this button to remove finished booklets from the finisher Note If the SquareFold Trimmer is installed pressing this button moves the booklets to the booklet tray installed on SquareFold Trimmer PR Finisher Specifications Item Specification Tray Top tray Collate and stack 163 ...

Page 164: ... tray 52 400 g m2 Stacker tray 52 400 g m2 Booklet tray 60 350 g m2 Tray capacity Top tray 500 sheets Stacker tray without staples 8 5 x 11 in A4 PR Finisher 3 000 sheets PR Booklet Maker Finisher 2000 sheets JIS B4 or larger 1500 sheets Mix stack 350 sheets Stacker tray with staples 8 5 x 11 in A4 PR Finisher 200 sets or 3000 sheets PR Booklet Maker Finisher 2000 sheets JIS B4 or larger 100 sets ...

Page 165: ...ndard size Maximum A3 Tabloid 11 x 17 in Minimum 2 hole or 3 hole JIS B5 4 hole A4 16K Custom size Height 203 297 mm Width 182 431 8 mm Paper weight Uncoated 52 220 g m2 Coated 72 200 g m2 Number of Holes 2 4 hole or US 2 3 hole Note The number of punch holes you can choose depends on the paper size Saddle Stitch Bi Fold Capacity Saddle Stitch 30 sheets PR Booklet Maker Finisher Bi Fold 5 sheets N...

Page 166: ...job whose number of pages is within the limit staple faults can occur depending on the following conditions Type of paper such as Gloss Coated Paper Environment where the press is installed such as room temperature humidity and others Print data even if you use recommended paper types The job is made of a mixture of paper type or paper weight Important In an environment at a low temperature and lo...

Page 167: ...e booklet The SquareFold Trimmer device Receives the booklet from the booklet maker area of the finisher Flattens the booklet spine which reduces the booklet thickness and gives it the appearance of a perfect bound book Trims and cuts away the face edge of the booklet resulting in a neat finished edge The booklet area of the finisher assembly and staples booklet The booklet enters the SquareFold T...

Page 168: ...let Tray This tray receives square fold booklet output from the finisher 5 Square fold Adjustment Button Press this button to adjust the thickness of printed booklets 6 Paper Jam and Error Indicator Lights when a paper jam occurs 7 Trimmer Waste Container Collects waste from the trimmer area of the device The covers cannot be opened during normal operation or when the press is idle The covers can ...

Page 169: ...o discontinue the electrical flow to the device For electrical information refer to Safety Under normal operating conditions this switch should not be touched If the press is moved press this button to switch off power to the device Output Trays 1 Finisher Output Tray Unused sheets that are purged by the press are ejected to this output tray 2 Booklet Tray Saddle Stitch Bi fold and Trim Square fol...

Page 170: ... idle the covers cannot be opened 2 Select the desired square fold setting for more information refer to the Square Fold Adjustment Settings 3 Press this button to adjust the square fold book thickness setting SquareFold Trimmer Paper Path Number Description 1 The booklet leaves the booklet area of the finisher and enters the SquareFold Trimmer device The booklet exit sensor in the SquareFold Trim...

Page 171: ...t This is due to static electricity build up and is normal If booklets contain trim remnants or scraps simply remove and discard them Square Fold and Trim Features Square Fold Feature The Square Fold feature is available only when the press is connected to both a finisher with a booklet maker and the SquareFold Trimmer Module The Square Fold feature can be selected or accessed from your computer p...

Page 172: ... of the booklet but not as much as the 2 setting uses 5 Select this setting 2 Higher High 2 when you want the most amount of pressure applied to the spine of the booklet The more pressure applied the more square the booklet spine will be The greatest amount of pressure that can be applied to the booklet is 2 Booklet Example The following illustration shows two different booklet types 1 This bookle...

Page 173: ...ngs cannot be adjusted to remove less than 2 mm 0 078 in or more than 20 mm 0 787 in of edge material from the booklet Adjustments less than 2 mm may produce poor trim quality Adjustments greater than 20 mm result in no trimming to the booklet edge Trim Guidelines The following table shows various scenarios using different paper weights media types and trim setting selections Use this table as a g...

Page 174: ...1 in A4 80 lbs 120 g m2 205 10 13 305 x 458 mm 12 x 18 in 152 x 229 mm 6 x 9 in 80 lbs 120 g m2 220 6 14 305 x 458 mm 12 x 18 in 152 x 229 mm 6 x 9 in 80 lbs 120 g m2 215 5 15 305 x 458 mm 12 x 18 in 152 x 229 mm 6 x 9 in 80 lbs 120 g m2 210 4 16 305 x 458 mm 12 x 18 in 152 x 229 mm 6 x 9 in 28 lbs 105 g m2 220 16 17 305 x 458 mm 12 x 18 in 152 x 229 mm 6 x 9 in 80 lbs 120 g m2 210 14 SquareFold T...

Page 175: ...sements A4 landscape book covers calendars and long sheet prints XLS specifications include Print Speed Up to 9 ppm 1 sided mode only Paper Weights For uncoated 52 220 g m2 and coated 72 220 g m2 Maximum Paper Size 330 x 660 mm Maximum Printable Area 323 x 654 mm To use this feature feed sheets from Tray 5 then for output destination specify an option Offset Catch Tray Top Tray of the desired fini...

Page 176: ...y of the paper that you loaded For example 26 in x 13 in e Touch Save f Change other parameters as needed g Touch Save 4 Touch Confirm 5 Submit the job file to the Hold Queue for the print server To send the job use File Print from a PC on the network or use the Import function at the server To use Import follow these steps a On the Fiery print server click the Import shortcut b Click Add c Naviga...

Page 177: ...tend to the edge of the pages Preprinted cover pages are inserted into the workflow with the Inserter device There is one workflow scenario for the Xerox EX 280 and EX i 280 Print Servers Powered by Fiery Creating Booklets with Full Bleed with the EX Print Servers This procedure requires the following finishing devices A Production Ready Booklet Maker Finisher A Crease and Two Sided Trimmer device...

Page 178: ...ishing tab under Stapler set Stapler mode to Center 9 On the Finishing tab under Trim select the box for Head and foot trim 10 Use the up and down arrows to set the Finish Size of pages This is the distance from the top of the page to the bottom 11 For Spine printing select Normal 12 Select the box for Engage fore face trim 13 Use the up and down arrows to set the face trim You can set the Finish ...

Page 179: ... a back cover A Ad dj ju us st tiin ng g B Bo oo ok klle et t F Fo olld d a an nd d S St ta ap plle e P Po os siit tiio on ns s Use this procedure To adjust the staple position horizontally on the paper To ensure that the booklet staples lay precisely on the fold not off the fold Note This procedure does not enable you to move the staples up or down on the fold A Customer Service Engineer must mak...

Page 180: ... Weight you are using to print the booklets 12 Touch Save 13 For Adjustment Method select Standard or Variable Sheet Standard provides a profile with the most flexibility for booklets with a range of pages When you select Standard you must print and check two sample prints One sample print is for a small page set The other sample print is for a large page set The system interpolates the settings f...

Page 181: ...ng how to measure the offsets 29 Record the following measurements a The distance the fold is off A b How far the staple position is off B Measure the B value from the current position of the fold 30 Use the arrows to enter the A distance and the B distance 31 Touch Sample Printout 32 Select Paper Supply then select the tray that contains the paper for the booklets 33 Touch Save 34 Press the green...

Page 182: ...sert folded sheets into a document With the optional C Z Folder you can produce C and Z folds on 8 5 x 11 in or A4 sheets You also can create engineering Z folds on 11 x 17 in or A3 B4 media These Z folds are called Half Z folds The engineering Z fold or Half Z fold folds the 11 x 17 in or A3 B4 paper and reduces the sheet to 8 5 x 11 in or A4 paper respectively This process allows you to insert t...

Page 183: ...large sheets For example if they are stapled or hole punched but not booklets document sets can receive folded sheets Engineering Z folds or Half Z folds can create a useful and attractive fold out sheet for large images in technical manuals or advertising pieces The folded sheet is printed as a regular sheet in the document but is programmed as an exception page for folding 1 If needed load the p...

Page 184: ...ert covers and sheets into documents Note To insert tabs use Tray 5 1 If needed load the main media for the document into a feeder tray with a long edge feed orientation 2 Load the sheets into the Inserter Tray T1 with a long edge feed LEF orientation If you load tabs in Tray 5 place the tabs face up and out at the trailing edge of the media When you insert preprinted or blank tabs the system does...

Page 185: ...or the job such as Copies Paper size Source tray and 1 sided or 2 sided b Select the Finishing tab c Scroll down to the Punch area d For Punch edge select the location of the punch on the paper Left Right or Top e For Punch select Advanced Pro ANSI or Advanced Pro ISO The name of the unit depends on your geographic region f To release the job on the finishing tab select Print M Ma aiin nt te en na...

Page 186: ...ess water from the exterior with a soft cloth Cleaning the Document Cover and Glass 1 Cleaning the document cover a Raise the document feeder b To remove dirt wipe the document cover with a soft cloth moistened with water and then wipe it dry with a soft cloth If dirt is difficult to remove try gently wiping with a soft cloth moistened with a small amount of neutral detergent 2 Cleaning the docume...

Page 187: ...cond side scanning lens assembly a The second side scanning lens assembly is located along the left side of the document cover The assembly consists of the mirrored glass strip a metal strip a white plastic strip and rollers All parts of the assembly must be cleaned to ensure the best image quality when making copies b With the document feeder open pull the lever that is located at the top of the ...

Page 188: ...n damage to the film around the glass surface Note If dirt is difficult to remove try gently wiping with a soft cloth moistened with a small amount of neutral detergent 4 Once the second side scanning assembly is clean return the document cover to its original position and ensure that the lever is locked in place If you touch the document cover with your bare hands wipe it clean before closing the...

Page 189: ...a drum cartridge before inserting the new cartridge perform these steps to clean under the drum cartridge area 1 With the Drum Cartridge Drawer open look for dry ink toner waste on the bottom of the catch pan under the drum cartridges 2 Use a clean cloth to wipe down the catch pan 3 Continue following the instructions on how to insert the new cartridge Cleaning the ROS Windows Unfused dry ink tone...

Page 190: ... back of prints you can initiate this procedure manually Note If you still notice contaminants on the back of the prints after running this procedure contact Xerox Service Dry ink toner debris can originate from either of two areas in the press the Transfer Roll or the Fuser Assembly Roll Cleaning the Fuser Assembly with Paper 1 Press the Machine Status button on the press User Interface 2 Select ...

Page 191: ...ies link For any item that is not orderable from the web site contact your Xerox Service Representative Note The cleaning pads used with the ROS Window cleaning wand are not orderable Contact your Xerox representative for any additional cleaning pads CRUs Supply Item Reorder Quantity Approximate Print Yield Full Color 8 5x11 A4 Prints Black Dry Ink Toner Cartridge 1 per box 2 per press 50 000 Cyan...

Page 192: ...s without immediately replacing the item Otherwise when it is time to replace it a message appears and the press stops running 1 Press the Home button on the UI 2 Press Machine Status and select the Supplies tab The Supplies area shows a 1 to 100 indicator bar of the remaining amount of dry ink toner Remaining dry ink toner is updated in 10 increments 3 From the Supplies pull down menu select Othe...

Page 193: ...o www xerox com environment 6 Remove the new dry ink toner cartridge from its packaging 7 With one hand on either side of the cartridge vigorously shake and rotate the new cartridge up and down and left and right for 30 seconds to redistribute the dry ink toner 8 Install the new dry ink toner cartridge by gently and evenly sliding the cartridge into the press until it stops 9 Close the dry ink ton...

Page 194: ...halfway out of the press 5 Support the underside of the bottle with your other hand and continue pulling it out from the press Caution Never use a vacuum cleaner when cleaning up spilled dry ink toner Use a broom or a cloth moistened with a neutral detergent 6 Use both hands to place the old used Dry Ink Toner Waste Bottle into the provided plastic bag 7 Remove a new empty waste bottle from the pa...

Page 195: ...usuage counter of this CRU component to zero 0 Check the Consumables screen for the reset and new status Caution Drums are light sensitive Do not leave the Drum Cartridge Drawer open for more than one minute Exposing the drum cartridges to direct sunlight or strong light from indoor fluorescent lighting for more than one minute can cause image quality defects Caution Replace drum cartridges while ...

Page 196: ...the new drum cartridge near the press Caution Do not touch or scratch the surface of the drum when you take it out from the bag 5 Unwrap the sheet covering the new drum cartridge and place it under the cartridge Some drum cartridges may include a protective film Remove the film on the drum cartridge if the film is present 196 ...

Page 197: ...ion Drums are light sensitive Do not leave the Drum Cartridge Drawer open for more than one minute when replacing cartridges Exposing the drum cartridges to direct sunlight or strong light from indoor fluorescent lighting for more than one minute can cause image quality defects 8 Install the new drum cartridge into the press following the guides with the side marked front facing the front 197 ...

Page 198: ...g Replacing the Suction Filter You will need the T10 Torx driver tool for this procedure After you replace the filter you will need to contact the system administrator who will log into administrator mode and reset the counter to zero 0 for this CRU Caution Make sure the press is powered off before performing this procedure 1 At the back of the press locate the Suction filter cover on the lower pa...

Page 199: ...he Machine Status button b From the screen that displays select the Tools tab c Select System Settings Common Service Settings Maintenance d Use the arrow buttons to access the next Maintenance screens Note After selecting the icon in following step there is a 4 second delay before the Technical Key Operator feature displays e Select the Technical Key Operator TKO icon The Technical Key Operator f...

Page 200: ...gh Capacity Feeder or Dual Advanced Oversized High Capacity Feeder 1 roll kit is required for each tray For more information contact the Customer Support Center Replacing Tray 5 Feed Rolls Use this procedure by Tray 5 is installed on top of Trays 6 and 7 Tip Replace the bypass tray feed rolls when experiencing frequent multifeeds single feeds or blank prints in the stack of the output prints Use t...

Page 201: ...replace the separator roll using the same technique 6 Close the bypass tray cover 7 Verify that the tray is operating correctly by feeding paper from the bypass tray 8 Log in as the administrator or ask the administrator to perform the following steps to reset the HFSI count to zero 0 a At the UI press the Machine Status button b Select the Tools tab 201 ...

Page 202: ...ustomer Service Engineer g Select the bypass rolls item that corresponds with the newly replaced components h Select Reset Current Value The system resets the HFSI to 0 9 Exit the administrator mode by pressing the Log In Out button on the UI When prompted select Logout Replacing Trays 6 and 7 Feed Rolls Replace the feed rolls every 300 000 prints or when experiencing frequent multifeeds single fe...

Page 203: ...s 2 On the right side panel of the tray is the feed roll compartment 3 Remove the nudger roll by pushing down on the black tab with one hand which raises the roll upward and then squeezing the metal shaft on both ends with your other hand Lift out the nudger roll 4 Replace the new roll by squeezing both ends of the metal shaft and pushing down on the black tab insert and release the roll ends into...

Page 204: ...the way to the left so it is out of the slots Pull the assembly out towards you until completely removed from the tray Set aside 7 With the separator assembly out access and remove the feed roll To remove squeeze both ends of the metal shaft and lift out To replace squeeze both ends of the new roll shaft then insert and release the roll ends into the notches 204 ...

Page 205: ...les match up Insert the assembly into the frame Slide the assembly all the way to the right using the pin as a guideline Ensure the device is all the way into the slots and the 3 screw areas align 11 Screw in the 3 thumbscrews to attach the assembly Do not overtighten 12 Close the tray and verify that the tray is operating successfully by feeding paper using that tray 13 Log in as the administrato...

Page 206: ...n on the UI When prompted select Logout T Tr ra ay ys s 8 8 a an nd d 9 9 M Ma aiin nt te en na an nc ce e Replacing Tray 5 Feed Rolls Use this procedure by Tray 5 is installed on top of Trays 8 and 9 Tip The feed rolls for Tray 5 Bypass should be replaced when experiencing frequent multifeeds single feeds or blank prints in the stack of the output prints Use this procedure to replace the followin...

Page 207: ...hnique 5 Remove and replace the separator roll using the same technique 6 Close the bypass tray cover 7 Verify that the tray is operating correctly by feeding paper from the bypass tray 8 Log in as the administrator or ask the administrator to perform the following steps to reset the High Frequency Service Item HFSI count to zero 0 207 ...

Page 208: ... TKO password call your Customer Service Engineer g Select the bypass roll items that corresponds with the newly replaced components h Select Reset Current Value The system resets the High Frequency Service Item HFSI to 0 9 Exit the administrator mode by pressing the Log In Out button on the UI When prompted select Logout Replacing Trays 8 and 9 Feed Rolls Replace the feed rolls every 300 000 prin...

Page 209: ...feed components 2 Notice the feed roll compartment on the right side panel of the drawer 3 Remove the nudger roll by pushing down on the black tab with one hand which raises the roll upward and then squeezing the metal shaft on both ends with your other hand Lift out the nudger roll 4 Replace the new roll by squeezing both ends of the metal shaft and pushing down on the black tab insert and releas...

Page 210: ... the way to the left so it is out of the slots Pull the assembly out towards you until completely removed from the tray Set aside 7 With the separator assembly out access and remove the feed roll To remove squeeze both ends of the metal shaft and lift out To replace squeeze both ends of the new roll shaft and insert and release the roll ends into the notches 210 ...

Page 211: ...e pin holes match up Insert the assembly into the frame Slide the assembly all the way to the right using the pin as a guideline Ensure the device is all the way into the slots and the 3 screw areas align 11 Screw in the 3 thumbscrews to attach the assembly Do not over tighten 12 Close the tray and verify that the tray is operating successfully by feeding paper using that tray 13 Log in as the adm...

Page 212: ...elect Logout F Fiin niis sh hiin ng g D De ev viic ce es s M Ma aiin nt te en na an nc ce e Business Ready BR Finisher and Optional Booklet Maker Maintenance Consumable Supplies for the BR Finisher CRUs Supply Item Reorder Quantity Approximate Print Yield Full Color 8 5x11 A4 Prints Business Ready BR Finisher Staple Cartridge 1 Staple Cartridge 5 000 staples per cartridge Business Ready BR Finishe...

Page 213: ...sh the rear side into the cartridge 2 6 Close the front door of the Business Ready Finisher Replacing Staples in the Booklet Maker 1 Open the front door of the Business Ready Finisher 2 Grasp the booklet maker handle and pull the unit toward you until the staple cartridges appear on the top edge of the device 3 To remove the staple cartridge from the booklet maker push down on the staple cartridge...

Page 214: ...ole Punch Waste Container A message appears on the press User Interface UI when the hole punch waste container is full WARNING Do not perform this procedure while the printer is copying or printing 1 Open the front door of the Business Ready Finisher 2 Remove the hole punch waste container from its slot near the top left of the finisher Wait 10 seconds before reinserting the container into the pri...

Page 215: ...3 Empty the container 4 Insert the container all the way into the finisher 5 Close the front door of the Business Ready Finisher 215 ...

Page 216: ...e waste container can be emptied before it is full and also while the printer is running When the waste container reaches the full condition the following changes occurs The indicator changes from a steady lighted condition to blinking A message appears on the press indicating that the waste container is full Perform the following steps to empty the trimmer waste container 1 Open the lower cover o...

Page 217: ... may malfunction 4 To ensure that you remove all waste and debris especially beneath the frame that is located behind the container use the cleaning rod to remove any remaining waste from inside the trimmer 5 Return the cleaning rod to its original position on the inside of the lower cover 6 Reinsert the waste container and push it in fully 7 Close the lower cover 217 ...

Page 218: ...r Finisher and the PR Finisher Plus 4 staple cartridges 5 000 staples per cartridge and 1 staple waste container per carton PR Booklet Maker Finisher Staple Cartridge 4 pack 5 000 staple refills each Checking the Status of Finisher Consumables When a consumable is nearing the time for replacement a message is displayed on the control panel touch screen This indicates when it is time to order and i...

Page 219: ...appears and provides information about the percentage of remaining life for each consumable 4 Use the up and down arrows to see additional consumables such as the finisher staples the staple waste container and other consumables for any additional optional devices that are configured with the press Replacing the Basic Staple Cartridge for Side Stitching Note Ensure that the press is not running be...

Page 220: ...1 Open the finisher front cover 2 Pull out R1 3 Holding the staple cartridge at the position indicated by the arrow remove it from the unit 220 ...

Page 221: ...ge into the unit 5 Insert the unit to its original position 6 Close the finisher front cover Replacing the Booklet Staple Cartridge for Saddle Stitching Note Ensure that the press is not running before performing this procedure 221 ...

Page 222: ... finisher front cover 2 Pull out the Saddle Stitch Unit 3 toward you until it stops 3 While holding the tabs on the staple cartridge pull out the cartridge to remove it Note There are two booklet staple cartridges provided Check the message to see which cartridge needs replacing 222 ...

Page 223: ...ARNING To avoid personal injury use care when removing staple waste container The press displays a message when staple waste container is full When the message appears replace the container with a new one Important Before you perform this procedure ensure that the press is not running When you replace the staple waste container keep the press powered on If the press is powered off it does not reco...

Page 224: ...you replace the waste container close the finisher front cover Note A staple waste container comes with the basic staple cartridge 1 Open the finisher front cover 2 Move the lock lever under R5 toward the left to the opened lock mark 3 Pull out R5 224 ...

Page 225: ...taple waste containers to the Customer Support Center 5 Insert the new staple waste container by lowering it into position and gently pushing it into place WARNING To prevent injury do not put your fingers on top of the container 6 Move the lock lever under R5 toward the right to the closed lock mark 7 Close the finisher front cover 225 ...

Page 226: ...u perform this procedure ensure that the press is not running When you empty the container keep the press powered on If the press is powered off it does not recognize that the container was emptied and the full message remains displayed To ensure that the press continues running after you empty the container close the finisher front cover 1 Open the finisher front cover 2 Pull out the R4 226 ...

Page 227: ...o its original position 5 Close the finisher front cover PR Finisher Plus Maintenance For information on consumable supplies and maintenance procedures for the PR Finisher Plus refer to the following Finisher Consumable Supplies Checking the Status of Finisher Consumables Replacing the Basic Staple Cartridge for Side Stitching Replacing the Finisher Staple Waste Container Emptying the Hole Punch W...

Page 228: ...ting that it is full When the message appears dispose of the paper scraps Note Keep the press powered on when disposing of the waste If powered off the press does not recognize that the container was emptied Perform the following steps to empty the trimmer waste container 1 Ensure that the press is not running then slowly pull out the Trimmer Waste Container 2 Hold the belt on the waste container ...

Page 229: ...lly instructed in this guide A high voltage component can cause electric shocks When opening the panels and covers that are screwed shut to install or detach optional accessories be sure to follow instructions in this guide Do not try to alter the press configuration or modify any parts Doing so might cause press malfunction or fire The information in this section helps you resolve some basic prob...

Page 230: ...imum power consumption of the press which is 2 8 3 1 kVA kilo volt ampere 5 Check the ground fault interrupter GFI circuit breakers 6 If the power in your location is working properly and you have tried the suggested solutions but the press does not power on contact the Customer Support Center for assistance C Ca an nn no ot t O Ob bt ta aiin n t th he e P Pr re es ss s S Se er riia all N Nu um mb...

Page 231: ...ot be configured on the network To connect the press to the network contact the system administrator T Tiim me e I In nt te er rv va all B Be et tw we ee en n P Pr riin nt t J Jo ob bs s I Is s L Lo on ng ge er r T Th ha an n 1 1 M Miin nu ut te e Problem The press is taking longer than one minute before printing the next job Solutions The system requires approximately 2 minutes when switching pri...

Page 232: ...ttings for the tray To check the paper settings for a tray select Machine Status Device Information Paper Tray Status Check the print server settings Check that the paper is loaded correctly in either the short edge feed SEF or long edge feed LEF direction and at the print server ensure that the settings match the programmed paper settings P Pr riin nt ts s A Ar re e N No ot t o on n t th he e D D...

Page 233: ...ith paper from a new package Remove any partially fed paper from the trays Make sure to remove any torn pieces of paper still remaining inside the press Ensure that the paper you are using had been stored properly If the problem is from trays 6 9 only refer to Multifeeds Misfeeds and Paper Jams in Trays 6 9 M Mu ullt tiip plle e S Sh he ee et ts s F Fe ed d F Fr ro om m t th he e P Pa ap pe er r T...

Page 234: ...per tray fit snugly against the paper stack Do not fill the paper trays above the MAX fill line indicator Close the tray slowly to avoid shifting the paper stack P Pr riin nt te ed d O Ou ut tp pu ut t J Ja am ms s W Wh he en n E Ex xiit tiin ng g P Pr re es ss s t to o O Of ff fs se et t C Ca at tc ch h T Tr ra ay y O OC CT T Problem When exiting the press to the offset catch tray OCT the printed...

Page 235: ...e Spectrophotometer ILS is attached use the manual decurl buttons on the control panel for the module For information refer to Interface Decurler Module and Interface Decurler Module with Inline Spectrophotometer ILS Refer to Paper Curl Use the Adjust Paper Curl feature For information refer to the System Administrator Guide C Ca an nn no ot t P Pr riin nt t B Be ec ca au us se e O Ou ut tp pu ut ...

Page 236: ...temperature adjusts for different types of media and paper tolerates more heat than transparencies P Pr riin nt te ed d O Ou ut tp pu ut t I Is s N No ot t S St ta ac ck ke ed d C Co or rr re ec ct tlly y Problem The output is not stacked correctly Solution Check paper curl and ensure that the paper tray guides are locked into position against the paper Note Mixed media sizes may not stack well P ...

Page 237: ...t Copy or Print Jobs With a Combination of Color and Black and White Output Problem For jobs that are a combination of color and black and white the first copy or print output takes longer than the expected 10 seconds Job Workflows and First Copy or Print Output Time Factors The following workflow scenarios affect the extended wait time for the first copy or print output Copy or print jobs that ar...

Page 238: ... media types Copy or print jobs that use only a color output If you do not use one of these workflows the implementation of this solution can result in color stability issues Solution To decrease the wait time for first copy or print out perform the following 1 Increase the Power Saver time to 30 minutes If the wait time remains too long continue to the next step 2 For this user requirement to cha...

Page 239: ...762 075 752 175 and 762 098 contact Xerox Technical Customer Support 3 Lower Toner Consumption Priority These settings decrease dry ink toner usage and increase productivity but can result in degraded IQ For this user requirement to change the NVM values for 762 075 contact Xerox Technical Customer Support For the NVM values 752 175 and 762 098 no change is required I Im ma ag ge e Q Qu ua alliit ...

Page 240: ...the media in use For information and procedures refer to the System Administrator Guide Paper Tray Settings If the defect is the specific streak on the back of prints there may be a secondary bias transfer roll 2nd BTR failure Perform the Cleaning the Fuser Assembly with Paper procedure If the problem continues contact the customer support center B Ba an nd diin ng g o on n P Pr riin nt ts s Probl...

Page 241: ...he defect is defect at the interval of 154 mm the problem may be with the Pressure Roll Assembly fuser assembly For more details contact the customer support center If the defect is 375 mm the problem may be Fuser Belt failures For more details contact the customer support center C Co ollo or r N No on nu un niif fo or rm miit ty y o on n P Pr riin nt ts s Problem The print has variations in color...

Page 242: ...r to the System Administrator Guide Simple Image Quality SIQA For other suggested solutions refer to Custom Paper Settings Troubleshooting R Ra an nd do om m W Wh hiit te e o or r D Da ar rk k S Sp po ot ts s o on n P Pr riin nt ts s Problem The prints show random spots but they do not repeat at regular intervals 242 ...

Page 243: ...g tool from either www xerox com VERSANT_280docs or the Nationalization Kit Check the frequency of the spot intervals If spots occur every 147 mm on the prints determine which color drum is affected To determine which color drum is affected go to www xerox com VERSANT_280docs to download and then print the Halftone Test Pattern PDF To replace or swap the drum refer to Drum Cartridge R Re ep pe ea ...

Page 244: ...act the Customer Support Center If spots or bands occur every 147 mm on the prints a drum is damaged or light shocked Replace or swap the appropriate drum cartridge refer to Replacing a Drum Cartridge If the defect occurs every 374 mm on the prints replace the fuser belt assembly For details contact the Customer Support Center S St tr re ea ak ks s o or r L Liin ne es s o on n P Pr riin nt ts s Pr...

Page 245: ...For IQ defects that run Inboard to Outboard IB or OB refer to Banding on Prints Solutions Perform the Cleaning the ROS Windows procedure Measure and check the frequency of the defect intervals 245 ...

Page 246: ...ge ew we ea ar r o on n P Pr riin nt ts s Problem The IB and OB edges of the output prints shows dry ink toner deletions density inconsistency or is lacking in color depth occurs mainly when using heavier or lighter weight stock Solutions If you run multiple width papers for more information refer to Fuser Hints and Tips and Extended Fuser Life H Ha allo o o or r S Sm mu ud dg ge es s o on n P Pr ...

Page 247: ...System Administrator Guide Simple Image Quality SIQA For other suggested solutions refer to Custom Paper Settings Troubleshooting I Im ma ag ge e D De en ns siit ty y Problem Print output is too light faint or washed out solid areas not black or inconsistent shading part of image missing 247 ...

Page 248: ...g a set of halftone test patterns to identify which color is affected Go to www xerox com VERSANT_280docs and download the Halftone Test Pattern PDF Print several sets of the Halftone Test Pattern PDF Identify which color is affected Replace or swap the appropriate drum Refer to Drum Cartridge For other suggested solutions refer to Custom Paper Settings Troubleshooting I Im ma ag ge e o on n P Pa ...

Page 249: ...ent procedure For instructions refer to the System Administrator Guide Simple Image Quality SIQA Refer to the Image Registration Perpendicularity Skew and Magnification U Un nf fu us se ed d P Pr riin nt ts s o or r F Fu us se er r O Of ff fs se et t Problem The image is not properly fused Dry ink toner on print is not permanent smears flakes or rubs off 249 ...

Page 250: ...nto the selected paper tray For other suggested solutions refer to Custom Paper Settings Troubleshooting Perform the Cleaning the Fuser Assembly routine If the problem continues contact the Customer Support Center for service T Tr ra aiill E Ed dg ge e D De elle et tiio on ns s Problem Trail edge of output contains dry ink toner deletions density inconsistency or is lacking in color depth this occ...

Page 251: ... es sh ho oo ot tiin ng g This section helps you locate and resolve specific problems through the use of the Custom Paper Settings For more information refer to the System Administrator Guide To improve print quality ensure that the used page is Compatible with the press Within supported specifications In good condition Assigned to the correct Press Tray If problem continues contact the customer s...

Page 252: ...ou use paper that tends to trigger multifeeds This setting increases the air volume to a level higher than System Default Mis Feed Support Table Select this option if you use paper that tends to trigger paper jams This setting increases the air volume to a level higher than Multifeed Support Table Forced Off Select this option when working with special media that tends to jam as a result of the ai...

Page 253: ... The Multifeed Detection feature is accessed from Machine Status Tools Setup Adjustment Custom Paper Settings Select the desired Custom Paper Change Settings Multifeed Detection Change Settings The settings available for the Multifeed Detection option include Enabled checked Multifeed notifications are switched On Disabled unchecked Multifeed notifications are switched Off Note To prevent the syst...

Page 254: ...ings From the Adjust Paper Curl screen make the change by moving up or down the selections available one at a time Use the following sequential order when making changes to the paper curl This ensures that the desired output is achieved Tip Paper jams and wrinkled output may occur if the change is not performed in the recommended sequential order for example using Default and then skipping to Type...

Page 255: ...minates the need for you to interpret printed targets and manually enter adjustment values This saves time and avoids errors Manual The user must manually perform the adjustment including printing test patterns interpreting the printed targets on those patterns then manually entering the adjustment values Tip Use the Manual adjustment option only when the Auto adjustment does not provide the desir...

Page 256: ...ays 1 2 or 3 switch the optional trays 6 7 8 or 9 if available Note Trays 6 9 have better registration and skew performance 2 Create and or use an existing Alignment Profile Note Before creating a new and or using an existing manual alignment read all the information in the Alignment Adjustment of System Administrator Guide Use Center Line Stock for Alignment Profiles If the problem occurs when us...

Page 257: ...o adjust Regi Loop When paper feeds through the press it stops once and pressure is applied in order to correct registration and skew The loop is created when paper is stopped and pressured is Regi Loop To correct for registration and skew when the degree of skew varies from sheet to sheet increase the Regi Loop value to increase pressure on the Lead Edge LE of the paper Increasing the value too m...

Page 258: ...g of 0 zero is a temporary solution because environmental conditions vary from day to day Upon completion of the print job the recommendation is to return the option to its default setting Use this feature to adjust the fuser temperature If dry ink toner comes off the paper especially with special media resolve the problem by increasing the fusing temperature If the fuser temperature is too high w...

Page 259: ...the box for Tray Heater F Fo olld d A Ad dj ju us st tm me en nt t Problem The fold on the output is not correct or as desired Solutions The Finisher Fold Adjust Position is available only when the system configuration includes one of the following Production Ready PR Booklet Maker Finisher for Bi Fold or Single Fold Optional C Z Folder with one of the following optional finishers PR Finisher PR B...

Page 260: ...Fold Adjustment Profile section in the System Administrator Guide S Sm me ea ar r a at t 2 20 08 8 m mm m f fr ro om m t th he e L Le ea ad d E Ed dg ge e Problem On the printed output a smear occurs at 208 mm from the lead edge of the paper Solutions 1 Confirm that the media being used is compatible with the press is within supported specifications and is in good condition 2 Change the Adjust Pap...

Page 261: ...iill E Ed dg ge e D De elle et tiio on ns s Problem The printed output contains trail edge deletions Solutions Change the Adjust Image Transfer for Trail Edge setting This feature is used to adjust the voltage ratio on the Secondary Bias Transfer Roll BTR where the image is transferred from the belt to the paper This feature can be found in Machine Status Tools Setup Adjustment Custom Paper Settin...

Page 262: ...0 0 0 1 2 0 to 2 0 mm Determined by test print output Table 6 Perpendicularity Option or Setting Default Value Adjust ment Step Incre ments Available Range Recommended Incremental Adjustment Side 1 0 0 0 1 1 0 to 1 0 mm Determined by test print output Side 2 0 0 0 1 1 0 to 1 0 mm Determined by test print output Table 7 Skew Option or Setting Default Value Adjust ment Step Incre ments Available Ran...

Page 263: ... Option or Setting Default Value Adjust ment Step Incre ments Available Range Recommended Incremental Adjustment Left and Right Sides Equal N A N A N A N A Left Side of Fold is Longer 0 0 0 1 0 0 20 0 mm Determined by test print output Right Side of Fold is Longer 0 0 0 1 0 0 20 0 mm Determined by test print output Table 10 Bi Fold Multiple Sheets Stapled Option or Setting Default Value Adjust men...

Page 264: ... 0 0 1 0 0 20 0 mm Determined by test print output Sheets in Set 2 Left and Right Sides Equal N A N A N A N A Left Side of Fold is Longer 0 0 0 1 0 0 20 0 mm Determined by test print output Right Side of Fold is Longer 0 0 0 1 0 0 20 0 mm Determined by test print output On the Fold N A N A N A N A Left of Fold 0 0 0 1 0 0 20 0 mm Determined by test print output Right of Fold 0 0 0 1 0 0 20 0 mm De...

Page 265: ...Determined by test print output B Length 0 0 0 1 0 0 20 0 mm Determined by test print output Stock Properties Custom Paper Settings Table 15 Stock By Name and Multifeed Detection Option or Setting Default Value Adjust ment Step Incre ments Available Range Recommended Incremental Adjustment Stock By Name Only Checked Box Multi Feed Detection Checked Box Table 16 Primary Transfer Current Adjustment ...

Page 266: ... 1 150 1 10 300 Perform Auto Adjustment Side 2 150 1 10 300 Perform Auto Adjustment Adjust Air Assist Values System Default Distinct Selections Available System Default Multi Feed Support Table Mis Feed Support Table Forced Off Custom 1 through 8 Determined by test print output Tray Heater Checked Box Adjustment of Image Transfer Trail Edge 100 1 0 100 10 Adjustment of Paper Speed at Transfer 0 00...

Page 267: ...t Adjustment Default Distinct Selections Available Available selections will be based on the Profiles created by the user Determined by test print output Fold Adjustment Profile Default Distinct Selections Available Available selections will be based on the Profiles created by the user Determined by test print output 267 ...

Page 268: ...wnward Custom Curl Correction Moderate Small Upward or Moderate Small Downward Custom Curl Correction Medium Upward or Medium Downward Custom Curl Correction Severe Large Upward or Severe Large Downward 1 Sided Face Down Default Distinct Selections Available Default Type A Type B Type C Custom Severe Upward Medium Upward Moderate Upward Slight Upward No Curl Follow recommended sequential order Def...

Page 269: ...ded sequential order Default Type A Type B Type C Custom Curl Correction Slight Very Small Upward or Slight Very Small Downward Custom Curl Correction Moderate Small Upward or Moderate Small Downward Custom Curl Correction Medium Upward or Medium Downward Custom Curl Correction Severe Large Upward or Severe Large Downward P Pa ap pe er r J Ja am ms s P Pa ap pe er r J Ja am ms s O Ov ve er rv viie...

Page 270: ...r is stuck in a hidden area or paper is wrapped around the fuser unit or rollers do not remove it forcefully You can get injured or burned Switch off the press immediately and contact the Customer Support Center J Ja am m R Re ec co ov ve er ry y O Of ff fs se et t F Fe ea at tu ur re e The Jam Recovery Offset Feature helps users verify and or monitor job integrity when a jam occurs while printing...

Page 271: ...e installed with your system In other words you cannot assign the jam recovery insert sheet to the Top Tray of the Standard Finisher because your system only has a High Capacity Stacker HCS attached Therefore you must select the HCS for the insert sheet The selected paper tray must support the desired paper size for the insert sheet For example You want the jam recovery sheet to be 11 x 17 in A3 s...

Page 272: ... main Tools screen displays 12 Exit the administrator mode a Press the Log In Out button b When the Logout screen appears select Logout P Pa ap pe er r J Ja am ms s iin n t th he e D Do oc cu um me en nt t F Fe ee ed de er r Document Feeder Jams 1 Gently lift the latch of the document feeder top cover until it is completely open 2 Open the left cover until it comes to a stop 3 If the document is n...

Page 273: ...t 5 If the jam is inside of the left cover remove the jammed document 6 Close the following open covers until they click into place Close them in the following order Inner cover Top cover Left cover 7 If a document jam cannot be found slowly raise the document feeder and if the document is there remove it 8 Close the document feeder 9 If indicated raise the feeder tray area and remove the document...

Page 274: ...canned prior to the jam Document Jams Under the Document Feeder Belt 1 Open the document feeder 2 Open the belt of the document cover while gripping the lever and remove the jammed document 3 Gently return the belt to the original position 4 Close the document feeder 5 Follow the instructions to reload the entire document set into the document feeder Note Ensure that there are not any torn wrinkle...

Page 275: ...r nearby indicating High Temperature and Caution Contact can lead to burns 1 Open the Press Front Door 2 Rotate Handle 2 to the right until it is in the horizontal position then pull out the transfer module 3 Remove the visible jammed paper 4 After clearing the jammed sheets ensure that no torn paper pieces are left in the press 275 ...

Page 276: ...ginal position 7 Move Handle 2e and remove any jammed paper 8 Return Handle 2e to its original position 9 Pull down Handle 2f and remove the jammed paper 10 Return Handle 2f to its original position 11 Push in the transfer module completely and rotate Handle 2 to the left 276 ...

Page 277: ...12 Close the press Front Door 13 Run five blank sheets to clean left over toner from the fuser roll and resume the copying printing process 277 ...

Page 278: ...ess if you open a tray without checking the paper jam position This may cause a malfunction Check where the paper jam occurred before clearing the problem 1 Open the tray where the paper jam occurred 2 Remove the jammed paper 3 Push the tray in gently until it comes to a stop 278 ...

Page 279: ...ional feeder such as the Advanced Oversized High Capacity Feeder Tip Always ensure that all paper jams including any small ripped pieces of paper are cleared before proceeding with any copy print jobs 1 Remove the jammed paper and any paper that is loaded from the Bypass tray Note If paper is torn check inside the press and remove it 2 Open the Bypass Top Cover and remove jammed paper 3 Close the ...

Page 280: ...and remove any jammed paper Note If paper is torn check for any torn pieces of paper inside the machine 2 Gently close the tray 3 Gently move Tray 6 to the left until it stops 4 Grasp the top cover handle and open the top cover 5 Remove any jammed paper from the top cover area of Tray 6 6 Close the Tray 6 top cover 7 Return Tray 6 to its original position 280 ...

Page 281: ...e the machine 4 Gently close the lower left cover 5 Gently move Tray 6 back into position T Tr ra ay y 6 6 F Fa au ullt t M Me es ss sa ag ge es s When a fault occurs such as paper jams open doors or covers or a press malfunction the press stops printing and a message appears on the press UI A graphical illustration shows the location of the fault with a brief explanation of corrective actions for...

Page 282: ... instructions for correcting the fault Tip Tray 6 faults are identified by the codes which start with the three digit numbers 024 and 078 T Tr ra ay ys s 6 6 a an nd d 7 7 T Tr ro ou ub blle es sh ho oo ot tiin ng g T Tr ra ay ys s 6 6 a an nd d 7 7 P Pa ap pe er r J Ja am ms s Paper Jams When the Bypass is Installed on Trays 6 and 7 Tip Always ensure that all paper jams including any small ripped...

Page 283: ...3 Remove any jammed paper Note If paper is torn check inside the press and remove it 4 Close the Top Cover of the Bypass Tray 5 5 Reload paper into the tray and resume printing 283 ...

Page 284: ... Inside Trays 6 and 7 1 Pull out the tray where the paper jam occurred 2 Remove the jammed paper Note If paper is torn check inside the machine and remove it 3 Gently push in the tray until it comes to a stop 284 ...

Page 285: ...nd turn the knob 1c to the right Remove the jammed paper Note If paper is torn check inside the machine and remove it 3 Return the lever 1a to the original position 4 Close the front cover of the OHCF Note If the front cover of the OHCF is not completely closed a message will appear and the machine will not operate 285 ...

Page 286: ...nd turn the knob 1c to the right Remove the jammed paper Note If paper is torn check inside the machine and remove it 3 Return the lever 1b to the original position 4 Close the front cover of the OHCF Note If the front cover of the OHCF is not completely closed a message will appear and the machine will not operate 286 ...

Page 287: ...he OHCF 2 Move the lever 1d upward and remove the jammed paper Note If paper is torn check inside the machine and remove it 3 If the paper cannot be removed turn the knob 1c clockwise then remove the jammed paper Note If paper is torn check inside the machine and remove it 287 ...

Page 288: ... the location of the fault with a brief explanation of corrective actions for clearing the fault If a fault occurs in more than one location the illustration changes to indicate the multiple locations and the required corrective actions Trays 6 and 7 Fault Code Information When a fault occurs such as paper jams open doors or covers or a press malfunction the press stops printing and a message appe...

Page 289: ...ow the jam clearance instructions displayed on the touch screen Always ensure that all paper jams including any small ripped pieces of paper are cleared before proceeding with your print jobs Paper Jams When the Bypass is Installed on Trays 8 and 9 Tip Always ensure that all paper jams including any small ripped pieces of paper are cleared before proceeding with any print jobs 1 Remove the paper c...

Page 290: ...4 Close the Top Cover of the Bypass Tray 5 5 Pull open the Top Drawer located at the top of Trays 6 and 7 6 Lift levers 2a and 2b then remove any paper jams 7 Close levers 2a and 2b 290 ...

Page 291: ... tray and resume printing Paper Jams Inside Trays 8 and 9 1 Pull out the tray where the paper jam occurred 2 Remove the jammed paper Note If paper is torn check inside the machine and remove it 3 Gently push in the tray until it comes to a stop 291 ...

Page 292: ...urn the knob 1c to the right Remove the jammed paper Note If paper is torn check inside the machine and remove it 3 Return the lever 1a to the original position 4 Close the front cover of the feeder module Note If the front cover of the feeder module is not completely closed a message will appear and the press will not operate 292 ...

Page 293: ...urn the knob 1c to the right Remove the jammed paper Note If paper is torn check inside the machine and remove it 3 Return the lever 1b to the original position 4 Close the front cover of the feeder module Note If the front cover of the feeder module is not completely closed a message will appear and the press will not operate 293 ...

Page 294: ...aper is torn check inside the machine and remove it 3 If the paper cannot be removed turn the knob 1c clockwise then remove the jammed paper 4 Return the lever 1d to the original position 5 Close the front door of the feeder module Note If the front cover of the feeder module is not completely closed a message will appear and the press will not operate 294 ...

Page 295: ...n doors or covers or a press malfunction the press stops printing and a message appears on the press UI The UI also displays a Faults button which provides information about the fault and detailed instructions for correcting the fault Tip Trays 8 and 9 faults are identified by the codes which start with the three digit number 178 F Fiin niis sh hiin ng g D De ev viic ce es s T Tr ro ou ub blle es ...

Page 296: ...he press User Interface UI prompts you to release the paper turn green handle knob 3b in the direction shown 5 Return green handle 3a to its original position 6 Close the front door of the Business Ready Finisher Clearing Jams in the BR Finisher at Position 3c 1 Open the front door of the Business Ready Finisher 2 Move green lever 3c to the left 296 ...

Page 297: ...erface UI prompts you to release the paper turn green handle knob 3b in the direction shown 4 Return green lever 3c to its original position 5 Close the front door of the Business Ready Finisher Clearing Jams in the BR Finisher at Position 3d 1 Open the front door of the finisher and locate green lever 3d 2 Move green lever 3d to the right 297 ...

Page 298: ... the front door of the Business Ready Finisher Clearing Jams in the BR Finisher at Position 4 1 Open the front door of the Business Ready Finisher 2 Using the green handle pull out unit 4until it stops 3 To remove the jammed paper turn green knob 4 in either direction as shown Note If the paper is torn remove all torn pieces from the finisher 298 ...

Page 299: ...ess malfunction the press stops printing and a message appears on the press UI A graphical illustration shows the location of the fault with a brief explanation of corrective actions for clearing the fault If a fault occurs in more than one location the illustration changes to indicate the multiple locations and the required corrective actions When a fault occurs such as paper jams open doors or c...

Page 300: ...es to show the multiple locations and the required corrective actions Additionally if a fault occurs with an optional device an indicator lights on that device control panel and shows the corresponding area on the device where the fault occurred Always refer to the following information when clearing paper jams Do not power off the press when removing paper jams Paper jams can be removed with the ...

Page 301: ...uch screen To clear any remaining jams refer to the press touch screen for instructions and information Clearing Paper Jams on the Interface Decurler Module 1 Open the front cover on the Interface Decurler Module IDM 2 Remove jammed paper a Open lever 1a downward b Turn knob 1b counterclockwise Important To ensure the jammed paper exits the area turn the knob a minimum of ten 10 times or more c Re...

Page 302: ...l position 6 Close the IDM front cover 7 If required follow the instructions on the press touch screen to clear other areas of the system Fault Messages on the Interface Decurler Module When a fault occurs such as paper jams open doors or covers or a press malfunction the press stops printing and a message appears on the press touch screen A graphical illustration shows the location 302 ...

Page 303: ...n about the fault and detailed instructions for correcting the fault Tip Interface Decurler Module faults are identified by the codes which start with the three digit number 048 I In ns se er rt te er r D De ev viic ce e T Tr ro ou ub blle es sh ho oo ot tiin ng g Inserter Paper Jams The following occurs when there is a fault such as paper jams open doors or covers or a press malfunction The press...

Page 304: ...th print jobs Gently remove the paper taking care not to tear it If paper is torn be sure to remove all torn pieces After removing paper jams close all doors and covers The press cannot print when doors or covers are open After clearing a paper jam printing automatically resumes from the state before the paper jam occurred If all paper jams are not cleared an error message continues to display on ...

Page 305: ...learing Paper Jams from Inserter E2 Area 1 Open the Inserter front cover 2 Open lever 1a upward 1 and turn knob 1b counterclockwise 2 Remove jammed paper 3 3 Return lever 1a to its original position 305 ...

Page 306: ... have difficulty when removing jammed paper open lever 1c to the right 1 and turn knob 1b counterclockwise 2 Remove jammed paper 3 5 Return lever 1c to its original position 6 Close the Inserter front cover 306 ...

Page 307: ...rea 1 Open the Inserter front cover 2 Open lever 1d downward 1 and turn knob 1e counterclockwise 2 Remove the jammed paper 3 Note The jammed paper may be hidden behind the upper left cover area 3 Return lever 1d to its original position 307 ...

Page 308: ...nges to indicate the multiple locations and the required corrective actions The touch screen also displays a Faults button which provides information about the fault and detailed instructions for correcting the fault The E code on the upper left part of the Fault message displays which error indicator is lit on the Inserter control panel E1 E2 E3 Inserter Fault Code Information When a fault occurs...

Page 309: ...ptional devices connected to the press When this happens the graphical illustration changes to show the multiple locations and the required corrective actions Additionally if a fault occurs with an optional device an indicator lights on that device control panel and shows the corresponding area on the device where the fault occurred Always refer to the following information when clearing paper jam...

Page 310: ...print when doors or covers are open After clearing a paper jam printing automatically resumes from the state before the paper jam occurred If all paper jams are not cleared an error message continues to display on the press touch screen To clear any remaining jams refer to the press touch screen for instructions and information Clearing Paper Jams from HCS Area E1 1 Open the HCS top cover 2 Open l...

Page 311: ...g Clearing Paper Jams from HCS Area E2 1 Open the HCS top cover 2 Open lever 1b upward 1 and rotate knob 1a counterclockwise 2 and remove jammed papers 3 3 Return lever 1b to its original position 4 Close the HCS top cover 5 If the press indicates there are additional paper jams follow the instructions to clear the paper and to resume printing 311 ...

Page 312: ...n the HCS top cover 2 Open lever 1b upward 1 and rotate knob 1a counterclockwise 2 and remove jammed papers 3 3 Return lever 1b to its original position 4 Open lever 2b upward 1 and turn knob 2c counterclockwise 2 and remove jammed papers 3 312 ...

Page 313: ...e press indicates there are additional paper jams follow the instructions to clear the paper and to resume printing Clearing Paper Jams from HCS Area E4 1 Open the HCS top cover 2 Open lever 2a downward 1 and remove jammed papers 2 3 Return lever 2a to its original position 313 ...

Page 314: ...ng Clearing Paper Jams from HCS Area E5 1 Open the HCS top cover 2 Open lever 2b upward 1 and turn knob 2c counterclockwise 2 and remove jammed papers 3 3 Return lever 2b to its original position 4 Close the HCS top cover 5 If the press indicates there are additional paper jams follow the instructions to clear the paper and to resume printing 314 ...

Page 315: ...Clearing Paper Jams from HCS Area E6 1 Press the Unload button 2 Make sure the HCS front door is unlocked and then open it 3 Pull out the stacker cart slowly and remove any jammed paper 315 ...

Page 316: ... If the press indicates there are additional paper jams follow the instructions to clear the paper and to resume printing Clearing Paper Jams from HCS Area E7 1 Remove any output delivered to the top tray 2 Open the HCS top cover 3 Open lever 1b upward 1 and remove jammed papers 2 316 ...

Page 317: ...urs in more than one location the illustration changes to indicate the multiple locations and the required corrective actions The touch screen also displays a Faults button which provides information about the fault and detailed instructions for correcting the fault The E code on the upper left part of the Fault message displays which error indicator is lit on the HCS control panel E1 E8 HCS Fault...

Page 318: ...url is present and if the output is not acceptable call for service c If curl is present continue to the next step 2 To correct the paper curl use the paper curl correction controls on the top of the Interface Decurler Module IDM 3 If the output has not improved adjust the paper curl again 4 If the output still has not improved call the Customer Support Center C Cr re ea as se e a an nd d T Tw wo ...

Page 319: ...ormation when clearing paper jams Do not power off the press when removing paper jams Paper jams can be removed with the press still powered on When the power is turned off all information stored to the system memory will be erased Clear all paper jams before resuming print jobs Do not touch components inside the press This can cause print defects Ensure that all paper jams including any small rip...

Page 320: ...over 2 Open lever 1a downward 1 lever 1b downward 2 and lever 1d upward 3 Remove jammed paper 4 Note Check behind the upper cover for any hidden jammed paper 3 If you have difficulty removing any paper jams rotate knob 1c clockwise 1 then remove the jammed paper 2 320 ...

Page 321: ...indicates there are additional paper jams follow the instructions to clear the paper and to resume printing Clearing Paper Jams from Trimmer Area E2 1 Open the trimmer upper cover 2 Rotate knob 2 counterclockwise to align the mark on the knob with the unlock position a mark resembling an open padlock 321 ...

Page 322: ...3 Open lever 1a downward 1 and lever 1b downward 2 4 Turn knob 1c clockwise 1 and remove jammed papers 2 5 Return levers 1a and 1b to their original positions 322 ...

Page 323: ... the left 2 7 Rotate knob 2b counterclockwise 1 and remove jammed papers 2 8 Return levers 1d and 2a to their original positions 9 Close the trimmer upper cover 10 If the press indicates there are additional paper jams follow the instructions to clear the paper and to resume printing 323 ...

Page 324: ...mmer upper cover 2 Rotate knob 2 counterclockwise to align the mark on the knob with the unlock position a mark resembling an open padlock 3 Open lever 2c downward 1 and remove jammed paper 2 Note Check behind the upper cover for any hidden jammed paper 324 ...

Page 325: ...er 6 If the press indicates there are additional paper jams follow the instructions to clear the paper and to resume printing Clearing Paper Jams from Trimmer Area E4 1 Open the trimmer upper cover 2 Open lever 2c downward 1 lever 2d upward 2 and lever 2e to the right 3 325 ...

Page 326: ... difficulty removing the jammed sheet grasp the top edge at the inner right side of the sheet and gently pull out the sheet to remove it 5 Return levers 2e 1 2d 2 and 2c 3 to their original positions 6 Close the trimmer upper cover 7 If the press indicates there are additional paper jams follow the instructions to clear the paper and to resume printing 326 ...

Page 327: ...Clearing Paper Jams from Trimmer Area E5 1 Open the trimmer upper cover 2 Open lever 3a to the right 1 lever 3b to the left 2 3 Rotate knob 3c clockwise 1 and remove jammed paper 2 327 ...

Page 328: ...and remove jammed paper 2 5 Return levers 3a and 3b to their original positions 6 Close the trimmer upper cover 7 If the press indicates there are additional paper jams follow the instructions to clear the paper and to resume printing 328 ...

Page 329: ...s from Trimmer Area E6 1 Open the trimmer upper cover 2 Open lever 3a to the right 1 lever 4b downward 2 and lever 4c to the right 3 Remove jammed paper 4 3 Rotate knob 4d counterclockwise 1 and remove jammed paper 2 329 ...

Page 330: ...lever 4a while rotating knob 2f 5 Rotate knob 3c clockwise 1 and remove jammed paper 2 6 Return levers 3a 4b and 4c to their original positions 7 Close the trimmer upper cover 8 If the press indicates there are additional paper jams follow the instructions to clear the paper and to resume printing 330 ...

Page 331: ...ea E7 1 Open the trimmer upper cover 2 Open lever 3a to the right 1 and rotate knob 2f counterclockwise 2 Note Rotate the knob five times or more 3 Pull out and push in the trimmer waste container continuously for three times or more 331 ...

Page 332: ... Return lever 3a to its original position 5 If indicator E7 remains lit perform the following steps a Open the lower cover b Remove the supplied cleaning rod from its location inside the lower cover 332 ...

Page 333: ...o the trimmer waste container use the cleaning rod to gather waste then remove the waste by hand f Return levers 3a and 3d to their original positions 6 To ensure that all waste and debris is removed especially beneath the frame that is located behind the container use the cleaning rod to remove any remaining waste from inside the trimmer For information refer to Emptying the Crease and Two Sided ...

Page 334: ... required corrective actions The touch screen also displays a Faults button which provides information about the fault and detailed instructions for correcting the fault The E code on the upper left part of the Fault message displays which error indicator is lit on the Crease and Two Sided Trimmer indicator panel E1 E7 Crease and Two Sided Trimmer Fault Code Information When a fault occurs such as...

Page 335: ...mation when clearing paper jams Do not power off the press when removing paper jams Paper jams can be removed with the press still powered on When the power is turned off all information stored to the system memory is erased Clear all paper jams before resuming print jobs Do not touch components inside the press This can cause print defects Ensure that all paper jams including any small ripped pie...

Page 336: ... lever 2a upward 1 and lever 2b to the left 2 Remove jammed paper 3 3 Return levers 2a and 2b to their original positions 4 Close the folder front cover 5 If the press indicates there are additional paper jams follow the instructions to clear the paper and to resume printing 336 ...

Page 337: ...ver 2g to the right 1 and rotate knob 2c counterclockwise 2 Remove jammed paper 3 3 Return lever 2g to its original position 4 Close the folder front cover 5 If the press indicates there are additional paper jams follow the instructions to clear the paper and to resume printing 337 ...

Page 338: ...earing Paper Jams from Folder Area E12 1 Open the folder front cover 2 Pull open the C Z fold output tray 2d 3 Open lever 2e to the right 1 and rotate knob 2c counterclockwise 2 Remove jammed paper 3 338 ...

Page 339: ...r 2e to its original position 5 If you have difficulty removing any paper jams open lever 2f to the right 1 and rotate knob 2c counterclockwise 2 Remove jammed paper 3 6 Return lever 2f to its original position 339 ...

Page 340: ...changes to indicate the multiple locations and the required corrective actions The touch screen also displays a Faults button which provides information about the fault and detailed instructions for correcting the fault The E code on the upper left part of the Fault message displays which error indicator is lit on the C Z Folder indicator panel E1 E7 C Z Folder Fault Code Information When a fault ...

Page 341: ...ows the corresponding area on the device where the fault occurred Always refer to the following information when clearing paper jams Do not power off the press when removing paper jams Paper jams can be removed with the press still powered on When the power is turned off all information stored to the system memory will be erased Clear all paper jams before resuming print jobs Do not touch componen...

Page 342: ...ront cover 2 Open lever 1a to the left 1 and remove the jammed paper 2 Note Grasp the leading edge of the jammed sheet and pull out the sheet to remove it 3 If you have difficulty removing any paper jams rotate knob 1b clockwise 1 and remove the jammed paper 2 342 ...

Page 343: ...e the finisher front cover Clearing Paper Jams from Finisher Area E2 1 Open the finisher front cover 2 Open lever 1c to the right 1 and rotate knob 1e clockwise 2 Remove the jammed paper 3 Note The jammed paper may be hidden behind the upper cover 343 ...

Page 344: ... lever 1c to its original position 4 Close the finisher front cover Clearing Paper Jams from Finisher Area E3 1 Pull out the jammed paper from the finisher top tray 2 Open and close the finisher front cover 344 ...

Page 345: ...from Finisher Area E4 1 Open the finisher front cover 2 Open lever 1d to the right 1 and rotate knob 1e clockwise 2 Remove the jammed paper 3 3 Return lever 1d to its original position 4 Close the finisher front cover 345 ...

Page 346: ...m Finisher Area E5 1 Open the finisher front cover 2 Open lever 1d to the right 1 and rotate knob 1f counterclockwise 2 Remove the jammed paper 3 3 Return lever 1d to its original position 4 Close the finisher front cover 346 ...

Page 347: ...Clearing Paper Jams from Finisher Area E6 1 Pull out the jammed paper from the finisher stacker tray 2 Open and close the finisher front cover 347 ...

Page 348: ...sher Booklet Area E7 1 Open the finisher front cover 2 Open lever 3a to the left 1 and remove the jammed paper 2 3 If you have difficulty to remove the paper jam pull out the Saddle Stitch Unit 3 1 and remove the jammed paper 2 348 ...

Page 349: ...4 Return lever 3a to its original position 5 Gently push in the Saddle Stitch Unit 3 until it stops 6 Close the finisher front cover 349 ...

Page 350: ...klet Area E8 1 Open the finisher front cover 2 Pull out the Saddle Stitch Unit 3 toward you until it stops Note Check lever 3a for paper jam before pulling out the unit 3 Rotate knob 3b counterclockwise 1 and remove the jammed paper 2 350 ...

Page 351: ...l it stops 5 Close the finisher front cover Clearing Paper Jams from Finisher Booklet Area E9 1 Open the finisher front cover 2 Rotate knob 3b clockwise 1 and remove the jammed paper from the booklet tray area 2 3 Close the finisher front cover 351 ...

Page 352: ...ea E1 Clearing Paper Jams from Finisher Area E2 Clearing Paper Jams from Finisher Area E3 Clearing Paper Jams from Finisher Area E4 Clearing Paper Jams from Finisher Area E5 Clearing Paper Jams from Finisher Area E6 Clearing Paper Jams in the PR Finisher Plus Area E7 1 Open the finisher front cover 2 Remove any jammed paper 3 To clear paper jams from Area E7 perform the following a Open lever 3a t...

Page 353: ...Paper Jams in the PR Finisher Plus Finishing Transport Refer to the following procedures for clearing paper jams the PR Finisher Plus Finisher Module areas 1 4 Clearing Paper Jams in Finishing Transport Area 1 Clearing Paper Jams in Finishing Transport Area 2 Clearing Paper Jams in Finishing Transport Area 3 Clearing Paper Jams in Finishing Transport Area 4 353 ...

Page 354: ...ams in Finishing Transport Area 1 1 Open the Finishing Transport front cover 2 Open lever 1 downward and remove the jammed paper 3 Return lever 1 to its original position 4 Close the Finishing Transport front cover 354 ...

Page 355: ...sport Area 2 1 Open the Finishing Transport front cover 2 Open lever 2 to the right 1 and rotate the knob counterclockwise 2 Remove the jammed paper 3 Return lever 2 to its original position 4 Close the Finishing Transport front cover 355 ...

Page 356: ...Transport Area 3 1 Open the Finishing Transport front cover 2 Open lever 3 to the left 1 and rotate the knob clockwise 2 Remove the jammed paper 3 Return lever 3 to its original position 4 Close the Finishing Transport front cover 356 ...

Page 357: ...apers 3 Return lever 4 to its original position 4 Close the Finishing Transport front cover Finisher Staple Faults Use the following procedures when stapling issues occur with the printed output such as when the sheets are not stapled or the staples are bent Contact the service representative if the problems continue after you have tried the following solutions 357 ...

Page 358: ... staple raised up Staple raised up with center pressed inward Important Depending on the type of paper being stapled the staple nails may be bent If the bent nails are stuck inside the finisher they may eventually cause paper jams When you open the cover of the staple cartridge remove any bent staples otherwise staple jams may occur Use the cover of the staple cartridge only when removing jammed s...

Page 359: ... from its holder refer to Reinserting the Basic Staple Cartridge Note Ensure that the press is not running before performing this procedure 1 Open the finisher front cover 2 Pull out R1 Note After removing the staple cartridge check the inside of the finisher for any remaining staples 359 ...

Page 360: ... Open the unit cover and remove the jammed staples WARNING To avoid personal injury use care when removing jammed staples 4 Reinsert the unit to its original position 5 Close the finisher front cover 360 ...

Page 361: ...r accidentally removed perform the following procedure to correctly reinsert the staple cartridge into the cartridge unit 1 Open the finisher front cover 2 Pull out R1 3 Open the unit cover and remove the jammed staples WARNING To avoid personal injury use care when removing jammed staples 361 ...

Page 362: ...g the lever be careful not to hurt your fingers and nails 5 Turn the unit up while holding the lever then take out the staple cartridge from the unit 6 Remove the outside staples along the line WARNING When removing staples be careful not to hurt your fingers 362 ...

Page 363: ...7 Insert the staple cartridge into the unit 8 Reinsert the unit to its original position 9 Close the finisher front cover 363 ...

Page 364: ...ming this procedure 1 Open the finisher front cover 2 Pull out the Saddle Stitch Unit 3 toward you until it stops 3 While holding the tabs on the staple cartridge pull out the cartridge to remove it 4 Remove any jammed staples WARNING To avoid personal injury use care when removing jammed staples 364 ...

Page 365: ...raphical illustration shows the location of the fault with a brief explanation of corrective actions for clearing the fault If a fault occurs in more than one location the illustration changes to indicate the multiple locations and the required corrective actions The touch screen also displays a Faults button which provides information about the fault and detailed instructions for correcting the f...

Page 366: ...as paper jams open doors or covers or a press malfunction the press stops printing and a message appears on the press touch screen The touch screen also displays a Faults button which provides information about the fault and detailed instructions for correcting the fault Tip PR Finisher Plus faults are identified by the codes which start with the three digit numbers 013 and 051 366 ...

Page 367: ...ion when clearing paper jams Do not power off the press when removing paper jams Paper jams can be removed with the press still powered on When the power is turned off all information stored to the system memory will be erased Clear all paper jams before resuming print jobs Do not touch components inside the press This can cause print defects Ensure that all paper jams including any small ripped p...

Page 368: ...1 Open the left cover of trimmer device by pressing the button on the cover 2 Remove the jammed paper 3 If you have difficulty removing the jammed paper open the front cover of the finisher 368 ...

Page 369: ... finisher 6 Close the left cover of the trimmer device 7 If the press indicates there are additional paper jams follow the instructions to clear the paper and to resume printing Clearing Paper Jams from SquareFold Trimmer Area E3 Note Ensure that the press is not running before performing this procedure 369 ...

Page 370: ...ing the fault If a fault occurs in more than one location the illustration changes to indicate the multiple locations and the required corrective actions The touch screen also displays a Faults button which provides information about the fault and detailed instructions for correcting the fault The E code on the upper left part of the Fault message displays which error indicator is lit on the Squar...

Page 371: ...s of a booklet with preprinted front back covers with a full page image but different sizes 1 Booklet 1 is printed on 8 5 x 14 in B4 paper The front cover which was trimmed displays the entire image 2 Booklet 2 is printed on 8 5 x 11 in A4 paper The image on the front cover is truncated after trimming it Booklet Considerations Before you print any booklet consider the following Image location on t...

Page 372: ...t tiin ng g t th he e P Pr re es ss s S Se er riia all N Nu um mb be er r The press serial number can be accessed from the User Interface UI or from the serial number plate which is located on the inside frame of Tray 1 1 Press the Machine Status button on the UI 2 From the Machine Status screen ensure that the Device Information tab is displayed The press serial number is displayed under Device S...

Page 373: ...following for example One fuser roll for narrower paper One fuser for wider paper P Pr re ev ve en nt tiin ng g F Fu us se er r D Da am ma ag ge e 1 To reduce 11 in 279 4 mm lines and wear marks you may require the use of two fusers one when running 8 5x 11 in A4 stock and the other when running 12 x 18 in 304 8 x 457 2 mm or larger stock This is especially true for the graphic arts people 2 Image...

Page 374: ...tries Adobe and the Adobe logo InDesign Illustrator PageMaker Photoshop Acrobat Distiller PostScript and the Acrobat logo are either registered trademarks or trademarks of Adobe Systems Incorporated in the United States and or other countries Macintosh Mac OS Power Macintosh TrueType and Mac are registered trademarks of Apple Computer Inc in the United States and or other countries Microsoft Windo...

Page 375: ...s you can log into the Administrator mode From the select Administrator mode you can do the following Customize the press screen Select the power saver mode settings Run the Clean the Fuser Assembly with Felt procedure Reset a High Frequency Service Item HFSI counter Select and edit Copy and Scan setting Select and edit other System Settings Perform Simple Image Quality Adjustment SIQA procedures ...

Reviews: