2.PRINTING FROM WINDOWS
Printing With Best Functions for Your Needs 109
2 PRINTING FROM WINDOWS
Layout and finishing options in [Basic] tab menu
Using the printer driver, you can set various layout options to suit your preferences. In this section various
printing functions enabled with the [Basic] tab menu are explained.
P.109 “Fitting images within paper size”
P.110 “Printing color documents in gray scale”
P.111 “Printing color documents in twin colors”
Fitting images within paper size
You can automatically enlarge or reduce an image to fit into a specified paper size, or manually set the scale
to enlarge or reduce it. Also you can combine the desired paper size and reproduction ratio.
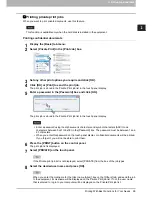
Printing enlarged or reduced image to fit the specified paper size
1
Display the [Basic] tab menu.
2
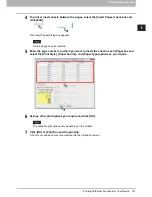
Select the document size on the [Original Paper Size] box. Then select the paper size
that you want to print at the [Print Paper Size] box.
The document image is automatically enlarged or reduced depending on the original paper size and
print paper size.
3
Set any other print options you require and click [OK].
4
Click [OK] or [Print] to send the print job.
The enlarged or reduced image is printed to fit the specified paper size.
Printing an enlarged or reduced image by specifying the scale manually
1
Display the [Basic] tab menu.
2
Check the [Image Scale] box. Then enter the scale.
The scale can be set from 25% to 400% in units of 1%.
3
Set any other print options you require and click [OK].
4
Click [OK] or [Print] to send the print job.
An enlarged or reduced image is printed in the specified scale.
Summary of Contents for e-STUDIO305CP
Page 1: ...MULTIFUNCTIONAL DIGITAL COLOR SYSTEMS PRINTER Printing Guide ...
Page 8: ......
Page 10: ...8 CONTENTS ...
Page 138: ......
Page 141: ...FC 3050CS 3050CP DP 3850S 3850P 5250P OME14006900 ...


