– 121 –
Objects Creation (3)
Page Introduction
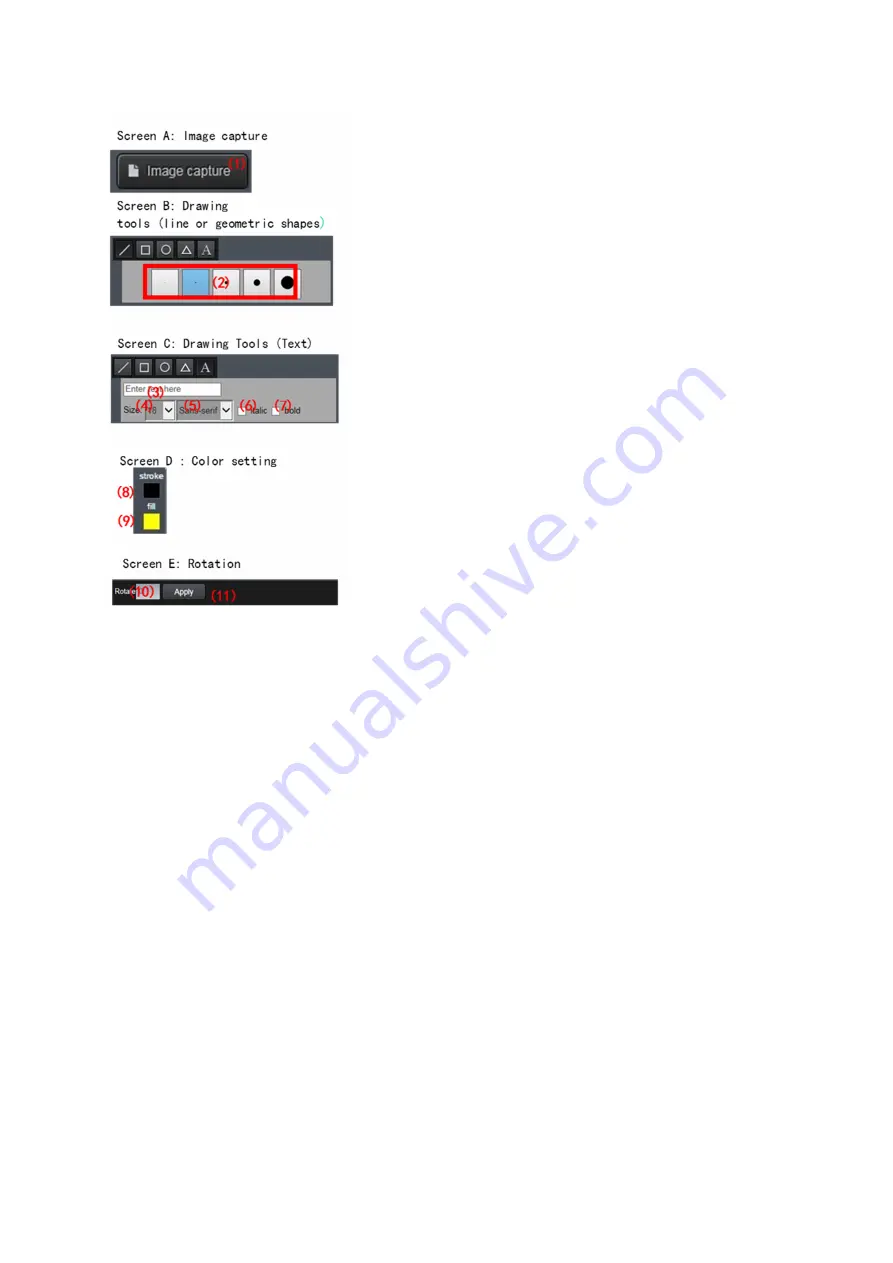
Screen A: Image capture
(1) Image capture
Screen B: Drawing tools (line or geometric shapes)
(2) Drawing tool (line thickness)
Screen C: Drawing Tools (Text)
(3) text input field
(4) text size
(5) text font
(6) italic
(7) bold
Screen D : Color setting
(8) Stroke color setting (with palette display)
(9) Fill color setting (with palette display)
Screen E: Rotation
(10) Rotation angle
(11) Apply
Setting Method
Image capture
1) Click “Image capture” button to select pictures from the local computer.
2) If you want image processing, process it by professional software before “Image capture”.
※
The background image size of the page is 1024x450 pixels.
Line
1) Single click the line icon of the drawing tool.
2) Set the line thickness.
3) Set the line color in stroke color setting.
4) Single click and drag on the page to draw a line.
5) After straight line is drawn, you can rotate it with the angle tool.
6) If you want to move the line on the page, you need to switch to the Move mode.
Geometric shapes
1) Single click the graphical icon (□ ○
△
) of the drawing tool.
2) Select the line thickness.
3) Set the line color in stroke color setting and graphic color in fill color setting.
4) Single click and drag on the page to draw the graphics.
5) After the graphic is drawn, you can rotate it with the angle tool.
6) If you want to move the graphics on the page, you need to switch back to the Move mode.
Text
1) Single click the text icon of the drawing tool ([A]).
2) Enter the text in the text input field.
3) Select the text size.
4) Select the font.
5) can be set in italics and bold.
6) Use Stroke color setting to set the text color.
7) Single click on the page for the text configuration.
8) Text can be rotated with angle tool.
9) If you want to move the text on the page, you need to switch back to the Move mode.
Paint Mode and Move Mode


