


NICE3000
new
User Manual Use of the NICE3000
new
- 67 -
•
UP: Press this button to increase the function group number.
Currently, the MCB defines a total of 13 function code groups, namely, F0 to F9, and
FA to FC. You can press the UP button to display them in turn. In addition, in special
function code group menu, you can input simple references by using the UP button.
•
SET: In the function code group menu, press this button to enter the menu of the
function code group.
In special function code group menu, after you input a simple reference and press this
button to save the setting, the display will return to the F0 menu by default.
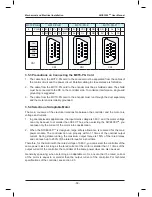
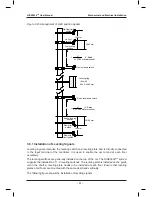
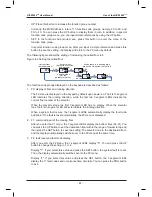
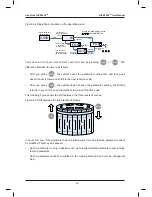
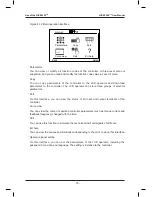
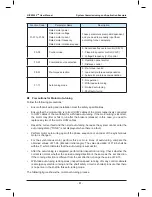
The following figure shows the setting of increasing the called floor to 5.
Figure 4-2 Setting the called floor
05
F0
04
(Select the function
code group)
(Set the
parameter value)
Level-I menu
Level-II menu
PRG
Without
saving
SET
Saving
When there is a blinking digit,
press the UP button to modify it.
01
SET
Enter
Current floor
UP
Increase
(default display)
F1
PRG
Switch
UP
Increase
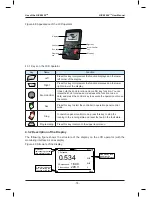
The function code groups displayed on the keypad are described as follows:
1.
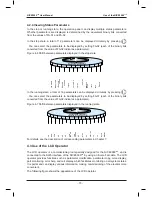
F0: display of floor and running direction
The F0 menu is displayed on the keypad by default upon power-on. The first 7-segment
LED indicates the running direction, while the last two 7-segment LEDs indicate the
current floor number of the elevator.
When the elevator stops, the first 7-segment LED has no display. When the elevator
runs, the first 7-segment LED blinks to indicate the running direction.
When a system fault occurs, the 7-segment LEDs automatically display the fault code
and blink. If the fault is reset automatically, the F0 menu is displayed.
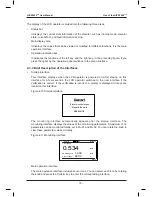
2.
F1: command input of the running floor
After you enter the F1 menu, the 7-segment LEDs display the bottom floor (F6-01). You
can press the UP button to set the destination floor within the range of lowest to top and
then press the SET button to save the setting. The elevator runs to the destination floor,
and the display automatically switches over to the F0 menu at the same time.
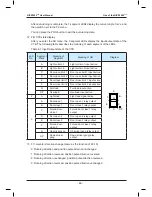
3. F2: fault reset and fault code display
After you enter the F2 menu, the 7-segment LEDs display "0". You can press the UP
button to change the setting to 1 or 2.
־ Display "1": If you select this value and press the SET button, the system fault is reset.
Then, the display automatically switches over to the F0 menu.
־ Display "2": If you select this value and press the SET button, the 7-segment LEDs
display the 11 fault codes and occurrence time circularly. You can press the PRG button
to exit.
Summary of Contents for NICE3000 New
Page 1: ......
Page 13: ......
Page 14: ...1 Safety Information and Precautions ...
Page 21: ...Safety Information and Precautions NICE3000new User Manual 20 ...
Page 22: ...2 Product Information ...
Page 33: ...Product Information NICE3000new User Manual 32 ...
Page 34: ...3 Mechanical and Electrical Installation ...
Page 67: ...4 Use of the NICE3000new ...
Page 79: ...5 System Commissioning and Application Example ...
Page 105: ...6 Function Code Table ...
Page 136: ...Function Code Table NICE3000new User Manual 134 ...
Page 137: ...7 Description of Function Codes ...
Page 205: ...8 EMC ...
Page 214: ...EMC NICE3000new User Manual 212 ...
Page 215: ...9 Troubleshooting ...
Page 230: ......
Page 233: ......