68
Tracking Targets (Tracking Function)
A
d
v
anc
ed
O
pera
tio
ns
2
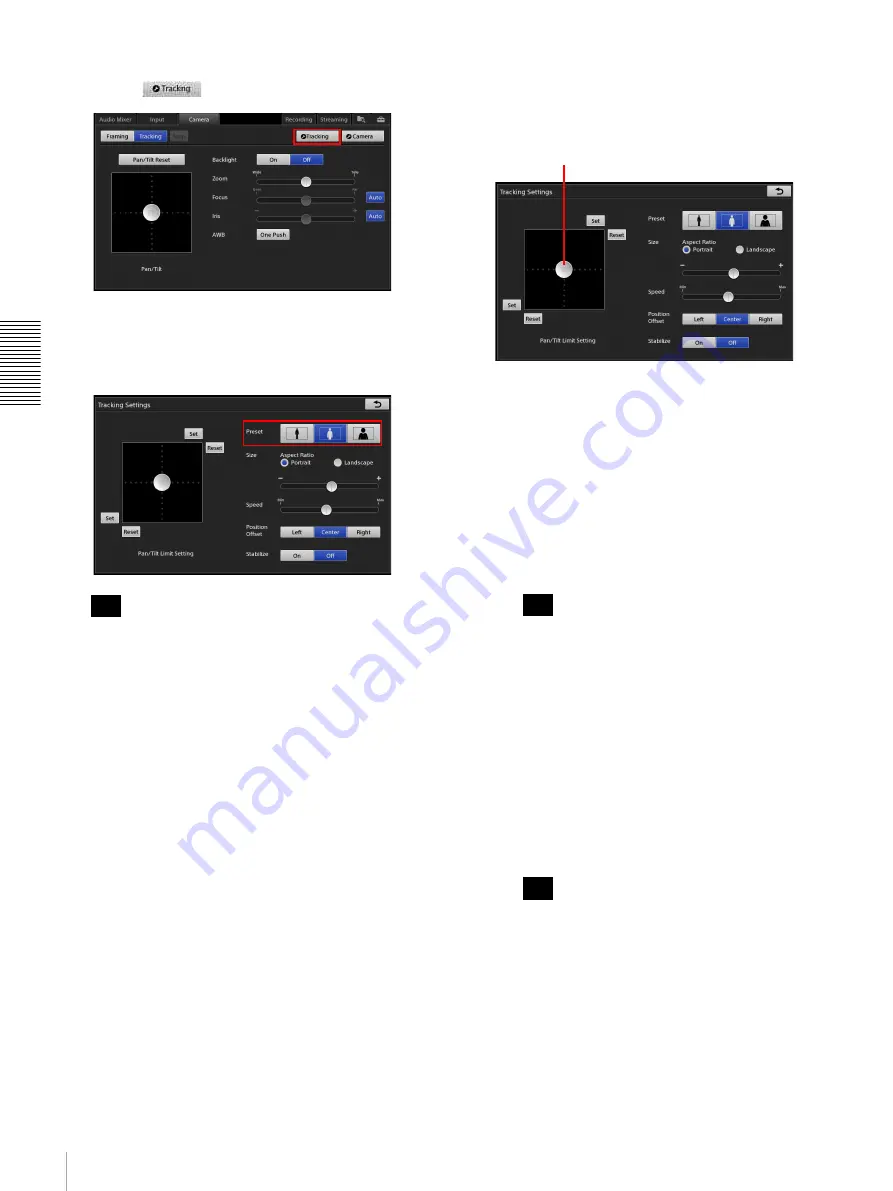
Tap the [Camera] tab to display the [Camera] screen,
and tap
.
The [Tracking Settings] screen appears.
3
Select a preset in [Preset] based on the size of the
tracking target.
If you change any other setting values after enabling
a preset button (highlighted in blue), the button will
turn off (no longer highlighted) to indicate that it has
been disabled.
4
Adjust the width of the tracking target in [Size].
The size specified here is the size of the tracking
quality indicator frame that appears in the [NEXT]
viewer.
[Aspect Ratio]:
Select the aspect ratio.
•
[Portrait]:
Use for full-body or half-body
shots.
•
[Landscape]:
Use for bust shots.
Slider:
Adjust the width of the frame to match the
width of the tracking target (shoulder width in the
case of a person).
5
Specify the movement range (tracking range) for the
camera in [Pan/Tilt Limit Setting].
By specifying the movement range, you can prevent
the camera from pointing in unintended directions
during tracking and make sure that your target does
not move out of the camera’s view.
1
Use the adjustment handle to control the camera,
and position the subject to the center of the
screen.
2
Move the camera up to the position you want to
use as the upper limit of movement, and from
that position, move the camera right to the
position you want to use as the right limit of
movement, and then tap [Set] at the upper right.
The upper and right limits of the movement
range will be set. (The button color will not
change.)
Tapping [Reset] will clear both the upper and
right limit settings.
3
Use the adjustment handle to control the camera,
and position the subject to the center of the
screen again.
4
Move the camera down to the position you want
to use as the lower limit of movement, and from
that position, move the camera left to the
position you want to use as the left limit of
movement, and then tap [Set] at the bottom left.
The lower and left limits of the movement range
will be set. (The button color will not change.)
Tapping [Reset] will clear both the lower and left
limit settings.
6
Save the settings to [Preset_1] in the [Camera] list.
For details on how to save, see “Saving Adjustments
as Presets” (page 49).
Tip
Tip
Tip
Adjustment handle
Summary of Contents for AWS-750
Page 121: ......


