background image

Tel: 886.2.2175 2930 Email: [email protected]

www.salukitec.com

99

Fig. 4.29 Pre-configured Measurement setups

2) Window arrangement
a) Several methods of window adjustment are provided in the analyzer.

Use the mouse to move and adjust the window.

Arrange the windows of the analyzer by the [Tile], [Cascade], [Maximize] and [Minimize] items of the

window menu.

Arrange the windows by the [One-window], [Two-window], [Three-window] and [Four-window] items of the display menu.

Use the [Minimize], [Maximize/reduce down] and [Close] button in the top right corner of the window to adjust or hide the
window.

b) The display menu of the analyzer provides four kinds of window arrangement. The existing tracks are distributed into different

windows according to a certain algorithm.

One-window arrangement

All tracks are displayed in one window in a cascading manner.

Two-window arrangement

All tracks are displayed in two windows which are vertically overlapped.

Three-window arrangement

All tracks are displayed in three windows. Two of the three windows are arranged in the upper part, and the other in the lower part.

Four-window arrangement

All tracks are displayed in four windows which respectively cover one fourth of the screen.
c) Setting of window arrangement
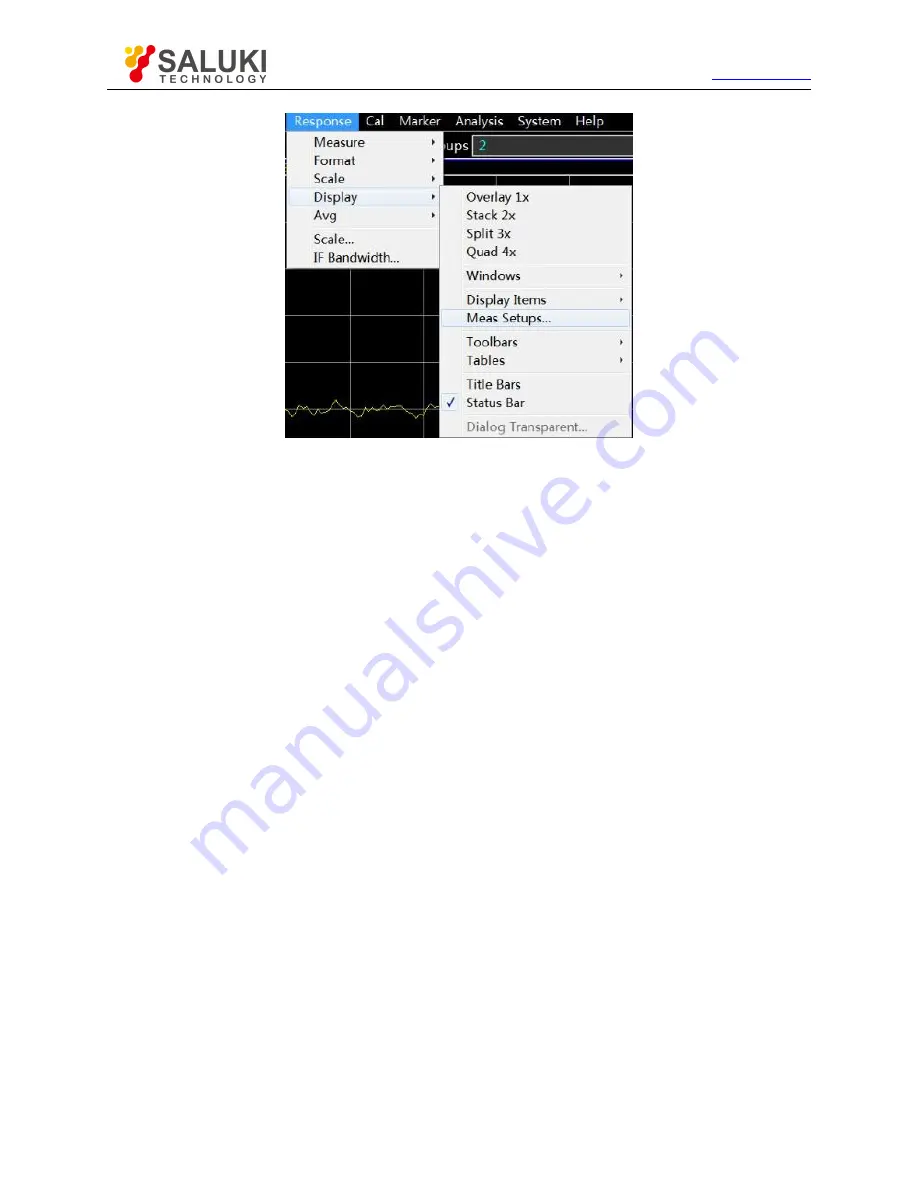
Menu path: [Response] > [Display]. The display sub-menu will pop up. Select the window arrangement mode in the display
sub-menu.

Summary of Contents for S3602 Series

Page 1: ...1 S3602 Series Vector Network Analyzer User Manual Saluki Technology Inc...

Page 2: ...Manual which should not be modified or tampered by any organization or individual or reproduced or transmitted for the purpose of making profit without its prior permission otherwise Saluki will reser...

Page 3: ...886 2 2175 2930 Email sales salukitec com www salukitec com 3 Contacts Service Tel 886 2 2175 2930 Website www salukitec com Email info salukitec com Address No 367 Fuxing N Road Taipei 105 Taiwan R...

Page 4: ...etting of Signal Power Level 81 4 5 Setting of Sweep 83 4 6 Trigger Mode 87 4 7 Setting of Data Format and Scale 93 4 8 Observation of Multiple Tracks and Opening of Multiple Channels 97 4 9 Setting o...

Page 5: ...s of Network Measurement 225 8 1 Reflection Measurement 225 8 2 Phase Measurement 227 8 3 Amplifier Parameter Specifications 229 8 4 Complex Impedance 231 8 5 Group Delay 233 8 6 Absolute Output Power...

Page 6: ...t overview of the front panel and the rear panel operation interface analyzer menus tracks channels windows and analysis and saving of measurement data Measurement setups This chapter describes variou...

Page 7: ...ment drive and the basic installation and configuration requirements of the IVI COM IVI C drive Fault diagnosis and repair This section describes the overall operating theory fault diagnosis and troub...

Page 8: ...l commands and methods of the instrument It mainly includes the following chapters Remote control Program control commands Programming examples Error illustration Appendix Quick Start Guide This manua...

Page 9: ...ion gain compression and two dimensional sweep and S parameter of the pulse network and accurately measure the amplitude frequency characteristics phase frequency characteristics and group delay chara...

Page 10: ...thus greatly improving the test efficiency S3602 series vector network analyzers are equipped with a 12 1 inch 1280 800 touch screen as shown in Fig 2 1 to facilitate operation Fig 2 1 12 1 inch 1280...

Page 11: ...ameters of the tested device thus simplifying the test process Fig 2 4 Multi window Multi channel Measurement Display 3 Wide dynamic range S3602 series vector network analyzers are designed based on f...

Page 12: ...the keyboard mouse printer electronic calibrator and other peripherals with USB interfaces 3 Printing function S3602 series vector network analyzers have a powerful printing function and are able to...

Page 13: ...users Safety signs Operation status and location Power safety Operation precautions Maintenance Battery and power supply module Transportation Waste disposal environment protection 2 2 1 Safety Signs...

Page 14: ...nger Prompt sign information of the instruction and operation 2 2 2 Operation Status and Location Pay attention to the following items before operation 1 Unless otherwise stated S3602 series vector ne...

Page 15: ...et clean and the plug and the socket in good and firm contact 8 The socket and power cord must not be overloaded otherwise fire or electric shock may be caused 9 If the voltage Vrms is higher than 30V...

Page 16: ...ducts 8 If the instrument is integrated with any laser product such as a CD DVD drive no additional function should be added except the settings and functions described in the manual in order to preve...

Page 17: ...ot be fixed on the transport equipment during transportation In order to prevent damage to the property and body observe the manufacturer s safety provisions on instrument transportation 3 If the inst...

Page 18: ...of S3602 series vector network analyzer Prevent damage to the instrument In order to avoid electric shock fire and personal injury Do not open the casing without permission Do not disassemble or modi...

Page 19: ...e dual shielded radio frequency network connection cable Please promptly close the cable connection port which is open and not used temporarily or the connection port connected to the matching load Re...

Page 20: ...n 401 1 4 ports dual source with extended power range 402 1 Intermodulation distortion application 008 1 Pulsed RF Measurements S10 1 Time Domain Measurement S80 1 Frequency offset measurements S82 1...

Page 21: ...s 1 Operating environment The operating environment should conform to the following requirements Table 3 2 Operating Environment Requirements of S3602 Operation Temperature 0 C 40 C Humidity 29 C 20 t...

Page 22: ...the places with the voltage higher than 500V 3 1 1 3 On Off 1 Precautions before powering on Check the following items before powering on the instrument a Confirm the power supply parameters S3602 se...

Page 23: ...e external cable power line or autotransformer subject to no grounding protection instead of the protective ground wire If required connect the common end of the autotransformer to the protective grou...

Page 24: ...b menu Click Vector network analyzer in the pop up sub menu Then the measurement application program will be run in the analyzer You can also double click the shortcut key on the desktop to run the pr...

Page 25: ...ly scratched 2 Check whether threads are deformed 3 Check whether there are metal particles on the connector threads and joint surfaces 4 Check whether the internal conductor is bent or cracking 5 Che...

Page 26: ...rotation of connectors during connection Fig 3 5 Connection Method Step 3 as shown in Fig 3 6 complete the final connection by tightening with the torque wrench Note that the torque wrench must not be...

Page 27: ...age to the electric plating and joint planes of connectors 6 Wear the anti static wrist band and operate the instrument on the grounded conductive workbench mat to protect the analyzer and connectors...

Page 28: ...lyzer In this case system recovery is recovered Recover default settings of the analyzer according to the following steps 1 Shut down the analyzer and connect the keyboard to the USB interface 2 Press...

Page 29: ...1 turn off the instrument by disconnecting the power line connected to the instrument Step 2 carefully wipe the surface with dry or slightly wet soft cloth Do not wipe the inside of the instrument St...

Page 30: ...ont Panel Rear Panel This chapter introduces the elements and functions of the front panel rear panel and operation interface of S3602 series vector network analyzer Front panel Rear panel 3 2 1 Front...

Page 31: ...9 Enter the numbers in measurement Setup and press the corresponding unit keys to complete input 6 Unit keys End the number input and distribute a unit to each input value The unit corresponding to e...

Page 32: ...center frequency frequency span and frequency offset 2 Power key It is a shortcut key to set the measurement power The power level power status ON OFF power attenuation and power slope 3 Measurement S...

Page 33: ...ing options will be displayed on screen Measurement Format Scale Display and Average 6 Calibration key Open the main calibration menu Following options will be displayed on screen Calibration Correcti...

Page 34: ...nly effective for Record Run 1 and cannot be used to control Record Run 2 3 Macro local key If the analyzer is programmed press this key to switch to the macro state If the analyzer is not programmed...

Page 35: ...exit the application program When the power supply will be turned off the standby state will be enabled This is only a standby switch It cannot be directly connected with the external power supply or...

Page 36: ...ted by the port will be used as the reference frequency of the instrument instead of the internal reference frequency The 10MHz reference input port has the following features Input frequency 10MHz 1p...

Page 37: ...r embedded contacts with Contact 1 on the left side and Type B Type A connector can be connected to the USB mouse keyboard or other USB interface devices The rear panel is equipped with four interface...

Page 38: ...50 007606GHz 67 007606GHz Power range of LO output signal 4dBm to 6dBm Frequency range of RF output signal 3 2GHz 13 5GHz 26 5GHz 43 5GHz 50GHz 67GHz RF output signal power 3dBm 2dB Fig 3 26 LO and R...

Page 39: ...control line and is used to control the external tester such as the external spread spectrum controller Fig 3 31 External Tester Interface Connector 12 Trigger input output interface connector As show...

Page 40: ...m www salukitec com 40 after one measurement Fig 3 32 Trigger Input Output Interface Connector 13 28V BNC interface connector As shown in Fig 3 33 this BNC female connector can be used to drive a nois...

Page 41: ...lbar to add the measurement trace Click the sweep toolbar to control sweep of the analyzer Click the stimulus toolbar to set sweep stimulus Click the time domain toolbar to set time domain settings Ri...

Page 42: ...d with measurement of the trace in the channel The same channel settings are applicable to tracks in the same channel Only the settings of the active channel can be changed Once the trace in the chann...

Page 43: ...small window size In this case one window can be displayed in the full screen so as to better observe the trace in the window Use the mouse to display one window in the full screen according to the fo...

Page 44: ...rmal marker and one reference marker can be used at most for each trace Equation Editor Move marker Marker search Marker function Advanced marker option setting Marker list 3 5 1 1 Create marker 1 Use...

Page 45: ...imulus box Click the Open check box 4 Marker dialog box a Marker box Select the marker to be defined b Stimulate box Define the stimulate value of X axis of the selected marker c Open check box Select...

Page 46: ...e the knob to move the marker Click the or in the Stimulate box to change the marker stimulate value Press or in the adjustment key zone to change the marker stimulate value c Move the marker in the i...

Page 47: ...h types Minimum value search the minimum measurement data point Maximum value search the maximum measurement data point Right peak value search next effective peak value on the right side of the marke...

Page 48: ...to the target value Left target only search the target value on the left side of the current marker Right target only search the target value on the right side of the current marker Bandwidth if the b...

Page 49: ...right corner at the same time Level of Bandwidth 1 set the level of Bandwidth 1 in the input box Level of Bandwidth 2 set the level of Bandwidth 2 in the input box Percentage frequency offset set the...

Page 50: ...e sweep reference value to be equal to the stimulate value of the active marker e Marker Delay button Click it and the electrical delay of the reception path will be adjusted according to the phase sl...

Page 51: ...ixed while the Y axis location changes with the trace data amplitude The marker can be moved right and left on the X axis by changing the stimulus value Fixed option box The X axis and Y axis coordina...

Page 52: ...arker list will be closed Fig 3 45 marker List Setting by View Menu 3 5 2 Trace Operation and Statistics The analyzer supports four kinds of mathematical operation of the current active trace and the...

Page 53: ...operation The analyzer supports the following operations Data No mathematical operation Data storage The displayed trace data are the measured data plus stored trace data Data storage The displayed t...

Page 54: ...lue of pass band ripple can be measured easily The statistical values of trace are calculated according to the data display format Rectangular coordinate format the statistical values of trace are cal...

Page 55: ...tion Each trace supports up to 100 separate limit segments for accurate definition Create and edit limit line Limit table Set limit test 3 5 3 1 Creating and Editing of Limit Line The analyzer support...

Page 56: ...default mode You can change the limit failure color in the Color setting of the right click menu of the mouse and the trace color of the passing part remains unchanged 1 Setting method a Menu path Ana...

Page 57: ...d in the csv format Limit type drop down option box Click this drop down option box to select the limit test type Four types are provided in total multi type limit line slope limit line single point l...

Page 58: ...warning sound and display the failure sign FAIL in case of the failure of ripple test When the ripple test function is enabled the trace of the failure part is red in the default mode You can change t...

Page 59: ...rt button Click it and the storage dialog box will pop up You can select the storage path and the file will be saved in the csv format Import button Click it and the storage dialog box will pop up Sel...

Page 60: ...hold NdB point maximum bandwidth and minimum bandwidth before the bandwidth test Several tracks can be set 1 Menu path Analysis Test BW test The test dialog box will appear 2 Tick the Bandwidth test o...

Page 61: ...on The user is allowed to enter an algebraic expression in the Equation Editor The algebraic expression can be used for mathematical operation of measurement data Operation results can be displayed in...

Page 62: ...the Equation Editor dialog box as shown in Fig 3 56 Fig 3 56 Equation Editor Menu 2 How to enter the formula in the Equation Editor dialog box a Function input Click the function list under Function a...

Page 63: ...te the right character If there is no character on the right side the marker position will remain unchanged 7 Selection of functions and variables The built in function library is set in the default m...

Page 64: ...the 2 j3 S11 the user should enter the expression 2 3 S11 for operation Table 3 11 List of Operators Addition operator Subtraction operator Multiplication operator Division operator Left bracket Righ...

Page 65: ...parameter otherwise the formula cannot be used for calculation 4 The reference trace must be the displayed trace if the trace of another channel is used as the reference trace The track must be used...

Page 66: ...t the saving path b File list box Display the holder under the current path and all files matching with the saving type Click one file to set its name Click the holder to change the current path c Fil...

Page 67: ...not be guaranteed c cst file All measurement status and calibration data of the instrument are saved in the cst file therefore the cst file can be called to save time 2 File calling Menu path File Ca...

Page 68: ...a or Unformatted to save the data file Close the dialog box Save contents zone Define the trace data to be saved into the file a Default radio box Save the data of active tracks in all windows b One t...

Page 69: ...e s1p or s2p in the Saving type box c Set the saving directory in the Save in box and File list box d Set the file name in the File name box e Click Save to save data 3 prn file The prn file is used t...

Page 70: ...breaks c Print active window radio box If this box is selected only the information of the current active window will be printed d Print all windows radio box If this box is selected only the informa...

Page 71: ...asurement Information 3 6 2 3 Printing into File The analyzer supports the output of print contents into the bitmap bmp file To print several pages various BMP files will be created automatically resp...

Page 72: ...Setting of data format and scale Observation of multiple tracks and opening of multiple channels Setting of analyzer display 4 1 Resetting of Analyzer Default reset state User reset state Resetting of...

Page 73: ...itude The details of various formats are shown in Table 4 1 Table 4 1 Default Format Setting of S3602 Series Vector Network Analyzers Format Scale Reference position Reference value Logarithmic amplit...

Page 74: ...R closed c Discrete marker closed d Format trace format e Type standard f Marker search type minimum g Search domain full bandwidth h Marker table empty 11 Limit test setting a Limit test closed b Li...

Page 75: ...us are as follows 1 Menu path System Define user state Then the Define user state dialog box will appear 2 Click Enable user reset status and tick the check box Notes a If you tick Save final status a...

Page 76: ...evice The S parameter is shown in the prescribed digit row and indicates the proportion of two complex vectors i e Soutput input including the amplitude and phase information The output refers to the...

Page 77: ...measurement SXX X 1 2 3 4 1 Return loss 2 Standing wave ratio SWR 3 reflection coefficient 4 Impedance 5 S11 S22 S33 and S44 b Transmission measurement SXY X 1 2 3 4 Y 1 2 3 4 X Y 1 Insertion loss 2 T...

Page 78: ...to create the balance parameter measurement trace d Channel selection box Select the channel where the new trace is located e Create in new window check box If this check box is selected a trace will...

Page 79: ...w trace dialog box any ratio and non ratio power measurement a Active check box Tick it to create a new trace b Numerator zone Select the numerator of any ratio measurement or the receiver for non rat...

Page 80: ...ick the Trace status button in the window The corresponding trace will be activated Fig 4 6 Change of trace Activation Status 2 Change the measurement parameter of the activated trace Menu path Respon...

Page 81: ...s to the power level of the output signal of the test port The power level indicators of the port of S3602 series vector network analyzer are as follows Table 4 2 Power Level Indicators of Source Outp...

Page 82: ...ope check box Click the Slope input box and enter the power slope 5 Power dialog box a Power ON off check box If this check box is ticked the port will normally output the power If this check box is c...

Page 83: ...ent In this case the matching source impedance better than the return loss of 20dB should be set within a wide frequency range f Attenuator bar Set the attenuation g Leveling Mode bar Set the fixed am...

Page 84: ...changes of measurement data with time are displayed 5 Segment Sweep Segment sweep aims to start sweep of several segments The power level IF bandwidth and sweep time of each segment can be set indepe...

Page 85: ...button click it to create and edit the sweep table e Hide table button click it to hide the segment sweep table 3 Segment insertion and deletion Only the displayed segment table can be edited Menu pa...

Page 86: ...e sweep in the auxiliary menu bar or select phase sweep in the Sweep type setting dialog box Fig 4 14 Setting of Sweep Type 4 5 3 Sweep Time After setting of measurement the minimum sweep time will be...

Page 87: ...his is only applicable to the step scanning mode d Sweep delay input box Set the waiting time of the analyzer before obtaining the measurement data It refers to the delay before measurement of the fir...

Page 88: ...om www salukitec com 88 Fig 4 17 Simple Trigger Setting 4 6 2 Detailed Trigger Setting Menu path Stimulus Trigger Trigger The trigger dialog box will appear Fig 4 18 Trigger Sub menu Fig 4 19 Trigger...

Page 89: ...ise the trigger may be enabled several times b Trigger Scope The measurement channel receiving the trigger signal is determined by trigger range setting Two types of trigger range can be set global an...

Page 90: ...he tracks sharing one source port in the channel will be triggered 2 Meas trigger options a Main trigger input zone Set the nature of the external trigger signal to be received in the trigger input zo...

Page 91: ...nt holding signal If this check box is ticked data will not be captured until the vector network analyzer receives the specific level from the auxiliary trigger input 1 2 connector of the rear panel T...

Page 92: ...signal will be input through the pulse input output interface of the rear panel of the analyzer The configurable synchronization trigger signal can be input to the analyzer according to the pulse syn...

Page 93: ...display the measurement information Data format Data format setting Scale 4 7 1 Data Format 1 Rectangular coordinate format Seven of nine formats of measurement data are in the rectangular coordinate...

Page 94: ...ission time through the tested device Y axis unit time second Applicable typical measurement group delay d Linear amplitude format Only display the positive value Y axis no unit U in ratio measurement...

Page 95: ...d by the displacement of this point relative to the central point or zero point In the default mode the amplitude is a linear scale and the excircle scale is set as 1 b The phase of any point is deter...

Page 96: ...t of Smith chart and horizontal axis have the same reactance d The reactance of the upper part of Smith chart is positive Therefore the upper part is the sensitive zone e The reactance of the lower pa...

Page 97: ...scales of all tracks in the window so that the tracks are better displayed in vertical grids of the window b Reference setting zone Reference position button The reference position refers to the posi...

Page 98: ...etting C Three tracks will be created in three windows of Channel 1 S11 will be displayed in the Smith chart format in Window 1 S22 in the Smith chart format in Window 2 and S21 in the logarithmic for...

Page 99: ...w b The display menu of the analyzer provides four kinds of window arrangement The existing tracks are distributed into different windows according to a certain algorithm One window arrangement All tr...

Page 100: ...screen including the following contents Current active channel Measurement parameter of active trace Mathematical operation of active trace Error correction status of active trace If the average func...

Page 101: ...Marker ON OFF check box Stimulus value Marker function marker maximum minimum value starting ending value and center span value Click the Stimulus value of the marker toolbar and rotate the knob on th...

Page 102: ...OFF check box sweep setting type Starting stimulus value Ending stimulus value More 2 Trigger toolbar display Menu path Response Display Point to the toolbar in the display sub menu Click the toolbar...

Page 103: ...nding stimulus value Starting and ending response value c Segment table Fig 4 35 Segment Table The segment table is used to display set and modify the segment sweep parameters including Status ON OFF...

Page 104: ...play Display time state a Title One title can be set for each window The title will be created through the title input dialog box and the entered title will be displayed in the upper left corner of th...

Page 105: ...ion is displayed in the upper right corner of each window on the screen The following information will be displayed Marker number Stimulus value Response value e Display time state If the display time...

Page 106: ...facilitate operation The menu system of S3602 series vector network analyzers is divided into the main menu primary menu secondary menu etc The analyzer can be directly and partially set and operated...

Page 107: ...2175 2930 Email sales salukitec com www salukitec com 107 Fig 5 1 File Menu Note Press the menu with an ellipsis to open the corresponding dialog box the same below 5 1 2 Trace Fig 5 2 trace Menu 5 1...

Page 108: ...Tel 886 2 2175 2930 Email sales salukitec com www salukitec com 108 Fig 5 3 Channel Menu 5 1 4 Stimulus Fig 5 4 stimulus Menu 5 1 5 Response...

Page 109: ...Tel 886 2 2175 2930 Email sales salukitec com www salukitec com 109...

Page 110: ...Tel 886 2 2175 2930 Email sales salukitec com www salukitec com 110 Fig 5 5 Response Menu 5 1 6 Calibration Fig 5 6 Calibration Menu 5 1 7 Marker...

Page 111: ...Tel 886 2 2175 2930 Email sales salukitec com www salukitec com 111 Fig 5 7 Marker Menu 5 1 8 Analysis Fig 5 8 Analysis Menu 5 1 9 System...

Page 112: ...ement display setting Calibration used for analyzer calibration and calibration setting marker used for relevant operations of the marker system Analysis used for analysis and statistics of test resul...

Page 113: ...f lower level or corresponding dialog box will appear For convenience the shortcut menu bar is set on the right side of the auxiliary menu bar including the commonly used menus Drag the shortcut bar p...

Page 114: ...ave the data file required by the user The data required by the user will be saved in different types of files The user can set the file name File types include state and calibration file CST state fi...

Page 115: ...the printer setting page Set the printer options paper and direction according to the prompts Parameter description None 2 Print into file Function description Click this menu to save the test curve a...

Page 116: ...corresponding trace state button to activate the trace 5 2 2 1 New Trace Function description Click this menu and the New trace dialog box will pop up The user can select different trace types includ...

Page 117: ...le select the Enable check box and click OK Thus the trace title is changed Parameter description None 5 2 2 5 Trace max Function description Click this menu to maximize the current active trace and h...

Page 118: ...ion description Click this menu and the Select channel list will pop up showing the existing channels The user can select the channel to be activated click Apply to select the channel and then click O...

Page 119: ...used to set the frequency Click it to enter the menu of lower level The specific menu includes Table 5 7 Frequency Freq Start Freq Stop center frequency Frequency span Frequency offset CW Frequency un...

Page 120: ...description 67GHz 10MHz 67GHz 3 Center frequency Function description Set the center point of sweep frequency Set and adjust the parameter by the mouse keyboard or the knob number keys and stepping ke...

Page 121: ...e 5 8 Power Menu Power Power and attenuation Power unit All power parameters are in dBm Click OK on the panel after entering Thus the power setting is completed 1 Power Function description Set the po...

Page 122: ...cy Set and adjust the parameter by the mouse keyboard or the knob number keys and stepping keys on the front panel Reference note 201points 198ms 198ms 86400s 2 Number of sweep points Function descrip...

Page 123: ...s Pulse rising falling time 30ns 6 Segment table This menu is used for relevant setting of the segment table Click it to enter the menu of lower level The specific menu includes Table 5 10 Segment Tab...

Page 124: ...ete all Segment Function description Delete all segment Parameter description None 5 Show Table Function description Show segment table Parameter description None f Hide table Function description Hid...

Page 125: ...on None 2 Single Function description If this menu is selected the system will automatically enter the holding mode after sweep once Parameter description None 3 Continuous Function description If thi...

Page 126: ...lated menu will pop up Specific items include Measurement Format Scale Display and Average The specific description of menu items is as follows 5 2 5 1 Measurement This menu is used to set measurement...

Page 127: ...option setting interface such as the mixer measurement Parameter description None 4 Measurement receiver Function description Select this menu to select the receiver parameter such as R1 R2 A B etc P...

Page 128: ...ry Polar coordinate Positive phase Imped Format 1 Log Mag Function description Select this menu to sweep in the logarithmic format Parameter description None 2 Phase Function description Select this m...

Page 129: ...Parameter description None 6 Lin Mag Function description Select this menu to display the linear amplitude curve Parameter description None 7 SWR Function description Select this menu to display the s...

Page 130: ...to display the positive phase curve Parameter description None 12 Imped Function description Select this menu to display the impedance curve Parameter description None 13 Format Function description...

Page 131: ...e scale factor will be selected so that data can be displayed in 80 of the screen Select the center value of the trace on the screen according to the reference value Parameter description None 2 Autos...

Page 132: ...arameter by the mouse keyboard or the knob number keys and stepping keys on the front panel Parameter description 0 1000 to 1000 6 Mag Offset Function description Select this menu to set the amplitude...

Page 133: ...window two window three window four window display Parameter description None 9 Window Function description Select this menu to create more windows and close unnecessary windows Parameter description...

Page 134: ...ulus state marker display display time etc Parameter description None 3 Soft key calibration ON OFF Function description Select this menu to calibrate keys in the soft keyboard form to facilitate the...

Page 135: ...description None 9 Table Function description Select this menu to display the marker table limit table and segment table Parameter description None 5 2 5 5 Average This menu is used to set the scale...

Page 136: ...duction of the IF bandwidth Parameter description OFF OFF ON 4 Smoothing This menu is used for smoothing setting Click it to enter the menu of lower level The specific menu includes Table 5 17 Smoothi...

Page 137: ...front panel Parameter description 1kHz 1Hz 5MHz 5 2 6 Calibration Press the Calibration key on the front panel or the Calibration menu item on the user interface The calibration related menu will pop...

Page 138: ...extension For the method of port extension setting refer to the section of port extension in 5 5 Improvement of Phase Measurement Accuracy Parameter description None 5 2 6 5 Fixture This menu is used...

Page 139: ...ng Function description Select this menu to enable the four port fixture de embedding embedding function For setting of port impedance conversion refer to 7 9 6 Four port fixture de embedding embeddin...

Page 140: ...specific description of menu items is as follows 5 2 7 1 Marker This menu is used to set the marker Click it to enter the menu of lower level The specific menu includes Table 5 19 Marker Marker Marke...

Page 141: ...fic menu includes Table 5 20 Marker Function Marker start Marker stop Marker center Marker span Marker ref level Marker delay 1 Marker start Function description Select this menu to set the frequency...

Page 142: ...the active marker as the power reference value Parameter description None 6 Marker delay Function description Select this menu to normalize the group delay of active marker points into 0 Parameter de...

Page 143: ...nu is used to set the peak search Click it to enter the menu of lower level The specific menu includes Table 5 22 Peak Value Next peak value Right peak value Left peak value Peak valley type Threshold...

Page 144: ...tion Function description Select this menu to define the minimum vertical distance between the peak value and valley value The vertical distance between the effective peak value and valley values on b...

Page 145: ...and adjust the parameter by the mouse keyboard or the knob number keys and stepping keys on the front panel Parameter description 3dB 500dB 500dB c Trace ON OFF Function description Select this menu t...

Page 146: ...ce percentage Trace ON OFF a Filter test ON OFF Function description Select this menu to enable the filter test function Parameter description OFF OFF ON b Bandwidth level Function description Select...

Page 147: ...ON OFF Advanced marker 1 marker ON OFF Function description Select this menu to enable the marker function Parameter description OFF OFF ON 2 Discrete ON OFF Function description Select this menu to...

Page 148: ...iption OFF OFF ON 5 Advanced marker Function description Select this menu to enter the shortcut menu of advanced marker Parameter description None 5 2 7 5 Marker display This menu is used to set the m...

Page 149: ...escription Select this menu to set the horizontal position of the marker Set and adjust the parameter by the mouse keyboard or the knob number keys and stepping keys on the front panel Parameter descr...

Page 150: ...data into the memory Parameter description None 2 Normalization Function description Select this menu to save the current test curve data into the memory and perform data memory operation Parameter d...

Page 151: ...e and memory trace curve Parameter description None 7 Hide trace Function description Select this menu to hide the data trace and memory trace Parameter description None 5 2 8 2 Test This menu is used...

Page 152: ...e display ON OFF Function description Select this menu to enable the limit line display function Clear this menu to close the function of limit line display of the active trace Parameter description O...

Page 153: ...able FAIL sign ON OFF g Ripple test ON OFF Function description Select this menu to enable the ripple test function Clear this menu to close the function of ripple test of the active trace Parameter d...

Page 154: ...L sign function In case of failure of the trace data point test the FAIL sign will appear on the screen Parameter description OFF OFF ON 2 Bandwidth test This menu is used to set the bandwidth test Cl...

Page 155: ...owable minimum bandwidth If the test bandwidth is less than the minimum value the prompt of bandwidth test failure FAIL will appear on the screen or the prompt sound will be sent so that the user can...

Page 156: ...ve trace statistics Parameter description Select this menu to enter the interface of curve trace statistics Three functions of trace statistics are provided average value deviation value and peak peak...

Page 157: ...on Select this menu to set the center value of the gate Parameter description 0ns 14 825797ns 14 825797ns 5 Gate span Function description Select this menu to set the span value of the gate Parameter...

Page 158: ...ime Center time Time span Time domain transformation Time domain window Couple setting Time domain toolbar 1 Time domain ON OFF Function description Select this menu to enable the time domain function...

Page 159: ...me domain transformation gate window and options can be set Parameter description None 7 Time domain window Function description Select this menu to enter the window of time domain transformation func...

Page 160: ...Z 1 SRL ON OFF Function description Select this menu to enable the SRL function Parameter description OFF OFF ON 2 Port connector 1 2 3 4 Function description Select this menu to set the length and ca...

Page 161: ...op up Specific items include Configuration Record Run 1 Record Run 2 Windows task bar Reset Custom user reset state Language CN EN and Spread spectrum The specific description of menu items is as foll...

Page 162: ...the current time name Not automatically save after calibration Display marker on all the existing tracks Display limit test on all the existing tracks Press the UP DOWN key to change the marker point...

Page 163: ...un 2 Function description Select this menu to automatically start recording If recording has been done press this key to automatically start running Parameter description None 5 2 9 4 Windows Task Bar...

Page 164: ...manual Technical support Error information and About The specific description of menu items is as follows 5 2 10 1 Quick Start Manual Function description Open the quick start manual Parameter descri...

Page 165: ...886 2 2175 2930 Email sales salukitec com www salukitec com 165 Function description Select this menu to view the basic information of the instrument and the company information Parameter description...

Page 166: ...io dB GHz can be used in this function to increase the source power of the analyzer The process of cable loss compensation is as follows Menu path Stimulus Power If the power slope function is not act...

Page 167: ...be calibrated Therefore the load matching error must be minimized Connect the unmeasured port in the following methods Connect the unmeasured port of the tested device to one high performance terminal...

Page 168: ...158 Attenuator Insertion loss AIL 10dB 316 SWR ASWR 1 05 024 Return loss 32 26dB Without attenuator With attenuator NA FIL NALM FIL 891 1 26 891 100 FIL AIL NALM AIL FIL 891 3 16 1 26 3 16 891 010 Att...

Page 169: ...ment such as the filter passband and stop band it is important to increase the dynamic range Fig 6 3 is a typical dynamic range of measurement Fig 6 3 Dynamic Range In order to reduce the instability...

Page 170: ...iver can be reduced so as to reduce the influence of random noise in measurement Once the IF bandwidth is reduced by 10 times the base noise will be reduced by 10dB However the smaller the IF bandwidt...

Page 171: ...a group of new average sweep 6 4 Improvement of Measurement Results of Electrical Long Device The frequency of the signal from the tested device may be different from the frequency of the signal into...

Page 172: ...er in the sub menu or click Custom Enter the value in the Number of sweep points dialog box or select the value with the arrow 2 Use of step sweep Change analog sweep into step sweep so that the sourc...

Page 173: ...it device can be used instead of the tested device on the reference plane after extension Generally the new reference plane is regarded in the open circuit state after removal of the tested device 3 T...

Page 174: ...te that this speed factor is the same as that of the system Coaxial set the coaxial characteristics of the current port extension Waveguide and Cutoff frequency set the waveguide characteristics of th...

Page 175: ...tically calculate the loss arising from the current port extension Compensation mismatch select it to automatically compensate the error arising from mismatch Prompt of calibration kit connection if t...

Page 176: ...e measurement results of 51 points and the group delay is negative But this is impossible in the actual situation as the response will not be below the reference line 0s b The second figure shows the...

Page 177: ...the typical light speed in the Teflon medium You can perform the following operation to check whether the sufficient delay is added Connect one short circuit device Adjust the port extension until the...

Page 178: ...al continuous sweep operations The times of continuous sweep are determined according to the setting of the averaging factor c The average value of tracks will be applied on all measurements of one ch...

Page 179: ...of the smoothing function Use sufficient points in the display to avoid misleading results The smoothing function must not be applied to the highly resonant device or the device subject to broad trac...

Page 180: ...etwork analyzer can change the received signal from the RF microwave frequency into the IF 7 606MHz The bandwidth of the IF band pass filter can be reduced from 5MHz to 1Hz min The IF bandwidth can be...

Page 181: ...cale Instead it is affected by other factors such as the flyback time data calculation formation time etc Refer to the technical specifications for the influence of the point number and other settings...

Page 182: ...reate a stable measurement environment The following factors have adverse effects on the measurement accuracy 1 frequency offset The frequency precision of the analyzer depends on the accuracy of the...

Page 183: ...methods a Check and clean the connectors of all components in the test equipment b Apply the correct connection method c Do not move the cable during measurement 5 Apply the external reference frequen...

Page 184: ...ng method in 4 5 3 sweep time of 4 5 Setting of sweep Number of sweep points use the minimum number required in measurement See the setting method in 6 7 Increase of Data Point Number 2 Setting of noi...

Page 185: ...speed and conforming measurement results a Delete the unnecessary trace Right click the mouse on the status bar button used to delete the trace The right click menu will appear Click Delete trace in...

Page 186: ...moothing function Fig 6 21 Shutdown of Smoothing Function d Shutdown of limit test Menu path Analysis Limit test The Limit test dialog box will appear Click Limit test ON off check box to shut down th...

Page 187: ...ils in Setting of preconfigured measurement of 4 8 Observation of multiple tracks and opening of multiple channels 2 Apply the segment sweep function Segment sweep can be applied to change the followi...

Page 188: ...toolbar Measurement data of Channel 2 will be updated 6 10 2 Automatic Change of Measurement setups Automatically change Measurement setupss by means of programming to effectively improve the efficien...

Page 189: ...measurement using SCPI so as to achieve the highest transmission speed 6 11 4 Use of LAN Use the LAN to increase the data transmission speed in the automatic SCPI measurement application 6 11 5 Use of...

Page 190: ...e macro title in the current toolbar button the number of title characters should not exceed 14 The macro title can be associated with the executable file It is better to describe the macro function s...

Page 191: ...log box 1 Macro name box Set the macro title name 2 Editing zone a Executable file box Set the full path of the executable file b Browse button Browse the drive and director position the executable fi...

Page 192: ...an be done according to the calibration guide of the calibration See details in 7 3 Calibration Guide The measurement accuracy after calibration depends on the quality of the calibration standard and...

Page 193: ...t and measure the tested device If error correction is applied during measurement the error influence will be eliminated 7 2 Selection of Calibration Type S3602 series vector network analyzers support...

Page 194: ...ission tracking Crosstalk e Measurement application Transmission measurement in any direction Improvement of the dynamic range of the system by means of isolation calibration Isolation calibration Iso...

Page 195: ...alibration process this kind of calibration is effective only in transmission measurement Enable the calibration guide for calibration 1 Menu path Calibration Calibration The Calibration guide dialog...

Page 196: ...the calibration standard and click OK to close the dialog box Fig 7 5 Type information Dialog Box 6 To directly connect Port 1 and 2 through the cable click Through and THRU After connection click OK...

Page 197: ...h type response and isolation calibration dialog box after calibration Fig 7 8 Through type response and isolation calibration Dialog Box Notes 1 The optional calibration type is associated with the m...

Page 198: ...t from calibration settings calibration data can be automatically interpolated into the analyzer In this case the measurement accuracy cannot be predicted and may drop greatly or not be affected The m...

Page 199: ...ow carefully the measurement is done The following kinds of errors may be produced in measurement with the analyzer 7 5 1 Drift Errors Drift errors are produced by performance changes of the instrumen...

Page 200: ...l errors include Crosstalk Effective load matching Effective transmission measurement 1 Direction errors The directional coupler or bridge is used for reflection measurement The coupling end of the id...

Page 201: ...include the reflection signals of Port 2 Thus load matching errors can be determined Eliminate source matching errors by means of error correction in reflection and transmission measurement 5 Reflect...

Page 202: ...ialog box 7 6 1 Calibration Kit Definition Each standard calibration kit represented by the standard kit ID is a specific and accurately defined physical device For example ID1 of 85056A calibration k...

Page 203: ...and click OK to close the dialog box Then it is not allowed to edit connector information g The connector of the other polarity can be added by click Add in the connector type zone of the Edit calibra...

Page 204: ...odify the selected calibration kit definition e Delete calibration kit button Delete the selected calibration kit definition f Recover calibration kit button Recover the modification of the selected c...

Page 205: ...g to the type b Edit type button Click it and the Type information dialog box to set the type of the calibration kit 4 Standard zone a Calibration kit box Display the ID name and description of the ca...

Page 206: ...mum frequency box Define the allowable minimum frequency of the standard calibration kit in calibration b Maximum frequency box Define the allowable maximum frequency of the standard calibration kit i...

Page 207: ...ected standard calibration kits box All the standard calibration kits in the Selected standard calibration kits box will appear in the Measurement of multiple standard kits dialog box Select the corre...

Page 208: ...Maximum frequency box Define the maximum working frequency of the open circuit device in calibration 3 Connector zone Define the connector polarity of the open circuit device male female or no gender...

Page 209: ...dance of the standard calibration kit 7 6 10 Short circuit device Dialog Box Fig 7 16 Short circuit device Dialog Box 1 Short circuit characteristic zone Define the residual inductance of the short ci...

Page 210: ...wo ports of the standard calibration kit in the Port 1 and Port 2 box 7 7 7 7 Standard Calibration Kit This section mainly introduces the basic principle of the calibration kit and some terms in the c...

Page 211: ...c Z0 Specify the characteristic impedance of the standard calibration kit instead of the characteristic impedance of the system or the terminal impedance of the standard calibration kit d Delay Specif...

Page 212: ...on kits are required for the transmission line at 2GHz to 26GHz The standard calibration kits for the transmission line should be particularly long at low frequency 2 TRL standard calibration kit Thre...

Page 213: ...ing de embedding in the mathematical sense It can be used to simulate various measurements based on measurement results in applications and also rapidly simulate the corresponding measurement results...

Page 214: ...e saved in this file Circuit parameter model The impedance of the components and circuits should be matched in the microwave component and circuit design phase Generally the conjugate matching circuit...

Page 215: ...tic Diagram of Port Matching take the 2 port tested device as an example 1 Port Matching dialog box Fig 7 22 Port Matching Interface a Port selection drop down menu Select the port number of the match...

Page 216: ...the Matching circuit type drop down menu is selected this button will be available Click this button and select the S2P file for import of fixture S parameters in the pop up dialog box After the file...

Page 217: ...parameter models and custom mode The schematic diagram is shown in the Circuit box If the circuit parameter model is selected as the circuit type edit the corresponding capacitance inductance resista...

Page 218: ...e name will be display in the box on the right side of the Import file button At the same time the relevant maximum minimum frequency will be updated on the frequency range display bar of the vector n...

Page 219: ...heck box to turn the power in the custom S2P file The corresponding schematic diagram will change accordingly Click OK to complete the setting 7 9 5 Port impedance conversion The measurement result wi...

Page 220: ...u Select the fixture embedding de embedding mode The vector network analyzer is configured with three network models Mode A B and C Fig 7 28 Three Modes of Fixture Embedding De embedding b Network emb...

Page 221: ...the electronic calibration kit through the network analyzer and calculation according to the fixed value of the electronic calibration kit The accuracy of electronic calibration is close to that of me...

Page 222: ...of SAV2040X Electronic Calibration Kit Precautions of electronic calibration 1 Do not disconnect or insert or connect the USB interface equipment during communication with the USB interface Do not pul...

Page 223: ...lectronic calibration kit reaches the set temperature the red READY indicator will be ON the preheating time is related to the ambient temperature 2 According to the characteristics of the tested devi...

Page 224: ...ng figure If this option is not ticked calibration will be done directly according to the set connection mode If the frequency measurement range set in the vector network analyzer is beyond the freque...

Page 225: ...ted light Fig 8 1 Light Reflection and Transmission The RF signal will be reflected if the impedance of two connectors is different from each other Reflection measurement is a process to measure the r...

Page 226: ...n line is connected with characteristic impedance all the energy will be transmitted to the load with no energy reflection 0 If the transmission line is connected through the open circuit device or sh...

Page 227: ...ifference at the resistor The phase relationship changes with the distance of the end resistor along the transmission line The valley of the standing wave figure is not approaching zero and the peak i...

Page 228: ...rement If the element and circuit are used to transmit signals in the communication system signal distortion must be within the normal limits The signal distortion can be divided into two types 1 Line...

Page 229: ...ed and the group delay is calculated according to the derivative of the measured phase response See details in 8 5 Group Delay 8 2 5 Linear phase offset and Group Delay The linear phase offset and gro...

Page 230: ...rature and bias The gain drift refers to the maximum gain change over time with the other parameters unchanged It is a function of the time The gain drift related to other parameters can be measured s...

Page 231: ...an be observed in S11 or S22 measurement of the tested device including the phase and amplitude information such as the series resistance series reactance and impedance in the Smith chart or polar coo...

Page 232: ...t the analyzer 2 Set and calibrate the analyzer 3 Connector shown in Fig 8 10 for S11 or S22 measurement 4 Observe the impedance data a Select the Smith chart format b Set the scale of the displayed m...

Page 233: ...includes the linear phase shift component and high order phase shift component 1 Linear phase shift component refer to the average transition time of the signal indicating the electrical length of th...

Page 234: ...g to the phase ripple slope The phase ripple slope depends on the ripple quantity within the unit frequency 8 5 3 What is the aperture of group delay The analyzer will measure the phase of two adjacen...

Page 235: ...t of the device of long electrical delay Adjust the following settings until the measurement trace does not change so as to ensure that the phase difference of two adjacent points is less than 180 1 I...

Page 236: ...elevant frequency through the marker 10 Print or save the data 8 6 Absolute Output Power The absolute output power is the relationship between the displayed absolute power dBm or W and frequency 8 6 1...

Page 237: ...the amplifier so as to prevent the receiver on Port 2 of the analyzer from compression or burning Fig 8 17 Connection in Absolute Output Power Measurement 1 Select the analyzer settings corresponding...

Page 238: ...in AM PM transformation Fig 8 18 Bit Errors in AM PM Transformation 1 The expected state change is from the small solid line vector into large solid line vector 2 As a result of AM PM transformation t...

Page 239: ...be within the linear zone generally at least 10dB less than the 1dB compression point of the amplifier response and the ending power level should be within the compression zone of the amplifier respon...

Page 240: ...in measurement This can be realized by the electrical delay function of the analyzer If the electrical length of the tested device is removed mathematically the linear phase offset or phase distortio...

Page 241: ...phase trace flat 8 Read the linear phase offset through the marker 9 Print or save the data 8 9 Reverse Isolation Reverse isolation aims to measure the reverse transmission response from the output t...

Page 242: ...hrough type response and isolation calibration can be implemented to reduce crosstalk errors Use the same averaging factor and IF bandwidth during calibration and measurement 2 The frequency response...

Page 243: ...stem 8 10 4 Factors Related to Measurement Accuracy 1 If the temperature varies the amplifier response may be thoroughly difference The test should be done at the working temperature of the amplifier...

Page 244: ...ed amplifier 7 Remove and calibrate the amplifier The attenuator coupler and cable used in measurement must be included in calibration 8 Reconnect the amplifier 9 Set the scale of measurement display...

Page 245: ...ort on the rear panel of the instrument For details refer to 9 1 1 1 LAN Interface GPIB IEC IEEE Bus Interface GPIB primaryaddress INSTR Remote control can be realized by the connecting the instrument...

Page 246: ...instrument INSTR refers to the instrument source type optional port refers to the socket port number SOCKET refers to the original network socket resource class Example If the IP address of the instru...

Page 247: ...ls visit the IEEE website http www ieee org The byte is used in information processing of GPIB The data transmission rate can reach 8MBps Therefore the speed of data transmission of GPIB is high The d...

Page 248: ...eter query The query command ends with a suffix question mark According to the definition in the standard General command the function and grammar are defined in the IEEE488 2 standard and this kind o...

Page 249: ...Command Classification of the program control manual 9 1 3 2 SCPI Command Specifications 1 General Terms The following terms are applicable to this section In order to better understand the contents y...

Page 250: ...des relevant power commands and the status subsystem STATus includes the status control register commands Fig 9 1 Types of SCPI Commands 3 Grammar of special instrument command A typical command is ma...

Page 251: ...b is generally ignored when not used between or in keywords However you must use the blank character to separate the command and parameter with no influence on the current path FREQuency or POWer LEVe...

Page 252: ...returned response data will be 5 00000000000e 000 no matter the setting command is SOUR POW LEV IMM AMP 5 or SOUR POW 5 Table 9 4 SCPI Command Parameters and Response Types Parameter type Response Da...

Page 253: ...Discrete parameters are used to identify a limited number of parameters to be set Discrete parameters use mnemonics to represent each valid setting Similar to the programmed command mnemonics discrete...

Page 254: ...se Data String response data are similar to string parameters The main difference is that the double quotation marks instead of single quotation marks must be used as the separator of the string respo...

Page 255: ...em The second command is started at the level lower than the HCOP command and the colon at the beginning of the command can be omitted The command line can be abbreviated as follows HCOP ITEM ALL IMM...

Page 256: ...three commands in synchronous execution is shown in the following table Table 9 5 Command Grammar Method Execution Action Programming Method OPC After command execution set the operation completion b...

Page 257: ...gisters defined by the SCPI standard including specific operations of the instrument All the SCPI status registers have the same internal structure refer to 2 1 5 2 Structure of SCPI Status Register o...

Page 258: ...der to properly realize the functions of the status report system the controller in the test system must receive and evaluate the information of all instruments Standard methods to be applied include...

Page 259: ...sed by the controller program so as to find more accurate causes The queue should be always inquired in the controller program test phase to obtain the commands sent by the controller to the instrumen...

Page 260: ...r Ensure normal physical connection of the vector network analyzer through the 10Base TLAN or 100Base TLAN cable The vector network analyzer only supports the establishment of one LAN control system a...

Page 261: ...g on Rear Panel of Instrument 9 2 3 2 Interface Configuration To build a system with the vector network analyzer the user should obtain the VID PID and serial number of the USB address In the default...

Page 262: ...nsmission functions of the bottom VXI GPIB LAN and USB interface to facilitate direct calling The vector network analyzer supports the following programmed interfaces GPIB LAN and RS 232 Such interfac...

Page 263: ...manager and return the instrument handle to the analyzer void InitController ViStatus status status viOpenDefaultRM defaultRM status viOpen defaultRM analyzerString VI_NULL VI_NULL analyzer 9 3 2 3 I...

Page 264: ...02 series vector network analyzers void SweepSettings ViStatus status long retCnt selection of measurement status viWrite analyzer CALC PAR SEL CH1_WIN1_LINE1 n 50 retCnt set the scanning type as line...

Page 265: ...of measurement status viWrite analyzer CALC PAR SEL CH1_WIN1_LINE1 n 50 retCnt set the data format as logarithmic amplitude format status viWrite analyzer CALCulate1 FORMat MLOG n 30 retCnt display th...

Page 266: ...smoothing aperture as 20 status viWrite analyzer CALCulate1 SMOothing STATe ON n 40 retCnt status viWrite analyzer CALCulate1 SMOothing APERture 20 n 40 retCnt 9 3 4 Reading of Measurement Instrument...

Page 267: ...UNCtion EXECute MAXimum n 25 retCnt read the X axis information status viWrite analyzer CALC MARK X 15 retCnt status viRead analyzer rd_Buf_Marker 30 retCnt read the Y axis coordinate information stat...

Page 268: ...the first point imaginary part of the first point real part of the second point imaginary part of the second point status viWrite analyzer CALCulate DATA SDATA n 30 retCnt status viRead analyzer rd_B...

Page 269: ...tinues 9 4 I O Library 9 4 1 Overview of I O Library The I O library is a library of pre written software programs for the instrument known as the instrument drive program i e instrument driver It is...

Page 270: ...h applications in the test field the I O library has experienced various development phases from the traditional instrument to virtual instrument In order ensure the instrument interchangeability in t...

Page 271: ...r to the help file of the driver Port configuration and I O library installation Before controlling the vector network analyzer with a computer check whether the necessary port and I O library are pro...

Page 272: ...ct us immediately in case of any trouble For the vector network analyzer within the warranty period we will implement free repair according to the commitments in the warranty otherwise we will charge...

Page 273: ...ter tester module is a signal separator to separate the incident signal reflected signal and transmitted signal of the tested device In the mixed frequency receiver module the incident reflected and t...

Page 274: ...on program in the root directory of Disc D or E Reinstall the vector network analyzer program 10 2 2 Curve Display Anomaly The curve display anomaly is caused for various reasons At first check whethe...

Page 275: ...in operation indicates operation or hardware problems All prompt warning and error events in operation are recorded in the error log of the vector network analyzer Using the error log the user can vi...

Page 276: ...not be done as a result of failure to complete all standard measurements This may be caused by enabling of the error correction function before all standard measurements for calibration 515 Prompt The...

Page 277: ...aused if one undesired standard calibration kit is measured during calibration 528 Prompt The electrical calibration system cannot be configured Check whether the module is connected properly Before e...

Page 278: ...f access to the electrical calibration module 553 Prompt Hardware error failure to release the LPT port Restart the instrument 554 Prompt Hardware error error of the vector network analyzer 555 Prompt...

Page 279: ...ng conflict the analyzer address must be 0 30 586 Prompt Setting conflict wrong print port driver or USB driven dynamic library 587 Prompt Grammar error the ECAL DELAY must include two digits 588 Prom...

Page 280: ...when the calibration type is valid and the appropriate calibration type is selected 609 Error Fail to achieve the calibration characteristics The specified calibration kit may be one of the optional...

Page 281: ...The calibration set is not available as a result of version nonconformity This may be caused by software upgrading 638 Error Incompatible calibration set x of y the saved calibration set is loaded Som...

Page 282: ...red power The indicated power is not accurate 856 Error The LO amplitude is not stabilized 859 Error YIG calibration fails The internal auto calibration tuning of the YIG oscillator fails 861 Error Th...

Page 283: ...completed COM programming information The sweep averaging is not completed and the value does not reach the set averaging factor 1037 Prompt At least three points are required for time domain transfo...

Page 284: ...alid and shut down 1116 Warning The non ratio power measurement is required for receiver power calibration 1117 Warning The source power calibration mode matching the channel and source port is not fo...

Page 285: ...The command in x must be queried 1420 Error The actual character number entered in x does not conform to the requirements 1421 Error The entered ASCII code is wrong 1422 Error The scientific input in...

Page 286: ...ed marker does not exist 1626 Prompt The specified window exists 1792 Prompt sweep is completed 1793 Prompt All trigger requests are completed 1794 Prompt The marker bandwidth is not found The trace c...

Page 287: ...ng points should be 401 in the logarithmic sweep mode 1878 Error The set point number is larger than the allowable number in the logarithmic sweep mode The maximum number of sweep points should be 401...

Page 288: ...ess Macro Local to retest the network analyzer Refer to the LCL and RMT operation 2072 Error The range setting is wrong 2073 Error The configuration has been changed Perform sweep again The trace conf...

Page 289: ...xist 2128 Error The specified file is not found 2129 Error WINNT anomalies occur in the automatic control layer 2130 Error Invalid port 2131 Error No printer is found 2132 Error Manual trigger is igno...

Page 290: ...ogram especially CPU board upgrading 2155 Error Power supply service x 2156 Error GPIB drive cannot be loaded or unloaded 2157 Error GPIB drive cannot be loaded or unloaded 2158 Error GPIB drive is lo...

Page 291: ...ration The pressure should be the atmospheric pressure Different models and options S3602A B C D E are respectively used to test the frequency of 13 5GHz 26 5GHz 43 5GHz 50GHz 67GHz S3602A B C D E of...

Page 292: ...Hz 6dBm 9dBm 4dBm 5dBm 20GHz to 26 5GHz 4dBm 2dBm 2dBm 0dBm Table 11 2 2 Maximum Output Power Indicator of S3602C D Test Port Description Standard Option 400 Option 201 401 402 Port 1 3 Port 2 4 Port...

Page 293: ...1 7 Output Power Sweep Range Table 11 3 Indicators of S3602A B Power sweep Range Frequency Range Power Sweep Range S3602A B S3602C D S3602E 10MHz f 50MHz 33dB 32dB 32dB 50MHz f 4GHz 30dB 29dB 29dB 4GH...

Page 294: ...tors of System Power setting maximum port output power IF bandwidth 1Hz 23 3 Frequency range Dynamic Range of System S3602A B S3602C D S3602E 10MHz f 1GHz 90dB 74dB 74dB 1GHz f 4GHz 120dB 119dB 90dB 4...

Page 295: ...of S3602C D Power setting 5dBm IF bandwidth 10Hz 23 3 Frequency range 10MHz f 2GHz 2GHz f 13 5GHz 13 5GHz f 40GHz 40GHz f 67GHz Transmission tracking 0 10dB 0 11dB 0 16dB 0 20dB Reflection tracking 0...

Page 296: ...omatic search on the measurement curve such as the maximum value minimum value right peak value left peak value etc b function used to read the difference between the current marker and reference mark...

Page 297: ...files can be saved state calibration files cst state files sta calibration files cal data files dat cti s1p s2p s3p and s4p table files prn and graphical files bmp and jpg 11 1 27 Port Type S3602A B 3...

Page 298: ...tive load matching Test of rising falling time of pulse modulation Test of pulse modulation switching ratio 11 2 1 Test of Frequency Accuracy 11 2 1 1 Items of Frequency Accuracy Test Test the frequen...

Page 299: ...of Port Output Harmonic Suppression 11 2 3 1 Items of Test of Port Output Harmonic Suppression Test the harmonic suppression indicators of frequency sweep signals output by the port of S3602 series ve...

Page 300: ...d the ENTER key 4 Press Scanning Sweep type CW Frequency and enter 10MHz Set the corresponding test frequency of the spectrum analyzer and record the reading of the spectrum analyzer Search the maximu...

Page 301: ...yzers 11 2 6 2 Instrument and Accessories for Test of Port Output Power Accuracy 1 Power meter ML2437A 2 Power probe MA2475A 11 2 6 3 Steps of Test of Port Output Power Accuracy 1 As shown in Fig 11 4...

Page 302: ...602 series vector network analyzers 11 2 8 2 Instrument and Accessories for Test of Port Output Power Linearity 1 Soft test cable Agilent 85131F AV3602A B or FE0BN0BM025 0 AV3602C D 11 2 8 3 eps of Te...

Page 303: ...tep by step and observe the marker value until the 1dB compression point appears 8 Change the frequency value and repeat Step 5 to 7 to measure the 1dB compression level of other frequency points 9 Co...

Page 304: ...he screen 3 Change the frequency value and repeat Step 4 to 13 Measure the trace noise value of other frequency points 11 2 11 Dynamic Range Test of System 11 2 11 1 Items of Dynamic Range Test of Sys...

Page 305: ...within each frequency range is the dynamic range of Port 1 Fig 11 8 Block Diagram I of Dynamic Range Calibration Test of System Fig 11 9 Block Diagram II of Dynamic Range Calibration Test of System Te...

Page 306: ...11 2 12 2 Instrument and Accessories for Test of Transmission Tracking Reflection Tracking Effective Source Matching Effective Direction and Effective Load Matching 1 Coaxial calibration kit AV31121 A...

Page 307: ...o start through type calibration 12 Wait for the calibration completed and disconnect the test cable Now the instrument now is ready to be tested Fig 11 13 Block Diagram II of Connection of Full 2 por...

Page 308: ...1 3 Repeat step 2 and complete the test for full frequency range of the instrument Test of effective load matching of Port 2 1 Click Measurement S22 2 Select Marker search Change frequency span Searc...

Page 309: ...ue and enter 50 3 Select Marker search Change frequency span Search the Maximum within the span The effective source matching value of the test port 2 is the difference of the obtained marker value mi...

Page 310: ...alue of the test port 3 Test of reflection tracking of Port 4 19 Connect the short circuit device to the test cable end face of the test port 4 Click Measurement S44 Then click Analysis Memory Normali...

Page 311: ...to 5 6 Read the measurement result of the peak power meter 11 2 14 Pulse Modulation Switching Ratio Test 11 2 14 1 Items of Pulse Modulation Switching Ratio Test Test the switching ratio indicators of...

Page 312: ...nal is low and the instrument works in the Pulse OFF mode Measure the signal power P OFF with the spectrum analyzer and record it 6 Calculate the difference of the power values measured in the Pulse O...

Reviews: