73
Basic
O
perations
Making/Receiving
Videophone
Calls
Making a Videophone Call
1
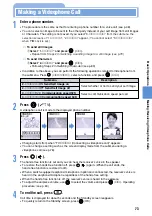
Enter a phone number.
•
The procedure is the same as that for entering a phone number for a voice call (see p.48).
•
You can select an image to be sent to the other party instead of your self image from still images
or Chara-den. The setting is not saved. If you select “3.
代替画像選択
” from the submenu, the
selection screens of “1.
イメージ
”, “2.
キャラ電
” appear. (You cannot select “3.
代替画像選択
”
when PIM Lock is set.)
■
To send still images
1
Select “1.
イメージ
” and press
(
選択
).
•
Repeat from Steps 2 in
Switching a sending image to a still image (see p.79)
■
To send Chara-den
1
Select “2.
キャラ電
” and press
(
選択
).
•
Following Steps 2 in
Switching Chara-den (see p.83)
•
In addition to the above, you can perform the following operations related to Videophone from
the submenu. Press
(
サブメニュー
)
, select a function, and press
(
選択
):
2
Press (
).
A videophone call is made to the displayed phone number.
•
Charging starts from when “
TV電話接続
(Connecting a videophone call)” appears.
•
You can change a setting such as the screen display mode from the submenu during a
videophone call (see p.78).
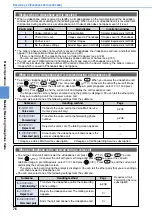
Submenu
2.
自画像送信OFF
Send Self Image off
2.
自画像送信ON
Send Self Image on
Description
Select whether or not to send your self image.
4.
通信速度64K
Communication speed 64 K
4.
通信速度32K
Communication speed 32 K
Select a communication speed per call.
TV
3
Press (
).
The hands-free function is set and you can hear the receiver’s voice in the speaker.
•
To restore the hands-free function off, press
(
) again. (When the call ends, the
hands-free function is restored to off).
•
When a switch-equipped earphone/microphone (optional) is connected, the receiver’s voice is
heard in the earphone/microphone regardless of the hands-free setting.
•
When the hands-free function is off, the receiver’s voice is heard in the earpiece.
•
To adjust the earpiece volume, use
to select the volume and press
(
設定
). Operating
procedure: (see p.60)
4
To end the call, press
.
Call time is displayed for about 5 seconds and the Standby screen reappears.
•
To quickly return to the Standby screen, press
(OK).
Summary of Contents for Foma D900i
Page 1: ...Manual for 04 5 IE ...
Page 25: ...23 Introduction 23 ...
Page 48: ...46 ...
Page 49: ...Basic Operations 47 ...
Page 125: ...Advanced Operations 123 ...
Page 202: ...200 ...
Page 203: ...201 Network Services ...
Page 231: ...Character Entry 229 ...
Page 255: ...Appendix 253 ...


