Chapter 2 CPT7 Installation
CPT7 and CPT7700 Installation and Operation User Manual v12
32
The CPT7 enclosure must be grounded.
To ground the CPT7, mount the enclosure to a grounded metal mounting plate or attach a chassis
ground cable under one of the mounting screw heads.
Do not install the CPT7 near a heat source, such as vehicle exhaust.
If the CPT7 will be used in areas of extreme high temperatures, be sure to mount the CPT7 on
a metal surface such as the NovAtel mount adapter or the metal vehicle chassis. This will
allow heat to leave the CPT7 through contact with the metal surface and allow more optimized
performance.
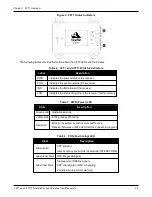
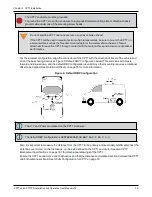
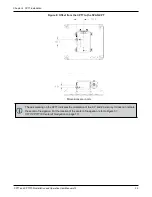
For the simplest configuration, align the connectors of the CPT7 with the direction of travel of the vehicle and
mount the base facing down (see
Figure 6: Default RBV Configuration
below) This coincides with X-axis
forward and Z-axis down, and the default RBV configuration is valid. Any other mounting requires a rotational
offset to be applied. See
on page 75 for more information.
Figure 6: Default RBV Configuration
The X, Y and Z axis are marked on the CPT7 enclosure.
The default RBV configuration is
SETINSROTATION RBV 180 0 90 3 3 3
.
Also, it is important to measure the distance from the CPT7 to the primary and secondary GNSS antennas (the
Antenna Lever Arms), on the first usage, on the axis defined on the CPT7 enclosure. See also
on page 167 for dimensional drawings of the CPT7.
Ensure the CPT7 cannot move due to dynamics and that the distance and relative direction between the CPT7
and both antennas is fixed. See


