background image

4-52  System Configuration 


TIPS: 

If you use SSL for access, the “Warning - Security” dialogue box(es) for server certification 
may be displayed for SSL in addition to the dialogue box shown above.     


Login and logout 

Login


When the login page appears, enter the user name and password, and then click [login]. 

When you login for the first time, use the following default user name and password.     

Default user name: administrator 
Default password: None (enter no data)   

IMPORTANT:  

By default, no password is set. Set your password immediately after login.     

For security, it is recommended to change the default user name as well.     

For information on settings and modification, see “BMC Settings” described later.   

 
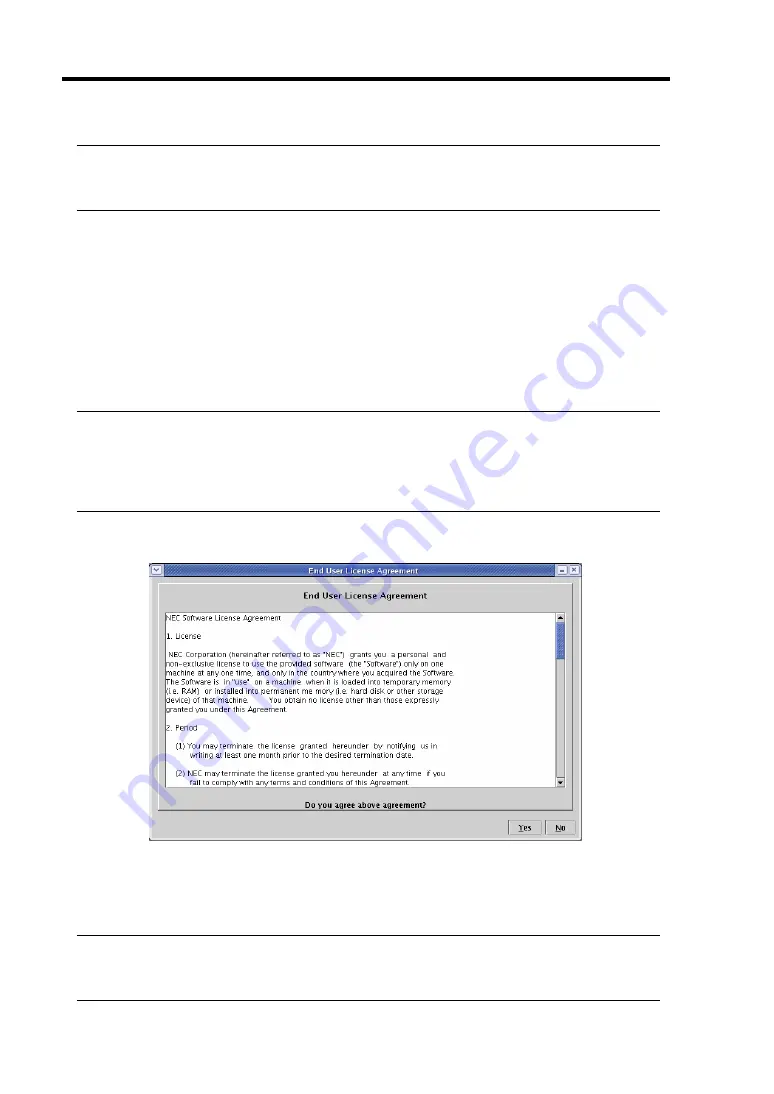
When the password is authenticated, the following end user license agreement is displayed.   


Read the agreement carefully.   
If you can agree, click [Yes], and you can start using remote management functions.   
If you cannot agree, click [No]. You cannot use remote management functions.   
 

TIPS:  

If you click [Yes], you do not see this message again because the data will be stored on the 
management PC.   


Summary of Contents for Express5800/320Fa-L

Page 1: ...eries N8800 082F 082AF EXP320B NEC Express5800 320Fa L N8800 083F 083AF EXP320A NEC Express5800 320Fa LR N8800 088F 088AF EXP320D NEC Express5800 320Fa M N8800 089F 089AF EXP320C NEC Express5800 320Fa...

Page 2: ......

Page 3: ...NEC Express5800 320Fa L N8800 083F 083AF EXP320A NEC Express5800 320Fa LR N8800 088F 088AF EXP320D NEC Express5800 320Fa M N8800 089F 089AF EXP320C NEC Express5800 320Fa MR User s Guide 1st Edition 6...

Page 4: ...e Warranty Statement accompanying each product However actual performance of each such product is dependent upon factors such as system configuration customer data and operator control Since implement...

Page 5: ...This guide uses the following three types of symbols to give indications and precautions against a danger They are defined as follows Indicates that there is a risk of danger Each image symbolizes a p...

Page 6: ...er beam Indicates a risk of an explosion Indicates a risk of a personal injury Prohibited actions Indicates a general prohibition that is not defined herein Do no touch the indicated area There is a r...

Page 7: ...Mandatory actions Unplug the server There is a risk of an electric shock or fire Indicates a general action to take that is not defined herein Make sure to follow the instructions...

Page 8: ...Causing Equipment Regulations Cet appareil num riqeu de la classe A respecte toutes les exigences du R glement sur le mat riel brouilleur du Canada CE Statement Warning This is a Class A product In re...

Page 9: ...s Server 2003 Standard Edition operating system and Microsoft Windows Server 2003 Enterprise Edition operating system are called Windows Server for short Microsoft Windows 2000 Server operating system...

Page 10: ...is a fault tolerant ft server focusing on high reliability in terms of fault tolerance in addition to high performance scalability and general versatility provided by NEC Express5800 series In the eve...

Page 11: ...ription This chapter describes what you should know about the product its component names functions operating procedures as well as handling of devices and other parts Chapter 3 Windows Setup and Oper...

Page 12: ...and check the individual items If some component is missing or damaged contact your sales agent Keep the accessories in a safe place You will need them when you perform setup addition of options or re...

Page 13: ...2 General Description 2 1 STANDARD FEATURES 2 2 How the Operating System Sees the CPU Modules 2 6 How CPU modules appear on Device Manager 2 6 How CPU modules appear on Task Manager 2 7 NAMES AND FUNC...

Page 14: ...u and Parameter Descriptions 4 9 SCSI BIOS SCSISelect 4 30 FORCED SHUTDOWN AND CLEAR 4 37 Forced Shutdown 4 37 Clear CMOS Password 4 38 How to Clear Passwords 4 41 Remote Management function 4 44 Netw...

Page 15: ...sage 7 14 SOLVING PROBLEMS 7 15 Problems with NEC Express5800 ft series 7 15 Event Log 7 31 Problems with NEC EXPRESSBUILDER 7 36 Problems with Master Control Menu 7 37 Problems with Configuration Dis...

Page 16: ...h Heat Sink 8 27 Installing CPU Model with Water cooling Kit 8 28 Removing CPU Model with Water cooling Kit 8 30 Replacing CPU 8 31 ft Remote Management Card 8 32 Installing ft Remote Management Card...

Page 17: ...Chapter 1 Precautions for Use This chapter includes information necessary for proper and safe operation of the server...

Page 18: ...bels are placed in certain parts of the system so that the user stays alert to possible risks Do not remove or damage these labels If some label is missing about to peel off or illegible contact your...

Page 19: ...Precautions for Use 1 3 Rack model Front Rear...

Page 20: ...1 4 Precautions for Use CPU IO modules The following shows the place on CPU IO modules where the label is attached...

Page 21: ...smoke odor or noise If the equipment emits smoke odor or noise immediately flip off the POWER switch unplug the cord and contact your sales agent There is a risk of a fire Do not insert a wire or meta...

Page 22: ...there is a risk of overheating that could lead to a fire Do not plug the cord insecurely Insert the plug firmly into an outlet There is a risk of heat or fire due to poor contact If dust settles on t...

Page 23: ...ingers on the rail when you mount dismount the equipment into from the rack Do not use or store this product in corrosive environment Avoid the usage or storage of this product in an environment which...

Page 24: ...ce cable or connector may cause an electric shock or a fire resulted from a short circuit Do not use any non designated interface cable Use only interface cables designated by NEC identify which compo...

Page 25: ...disassembling replacing or recharging it yourself Disconnect the power plug before cleaning the server Make sure to power off the server and disconnect the power plug from a power outlet before clean...

Page 26: ...e equipment when it thunders Unplug the equipment when it threatens to thunder If it starts to thunder before you unplug the equipment do not touch the equipment and cables There is a risk of a fire o...

Page 27: ...t is imposed on a single place To distribute the weight attach stabilizers or install two or more racks It may fall down to cause injuries Do not assemble parts alone It takes at least two people to m...

Page 28: ...al port RS 232C or the control using PowerChutePlus Check and adjust the system clock before operation in the following conditions After transporting the equipment After storing the equipment After th...

Page 29: ...ttach and connect Make sure that your options are compatible with the system If you attach any incompatible option there is a risk of malfunction that could lead to a breakdown It is recommended to us...

Page 30: ...ata before disposal You need to exercise sufficient care to protect privacy and confidential information Some of the system components have limited lifetime e g cooling fans built in batteries built i...

Page 31: ...m isn t solved by the above actions stop using the server and consult with your sales agent In this case check LED indications of the server and alarm indications on the display which will serve as he...

Page 32: ...ustment it is difficult to maintain a good work posture and may get tired soon Be sure to adjust the angle before using the display Adjust Brightness and Contrast Displays allow you to adjust brightne...

Page 33: ...apter 2 General Description This chapter describes what you need to know to use the NEC Express5800 ft series Refer to this chapter when you want to know about certain components and how to operate th...

Page 34: ...o emulation mode format supported POWER switch mask Remote power on feature AC LINK feature Self diagnosis Memory monitoring feature 1 bit error correction 2 bit error detection Bus parity error detec...

Page 35: ...and redundant memory It assures data redundancy through duplication of server data on an independent storage system These features eliminate server downtime that is usually caused by network disconne...

Page 36: ...rdware No need to modify applications You can run Windows Server 2003 compliant applications on NEC Express5800 ft series Thus unlike other highly fault tolerant products special API or scripts are no...

Page 37: ...EC Express5800 ft series events use unique IDs they are easy to distinguish In service repairing You can repair or replace a failed module even if NEC Express5800 ft series is operating Partition stru...

Page 38: ...n NEC Express5800 ft series the CPU modules are redundantly configured and all processors installed on this server are shown How CPU modules appear on Device Manager Device Manager shows as many CPUs...

Page 39: ...y It is a technology that makes the operating system see a single processor performing as two logical processors Task Manager shows logical processors using the Hyper Threading Technology As shown bel...

Page 40: ...escription on the front view page 2 9 3 Key slot The slot you insert the security key to unlock the front door 4 Drive cover The cover to be detached when removing the backup device bay Tower model 1...

Page 41: ...General Description 2 9 Front View inside The following illustrations show components in the front of the tower model and the rack model Tower model with the front door open...

Page 42: ...illuminates in amber or blinks in amber 5 CPU IO module 0 status LED This LED indicates the status of the CPU IO module 0 see page 2 26 When the module is running successfully the LED illuminates in...

Page 43: ...power supply to a module The switch is pressed when removing a failed module 15 Module POWER LED See page 2 28 16 Module FAULT LED See page 2 28 17 Processor error LED See page 2 28 18 I O error LED S...

Page 44: ...2 12 General Description 27 HCS1 error LED See page 2 29 28 Heat warning LED See page 2 29 29 Backup device bays These bays are used to install optional drives such as DAT or AIT drives...

Page 45: ...General Description 2 13 Rack model with the front door open...

Page 46: ...illuminates in amber or blinks in amber 5 CPU IO module 0 status LED This LED indicates the status of the CPU IO module 0 see page 2 26 When the module is running successfully the LED illuminates in...

Page 47: ...power supply to a module The switch is pressed when removing a failed module 15 Module POWER LED See page 2 28 16 Module FAULT LED See page 2 28 17 Processor error LED See page 2 28 18 I O error LED S...

Page 48: ...2 16 General Description 27 HCS1 error LED See page 2 29 28 Heat warning LED See page 2 29...

Page 49: ...us LED An LED that stays on while the loaded CD ROM is accessed 2 CD tray eject button A button for ejecting the CD tray 3 Manual release hole When the eject button does not work insert a metal pin in...

Page 50: ...2 18 General Description Rear View Tower model Rack model...

Page 51: ...nitor connector This connector is used to connect a display device 9 Management LAN port This is a LAN port dedicated to management and can be used when a ft remote management card is installed The po...

Page 52: ...A PCI board of low profile type is attached to this slot The number of this slot is PCI X slot 2 in the 320Fa L and 320Fa LR models 17 SCSI connector This connector is used to connect the internal bac...

Page 53: ...on on slot numbers see the figure on next page C C P U IO module without a water cooling kit 320Fa L 320FaLR model 1 Module handle 2 Cooling fan unit 1 3 Water cooling kit 4 PCI slot 5 DIMM 6 Memory D...

Page 54: ...slotA1 1 2 DIMM slot B1 1 3 DIMM slot A2 1 4 DIMM slot B2 1 5 DIMM slot A3 1 6 DIMM slot B3 2 ft remote management card connector 3 LAN1 connector 4 LAN2 connector 5 Riser card connector 6 PCI board s...

Page 55: ...socket CPU 2 13 HCS A connector A water cooling kit installed for the CPU 1 is attached to this connector only for 320Fa M and 320Fa MR models 14 Fan connector only for 320Fa M and 320Fa MR models 15...

Page 56: ...ith the server LINK ACT LED This LED indicates the network port status When power is supplied to this card and a connected device such as a hub and they are connected properly the LED illuminates in g...

Page 57: ...IONS page 3 2 to configure mirror volumes FT Status LED The LED stays green while the server is running normally in DUPLEX mode If this LED does not illuminate or illuminates blinks in amber there is...

Page 58: ...e CPU IO module handle is not firmly fixed Check to see the CPU IO module is firmly loaded and then fasten the screws of the handle to fix the handle Power supply is off POST is running Wait for a whi...

Page 59: ...IO status LED indications Description Action Detected a fan alarm Check if dust is accumulated on internal fans and confirm that the fan cables are connected firmly If the LED indication does not cha...

Page 60: ...ror LED This LED illuminates in amber when the processor of the CPU IO module has a problem I O Unit Error LED This LED illuminates in amber when the I O of the CPU IO module has a problem Memory Grou...

Page 61: ...ling kit 2 in the CPU IO module has a problem Access LED on the CD ROM Drive This LED illuminates when the installed CD ROM is being accessed Hard Disk Drive LED Each indication of the DISK LED on a h...

Page 62: ...the LED illuminates in green the port is operating on 100BASE TX Power Supply Unit LED Power supply units located at the rear have power supply unit LEDs When power is supplied to a power supply unit...

Page 63: ...locked only by the security keys shipped together Some software programs have commands to eject media on the tray of a CD ROM drive or device installed in a 5 25 inch device bay Before you run any of...

Page 64: ...the slot to release the lock 1 Insert the security key into the slot and turn it left with a little pressure to release the lock 2 Hold the right side of the front bezel lightly and pull it toward you...

Page 65: ...e NEC logo will appear on the screen IMPORTANT When you connect a power cord to an AC inlet wait ten or more seconds to press the POWER switch Do not turn off the power before you see the NEC logo and...

Page 66: ...ry modules CPU modules keyboard mouse etc It also shows startup messages for various BIOS setup utilities According to the factory default settings the NEC logo appears on the display while POST is be...

Page 67: ...tion for using the server Unless this message appears together with an error message you do not need to start the utility to modify the configuration If you wait for a few seconds POST will go on auto...

Page 68: ...or OS startup with different combinations of CPU IO modules If POST does not finish normally with any combinations the server will stop with the state of DC OFF or Post end with an error message disp...

Page 69: ...drive letter Floppy Disk Drive Option If you want to use a floppy disk drive with this server connect N8460 002USB FDD UNIT which are available optionally to a USB connector This server supports 3 5...

Page 70: ...ette smoke Do not leave the floppy disk near water or chemicals Keep away from magnetic objects Do not clip disks Be careful not to drop Store floppy disks in a protective case where they are kept awa...

Page 71: ...ter 1 Do not leave the CD tray ejected Insert Remove CD ROM Follow the steps below to set a CD ROM 1 Before you insert a CD ROM make sure that the server is powered on When the server is powered on th...

Page 72: ...did removal operation of these devices by mistake click Safely Remove Hardware icon again and select Safely remove AMD PCI to USB Open Host Controller The removed device will be then recognized again...

Page 73: ...touch the signal side blank side Place the CD ROM gently on the tray with the printed side up Do not scratch or use a pencil or ballpoint pen to write on the CD ROM Keep away from cigarette smoke Do...

Page 74: ...2 42 General Description This page is intentionally left blank...

Page 75: ...Chapter 3 Windows Setup and Operation This chapter describes setup procedures to make NEC Express5800 ft series ready for use...

Page 76: ...he help of operating procedures 1 Click Start Help and Support 2 Select Disks and Data from the topics on the help 3 Select Managing Disks and Volumes Disk Management How To then check the operating p...

Page 77: ...n creating or repairing mirror volume be sure to check the target ID by following the procedures below The pairs of mirror disks as shown above can be created by selecting hard disks whose target IDs...

Page 78: ...IDs of the other disks When disk numbers and target IDs are matched as shown above define hard disks 0 and 3 hard disks 1 and 4 and hard disks 2 and 5 as mirrored pairs and add mirror volumes Disk No...

Page 79: ...tart Administrative Tools then Computer Management The Computer Management dialog box will appear 2 Click Disk Management under Storage in the console tree The Disk Management window will appear on th...

Page 80: ...volume of the dynamic disk to mirror and click Add Mirror 6 On the Add Mirror dialog box select the disk to mirror and click Add Mirror IMPORTANT Clicking Add Mirror displays the Logical Disk Manager...

Page 81: ...Windows Setup and Operation 3 7 7 The volume status changes to Resynching 8 The mirror configuration is completed if the volume status changes from Resyching to Healthy...

Page 82: ...ully Disk mirroring is completed properly if the volume layout is Mirror and the status is Healthy on the Disk Management window z Is the mirror configured on the disks of the proper position On the D...

Page 83: ...mirror on C drive are discribed here 1 Click Start Administrative Tools Computer Management The Computer Management window will appear 2 Right click the volume of the dynamic disk whose mirror is to b...

Page 84: ...5 The mirror is broken and the volumes will be converted to simple volumes In the figure on the right the status of the volumes are as follows System Volume Volume OEM C Status Healthy System Broken...

Page 85: ...a boot disk on another system it becomes impossible to boot from the disk 1 Insert the disk to import 2 Foreign Dynamic Disk is displayed on Disk Management In the figure on the right Disk 2 and Disk...

Page 86: ...3 12 Windows Setup and Operation 5 In the Foreign Disk Volumes dialog box check the volumes to import and click OK 6 The disk import is completed if the disk status changes from Foreign to Online...

Page 87: ...or volume a mirror volume is extended in the following order Remove Mirror Extend Volume Add Mirror 1 Remove the mirror of the volume you want to extend and make it a simple volume In the case below t...

Page 88: ...the Select Disks dialog box enter the amount of space to extend and click Next In this case 1500MB is added 5 Check the settings on the Completing the Extend Volume Wizard dialog box and click Finish...

Page 89: ...Windows Setup and Operation 3 15 7 Configure the mirror of the extended volume...

Page 90: ...2 and 5 Do not mirror disks using the disk number shown in Disk Management When the disk to be inserted into a slot for dual configuration of disk has been used as a disk which contains the boot volu...

Page 91: ...click a volume that has and remove mirror 5 After checking to see the Missing disk is selected click Remove mirror At Drive F Mirror and Failed Redundant will change to Simple and Healthy 6 Right cli...

Page 92: ...tion 7 Similarly delete the other Missing disk 8 Insert new disks Right click Disk Management and run Rescan Disks They will appear on Disk Management If any uninitialized disk is inserted right click...

Page 93: ...ars execute Convert to Dynamic Disk after Convert to Basic Disk is executed 10 Open the disk s properties to check the target IDs In the following figures disks are configured as Disk 1 Target ID 1 Di...

Page 94: ...t used for any disks However when you restart the system the old disk numbers will not be retained and disks are re numbered according to the hard disk position Therefore you need to determine which d...

Page 95: ...ror dialog box appears select Disk 1 and then click Add Mirror 13 Similarly make settings of Disk 2 and Disk 5 Upon completion of synchronous processing recovery is completed 14 To reconfigure the dis...

Page 96: ...and then perform the operations described on the previous pages 1 Follow the instructions in Replacing Failed Hard Disk Drives on the previous pages and run Remove Mirror to make the disk to be repla...

Page 97: ...with the same target ID makes the LED illuminate green again If the Remove Disk is performed at the same time as the disk access the disk is recognized as an error and the LED of the disk may illumin...

Page 98: ...nal floppy disk drive drive letters may change from A to B by switching CPU IO modules When switching CPU IO modules an unallocated drive letter is automatically reallocated to the CD ROM drive in the...

Page 99: ...Adapter Fault Tolerance AFT Adapter Fault Tolerance AFT is a feature that places more than one LAN controller on the same LAN same segment and automatically switches the process of the primary control...

Page 100: ...ing dual configuration be sure to use at least one adapter of CPU IO module 0 and of 1 individually Example Configure the dual network which enhances the service life by using all adapters Example 2 C...

Page 101: ...how to configure dual LAN regarding to the example shown in Rules of Dual Configuration on NEC IMPORTANT Log on as Administrator or a member of the group Administrators 1 Start Device Manager 2 Selec...

Page 102: ...3 28 Windows Setup and Operation 3 Select the Teaming tab on the properties dialog box Select the Team with other adapters and then click the New Team button 4 Enter the team name and click Next...

Page 103: ...etup and Operation 3 29 5 Select the adapters to include in the team and click Next 6 Select Adapter Fault Tolerance or Adaptive Load Balancing as a team mode Usually select Adapter Fault Tolerance Cl...

Page 104: ...n 7 Click Finish 8 Start Command prompt to check the physical MAC address set on ipconfig all 9 Select the Team Adapter you have set Right click on it and select Properties from the menu displayed to...

Page 105: ...3 31 10 Select the Advanced tab on the properties dialog box Select Locally Administered Address from the Settings list box and then enter the MAC address of a Team Adapter which you have checked in...

Page 106: ...he group Administrators 1 Start Device Manager 2 Select the Team Adapter of which you want to remove dual LAN Right click on it and then select Properties from the menu displayed to show the propertie...

Page 107: ...Windows Setup and Operation 3 33 4 The confirmation dialog box appears Click Yes button...

Page 108: ...describes how to confirm the continuous system operation by failover after stopping one CPU IO module 1 Check whether the CPU IO modules are duplicated When the CPU IO modules are duplicated the FT st...

Page 109: ...the tree on the left pane Click Down on Bring Up Bring Down When stopping the CPU module FT status LED is turned off This means that the CPU module operates in simplex mode and the redundancy of the d...

Page 110: ...ility click Up of Bring Up Bring Down to the IO module which was stopped in the step 3 and the IO module will be started Once the IO module is started the IO module diagnosis and the IO module duplica...

Page 111: ...or the NEC Express5800 ft series operation Do not stop these services When minimizing the number of operating service programs temporarily is required for system disk backup using backup software etc...

Page 112: ...s not corrupted Even if this message is displayed and the server becomes unable to access the floppy disk the processing completes by accessing the floppy disk again If you need to change the color qu...

Page 113: ...ly Remove Hardware icon again and select Safely remove AMD PCI to USB Open Host Controller By doing this the removed device is recognized again 2 About compressing a system drive Do not compress the r...

Page 114: ...3 40 Windows Setup and Operation This page is intentionally left blank...

Page 115: ...ter describes Basic Input Output System BIOS configuration When you install the Express5800 fault tolerant server for the first time or install remove optional devices thoroughly read this chapter for...

Page 116: ...MPORTANT The SETUP utility is intended for system Administrator use only The SETUP utility allows you to set a password The server is provided with two levels of password Supervisor and User With the...

Page 117: ...n POST terminates Press F1 to resume F2 to SETUP Press F2 to start the SETUP utility and display its Main menu If you have previously set a password with the SETUP utility the password entry screen ap...

Page 118: ...e Enter Displays a submenu or chooses the selected parameter Esc Displays the previous screen F1 Press F1 when you need help on SETUP operations The help screen for SETUP operations appears Press Esc...

Page 119: ...the following If you select Yes and then press the Enter key the setup will complete with all changes you have made saved If you select No and then press either the Enter or Esc key the status before...

Page 120: ...trol Wake On LAN Enabled Using the PCI LAN card Select Advanced Advanced Chipset Control Wake On PME Enabled UPS To link power supply with the UPS To power on the server when power is supplied from th...

Page 121: ...enable Option ROM of the PCI card option installed on the server Select Advanced PCI Configuration PCI Slot n Option rom Enabled n Slot number to install the board Boot To change the boot order of dev...

Page 122: ...BIOS configuration data Select Exit Exit Saving Changes To discard changes to the BIOS configuration data Select Exit Exit Discarding Changes To restore the default BIOS configuration data the data m...

Page 123: ...xit To configure detailed settings of functions select a submenu from the above menus Below describes configurable functions and parameters and the factory settings displayed in the screen for each me...

Page 124: ...porting the equipment After storing the equipment After the equipment halt under the conditions which is out of the guranteed environment conditions Temperature 10 to 35 C Humidity 20 to 80 Check the...

Page 125: ...ology the ID of a physical processor but not logical processor appears here Processor 1 L2 Cache Displays the cache size of the L2 of the processor 1 Processor 2 CPUID CPUID Not Installed When the pro...

Page 126: ...Your Setting Boot time Diagnostic Screen Disabled Enabled Specify whether to display the Power On Self Test POST screen at start up If Disabled is selected the NEC logo appears while POST is in progre...

Page 127: ...tions Option Parameter Description Memory Size Displays the memory size DIMM Group 1 Status Normal Not Installed Displays the memory status DIMM Group 2 Status Normal Not Installed Displays the memory...

Page 128: ...ress Enter its submenu appears Refer to the table below for information on options Option Parameter Description PCI Slot 1 Option ROM Enabled Disabled PCI Slot 2 Option ROM Enabled Disabled PCI Slot 3...

Page 129: ...or information on options Option Parameter Description SCSI Controller Enabled Disabled If Disabled is selected chip stays in the reset status In this status the SCSI Controller is totally disabled an...

Page 130: ...or information on options Option Parameter Description LAN Controller Enabled Disabled If Disabled is selected chip stays in the reset status In this status the LAN Controller is totally disabled and...

Page 131: ...ptions Option Parameter Description Wake on LAN Disabled Enabled Select whether or not to enable the remote power on function via the LAN connector on motherboard Wake On PME Disabled Enabled Select w...

Page 132: ...ng pop up screen The screen below shows when Set Supervisor Password is selected Set a password on this pop up screen Enter a password of up to seven alphanumeric characters and symbols from the keybo...

Page 133: ...s Enter to display the supervisor password entry screen This option is available only when you log into the SETUP utility with the supervisor password Password on boot Disabled Enabled Specify whether...

Page 134: ...IRQ of BMC interruption Post Error Pause Disabled Enabled Set whether or not to pause POST at the end of POST if an error has occurred during POST execution AC LINK Stay Off Last State Power On Speci...

Page 135: ...lect System Management on the Server menu and press Enter to display the following screen See the table below for setup options on the screen Option Parameter Description BIOS Revision Displays the BI...

Page 136: ...mation is shown only when the N8815 001 001A ft Remote Management Card is installed Installed in standard for 320Fa M and 320Fa MR models Console Redirection Select Console Redirection on the System H...

Page 137: ...on Parameter Description Flow Control None XON XOFF CTS RTS CTS RTS CD Select a flow control method Console Type PC ANSI VT100 VT UTF8 Select a console type Factory set Displayed only when the BIOS Re...

Page 138: ...ay the following screen See the table below for setup options on the screen Option Parameter Description Clear Online Event Logs Press Enter To clear event logs of the working module press the Enter k...

Page 139: ...n OS with no NEC ESMPRO Agent installed disable this option If you use Disaster Recovery Option for ARCServe select Disabled Option ROM Scan Monitoring Disabled Enabled Select whether or not to enable...

Page 140: ...ce according to the order specified in this menu and use the software to boot the system if found You can change the boot device order using or and or Move the cursor to select the device by or and th...

Page 141: ...System Configuration 4 27 Exit Move the cursor onto Exit to display the Exit menu...

Page 142: ...volatile memory If you select Yes here the SETUP Warning dialogue box appears If you select No in the SETUP Warning dialogue box you can exit SETUP without saving the changes you have made If you sele...

Page 143: ...f you select Yes in the dialogue box changes you have made are discarded and previous settings are restored Save Changes Select this option if you want to save changes you have made in CMOS non volati...

Page 144: ...y starting up the utility on a SCSI controller basis The server is equipped with one SCSI controller If you have added SCSI controller boards you need to make SCSI controller settings as many as the n...

Page 145: ...press the Enter key If you want to make settings of the adapter selected channel or the SCSI device connected to the channel choose Configure View SCSI Controller Settings If you want to know or verit...

Page 146: ...mize your system SCSI Bus Interface Definitions Use arrow keys to select SCSI BUS Interface Definitions The following table provides information on options and their functions Option Parameter Functio...

Page 147: ...you select SCSI Device Configuration and press the Enter key the display changes as shown below IMPORTANT You can make settings on a SCSI ID basis Before you make settings confirm the SCSI ID of your...

Page 148: ...No Select whether or not to optimize the bus usage ratio by using the function to transfer packetized data DT or dual transition QAS Yes No Select whether or not to use the Quick Arbitration and Selec...

Page 149: ...necessary SCSI Controller Int 13 Support Enabled Disabled NOT Scan Disabled scan bus Select whether or not to enable SCSI BIOS Select Enabled except z when starting up the OS from a hard disk drive o...

Page 150: ...hannel to be configured the screen for scanning SCSI IDs is displayed After the scanning the screen showing SCSI IDs and corresponding devices appears When you select a device on this screen and press...

Page 151: ...own the server the POWER switch does not turn off the server or resetting does not work Press and hold the POWER switch on the server for over four seconds The power is forcibly turned off To turn on...

Page 152: ...MOS data restores the factory settings To clear the password or CMOS data power off the server To clear the password or the CMOS data use configuration jumper pins jumper switches located inside of th...

Page 153: ...r How to Clear CMOS 1 Power off the NEC Express5800 ft series and unplug the both power cords 2 Remove the both CPU IO modules 1 and 2 from the NEC Express5800 ft series see Removing CPU IO Module on...

Page 154: ...Module on page 8 14 remove the CPU IO module 0 from the server 8 Restore the previous CMOS clear jumper switch settings Remove the jumper pins 1 2 of the CPU IO module 0 and install them on the jumper...

Page 155: ...WER switch to power off and then disconnect the power cord from the outlet Example Phoenix ServerBIOS 3 Release 6 0 Copyright 1985 2003 Phoenix Technologies Ltd All Rights Reserved GPJ1 HA XXXX X XXXX...

Page 156: ...4 42 System Configuration 10 By referring to Installing CPU IO Module on page 8 16 install both CPU IO modules on the server 11 Connect both power cords...

Page 157: ...alling CPU IO Module on page 8 16 5 Connect the power cords of CPU IO modules and wait for 30 seconds Then disconnect the power cords of both CPU IO modules from outlet again 6 Remove your target CPU...

Page 158: ...uto registering with a DNS server using DHCP functions XXXXXXXXXXXX is the MAC address assigned to each management card The MAC address can be found on the label attached to the rear or the card or Se...

Page 159: ...make initial settings Either wait for a while after the above message is shown or press the F1 key to precede POST Start up the NEC EXPRESSBUILDER CD ROM and select initialize Remote Management Card...

Page 160: ...dows Server 2003 clear the Enhance pointer precision check box in the Motion box of the Pointer Option tab which is in the Mouse Properties as shown below If you cannot move the mouse cursor to the ri...

Page 161: ...below if you use NEC EXPRESSBUILDER for installation 1 Activate Windows on the PC on which you want to install Java2 Runtime Environment and set the NEC EXPRESSBUILDER CD ROM 2 By the auto startup fun...

Page 162: ...4 48 System Configuration If you access the login page without installing Java2 Runtime Environment the following message may appear Check the message and perform installation...

Page 163: ...r When connecting to network which supports DHCP protocol The default host name of BMC is ARMC characters followed by the MAC address if you use DHCP functions and automatically register it with your...

Page 164: ...or Change to change the settings Then set IP addresses of the managed LAN ports on the BMC Configuration menu LAN1 CPU IO Module 0 management LAN port LAN2 CPU IO Module 1 management LAN port The foll...

Page 165: ...gement Card LAN1 LAN2 Select Disable on Remote Management Console and register the setting The host name the domain name and the IP address cannot be modified on this screen The image below shows the...

Page 166: ...one enter no data IMPORTANT By default no password is set Set your password immediately after login For security it is recommended to change the default user name as well For information on settings a...

Page 167: ...System Configuration 4 53 Logout Click the File menu and select Exit to logout When you log out the main window closes and you will return to the login page on the browser...

Page 168: ...ncluding the KVM console window 3 Main frame A window is shown here 4 Click this to show the Help menu Click Help to see the version information of this applet Control panel The control panel allows y...

Page 169: ...Displays network access status 14 The status lamp of the server telling you of the server status 15 Opens the window showing system event logs SEL 16 Opens the window showing the sensor device inform...

Page 170: ...at it allows you using graphics directly and remotely CHECK You cannot use the remote KVM remote control for connection via proxy When you use the remote KVM console login with the settings where no p...

Page 171: ...in the same magnification 10 Window size icon use this icon to adjust the window size to the screen size 11 KVM indicator showing information including resolution 12 Remote KVM console screen on whic...

Page 172: ...he keyboard By doing so Ctrl Alt Del is sent to the server After the operation click the Ctrl and Alt icons to cancel the special key operation Windows key icon Virtual keyboard When you click the vir...

Page 173: ...resh the screen Modifying properties When you click the KVM properties icon the KVM properties window appears in which you can specify an interval between screen refreshes IMPORTANT A shorter interval...

Page 174: ...trol panel SEL information is collected from the BMC and shown on the system event log SEL window as shown below The upper pane shows a list of system event logs while the lower pane shows details of...

Page 175: ...panel the SDR information is collected from the BMC and shown on the sensor device information SDR window as shown below The upper pane shows a list while the lower pane shows details of the entry sel...

Page 176: ...mation on parts to be replaced for maintenance FRU on the control panel FRU information is collected from the BMC and shown on the window for parts to be replaced for maintenance FRU as shown below Th...

Page 177: ...ndow appears as shown below 1 Reads the BMC configuration file 2 Saves the BMC configuration file 3 Edits the BMC configuration 4 Reloads the BMC configuration 5 Sets the data loaded from the file to...

Page 178: ...ant to modify or add and click the icon for editing the following window for editing a user account appears 1 Enter the user name 2 Enter the password 3 You can specify whether or not to enable the re...

Page 179: ...EB client Not determined TCP BMC 80 2 WEB client SSL Not determined TCP BMC 443 3 1 Can be modified by selecting BMC Settings Alert Mail E Mail Alert Settings SMTP SMTP Port Number 2 Can be modified b...

Page 180: ...e completed by clicking OK Close the window once and then login again by entering the newly set IP address or host name in the browser The login page remaining on the browser is the page you accessed...

Page 181: ...or not to automatically acquire the IP address of the DNS server by DHCP 2 If you have selected not to automatically acquire the IP address by DCHP make settings here If the address is acquired autom...

Page 182: ...be easily guessed from the server s host name on the OS i e in Windows the computer name For example you may set the BMC host name as sapphire_bmc if the server s host name on the OS is sapphire IMPO...

Page 183: ...verall information of the web server settings IMPORTANT When you change the HTTP port number settings of SSL enable disable or SSL port number the current connection will be temporarily disconnected C...

Page 184: ...y specific reason such as SSL cannot be used By default this option is disabled 3 Specify the SSL port number 4 Specify the login trial period during which you can try login again if you have failed t...

Page 185: ...at you have set will be written into the BMC When you click Cancel the editing window closes without saving what you have edited Alert Mail Configuration Here you can make alert mail settings for BMC...

Page 186: ...test mail IMPORTANT Perform the mail test after you have completely configured E Mail Alert Settings described in the following pages Making entries in the editing window does not complete settings Yo...

Page 187: ...o be given to alert mail 4 Select whether or not to enable the body messages for all alert mail which is configured in the next step 5 Enter the body message to be used in all alert mail If you do not...

Page 188: ...the number to be made if sending a mail has failed 4 Specify the time period in seconds to wait for next retry If you click Default the default values for SMTP port number number of retries and retry...

Page 189: ...ion Product name code number of the server IP Address IP address of the BMC Event Time Time that the event occurred SEL Dump Data Data representing system event logs SEL in the hexadecimal format BMC...

Page 190: ...g up the firmware update window When you click the icon to start up firmware update on the control panel each pieces of revision information is loaded from the BMC to display the following firmware up...

Page 191: ...gins Wait for file loading to complete TIPS You can update in a batch If there are more than one update targets all the information of the update targets must be loaded You can select more than one fi...

Page 192: ...Selecting what to be upgraded Select check boxes of update targets CHECK Only those selected here will be written in Items with no check box selected will not be written in even if files have been loa...

Page 193: ...he Status column displays the result for each target CHECK To apply updates for targets other than applet reboot the server or power off and then on the server When you rebooted or power on the server...

Page 194: ...rivilege to perform the operation Try performing the operation with administrator s privileges Consult your administrator Network errors No Error message Action 1 The HTTP communication failed Check t...

Page 195: ...Received bad response from BMC Check the server A failure may have occurred in BMC If you do not find any problem contact your service representative 3 BMC does not support IPMI 2 0 functions Contact...

Page 196: ...d Check the network environment and server If you do not find any problem contact your service representative System event log SEL display errors No Error message Action 1 Failed to clear session even...

Page 197: ...s sign and underscore _ for a user name A user name should be 31 characters or less 8 The user name is too long A user name should be 31 characters or less 9 The password is too long Use 16 or less ch...

Page 198: ...he specified file may not exist Check the file name 32 Failed to close the file The specified file may be corrupted 33 Can t open the file The specified file may not exist Check the file name 34 Timeo...

Page 199: ...n 17 Invalid segment information Some update files may be corrupted Obtain update files again 18 Invalid data length Some update files may be corrupted Obtain update files again 19 Failed to open the...

Page 200: ...n update files again 32 Unexpected EOF is detected Some update files may be corrupted Obtain update files again 33 Unexpected token is detected Some update files may be corrupted Obtain update files a...

Page 201: ...Chapter 5 Installing and Using Utilities This section describes how to use the NEC EXPRESSBUILDER CD ROM that comes with your server and to install the utilities stored on the NEC EXPRESSBUILDER...

Page 202: ...and start the NEC Express5800 ft series from the system in the NEC EXPRESSBUILDER When the NEC Express5800 ft series is started by using this procedure the NEC EXPRESSBUILDER top menu shown on the rig...

Page 203: ...NEC EXPRESSBUILDER After the NEC EXPRESSBUILDER is started the NEC EXPRESSBUILDER top menu shown below appears A Setup Performs various automatic setup operations including settings of internal param...

Page 204: ...used with a partition different from that at purchase or if OS is reinstalled This feature carries out the complicated setup IMPORTANT To install Windows Server 2003 Enterprise Edition in your server...

Page 205: ...k program is started depending on the system status See the description in Chapter 6 to manipulate the system check program Create Support Disk In the support disk creation procedure the startup suppo...

Page 206: ...update is interrupted halfway the system will not be able to be started Initialize Remote Management Card Allows you to configure ft Remote Management Cards with correct parameters of the system wher...

Page 207: ...eans MC 1ST exe From the Master Control Menu you can install various software which runs on Windows or view online documents TIPS Some online documents are provided in the PDF format Acrobat Reader of...

Page 208: ...d you to create Configuration Diskette to setup the servers from NEC EXPRESSBUILDER NOTE You can install Windows Server 2003 without Configuration Diskette Also you can modify newly create Configurati...

Page 209: ...Using Utilities 5 9 4 Click Configuration Diskette Creator Configuration Diskette Creator window is displayed 5 Click Create New Information files from the File menu The Disk Environment dialog box wi...

Page 210: ...ire Array Disk settings Do not select Array Disk 7 Follow the message to specify each item on the dialog box and click Next NOTE If you click on Cancel all the input value will be deleted When complet...

Page 211: ...uration Diskette is used when you install Windows Server 2003 Put a label and keep it where it will not be lost NOTE For the information on the contents of each specifying item refer to the Help If yo...

Page 212: ...he File menu click Create new information files Disk Environment dialog box will be displayed 3 Specify each item and click on OK The dialog boxes to specify setup information will be displayed in ord...

Page 213: ...Save Setup Information dialog box is displayed confirm that the Configuration Diskette check box is checked and input file name for the Setup File in File Name 7 Insert the floppy disk formatted by 1...

Page 214: ...server management Stable operation of server Shutdown of a server immediately leads the customer to lose business opportunities and profits This requires servers to always operate in their perfect st...

Page 215: ...r fault NEC ESMPRO Agent includes the preventive maintenance function predicting the occurrence of a fault in advance as countermeasures for preventing faults from occurring It can previously detect t...

Page 216: ...ase in chassis Fan Fan failure decrease in the number of revolutions Storage File system usage rate LAN Line fault threshold over Send retry or send abort threshold over Prevention of Server Fault NEC...

Page 217: ...tors fans Voltage O Monitors the voltage inside of chassis Power Supply O Monitors the power unit Door x Monitors Chassis Intrusion chassis cover open and close of a door Software O Refers to the info...

Page 218: ...gement task NEC ESMPRO function or tool on managed server NEC ESMPRO function or tool on management manager Monitoring of major component states NEC ESMPRO Manager data viewer Diagnostics and start st...

Page 219: ...en is designed in the Explorer format to indicate the components in a server hierarchically for effective server management NEC ESMPRO Manager manages servers by using the following three types of GUI...

Page 220: ...In addition it changes the status color of the failed server component This enables you to identify the failed portion Alert Viewer The Alert Viewer manages fault reports sent from servers together A...

Page 221: ...slot 1 on PCI module 0 PCI slot 2 on PCI module 0 Slot 1 of riser card on PCI module 0 Slot 2 of riser card on PCI module 0 PCI controller 1 on PCI module 0 PCI controller 2 on PCI module 0 I O hub on...

Page 222: ...n PCI module 1 SCSI bus 2 of SCSI adapter 1 on PCI module 1 Ethernet adapter on PCI module 1 1 11 102 1 11 103 1 11 104 1 11 104 0 1 11 104 1 1 11 105 SCSI enclosure SCSI slot 0 on SCSI enclosure SCSI...

Page 223: ...104 0 0 10 104 1 0 10 105 CPU module 1 DIMM slot A1 on CPU module 1 DIMM slot B1 on CPU module 1 DIMM slot A2 on CPU module 1 DIMM slot B2 on CPU module 1 DIMM slot A3 on CPU module 1 DIMM slot B3 on...

Page 224: ...cations of the device names displayed on the NEC ESMPRO screen In the case of the tower model modules are mounted vertically instead of horizontally Front view of the rack mount model CPU IO module 1...

Page 225: ...dule also needs to be stopped Status during Module Diagnostics While diagnosing a stopped module the module is no longer in the duplex mode and the CPU and the memory cannot be used However the status...

Page 226: ...several minutes to recognize changes of disk status or the disk may need to be rescanned During this process the status color may turn to abnormal but when the mirror is created successfully it will...

Page 227: ...ed to the server Install it using the utility related to NEC ESMPRO setup Coexistence with the Oracle products The installation of the Oracle products may change Startup Type of SNMP Service into Manu...

Page 228: ...m that ESM Common Service is active and close the Service and Control Panel About the warning event of CPU load Monitoring If NEC ESMPRO Agent cannot get performance information from the OS due to a t...

Page 229: ...nsors Some modes are equipped with temperature voltage fan sensors that do not have information on status current values rpm threshold etc Therefore if you view such a sensor on NEC ESMPRO Manager it...

Page 230: ...OS Example drive name on Data Viewer A drive name recognized by the OS B Check the floppy disk drive name on Explorer Floppy Disk Drive Information If you add or delete floppy disk drive connected wi...

Page 231: ...properly make the settings of printer from its properties window The procedures are as follows 1 From Control Panel click Printers and Faxes and open the properties window of a printer for making sett...

Page 232: ...s has changed is registered However the previous status in the message shows an undefined value Event 401 and 402 of ESM HAS Storage Service An event Status of SCSI Slot ID 41 n has changed from Empty...

Page 233: ...ws Explorer format the data viewer indicates their states on the right side of the screen You can manage the status on a Web browser using Web component functions of NEC ESMPRO Manager For details see...

Page 234: ...n the ft tree You can see the following information on the modules and the components on the CPU modules in the CPU Module tree General Allows the configuration and other information on the CPU module...

Page 235: ...ted See Maintenance of the Server described later for the update of BIOS of the CPU modules The detailed device identification information can be checked by selecting ESMPRO tree Hardware tree Field R...

Page 236: ...IO modules and the components on the IO modules of the PCI Module tree This section describes the general information screens of the IO modules The components on the IO modules are described later Gen...

Page 237: ...aining PCI slot to be seen PCI slot of the ft tree You can see the following information on the PCI slot and the devices on the PCI slot in the PCI slot tree General Allows the PCI slot configuration...

Page 238: ...ling and Using Utilities PCI Device General Allows the information of devices on the PCI slot to be viewed PCI Device Detailed information Allows the detailed information of a device on the PCI slot t...

Page 239: ...management controller BMC controller for system management on the IO modules see the BMC tree To see the information on the BMC tree select PCI Module PCI module containing BMC to be seen BMC of the f...

Page 240: ...figuration and other information of the SCSI enclosure to be viewed IMPORTANT You need to be aware that PCI modules SCSI adapters SCSI buses and modules under the SCSI enclosure have impact on each ot...

Page 241: ...monitor the mirror disk components see the Mirror tree To view information on Mirror tree select Mirror under ft tree You can see the redundancy status of the mirrors and the device IDs of the SCSI sl...

Page 242: ...d disks 1 Confirmation of hard disk failure If NEC ESMPRO Agent detects some problem with a hard disk it will report an alert of the problem to NEC ESMPRO Manager Check the alert viewer in the manager...

Page 243: ...IMPORTANT The mirroring redundancy status will change depending on the status of the two hard disks that make up a mirror as follows Status of hard disk 1 Status of hard disk 2 Status of mirror volume...

Page 244: ...created within a single disk or one volume spans a few disks span volume A few volumes are created within a single disk The screen shows information on a pair of hard disks that make up a mirror It do...

Page 245: ...ing 1 Detecting problem of a hard disk See 1 Confirm of hard disk failure above 2 Removing the hard disk Disconnect the hard disk with the problem At this time NEC ESMPRO Agent reports the following a...

Page 246: ...to Warning SCSI Slot General IMPORTANT The status color of the SCSI slot differs depending on the connection of mirrored hard disks If one of the mirrored disks was removed Warning If both of the mirr...

Page 247: ...formation on a Data Viewer changed A hard disk drive is mounted and the SCSI slot status becomes Online Details of alert report TIPS The device ID for example 41 1 on the Details window of alert indic...

Page 248: ...5 48 Installing and Using Utilities The redundancy status becomes Normal because the hard disk drive constructing a mirror is mounted Mirror...

Page 249: ...tions available for Server Maintenance Utility by clicking each button Center Tree view Information display view Items indicating the information and configuration of the entire system and the compone...

Page 250: ...of the OS installed on the server OS Version Version of the OS installed on the server Name Host name of the server Product Information contains the following information Item Description Manufacturer...

Page 251: ...nabled and when the server is running in the simplex mode with one module if the other module is inserted to the chassis it will be automatically started and modules will become duplex The module POWE...

Page 252: ...ule before the CPU module Down Stops the CPU module Firmware Updates the firmware System BIOS Jump Switch Switches the board Start the IO module and the CPU module of the sopped module respectively an...

Page 253: ...Test Number Test number from the diagnostics result The following buttons are displayed for PCI Module Item Description Clear Clears the MTBF information of the PCI module Up Starts the PCI module Th...

Page 254: ...for the primary setting Item Description Setting Current setting Primary or Secondary of the SCSI bus The following information is displayed for SCSI Bus Item Description Primary Makes the current bu...

Page 255: ...losure Item Description Device SCSI enclosure name Status Status of the SCSI enclosure SCSI Enclosure ID n The following information is displayed for SCSI Enclosure Item Description Status Status of t...

Page 256: ...offline Specify the file path to update Select this radio button to specify the file path to update Type the location of the firmware Type the full path location and the file name of the firmware to...

Page 257: ...MC FW Properties Specifies the update medium of the BMC firmware Help menu There are the following commands for Menu Help Item Description Help topics Displays the contents of Help About Server Mainte...

Page 258: ...d using the up down right and left arrow keys Tab key Moves to the next selection item when the focus is on the information display view Pressing the Shift and Tab keys together moves the focus to the...

Page 259: ...nents and general system settings The maintenance functions common to all components are operated in the same way basically the operation procedure and typical examples of screen images are described...

Page 260: ...from remote management PC by using NEC ESMPRO Manager L Local Executable on local server by using Server Maintenance Utility Support Not support BMC firmware update Component R L BMC R Remote Executa...

Page 261: ...alfunction of module Executable in the following module state this can be viewed on manager screen Duplex When system is stopped forcibly due to replacement or malfunction of module Executable in the...

Page 262: ...n The result of the start operation is reported by the server as an alert CHECK When starting a stopped IO module diagnostics of the CPU IO modules are automatically performed The IO module is started...

Page 263: ...ing Utilities 5 63 Sample screen of NEC ESMPRO Manager 1 Maintenance screen of CPU module CPU Module CPU Module Maintenance Sample screen of NEC ESMPRO Manager 2 Maintenance screen of IO module PCI Mo...

Page 264: ...s of the CPU IO modules are automatically performed The IO module is started after the diagnostics Stop Stop before replacing components 1 Select the target component by using the Server Maintenance U...

Page 265: ...Installing and Using Utilities 5 65 Sample screen of Server Maintenance Utility...

Page 266: ...aintenance tree of the component of the ft tree of the data viewer Open the tree of the component whose MTBF information is to be cleared and select the Maintenance tree To clear the MTBF information...

Page 267: ...omponent screen The result of the MTBF clearing operation is reported by the server as an alert CHECK At this point the State display on the target component screen is not changed If the MTBF clear is...

Page 268: ...confirmed by the LEDs on the target component The result of the MTBF clearing operation is registered in the event log CHECK At this point the State display on the target component screen is not chang...

Page 269: ...n any of the following module states this can be viewed on manager screen Removed Broken Shot Firmware Update Complete To diagnose the module under operation bring down the module before the diagnosti...

Page 270: ...be confirmed by Result of the diagnostics on the target component screen The result of the diagnostics is reported by the server as an alert The result of diagnostics executed last is displayed in th...

Page 271: ...agnostics button in the Diagnostics Information on the target module The diagnostics result can be confirmed by re obtaining the status of the target module The result of the diagnostics is registered...

Page 272: ...server On the firmware update screen specify the path to the firmware image file for update The table below shows the potential cases in which the firmware of a component is to be updated Firmware upd...

Page 273: ...ter the directory where the firmware to update is stored the directory you wrote down in step 1 and the file name of the image data into the input box and click the Execute button The server will upda...

Page 274: ...h a case perform the following operations before starting the module 1 Click the Firmware Update button in the Update screen for the target component 2 In the Firmware Update dialog box select Copy on...

Page 275: ...component with the LEDs If the component is operating stop the component Stop the CPU module and then stop the PCI module 4 Click the Firmware button for the target component Sample screen of Server M...

Page 276: ...art the other inactive module Starting the module causes the firmware to be updated automatically However if the Enable automatic firmware update property is disabled the module is started but the fir...

Page 277: ...city exceeds 2GB after additional memory has been installed in the system with complete memory dump enabled If the setting is not changed incorrect dump files may be collected 1 Go to Control Panel cl...

Page 278: ...the dump if requested by maintenance personnel Executable in the following module state this can be viewed on Server Maintenance Utility screen Removed Broken Shot Firmware Update Complete Diagnostic...

Page 279: ...urrent state with the State display on the target component screen 3 Click the Dump button in the Maintenance screen for the target component A certain time is required for the dump saving The dump is...

Page 280: ...f the target CPU module with the LEDs 3 Select the dump acquisition method with Dump of the target CPU module and click the Harvest button A certain time is required for the dump acquisition The dump...

Page 281: ...the setting is not set to Complete memory dump the standard memory dump function is performed even if the quick dump setting is set to Enable In addition the standard memory dump function is used when...

Page 282: ...ting firmware Wait until such processing is finished to make the settings Quick dump Auto firmware update Auto module start Component Remote Local Remote Local Remote Local Whole system Executable if...

Page 283: ...er Maintenance Utility in the following procedure The system cannot be configured using the NEC ESMPRO Manager 1 Select System Configuration 2 Select radio buttons to change the settings in System Con...

Page 284: ...On the BMC firmware update screen specify the path of the image file of the firmware to be updated The table below shows the potential cases in which the BMC firmware is to be updated IMPORTANT Contac...

Page 285: ...W Update dialog box appears 2 Enter the device name and click OK The Execution Check dialog box appears 3 Store the firmware in the directory specified by Location The storage area may be modified See...

Page 286: ...Update dialog box appears 2 Enter the device name and click OK The Execution Check dialog box appears 3 Store the firmware in the directory shown in Location The storage area may be changed See Change...

Page 287: ...irmware update by using the Server Maintenance Utility in the procedure below 1 From the menu bar click Tool point to BMC FW and select Properties The BMC FW Update Service Properties dialog box appea...

Page 288: ...little bit more network band width since each state change will be notified to NEC ESMPRO Manager as some kind of alert Setting 1 Select All Programs Esmpro from the start menu and click Manager Setti...

Page 289: ...Card comes with one license of NEC DianaScope It is installed in the 320Fa M ad 320Fa MR models as standard Notes The online document provides general descriptions of overall severs to be remotely ma...

Page 290: ...to Windows Server 2003 as a user with administrator authority 2 Set the NEC EXPRESSBUILDER CD ROM into the CD ROM drive 3 From the Start menu select Run 4 Type Q HAS W2K3 HASFTSTS SETUP EXE and click...

Page 291: ...and other logs for non redundancy status If this dialog box appears even though the status of CPU IO modules is duplex the connection of LANs built in SCSI HDDs or external storage devices connected...

Page 292: ...itor Tool follow the procedure below to uninstall it On the Add or Remove Programs dialog box select GeminiEngine Monitor and click the Remove button When the confirmation dialog box appears click Yes...

Page 293: ...Chapter 6 Maintenance This chapter describes the daily maintenance of NEC Express5800 ft series and precautions when relocating or storing the server...

Page 294: ...ager on the management PC Check whether any alert is reported on the Operation Window Data Viewer or Alert Viewer of NEC ESMPRO Manager Viewers of NEC ESMPRO Operation Window Alert Viewer Data Viewer...

Page 295: ...the CD ROM drive Disconnect the power plug before cleaning the server Cleaning the NEC Express5800 ft series For daily cleaning wipe the external surfaces of the server with a dry soft cloth Follow t...

Page 296: ...ollow the steps below to clean the mouse regularly 1 Disconnect the mouse from the USB hub of the keyboard while the server remains powered on 2 Turn the mouse upside down and rotate the mouse ball co...

Page 297: ...ton on the front of the CD ROM drive The tray comes out 3 Hold the CD ROM lightly and take it out from the tray IMPORTANT Do not touch the signal side of the CD ROM with your hand 4 Wipe the tray with...

Page 298: ...ead may be a cause of unsuccessful backup and damage to tape cartridge Clean the tape head regularly using a cleaning tape For procedure and interval of cleaning as well as lifetime of a tape cartridg...

Page 299: ...ing the hard disk drive no data is written into the disk Startup and Exit of System Diagnostics Follow the steps below to start the system diagnostics If the server is running shut it down and execute...

Page 300: ...pletes Test result Shows the start end and elapsed time and completion status of the diagnostics Guideline Shows the details of the keys to operate window Test summary window Shows the results of each...

Page 301: ...the log information of the diagnostics It can be saved on a floppy disk To save it on a floppy disk insert a formatted floppy disk to the floppy disk drive and select Save F Option Changes the output...

Page 302: ...Utility from the maintenance partition From the CD ROM Set the NEC EXPRESSBUILDER CD ROM in the CD ROM drive and reboot the system After the menu is displayed on the screen select Tools Off line Maint...

Page 303: ...he system specific information and or configuration may not be restored TIPS For information on making backup copy of system information see the separate volume User s Guide Setup Only the authorized...

Page 304: ...ANT If the server needs to be relocated stored due to a change in the floor layout to a great extent contact the sales agent Make sure to make a backup copy of your valuable data in the hard disk if a...

Page 305: ...ort time condensation will occur and cause malfunctions and breakdown when these are used in such state When you start operating these equipments again after the transportation or the storage make sur...

Page 306: ...6 14 Maintenance This page is intentionally left blank...

Page 307: ...Chapter 7 Troubleshooting If the product does not work properly see this chapter before deciding that it is a breakdown...

Page 308: ...tem operation Especially take note on whether any alert is reported to NEC ESMPRO Manager on the management PC Check whether any alert is reported on the Operation Window Data Viewer or Alert Viewer o...

Page 309: ...panels of the NEC Express5800 ft series and near the handles of hard disks inform the user of the various server statuses by the colors and the patterns of going on going off and flashing If trouble s...

Page 310: ...isconnect the keyboard and connect it back again Replace the keyboard 0211 Keyboard error Keyboard is faulty Disconnect the keyboard and connect it back again Replace the keyboard If restarting does n...

Page 311: ...e 0B28 Unsupported Processor detected on Processor 1 Unsupported CPU is mounted 0B29 Unsupported Processor detected on Processor 2 Unsupported CPU is mounted Check the supported CPU and replace it If...

Page 312: ...form Information Area corrupted 0B91 BMC update firmware corrupted BMC device is faulty 0B92 Internal Use Area of BMC FRU corrupted Data within SROM is faulty Replace the CPU IO module or ft Remote Ma...

Page 313: ...tected startup failure of 1st Processor 0BC1 POST detected startup failure of 2nd Processor CPU is faulty Replace the CPU 8120 Unsupported DIMM detected in DIMM group 1 8121 Unsupported DIMM detected...

Page 314: ...y Test failed Memory is faulty Replace the DIMM If replacing it does not help replace the CPU IO module 9009 Chipset NMI occurred BIOS NMI handler is executed and POST is stopped Obtain detailed infor...

Page 315: ...er CPU IO module and install it If this does not help replace the CPU IO module 9008 Forced power off occurred by another CPU IO module has a problem Pull out another CPU IO module and install it If t...

Page 316: ...the CPU IO module If this does not help replace another CPU IO module or center plane 902B BIOS revision does not match This BIOS revision cannot support the duplex mode Update the BIOS revision 9031...

Page 317: ...Remote Management Card option 9065 One or both the CPU IO modules have a problem There are some error messages in addition to this error code Check the other error message 9071 9072 Water cooling kit...

Page 318: ...ry manager 1 3 4 1 RAM address error 1 3 4 3 RAM low byte data error 1 4 1 1 RAM high byte data error Check the installation of DIMM board If the error persists contact your sales agent to replace the...

Page 319: ...indicating that virtual memory is insufficient when you restart the system after a STOP or system error has occurred Ignore the message and start the system If an error such as a stop error of the OS...

Page 320: ...tool such as NEC ESMPRO Agent or NEC ESMPRO Manager has been installed in the NEC Express5800 ft series or management PC you can obtain the error information from the display unit of the server or man...

Page 321: ...wer breaker for the connected power outlet is on If the power cord is plugged to a UPS make sure the UPS is powered and it supplies power See the manual that comes with the UPS for details Power suppl...

Page 322: ...start the server Does the server have appropriate memory boards or PCI card Operation of the server with unauthorized devices is not guaranteed Server reboots while running the SCSISelect utility Have...

Page 323: ...e memory configuration is correct Check if third party CPUs or memory DIMM are used Disks not in Duplex mode Unless you perform mirroring including reconfiguration after failed disks are replaced in c...

Page 324: ...position Is the floppy disk formatted Use a formatted floppy disk or format the floppy disk in the floppy disk drive Refer to the manual that comes with the OS for formatting a floppy disk Fail to ac...

Page 325: ...with the blue screen displayed Keep pressing the POWER switch for about 4 seconds Pressing the POWER switch quickly does not turn off the power in this case The server is not found on the network Is...

Page 326: ...ing conditions 1 CHKDSK is scheduled to be executed at next system startup 2 Corruption of file system is detected since the previous startup until shutdown 3 Inconsistency corruption of file system i...

Page 327: ...he driver failed the fast re sync function of the CPU module Module Module Number Module Number 0 or 1 Source HasCtrl Type Warning Event ID 3500 Description The error occurred on the CPU module of Mod...

Page 328: ...event log and the CPU IO module will not be integrated In this case contact your sales agent since device replacement will be required Source HasCtrl Type Warning Event ID 1703 Description The driver...

Page 329: ...ales agent since device replacement will be required Source HasCtrl Type Warning Event ID 1407 Description The driver was not able to bind South Bridge It has broken down in the past Module Module Num...

Page 330: ...rring to After starting up FT Status LED do not illuminate or illuminate amber of this chapter Source HasCtrl Type Warning Event ID 1505 Description Device Device name is not duplexing Device name LAN...

Page 331: ...CESS LED is amber and blinking Is the mirror of the hard disk not removed Check Disk Management and reconfigure the mirror if the mirror is broken See Configuring and Breaking Mirror in Chapter 3 Wind...

Page 332: ...up message may be displayed when you restart the system which NEC ESMPRO Agent is installed to and removal drives such as MO and DVD RAM are mounted on without closing Windows Explorer after displayin...

Page 333: ...eshold value Contact your sales agent since device replacement is usually required Blink in amber Collecting the dump No action is necessary Preparing for dual mode Wait for a while CPU module and or...

Page 334: ...specification and there is no effect to the operation Exclamation mark appears to VGA Display Controller since OS Standard VGA driver is not activated in the server Exclamation mark appears to Serial...

Page 335: ...the location below http java sun com j2se Is the LAN cable properly connected Make sure that LAN cable is properly connected The device sensor cannot be referred unless the cable is properly connecte...

Page 336: ...to connect NEC DianaScope and NEC Express5800 ft series When you use NEC DianaScope save the setting to connect to NEC DianaScope to a floppy disk before performing the operation BMC setting can be co...

Page 337: ...s of the source iANSMiniport are the logs about the duplex of the network The following logs may be recorded in the system event log after starting the system or after setting duplex but there is no p...

Page 338: ...de to the duplex mode at OS startup or during maintenance operations If the number of the following errors recorded in the system event log is few ignore the errors This error is logged about 5 to 50...

Page 339: ...rmation it will treat the load ratio as 0 So if NEC ESMPRO Agent cannot get information continuously the CPU load ratio may appear lower than the actual value HAS Fault Tolerance related logs are reco...

Page 340: ...t can handle the problem It is also set to self recover even when exceeding the allowance range HasCtrl related logs are recorded in the system event log The following event logs may be recorded durin...

Page 341: ...MC could not receive response from BMC within a given period of time There is no problem to the system by this warning Source HASIPMI Type Information Event ID 22 Description IPMI driver detected the...

Page 342: ...e appropriate corrective action according to the error codes listed in the table below Message Cause and Remedy This machine is not supported This NEC EXPRESSBUILDER version is not designed for this s...

Page 343: ...or more Set the display unit to display 256 colors or more The master control menu fails to appear Is your system Windows NT 4 0 or later or Windows 95 or later The CD ROM Autorun feature is supporte...

Page 344: ...splay setting the bit map is not displayed correctly but the setup information can be displayed The Point to Point tunneling protocol cannot be set The protocol is not supported at present After insta...

Page 345: ...NEC ESMPRO Manager to receive traps from NEC ESMPROAgent properly both community names must be matched Alert is redundantly reported to NEC ESMPRO Manager When NEC ESMPRO Manager s IP address or host...

Page 346: ...own or illegal information is displayed in CPU information If you select CPU Module CPU in the FTServer tree of the data viewer unknown or incorrect information appear in some information items The CP...

Page 347: ...high line impedance may have occurred Hence there is no problem Threshold value of LAN monitoring does not reflect Because the NEC Express5800 ft series detects hardware faults on the network in the d...

Page 348: ...istered in the monitoring event tree on the setting tool of alert function Alert Manager is not alerted to the manager if Alert Manager Main Service does not operate Even when the service is operating...

Page 349: ...MPRO Agent is running z To format or delete a partition by Disk Administrator or by other means z To request programmatically to remove media from removable disks such as MO Zip and PD Please conduct...

Page 350: ...it may be displayed as follows The status becomes Unknown grayed out on the data viewer The current value or rpm is displayed as Unknown on the data viewer The status is grayed out on the Web compone...

Page 351: ...he CPU PCI module CPU IO module the floppy disk drive name of I O Device on Data Viewer may be different from the name that is recognized by the OS Example drive name on Data Viewer A drive name recog...

Page 352: ...nvironment where Oracle products and NEC ESMPRO Agent coexist The installation of the Oracle products may change Startup type of SNMP Service into Manual If so change the setting back to Automatic and...

Page 353: ...curred in the NEC Express5800 ft series IMPORTANT If a STOP error or system error has occurred or the system has stalled restart the system and then start collecting event logs 1 Click Start Settings...

Page 354: ...ork 1 Click Start All Programs Accessories System Tools System Information 2 Select the Save from the File menu 3 Enter the name of the target file in the File name box 4 Click Save Collection of Diag...

Page 355: ...the server to restart In such a case it is required to force the server to shut down This forced shutdown however is not available if Enabled is selected for Switch Inhibit on the Security menu of th...

Page 356: ...ESRAS Utility window appears 2 Select Most recent IPMI Data from the tree view to obtain the information of the local computer If the data is displayed that means the information is successfully obta...

Page 357: ...s not assume any liability for damage to optional devices or the server or malfunctions of the server resulted from installation by the user NEC recommends you ask your sales agent to install or remov...

Page 358: ...or alter the server Do not look into the CD ROM drive Do not remove the lithium battery Disconnect the power plug before working with the server CAUTION Observe the following instructions to use the...

Page 359: ...uitable workspace Work with the server on the anti static or concrete floor When you work with the server on a carpet where static electricity is likely to be generated make sure take anti static meas...

Page 360: ...CPU or PCI module during the continuous operation disable the intended module place the module off line by using the Server Maintenance Utility of the NEC ESMPRO Agent or the NEC ESMPRO Manager from...

Page 361: ...s you should take are the same for other models You can install 25 4mm 1 inch high hard disk drives to six 3 5 inch hard disk drive bays on the server 3 5 imch hard disk drive bays have labels with sl...

Page 362: ...2 Click Disk Management under Storage in the console tree 3 If you are using the tower model Unlock the front door lock with the security key and open the front door If you are using the rack model U...

Page 363: ...hen the lever is locked you will hear a click sound IMPORTANT Be careful not to pinch your finger s between the lever and handle TIPS Check the hook of the lever is engaged with the frame 9 Connect th...

Page 364: ...er cords from the power outlet 3 If you are using the tower model Unlock the front door lock with the security key and open the front door If you are using the rack model Unlock the front bezel with t...

Page 365: ...ndle illuminates amber The DISK Access LED of the amber lit disk also illuminates amber 2 Remove the failed hard disk referring to Replacing Failed Hard Disk Drives on page 3 16 and Removing 3 5 inch...

Page 366: ...10 System Upgrade 5 25 INCH DEVICE The server has two slots to which you can install magnetic tape backup devices You need a SCSI controller sold separately to install a backup device Backup device tr...

Page 367: ...5 25 inch Device 1 See page 8 4 to prepare for installation 2 Loosen screws to remove the side cover 3 Loosen screws to remove the tray for adding devices 4 Remove the four screws securing the dummy c...

Page 368: ...the device IMPORTANT Distorted connector pins or loose connections may cause malfunction Make sure that the device and cable connectors are connected correctly 8 Secure the side cover with the screws...

Page 369: ...nagement software e g Server Maintenance Utility or NEC ESMPRO Manager to identify the module to be removed so that the module is removed when it is stopped without fail Then remove the relevant modul...

Page 370: ...t series in Chapter 5 NEC ESMPRO Manager Select ft CPU Module CPU Module to be removed Maintenance Bring Up Bring Down Bring Down Server Maintenance Utility Select FTServer CPU Module CPU Module to be...

Page 371: ...es are connected and then disconnect all cables connected to the module you are to pull out 5 Hold the release levers of the CPU IO module and pull it off IMPORTANT Do not hold part other than the han...

Page 372: ...he module as far as it goes 3 Put the handle back in the position where it was The installed CPU IO module will start automatically IMPORTANT Connect the cables that you disconnected before removing t...

Page 373: ...ed as group The number next to group corresponds to the connector number shown in the figure on the next page IMPORTANT The DIMM is extremely sensitive to static electricity Make sure to touch the met...

Page 374: ...hould be installed to the socket with the same number in another group This rule is applied to the case of removal The linked DIMMs should be of the same product with the same performance DIMMs should...

Page 375: ...ed to the open socket When the levers on both ends of the connector are opened the DIMM connector cover is unlocked and you can remove the cover IMPORTANT Keep the removed DIMM connector cover 7 Inser...

Page 376: ...ys an error message write it down and see the POST error message list on page 7 4 13 After starting the OS set the paging file size to at least the recommended value 1 5 times the installed memory siz...

Page 377: ...from the outlets 3 Remove the CPU IO module referring to page 8 14 4 Open the lever on both ends of the target DIMM socket to unlock the DIMM Then remove the DIMM 5 Mount the CPU IO module referring...

Page 378: ...DIMM 1 Identify the failed DIMM using the Data Viewer of NEC ESMPRO Manager 2 Remove the CPU IO module referring to page 8 14 3 Replace the DIMM 4 Install the CPU IO module referring to page 8 16 5 S...

Page 379: ...arts with a bare hand or place the CPU directly on the desk For more information on static electricity see ANTI STATIC MEASURES Do not use the system before checking to see it works correctly Make sur...

Page 380: ...wn OS The system turns off automatically 2 Unplug the power cords 3 Remove the CPU IO module referring to page 8 14 4 Remove the cable to remove the cooling fan unit 5 Check to be sure of the location...

Page 381: ...marks of the CPU and the socket and insert the CPU correctly 9 After pressing the CPU softly against the socket close the lever to secure it 10 Remove the film of the cool sheet on the heat sink 11 Pl...

Page 382: ...s not mounted correctly the screws are not fully fastened Do not hold the fastened heat sink to move the CPU 14 Insert the cable and then install the cooling fan unit 15 Install the CPU IO module refe...

Page 383: ...k may stick to the CPU because of the heat When you dismount the heat sink turn it sideways lightly to make sure that it is not sticking to the CPU If it is sticking to the CPU and you remove it the C...

Page 384: ...ng kit installed 1 Shut down the OS The server is automatically powered off 2 Unplug the power cords 3 Remove the CPU IO module referring to page 8 14 4 Remove the two screws securing the cooling fan...

Page 385: ...ooling bracket and secure it with two screws 8 Fix the water cooling kit on the other board with four screws of the pump area IMPORTANT Place the protuberances of the water cooling kit in the hollows...

Page 386: ...and secure the cooling fan unit with two screws IMPORTANT When mounting the water cooling fan unit avoid catching or damaging the tube of the water cooling kit Removing CPU Model with Water cooling K...

Page 387: ...replace a failed CPU 1 Use Data Viewer of NEC ESMPRO Manager to identify the failed CPU 2 Remove the CPU IO module referring to page 8 14 3 Replace the CPU 4 Install the CPU IO module referring to pag...

Page 388: ...EC logo screen is displayed and the startup process is stopped Press ESC to delete the logo screen and check the diagnostic message H W Configuration of BMC is corrupted Update BMC H W Configuration b...

Page 389: ...odule remove the PCI board referring to page 8 38 2 Remove PCI rear bracket installed to the CPU IO module as a standard with two screws 3 Remove the blank cover for LAN connector of ft Remote Managem...

Page 390: ...e slot and secure it with two screws IMPORTANT If you have trouble installing the card remove the card once and install it again Be careful since the card gets damaged if you press it too hard TIPS If...

Page 391: ...static electricity see ANTI STATIC MEASURES on page 8 3 Make sure to read ANTI STATIC MEASURES and PREPARING YOUR SYSTEM FOR UPGRADE before starting installing or removing options Note the following...

Page 392: ...ce 64bit 100MHz Slot size Low Profile PCI board type 3 3V N code Mountable board size MD2 N8804 002 1000BASE T 1ch board set N8804 003 1000BASE SX 1ch board set Only one board can be mounted when N880...

Page 393: ...all a PCI board and remove the connector cap IMPORTANT Carefully keep the removed connector cap 3 Remove the PCI bracket by loosening the screw and remove the slot cover of an expansion slot IMPORTANT...

Page 394: ...oard remove the board once and install it again Be careful since the board gets damaged if you press it too hard 7 Install the PCI bracket and secure the board 8 Install CPU IO module referring to the...

Page 395: ...associated with the PCI board slot are being turned off 2 Remove the CPU IO module referring to the page 8 14 3 Remove the PCI bracket then remove the PCI board 4 Replace the board and fasten it 5 In...

Page 396: ...compliant with IEC8877 standard If any other connector is used it may not be removed easily List of slots to install optional PCI boards Refer to List of option PCI boards and installable slots on pa...

Page 397: ...rver and start the system 2 Set the NEC EXPRESSBUILDER CD ROM into the CD ROM drive and run UPDATE VBS located at CD ROM_drive HAS W2K3 HASSETUP SCSI_folder If the pop up window for confirming to over...

Page 398: ...unt a N8803 033 Fibre Channel board set and then start the system 2 Start Device Manager from Start Program Administrative Tool Computer Management and check if Emulex LP1050 Fibre Channel Host Adapte...

Page 399: ...vice N8190 110F using N8803 033 Fiber Channel boards NEC Storage StoragePathSavior FC array device N8190 110F PortDuplexManager Mount N8803 033 Fibre Channel boards after completing the OS installatio...

Page 400: ...8 44 System Upgrade This page is intentionally left blank...

Page 401: ...300GB 6 The user area is reduced to a half of the physical capacity due to software mirroring Auxiliary input device CD ROM standard ATAPI interface 1 Load on tray type x24 speed 5 25 inch 2 slots Non...

Page 402: ...B 6 The user area is reduced to a half of the physical capacity due to software mirroring Auxiliary input device CD ROM standard ATAPI interface 1 Load on tray type x24 speed 5 25 inch 2 slots None Fi...

Page 403: ...0600 0000061F 00000A79 00000A79 00000CA2 00000CA5 00000CF8 00000CFF 0000FE00 0000FE20 DMA controller Programmable interruption controller Motherboard resource System timer Motherboard resource Motherb...

Page 404: ......

Page 405: ......

Page 406: ...NEC Express5800 320Fa L N8800 083F 083AF EXP320A NEC Express5800 320Fa LR N8800 088F 088AF EXP320D NEC Express5800 320Fa M N8800 089F 089AF EXP320C NEC Express5800 320Fa MR User s Guide 1st Edition 6...

Reviews: