


Installation
Installation of robot CPU R16RTCPU
FR series
3 - 27
3.5.1 Installation
and
removal of modules
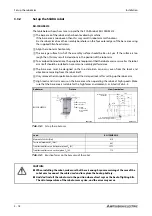
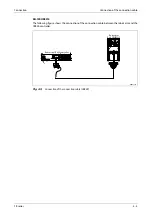
This section shows you how to assemble modules onto the rack such as, e.g. power supply unit, a PLC
or a robot CPU.
Installation
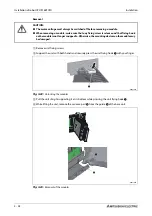
Switch off the mains voltage!
When a cap is attached to the unit connector of the base unit, remove it.
Place the concave part
of an unit onto the guide
of the base unit.
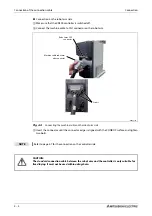
Push in the unit until the module fixing hook
snaps into place.
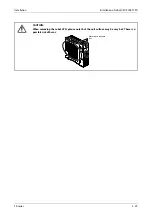
Fix the unit on the base unit with the screws (M3 x 12).
E
CAUTION:
●
The mains voltage must always be switched off before installing a module.
●
If the concave part of the module is not placed correctly onto the guide of the base unit, the
PINs on the module plug might become bent.
R002705E
Fig. 3-20:
Installation of the modules
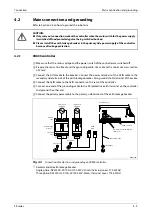
R002706E
Fig. 3-21:
Locking the modules
Summary of Contents for MELFA RH-FRH-D
Page 2: ......
Page 4: ......
Page 6: ......
Page 16: ...Contents X ...
Page 22: ...Environmental conditions for operation Introduction 1 6 ...
Page 70: ...Grounding the robot system Installation 3 32 ...
Page 90: ...Teaching Box connection Connection 4 20 ...
Page 96: ...Switch on the robot system Startup 5 6 ...
Page 128: ...Dimensions Appendix A 18 ...
Page 130: ...A 20 Index Appendix ...
Page 131: ......
Page 132: ......
Page 133: ......
Page 134: ......
Page 135: ......
Page 136: ......
Page 137: ......
Page 138: ......
Page 139: ......
Page 140: ......
Page 141: ......
Page 142: ......
Page 143: ......
Page 144: ......
Page 145: ......
Page 146: ......
Page 147: ......
Page 148: ......
Page 149: ......
Page 150: ......
Page 151: ......
Page 152: ......
Page 153: ......
Page 154: ......
Page 155: ......
Page 156: ......
Page 157: ......
Page 158: ......
Page 159: ......
Page 160: ......
Page 161: ......
Page 162: ......
Page 163: ......
Page 164: ......
Page 165: ......