background image

Scala2 | Version 5 | System Configuration

Outputting Scala2 Symmetry Data to Scantrol

You can output across speed data from Scala2 to Scantrol iSYM application.

Before you begin

• You need to have iSYM version 3.5.10 (beta version) and above
• Make sure you have a license to use Marport software with Scantrol.

Procedure

1.

Scantrol and Marport computers must be connected together via an Ethernet wired network.
Both computers must be on the same sub-network to communicate with each other:
192.168.0.XX.
For example, the network IP address can be set at 

192.168.0.10

 on Scantrol computer and at

192.168.0.12

 on Marport computer. The subnet mask address is 255.255.255.0 for both.

2.

In Scala2, go to 

Settings

 > 

NMEA Outputs

.

3.

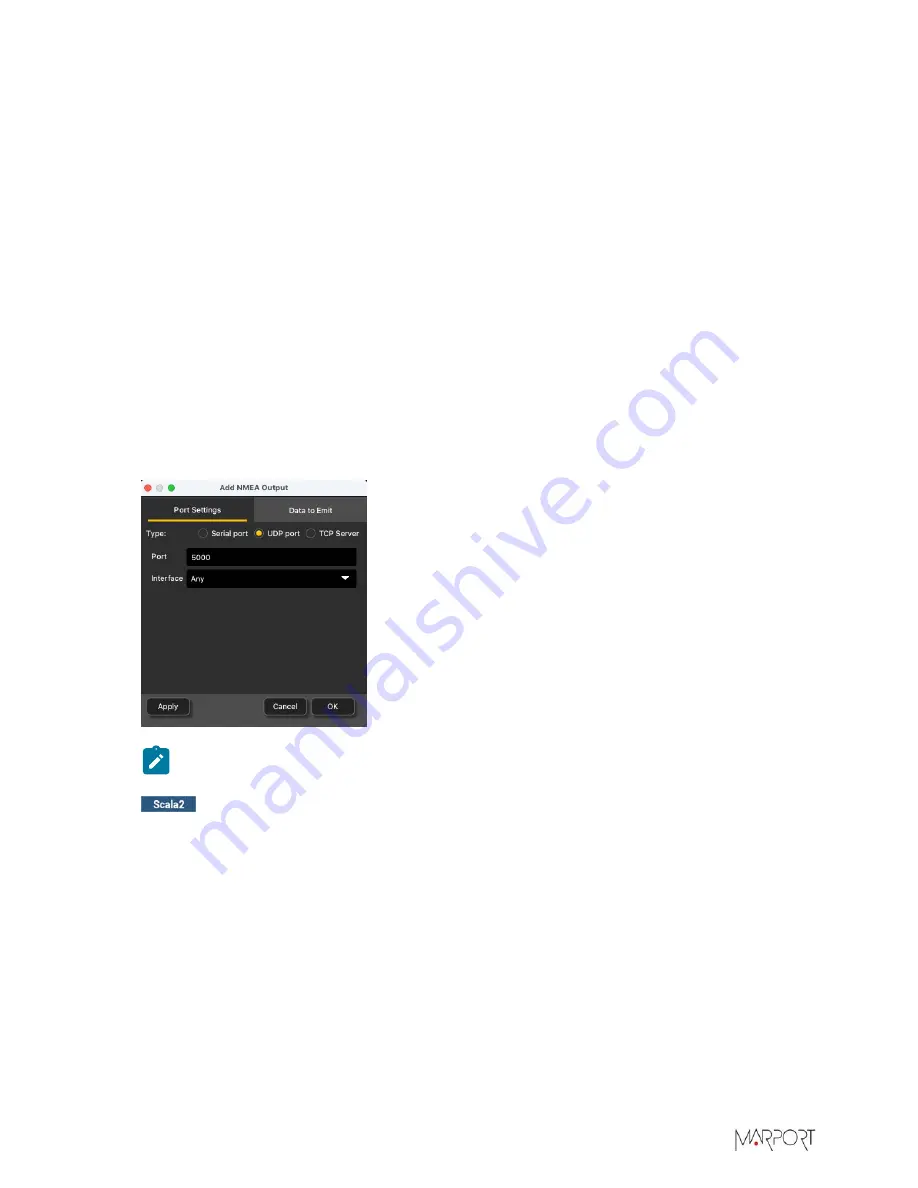
In 

Port Settings

, select 

UDP port

.

4.

Enter a port number, for example 

5000

, and leave 

Interface

 at 

Any

.

Note: 

 The port number must be different from the one on which Scantrol data are

received (if applicable).

5.

 In 

Data to Emit

,

a)

Select 

Emit Sensor Data

 > 

Raw data

.

b)

Select 

Emit only selected data types

, then select 

Water Speed Along

 and 

Water Speed

Across

.

 | 

64

Summary of Contents for Scala2

Page 1: ...Scala2 User Manual...

Page 2: ......

Page 3: ...ensor Locations 26 Configuring the Sensor Settings 30 Configuring Trawl Positioning System 31 Calculations for Positioning System 33 Exporting a Summary of the Receiver Configuration 34 Applying Filte...

Page 4: ...e 100 Changing the Distance from the Door Sounder to the Bottom 101 Adding a Range Marker 102 Zooming on Timestamp and Distance Scale 103 Sensor Numerical Data 105 Display Types 105 Changing the Displ...

Page 5: ...Advanced Troubleshooting Tools 148 Messages 148 Log 150 Checking Noise Interference 151 Recording Audio Files 153 Giving Remote Access to the Computer 154 Uninstalling Scala2 154 Support Contact 156 A...

Page 6: ...l on page 42 and Outputting Scala2 Symmetry Data to Scantrol on page 64 added details about the computer IP address Changed Settings tabs Data Recorder and Data History tabs have been merged into one...

Page 7: ...sors Using the MultiTrawl View on Scala2 on page 113 added new viewing angles V5 07 01 22 Now documents Scala2 version 02 10 x Changing the Language Settings of Scala2 on page 18 the language can now...

Page 8: ...egistered trademarks of Marport All other brands products and company names mentioned are the trademark and property of its respective owners only Marport is a division of Airmar Technology Corporatio...

Page 9: ...ded to be used with the new Dock product A new multitrawl view of single twin triple and quad trawls with doors and clump alignment warp length and echogram display Access all the customization option...

Page 10: ...sensors displayable on screen Adjust windows and graphs according to your needs Compare data from equivalent sensors using multiple history plots Scala2 is optimized to interface with other marine eq...

Page 11: ...2 Mac Mini 3 Internet access optional 4 PoE 5 M3 receiver M3REC 6 Junction boxes 2 One optional junction box 7 Thru hull penetration TH 1 01 8 Hydrophones NC 1 XX Manufacturer standard cable CAT5e Et...

Page 12: ...oduction and Presentation Overview of Scala2 1 Menu 6 Incoming Data 2 Toolbar for Page Display 7 Receiver Activity 3 Data Display 8 Echogram Time Stamp 4 Control Panels 9 Alarms 5 Customizing panel Cu...

Page 13: ...screen called the Dock to access applications and files Click icons to open items 1 Launchpad access all your applications 2 Web 3 Scala2 4 Mosa2 5 TeamViewer 6 Trash to delete items drag them to the...

Page 14: ...la2 Version 5 Introduction and Presentation Switching Off the Computer From the top left corner of the screen click Apple Menu Shut Down Also use this menu to restart or put the computer in sleep mode...

Page 15: ...he Scala2 software dongle for basic or full version 2 Double click the installation file dmg 3 From the installation panel double click Sentinel Runtime pkg If a warning appears click Open 4 Follow th...

Page 16: ...orner of your screen and type Terminal Select Terminal from the results In the terminal enter sudo spctl master disable Press enter Anywhere option is now displayed in your Security Privacy preference...

Page 17: ...matically Opening Scala2 at Start Up To do this apply the following settings in the system preferences Procedure 1 From the top left corner of the screen click Apple Menu System Preferences Users Grou...

Page 18: ...is a software that analyzes sensors data This program is necessary for the correct operation of the receiver DO NOT CLOSE this window If the window appears click minimize to hide it and change the set...

Page 19: ...select the language the first time you open Scala2 It can be changed afterward in Scala2 settings Procedure 1 From the top left corner of the screen click Menu Settings then go to Advanced tab 2 In Us...

Page 20: ...Scala2 Version 5 Installation 19...

Page 21: ...Firefox web browser 1 Click Menu Expert Mode 2 In the following window enter the password copernic 3 Open the control panels and go to the Mx panel Click the menu icon next to the name of the receiver...

Page 22: ...ck Click to Add on one of the hydrophones ports 3 In the hydrophone selection page scroll the top part to see the available hydrophones 4 Click the picture of the correct type of hydrophone between ac...

Page 23: ...status Note If the hydrophone current is outside normal values it is indicated with a red cross Refer to List of Marport Hydrophones on page 22 to know what are normal values Troubleshooting If an act...

Page 24: ...sion 33 60 KHz 0 0 mA Blue NC 1 05 NC 2 02 Passive hydrophone Wideband preamplifier box Vessel with normal level of noise below 100 dBV Large number of sensors Use at great depths 500 m Gain configura...

Page 25: ...500 m Gain configurable Low or High Filters configurable 38 and or 50kHz 30 60 KHz 18 22 mA Yellow NC 1 09 Active hydrophone integrated preamplifier For use on a paravane only Vessel with normal level...

Page 26: ...of trawl in the Trawl Gear List A picture of the selected trawl gear is displayed with the nodes sensor locations where sensors can be placed What to do next Now you have chosen a type of trawl gear...

Page 27: ...re to know to which node the number corresponds 5 Click Add Sensor What to do next You can now configure the settings of the sensor Trawl Gears and Sensor Locations Sensor locations in the system are...

Page 28: ...Scala2 Version 5 System Configuration Single Trawl Gear Twin Trawl Gear Triple Trawl Gear 27...

Page 29: ...Scala2 Version 5 System Configuration Quadruple Trawl Gear Twin Outrigger Trawl Gear 28...

Page 30: ...Scala2 Version 5 System Configuration Port Seine Gear Starboard Seine Gear 29...

Page 31: ...user guide to know the recommended settings Note Before you add the sensor to the receiver on the system web page using Scala2 or Firefox web browser the sensor must be configured with Mosa2 applicati...

Page 32: ...itioning Before you begin Door sensors are already added and configured Tip A spreadsheet is available on Marport support website to help you complete this page go to the Useful Resources page Procedu...

Page 33: ...the misalignment Y c Receiver firmware from version 08 01 Enter the misalignment angle shown on the drawing Note The baseline is very important to have accurate positions of the doors 3 Receiver firm...

Page 34: ...should calculate Misalignment Z is the more critical for correct positioning data Make sure these calculations are correct if you enter them in Scala2 Receiver firmware from version 08 01 Calculate mi...

Page 35: ...Receiver Configuration You can export a text file containing a summary of the configuration of the receiver Procedure 1 In the status bar right click the IP address of the receiver and click Save Rece...

Page 36: ...h echo sounder systems installed on the boat hull Typically these perturbations would be seen as isolated targets on echograms In order that the user do not mix echogram targets coming from perturbati...

Page 37: ...a can change when sent and displayed on the user interface It removes incoherent variations It is useful on all data Min Max Some Smoothing Smoothens data and prevents jumps in the display This can ad...

Page 38: ...e if you have a low level of noise you can choose Echosounder Interference Reduction If you have a high level of noise you can choose Echosounder and Interference Reduction Then adapt the level of fil...

Page 39: ...nal Interference Reduction filter is applied The Medium level of the filter means data are moderately smoothed Applying Filters You can apply different types of filters on sensor s incoming data Proce...

Page 40: ...he functions of the selected sensor 6 From the Standard tab select filters for each function See Types of Filters on page 36 for details about the filters 7 To change the default threshold values for...

Page 41: ...cond c Leave the other default parameters if you have no specific requirements d Select a different input format if you have Marelec or Rapp Marine Rapp Hydema equipment Otherwise select Standard NMEA...

Page 42: ...y When communication with the NMEA devices is lost LEDs do not blink anymore Troubleshooting If you see a warning sign in front of data it means that you receive the same data from more than one devic...

Page 43: ...computers must be on the same sub network to communicate with each other 192 168 0 XX For example the network IP address can be set at 192 168 0 10 on Scantrol computer and at 192 168 0 12 on Marport...

Page 44: ...o not clear this checkbox you will not receive the data from Scantrol Results Scantrol data are displayed in Scala2 Outputting NMEA Data to Other Systems You can send to other systems data you receive...

Page 45: ...on purpose TCP enter the port number from which data are sent 5 Under the Data to Emit tab select which data you want to output Select Emit Sensor Data to output data that is received on Scala2 from M...

Page 46: ...the sensors are not in water configure the same output settings in ScalaReplay2 then replay SDS files containing positioning data Displaying Trawl Positioning from Scala2 on Olex You can export trawl...

Page 47: ...only If you need to use slant distances rather than warp lengths select Use slant distances from sensors rather than warp lengths in Trawl Modeling If you receive neither warp lengths nor slant distan...

Page 48: ...ta to Emit select Emit only selected data types and deselect all the items This is to make sure Scala2 do not output these data If you do not do this Scala2 outputs all data and this slows down Olex e...

Page 49: ...the LED is grey it means the port is not accessible Check that you chose the correct port from the list of ports in Port Settings 8 From Olex check that you correctly receive data a Click Layers Show...

Page 50: ...Scala2 Version 5 System Configuration If Olex is not connected to Scala2 no NMEA sentences are displayed Results You can see the trawl position on Olex 49...

Page 51: ...between both doors You cannot display a 3D view of the trawl when using IIGLL sentence To use PTSAL sentence you need a good stability of heading values If heading values are unstable the trawl displa...

Page 52: ...Serial port or UDP port and enter a port If using a serial port enter a baud rate of 19200 for PTSAL and 4800 for IIGLL to correspond with baud rates in MaxSea d In Data to Emit select Emit only selec...

Page 53: ...If using PTSAL sentence select PACHA GEONET and if using IIGLL select Simrad ITI f You cannot change the baud rate from MaxSea If using a serial port make sure you put the same baud rate in Scala2 g C...

Page 54: ...System Configuration 6 Click the Data Display tab and check that you see For PTSAL sentence 3 trawl positions with latitude and longitude data For IIGLL sentence 1 trawl position with latitude and lo...

Page 55: ...t c Click Display Figure 3 Example of incoming PTSAL sentence Results From MaxSea you should see the trawl behind the boat With a PTSAL sentence there are 3 points corresponding to the location of the...

Page 56: ...Scala2 Version 5 System Configuration With a IIGLL sentence there is 1 point corresponding to the center between the doors The line corresponds to its heading 55...

Page 57: ...boat If you have both a winch control system and sensors sending slant distances Scala2 will use warp lengths only If you need to use slant distances rather than warp lengths select Use slant distance...

Page 58: ...ion 5 System Configuration 3 From TimeZero check that you receive NMEA data from Scala2 and data from a GPS a From TimeZero click TIMEZERO menu Connection Wizard b In the connection wizard select Port...

Page 59: ...Scala2 Version 5 System Configuration c Select the port of the NMEA data You should see Marport NMEA positioning data PMPT d Select the port of the GPS You should see incoming data 58...

Page 60: ...s configuration The wizard analyzes the system and search for incoming data When the search is complete it shows a list of ports where devices are connected and data they transmit c Check if the ports...

Page 61: ...Scala2 Version 5 System Configuration e Follow the instructions from the wizard 5 From TimeZero chart check that you see the trawl behind the vessel 60...

Page 62: ...a winch control system and sensors sending slant distances Scala2 will use warp lengths only If you need to use slant distances rather than warp lengths select Use slant distances from sensors rather...

Page 63: ...nput Output Mobile Configuration b In the left panel right click System and select Add Stream then choose a port between serial COM UDP NET or TCP c To configure the port click its name in the left pa...

Page 64: ...t Position c Under the Source tab select NMEA PTSAL Geonet d From Stream select the port connected to Scala2 or select Automatic to automatically find the port e You do not need to change the other se...

Page 65: ...he same sub network to communicate with each other 192 168 0 XX For example the network IP address can be set at 192 168 0 10 on Scantrol computer and at 192 168 0 12 on Marport computer The subnet ma...

Page 66: ...Scala2 Note Port closed mention at the bottom of the window does not impact the configuration and should be ignored Tip If you need to test the NMEA connection but the sensors are not in water config...

Page 67: ...You need to save GEBCO files according to a specific folder structure a Create a folder named Databases anywhere on the computer b Create the following folder structure inside Databases and save the...

Page 68: ...Scala2 Version 5 System Configuration 5 Open a page with a 3D overview of the vessel Results GEBCO bathymetric data is displayed on Scala2 67...

Page 69: ...Scala2 Version 5 System Configuration 68...

Page 70: ...Scala2 and how to change their display Control Panels By default the control panels are displayed on the right side of the screen Click the drawer to open or close them Note To change to position of...

Page 71: ...a2 Version 5 Display Configuration 1 Computer It displays the temperature of the central processing unit of the computer and the GPS position of the computer if you allowed Scala2 to use your location...

Page 72: ...ation of the sensor on the trawl gear is written between brackets next to the name of the sensor To know the location corresponding to the number refer to the pictures in Sensor Nodes The shape of the...

Page 73: ...uration 4 NMEA Inputs This is where you add NMEA inputs received from external devices It displays the incoming NMEA data 5 A2S Data ScalaReplay2 only the panel displays the replay of data recorded on...

Page 74: ...d to use slant distances only Estimate horizontal distance from depths estimates the distance between the doors and vessel if the system receives neither warp length data nor slant distances from sens...

Page 75: ...zation options for the data By default the customization panels are on the left side of the screen Click the drawer to open or close them Drag elements from this panel to the pages to add data 1 Stand...

Page 76: ...tem and chart view See Displaying Vessel System 3D View on page 131 and Displaying the Chart View on page 132 3 MX You can find here echogram and 3D views of equipments such as the doors the Trawl Spe...

Page 77: ...m left corner of the screen A dot next to the receiver name indicates its activity the receiver is active the receiver is in Spectrum mode the receiver is in audio recording mode the communication wit...

Page 78: ...or tiles will only inform if the sensor is trawling or on deck turned off Note The Virtual Charger Room is compatible with single twin triple and quad trawls Main page To open the Virtual Charger Room...

Page 79: ...It displays Ready to deploy when fully charged Click to display a visual animation on the charger plug when the sensor must be deployed The sensor is operating on the trawl The sensor is out of water...

Page 80: ...eate a new page from scratch or from a template Procedure 1 From the top left corner of the screen click Menu Customize 2 Enter the password eureka 3 From the top toolbar click the add icon Page Templ...

Page 81: ...Empty Page To open a page with data already displayed select a page from the Page Templates Tip You can use these pages as a basis and add other data To display a page that was previously saved as an...

Page 82: ...do next Deactivate the Customize mode when you have finished customizing pages click Menu Customize again Adding Data to a Page You can choose data that will appear on the screen Before you begin You...

Page 83: ...ls connect in Expert Mode then click Menu Settings Advanced 2 Under the Mx tab choose data and click hold for 3 seconds until a rectangle with data appears 3 Hold drag the rectangle to the middle of t...

Page 84: ...on page 105 for more information about the types of display Data is displayed on the screen 6 Drag the lines around data to resize it Tip To place data e g dial gauge text on top of previously placed...

Page 85: ...w area 2 In the Choose new Gauge Type dialog box select History Plot 3 Drag other data for example Depth from a Spread Master to the first Depth history plot 4 The second data appear in the history pl...

Page 86: ...displayed on a page Before you begin You must be in Customize mode to do this task Procedure Right click data and select Remove Dial or other data type What to do next Deactivate the Customize mode w...

Page 87: ...the name of the page displayed in Hidden Pages Exporting a Page You can export pages you created for example if you want to reuse them for other configurations Before you begin You must be in Customi...

Page 88: ...Page on page 81 Deleting a Page You can delete pages Before you begin You must be in Customize mode to do this task Procedure 1 To permanently remove a page right click the page tab and click Delete 2...

Page 89: ...at the same time Opening a Page in a New Window You can open a page in a new window and drag this window to another desktop screen Procedure 1 From the top left corner of the screen click Menu Custom...

Page 90: ...desktop screen The initial window is considered as main window and it has the control panels The window you created is named Scala 2 Its name is displayed on the top of the window When moving pages b...

Page 91: ...es click Menu Customize again Moving Pages Between Windows You can distribute pages among different windows Procedure 1 From the top toolbar of the main window right click a page name and select for e...

Page 92: ...ges or Hide to keep the page hidden The window disappears when all pages are removed Customizing the Display of Data Note Customization options are all in the panel on the left side of the screen avai...

Page 93: ...de to do this task Procedure 1 Open the drawer on the right side of the screen to display the control panels 2 In the control panels click the Mx tab Under the sensor s name click then drag Sonar Data...

Page 94: ...ed above each other 4 If you use the side sounding on a Seine Explorer right click the echogram then click Vertical Display 5 If the sensor has been configured in Down 1 Down 2 sounding mode there is...

Page 95: ...h value that you set on the top of the scale and adjust the zooming to always keep the bottom on the first third of the image Z Scale Follow Bottom Keep the zoom you set on the depth scale and follow...

Page 96: ...one is for latest generation sensors It displays the target strength 2 For both types of palettes a Drag the top handle down to increase the red color b Drag the bottom handle up to eliminate noises...

Page 97: ...Fire Fire color palette NC42 Standard Scala2 color palette NC42Grayscale Shades of grey NC42Ossian Ossian color palette OssianGrey Ossian color palette NC42ScanmarTrawleye Scanmar Trawleye color pale...

Page 98: ...c A file with the list of the colors is saved in Documents Marport ScalaLive mx SonarPalettes You can modify the file directly 6 For example to have the following display with the first type of palett...

Page 99: ...al Smoothing and or Horizontal Smoothing Displaying the View from Surface to Seabed You can choose to display the echogram beginning from the water surface instead of the default view from the sensor...

Page 100: ...e This option is compatible with True Mode only Displaying Echograms of Seine Sensors You can display an echogram image of the contents of a seine purse when using a Seine sensor with side looking opt...

Page 101: ...the bottom of the trawl and the beginning of the seabed Procedure Right click the echogram then click Draw Bottom Line A yellow line appears at the bottom of the trawl and a white line appears at the...

Page 102: ...ns to Have distance to bottom values beginning from the shoes instead of from the sensor position Remove the echo of the shoes from the echogram Procedure 1 Click Menu Settings then go to the Trawl ta...

Page 103: ...depth for example if you need to ensure that your trawl net stays at this depth It is called a Variable Range Marker VRM Procedure 1 Right click the echogram and select Set VRM 2 Use the arrows above...

Page 104: ...le place your cursor on the vertical axis of the echogram or history plot and scroll 2 To zoom in and out of the time stamp place the cursor on the horizontal axis and scroll Note When two echograms o...

Page 105: ...Scala2 Version 5 Display Configuration 104...

Page 106: ...between different types of display in the customization panel or when you drag numerical data to a page Dial Gauge History Plot Label There are also dials specific to certain types of data Name Types...

Page 107: ...peed across Bearing angle is negative when the sensor is oriented toward port and positive when oriented toward starboard Water Speed WS Dial For speed log type of device data received from NMEA input...

Page 108: ...ck the element and choose Option Description Dial Font size Gauge Rotate Font size Units History Plot Show raw data useful to check if there are communication problems Show points useful to see the in...

Page 109: ...e mode when you have finished customizing pages click Menu Customize again Displaying Catch Monitoring You can be alerted when the codend is full Before you begin You must be in Customize mode to do t...

Page 110: ...e trawl doors For twin trawls you can also see the distance between both doors and the clump Before you begin You need to have Spread sensors that send distance between port and starboard doors Proced...

Page 111: ...and port starboard doors This way if the trawl is asymmetric you can adjust accordingly and see live results very easily Before you begin You must be in Customize mode to do this task You need to hav...

Page 112: ...between the port door and clump are displayed 2 If you have twin trawls with 3 measured distances open the Customize panel and go to the Mx tab Click drag a Twin Trawl Spread Plot to the page You can...

Page 113: ...door and clump clump and starboard door Note Right click the plot and click Single Trawl Spread Plot if you need to switch to single trawl What to do next Deactivate the Customize mode when you have...

Page 114: ...o to Menu Settings Trawl then select Auto to automatically detect the number of trawls or select manually the type of trawl gear in use If you change the trawl gear change this setting accordingly Pro...

Page 115: ...distance Nominal value total spread distance you want to have If the value of the current distance becomes larger or smaller than the nominal value the alignment axis appears in red Tolerance toleranc...

Page 116: ...es and projection distances should be the same If not it means the doors or clumps are not aligned Time Ticks select Show dates to show the current time on the timescale or Show delays to show the tim...

Page 117: ...Scala2 Version 5 Display Configuration Models You can change the model of trawl doors or clumps Click the arrows to select the model The 3D view will change accordingly 116...

Page 118: ...een doors for a single trawl 4 3D representation of the position of the doors and clump Alignment is correct when the doors are inside their outline clumps are framed in green and axis is green 5 Trac...

Page 119: ...tance from the alignment axis is displayed above In this case the current spread distance is inferior to the nominal spread distance that was set Doors are shown out of their expected position and axi...

Page 120: ...Scala2 You can display a 3D view showing the trawl gear and the echogram images received from a Door Sounder and Door Explorer Displaying the MultiDepth View Before you begin Go to Menu Settings Traw...

Page 121: ...nce from the sensor to the sea surface and height distance from the sensor to the seabed of the sensors above the 3D view Right click the view to see the display options To zoom on specific area of th...

Page 122: ...Scala2 Version 5 Display Configuration 121...

Page 123: ...en the colors in the echogram True Mode select to see the echogram beginning from the water surface If not selected the echogram begins from the sensor position Scaling zoom in and out of the echogram...

Page 124: ...f you change the trawl gear change this setting accordingly Important To have correct door spread values displayed on Scala2 you need to be careful when you reduce the number of trawls See Changing th...

Page 125: ...u reduce the number of trawls Door sensors are configured to operate on specific locations on doors and clumps If the composition of the trawl gear does not correspond to the configuration of the sens...

Page 126: ...Quadruple trawl Distances sent by Master on port door Distance sent by inner port clump Distance sent by center clump Distance sent by the inner starboard clump Quadruple trawl Quadruple to triple kee...

Page 127: ...ors and clump This way you can see the movements of the doors and clump Procedure 1 Open the customization panel and go to the Mx panel Click drag the Door 3D View to the page and select the fishing g...

Page 128: ...Tip You can change the fishing gear element anytime right click the 3D view and click Configure 2 You can also change the viewing angle looking from the trawl toward the vessel front or from the vesse...

Page 129: ...r click Menu Settings b Click the Trawl tab and select the models of doors and clump from the lists using left and right arrows 4 To change the view angle of the door right click the 3D view and choos...

Page 130: ...view and select or not Display Ground You should leave the ground displayed in order to see if the doors are touching it Displaying Trawl Speed 3D View You can display a 3D view of the trawl speed sen...

Page 131: ...t in a yellow area 4 In the dialog box that appears select the location of the trawl speed sensor The 3D view of the trawl speed sensor is displayed You can see the along and across speeds and the pos...

Page 132: ...omize mode to do this task You need to have incoming data from GPS position heading Sensors with positioning Warp lengths or Slant Range sensors giving distance to vessel Procedure 1 Open the customiz...

Page 133: ...n Trawl to focus on the trawl What to do next Deactivate the Customize mode when you have finished customizing pages click Menu Customize again Displaying the Chart View You can display the location a...

Page 134: ...play the setting menu View White Background change the chart background to white instead of black Center on Ownship center the view on the vessel only Center on Ownship and Trawl center the view on bo...

Page 135: ...et Display Positionning Filter Data used for development only Display Positionning Sensors Data displays raw data used to get the trawl position What to do next Deactivate the Customize mode when you...

Page 136: ...In the control panel click the data on which you want to set an alarm 2 Alternatively from the top left corner of the screen click Menu Settings then go to Alarms tab 1 Default low battery alarm 2 Cus...

Page 137: ...is triggered 6 In Alarm Notifications choose if you want to display a pop up notification and or a sound These are examples of alarm settings Alarm on the catch status Alarm on a depth value The noti...

Page 138: ...s of data displayed in Scala2 Procedure 1 From the top left corner click Menu Settings 2 In Units select the units to use in Scala2 among the following units For distance data meter foot yard fathom c...

Page 139: ...The name of the SDS files indicates the year month day and hour of the beginning of the record in GMT timezone To access data recording settings connect in Expert Mode then click Menu Settings Advanc...

Page 140: ...Scala2 Version 5 Display Configuration If there is not enough space on the hard drive to record data Scala2 displays a warning 139...

Page 141: ...ontrol panels then click Mx Scala Processing Sensor Data Filters and select Use Mx embedded filters 3 To choose the source directory right click the timeline and click Change Directory Note By default...

Page 142: ...d value of data in plots a Click Menu Settings Advanced b Select Display global position cursor on plots and echograms c Pause the replay then hover the mouse over plots to see the global position and...

Page 143: ...w you to directly jump from a given position green arrow to another location blue arrow You can jump forward 3 or backward 4 in the timeline Here is an example of a code and the result Figure 4 Exampl...

Page 144: ...rectory to choose the source directory where A2S files are stored In the replay bar the recording period of A2S files is displayed in green In the control panels data that were received in live are di...

Page 145: ...e saying Scala2 cannot be opened Your Mac security preferences do not allow you to open applications not downloaded from the App Store 1 Click Apple menu System Preferences Security Privacy 2 From the...

Page 146: ...s appear at the bottom of your desktop screen If you close the window restart the computer Do not click inside the window or you will loose the mouse If you lost the mouse connect a keyboard and press...

Page 147: ...lick Hydrophones from the panel on the left 6 Check the hydrophones current status If there is no current 1 Check from the configuration page that the correct hydrophone type between passive and activ...

Page 148: ...o a new window 1 Check your other windows to see if your page appears in it If you created a window and cannot find it see the previous troubleshooting case 2 If you want to move your page to another...

Page 149: ...o have internet It can be for example your phone WiFi your WiFi router a USB to Ethernet adapter Advanced Troubleshooting Tools Messages You can see on Scala2 incoming messages from the equipment conn...

Page 150: ...ta and Sensor Data Expand these messages to see the SNR and noise level of the hydrophones This helps identifying on which hydrophone data are better received Squid heartbeat Shows if Scala2 communica...

Page 151: ...ck a message to pause and scroll through the messages Click the arrow at the bottom of the list to resume Sensor and sonar data can be expanded to see more details about the hydrophone diagnostic mess...

Page 152: ...n the spectrum has been started 5 The spectrum analyzer is displayed You can display up to 6 spectrum analyzers at the same time Below is an example of a page with two spectrum analyzers The FFT plot...

Page 153: ...um noise level dark blue line and the average noise level cyan line on the peak of sensor frequencies 9 If you changed the configuration of the hydrophone or sensors right click the graph and click Re...

Page 154: ...ssues with the reception of sensor data or with noise interference the support service may need a recording of the system noise in order to analyze it Procedure 1 From the lower right corner of Scala2...

Page 155: ...cess to your computer to the support team by giving them the ID and Password displayed under Allow Remote Control Uninstalling Scala2 You can uninstall Scala2 and ScalaReplay2 from your computer About...

Page 156: ...Scala2 Version 5 Maintenance and Troubleshooting c Double click UninstallScala command 155...

Page 157: ...nd supporticeland marport com NORWAY Marport Norge A S Breivika Industrivei 69 6018 lesund Norway supportnorge marport com SOUTH AFRICA Marport South Africa Cape Town Western Cape 11 Paarden Eiland Ro...

Page 158: ...matter 3 a a F Depth feet 4 b b M Depth meters 5 c c F Water depth fathoms 6 hh Checksum 1 4 0 0 DBT Depth Below Transducer DBT a a F b b M c c F hh CR LF 1 Talker identifier 2 DBT Sentence formatter...

Page 159: ...satellites in use 00 12 8 g g Horizontal dilution of precision 9 h h M Antenna altitude above below mean sea level geoid meters 10 i i M Geoidal separation meters 11 j j Age of differential GPS data...

Page 160: ...rs 10 g g Geoidal separation meters 11 h h Age of differential data 12 i i Differential reference station ID 13 hh Checksum 1 0 0 0 HDG Heading Deviation Variation HDG a a b b M c c M hh CR LF 1 Talke...

Page 161: ...d speed 6 d Wind speed units K km h M m s N knots 7 E Status A data valid V data invalid 8 hh Checksum 1 0 0 0 RMC Recommended Minimum Navigation Information RMC aaaaaa A bbbb bbb B ccccc ccc C ddd d...

Page 162: ...invalid 11 f f Stern Transverse ground speed port 12 A Status A data valid V data invalid 13 hh Checksum 1 4 0 0 VHW Water Speed and Heading VHW a a T b b M c c N d d K hh CR LF 1 Talker identifier 2...

Page 163: ...s Magnetic 5 c c N Speed over ground knots 6 d d K Speed over ground km hr 7 hh Checksum 1 3 3 0 VWR Relative Apparent Wind Speed and Angle VWR a a L b b N c c M d d K hh CR LF 1 Talker identifier 2 V...

Page 164: ...t meter or feet min l Line speed middle meter or feet min m Towing time meter or feet min 1 2 0 0 SICON aaa bbb cc ddd ee e ff f hh CR LF 1 SICON Talker identifier sentence formatter 2 aaa consumption...

Page 165: ...TS eeeeK TM ffffK gg CR LF 1 MA DD talker identifier 2 dd mm yy date 3 hh mm ss time 4 LB aaaam Shooted length portside in meters 5 LS bbbbm Shooted length starboard in meters 6 LM ccccm Shooted leng...

Page 166: ...0 0 1 0 0 45 5 c 33 0 p 32 8 p 31 1 WMSYN Talker identifier sentence formatter 2 aaa a winch starboard length in meters 3 bbb b winch inner starboard length in meters 4 ccc c winch inner port length...

Page 167: ...4 4 0 TAWWT RappHydema PTS Pentagon warp tension TAWWT a a b b c c hh CR LF 1 TAWWT Talker identifier sentence formatter 2 a a Starboard winch tension 3 b b Port winch tension 4 c c Middle winch tensi...

Page 168: ...ort mid wire out meters 12 i port mid wirespeed m min 13 2 port mid 14 k stb mid wire tension tons 15 l stb mid wire out meters 16 m stb mid wirespeed m min 17 3 starboard mid 18 hh Checksum 2 2 2 0 W...

Page 169: ...E a a T hh CR LF 1 SCWLE Talker identifier sentence formatter 2 a a M paid out wire in meters 3 b b M wirespeed in meters sec positive when paying out wire 4 hh Checksum 2 0 0 0 WTP Scantrol winch ten...

Page 170: ...l value 7 chk checksum The checksum is a security measure to ensure that the sentence is transmitted accurately The checksum follows the NMEA specifications IEC 61162 1 Ed 4 The following sections giv...

Page 171: ...rawl starboard clump M SD Middle trawl starboard door Triple trawl port clump P SD Port trawl starboard door Sensor data types and values TTT u VV VVV contains the type unit and value of sensor data T...

Page 172: ...wl body to the sea floor Slant Distance SLD meters m Distance from the sensor to the hydrophone Relative Bearing RBR degrees d Angle from the ownship to the sensor relative to ownship heading True Bea...

Page 173: ...g aaa M slant range to sensor in meters filtered values no decimals bbb M horizontal range to sensor in meters unfiltered values no decimals Transmits null fields if depth sensor is not activated will...

Page 174: ...eee e M distance to bottom in meters if available or empty hhmmss time of data hour minutes seconds hh checksum IITPT aaa M bbb P ccc c M cr lf IITPT talker identifier sentence formatter TPT Trawl pos...

Page 175: ...mizing display 91 D Data filters Creating 38 Types 36 Data recording Audio recording 153 Automatic deleting 138 Incoming data 138 Data units 137 Dock 12 77 Dongle 14 17 Door sensors 31 Door spread 31...

Page 176: ...ening Scala 17 Overview Scala 11 System 10 Ownship panel NMEA 40 Warning 40 P Page Adding data 81 Cannot find 144 Creating 79 Deleting 87 Exporting 86 Removing data 85 Resize data 81 Window 88 Page di...

Page 177: ...um 151 System web page 20 T TeamViewer 12 154 Time stamp 103 TIMEZERO Trawl positioning 56 Trash 12 Trawl 3D 126 Setup 124 Trawl full 108 Trawl Gear Defining 25 Types 26 Trawl Modelling 69 Trawl Speed...

Reviews: