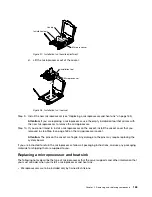
Thermal
grease
Heat
sink
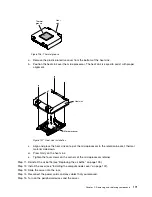
Figure 106. Thermal grease
a.
Remove the plastic protective cover from the bottom of the heat sink.
b.
Position the heat sink over the microprocessor. The heat sink is keyed to assist with proper
alignment.
Microprocessor
Heat sink
Figure 107. Heat sink installation
c.
Align and place the heat sink on top of the microprocessor in the retention bracket, thermal
material side down.
d.
Press firmly on the heat sink.
e.
Tighten the four screws on the corners of the microprocessor retainer
Step 11. Reinstall the air baffle (see “Replacing the air baffle” on page 109).
Step 12. Install the cover (see “Installing the compute node cover” on page 107).
Step 13. Slide the server into the rack.
Step 14. Reconnect the power cords and any cables that you removed.
Step 15. Turn on the peripheral devices and the server.
Removing and replacing components
171
Summary of Contents for NeXtScale nx360 M4
Page 1: ...IBM NeXtScale nx360 M4 Installation and Service Guide Machine Type 5455 ...
Page 6: ...iv IBM NeXtScale nx360 M4 Installation and Service Guide ...
Page 34: ...20 IBM NeXtScale nx360 M4 Installation and Service Guide ...
Page 58: ...44 IBM NeXtScale nx360 M4 Installation and Service Guide ...
Page 94: ...80 IBM NeXtScale nx360 M4 Installation and Service Guide ...
Page 192: ...178 IBM NeXtScale nx360 M4 Installation and Service Guide ...
Page 538: ...524 IBM NeXtScale nx360 M4 Installation and Service Guide ...
Page 562: ...548 IBM NeXtScale nx360 M4 Installation and Service Guide ...
Page 722: ......
Page 730: ......
Page 737: ......
Page 738: ...Part Number 00KC216 Printed in China 1P P N 00KC216 1P00KC216 ...


